Installing Printers
To add a printer to your system in Windows 2000, as in Windows NT 4 and Windows 95/98, you use the Add Printer Wizard. If you've configured printers in any of these operating systems, you'll find that the process is similar in Windows 2000.

TIP
To change the default behavior of the Add Printer Wizard for clients, servers, or both, use the Group Policy snap-in, covered in Chapter 9.
After adding a printer by using the Add Printer Wizard, you'll need to set up the appropriate permissions for the printer, set up any installable options with which your printer is equipped, and set your printing defaults. See the "Changing Printer Options" section later in this chapter for more information.
TIP
To enable Macintosh clients to print to your print server, use the Windows 2000 Add Component Wizard to install Macintosh print services, and make sure that your server is running the AppleTalk protocol. To allow clients that use the LPR service (such as UNIX clients) to print to your server, install UNIX print services, and make sure that the LPD system service is started if it's not started automatically. You'll find more on UNIX printing in Chapter 21 and more on Macintosh printing in Chapter 22.
Adding Local Printers
Physically connecting printers to the print server isn't popular these days, but sometimes you'll still want to do it. Whether the computer is a print server or simply a workstation, understanding the process of installing a printer under Windows 2000 is helpful. (All versions of Windows 2000 handle adding local printers in the same way.) To use the Add Printer Wizard to set up a local printer that is physically connected to your system, follow these steps:
- Connect the printer to the appropriate port on your server.
- Click the Start button, choose Settings, and then click Printers to open the Printers folder.
- Double-click the Add Printer icon to start the Add Printer Wizard.
- Click Next in the first screen to begin using the Add Printer Wizard.
- Select the Local Printer option, select the Automatically Detect My Printer check box (Figure 8-3), and then click Next.

CAUTION
If you're installing a Plug and Play (PnP) printer, always select the Automatically Detect My Printer check box in the Add Printer Wizard. If you don't select this option, Windows 2000 will detect the printer the next time the system is rebooted and will attempt to install the printer a second time.
- Click Yes. Windows 2000 displays the New Hardware Found dialog box when it locates the printer. If Windows 2000 has the appropriate drivers for your device, it installs those drivers automatically.
- If your printer wasn't detected, run the Add Printer Wizard again, but this time clear the Automatically Detect My Printer check box in the Local Or Network Printer screen, and then click Next.
- In the Select The Printer Port screen, shown in Figure 8-4, choose the port your printer is attached to, and then click Next.
- Select the manufacturer and model of your printer from the Manufacturers and Printers dialog boxes, and press Next. Or, click the Windows Update button to view a list of updated drivers and click the Have Disk button to provide a driver disk.
- Enter a name for your printer in the Printer Name text box. Enter the share name for the printer on your network.
- Choose whether to share your printer by selecting either the Do Not Share This Printer of the Share As option. If Share As is selected, provide a share name for the printer.
- Enter the location name for your printer in the Location box. (See the "Creating Location-Naming Conventions" section earlier in this chapter for information on choosing a location-naming scheme.) Describe the capabilities of your printer in the Comments box.
- Print a test page by clicking Yes in the Print Test Page screen, and then click Next to display a summary of your printer installation. To change your installation choices, click Back; otherwise, click Finish to complete your installation.
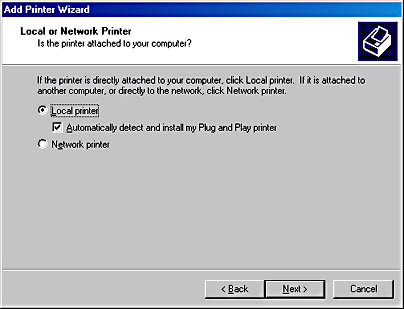
Figure 8-3. The Local Or Network Printer screen of the Add Printer Wizard.
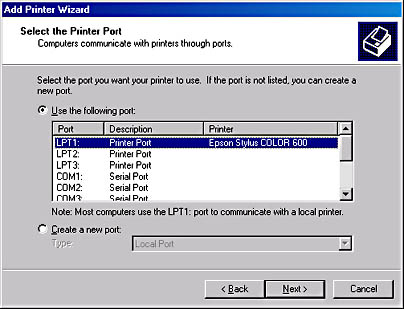
Figure 8-4. The Select The Printer Port screen of the Add Printer Wizard.
If you're using a USB or IEEE 1394 connection to the printer, Windows 2000 will automatically detect the printer and install it on your server as soon as you plug the printer into your server (although you might be prompted for drivers). In Windows 2000 Server, the Add Printer Wizard will automatically share the printer and publish it in Active Directory unless you select Do Not Share This Printer on the Printer Sharing screen. In Windows 2000 Professional, the default is to not share the printer unless you select Share As on the Printer Sharing screen—then the printer will be shared and published.
EAN: 2147483647
Pages: 366
- Key #3: Work Together for Maximum Gain
- When Companies Start Using Lean Six Sigma
- Making Improvements That Last: An Illustrated Guide to DMAIC and the Lean Six Sigma Toolkit
- The Experience of Making Improvements: What Its Like to Work on Lean Six Sigma Projects
- Six Things Managers Must Do: How to Support Lean Six Sigma