Services for UNIX Configuration
Now that you've installed SFU, let's look at its configuration. SFU originated as several different products from various sources, which have been pulled together into a single package. Each product has a different interface and configuration mechanism, and as a result they don't have a cohesive look and feel. Even so, the functionality is all there and not, generally, dependent on the other pieces. The basic pieces of the product (most of which we've already covered briefly) fall into the following three categories:
- Connectivity services Includes both a telnet server and an improved, text-based (character-mode) telnet client, along with a password synchronization daemon. The telnet client was such a major improvement that Microsoft included it as part of the standard Windows 2000 product.
- File services Includes NFS client and server support.
- Usability services Provides a set of UNIX utilities and a Korn shell.
The telnet client and server, NFS client and server, and UNIX utilities are discussed in more detail in the following sections. The Korn shell is explained later, toward the end of this chapter. Let's begin with connectivity services.
Connectivity Services
The telnet client and server provide an excellent method for communicating between Windows 2000 machines and UNIX machines. But the telnet services can also offer substantial benefits in daily administration of the Windows 2000 machines themselves. By adding a telnet service to your Windows 2000 Servers, you provide a simple, low-overhead command-line interface to the servers that will let you easily manage a variety of administrative tasks from a single desktop and even over a slow dial-up line.
The Telnet Server
As installed, the telnet server works optimally for most installations. It provides access from any server or workstation that has a telnet client installed, offering improved interoperability in the enterprise and improved manageability even in a pure Windows 2000 environment. It will accept logins from a variety of clients, including the graphical telnet client shipped with Windows NT and Microsoft Windows 95/98 and a variety of character-mode terminal clients from virtually any operating system. Additionally, it can meet specific site requirements to improve security, simplify logins, and so on.
The NT LAN Manager The SFU telnet server supports NT LAN Manager (NTLM) for authentication of client logins. NTLM automatically authenticates the user based on his or her Windows 2000 logon, giving a transparent connection to the host while ensuring that clear text passwords don't pass over the network. NTLM must be supported on both the client and server side, however, making this option viable only between Windows machines, not directly to or from UNIX machines.
When using NTLM logon, users are restricted to local drives on the machine they are logged on to. If they need to map network resources, they can do so by explicitly mapping with full credentials. For example,
net use g:\\server\share\user:domain\username.
Administration The telnet server is administered by using the tlntdmn.exe program, which is installed by default in <SFU Root>\telnet and provides a simple text menu that will run from virtually any character-mode window, including a remote telnet login. With the tlntadmn.exe program, you can list the current users, terminate a user or users, display (and modify) the registry settings for the server, and start and stop the service. The registry settings you can change include the following:
- The allowing of logins from a trusted domain The default is on.
- The default mapping that simulates the Alt key from a telnet session
- The default login domain, initially set to "." By changing this setting, you can make it easier for users to log in. Set this to your normal Windows 2000 domain name, and the system won't require a login of the DOMAIN\username format, but it will accept a simple user name.
- The default shell The user will receive this command shell when logging in. By default, it is %SystemRoot%\system32\cmd.exe/q/k. Leave the default alone. Users can easily change their shell once they have logged in, and sticking to the default will reduce confusion and problems.
- The login script that is executed when the user logs in The default value is <SFU Root>\Telnet\login.cmd. Use this script to customize the settings for your users and make any drive mappings that you'll need to be made automatically. The default Windows 2000 logon script will not automatically execute for telnet sessions.
- The maximum number of connections allowed to the server The default (and maximum) is 63. However, the actual number may be less if fewer licensed connections are available for the Windows 2000 machine.
- The maximum number of failed logins permitted before the session returns a failure The default is 3, a reasonable number.
- The option to use NTLM for authentication The allowable values are as follows:
- 0 No NTLM is used.
- 1 NTLM is used if available; otherwise a login prompt is presented.
- 2 NTLM only is permitted. No login prompt is presented.
- The default TCP/IP port number used for telnet The default is 23.
![]()
NOTE
Using a value of 2 (NTLM only) in a mixed UNIX and Windows 2000 environment would effectively lock out UNIX users from the Windows 2000 Servers because they wouldn't have a client that supports NTLM authentication. Forcing NTLM does, however, eliminate the passing of clear text passwords over the network.
Registry Settings You can use the provided telnet administration program to edit the registry settings for the telnet server, or you can edit them manually by using regedit or regedt32. The subkey for the telnet server is HKEY_LOCAL_MACHINE\SOFTWARE\Microsoft\TelnetServer\1.0. The keys and their types, which correspond to the tlntadmn.exe settings explained in the previous section, are listed in Table 21-1.
Table 21-1. Registry settings for the telnet server
| Registry Key | Type | Default Value |
|---|---|---|
| AllowTrustedDomain | REG_DWORD | 0x00000001 |
| AltKeyMapping | REG_EXPAND_SZ | |
| DefaultDomain | REG_EXPAND_SZ | |
| DefaultShell | REG_EXPAND_SZ | %SystemRoot%\system32\cmd.exe/q/k |
| LoginScript | REG_EXPAND_SZ | %SystemRoot%\system32\login.cmd |
| MaxConnections | REG_DWORD | 0x0000003f (63) |
| MaxFailedLogins | REG_DWORD | 0x00000003 |
| NTLM | REG_DWORD | 0x00000002 (NTLM only) |
| TelnetPort | REG_DWORD | 0x00000017 (23) |
| Termcap | REG_DWORD | %SystemRoot%\system32\termcap |
In addition, a specific subkey exists for performance tuning: HKEY_LOCAL_MACHINE\SOFTWARE\MICROSOFT\TelnetServer\1.0\Performance \NumThreadsPerProcessor. The minimum value for this setting is 2, and the default is 10 (0x0000000a). For most environments, the default value will optimize performance.

CAUTION
Use extreme care when editing the registry because changes can result in a computer that won't boot. Be sure to back up your registry before making any changes.
The Telnet Client
While Windows 2000 comes with a familiar graphical-mode telnet client, Windows 2000 includes the new SFU character-mode telnet client that provides greatly improved scroll bars and the ability to authenticate use of encrypted passwords when connecting to telnet servers that support NTLM authentication. It is both faster and better behaved than the graphical-mode client it has replaced.
Furthermore, the telnet client provides terminal emulations, including an ANSI emulation that supports colors correctly when connecting to servers that support it, such as those running the Santa Cruz Operation (SCO) variant of UNIX. There is also a new VTNT emulation that supports enhanced features when connecting between Windows NT and Windows 2000 machines—including the ability to run complex character-mode applications such as edit.exe that won't work with standard terminal emulations.
The telnet configuration is done from within a telnet session by "escaping" to the telnet prompt. Press Ctrl+right bracket (]) to bring up the telnet prompt once you've started a telnet session. From here, you can use the following:
- ? To get help.
- close To close the current connection.
- display To show the current operating parameters.
- open <machinename> To open a connection to a machine. (You can use an IP address here as well.)
- quit To exit the telnet client completely.
- set To set an operating parameter. The choices are
- set ? Displays help on other set options.
- set NTLM Turns on NTLM authentication.
- set LOCAL_ECHO.
- set TERM <value> Sets the requested terminal emulation. Choices are ANSI, VT52, VT100, and VTNT.
- status To print the current status.
- unset To clear the options selected with the Set command.
![]()
REAL WORLD Terminal Emulation Choices
If you connect primarily to UNIX systems, set TERM to ANSI and set NTLM off, but if you connect frequently to both Windows NT and UNIX systems or primarily to Windows NT systems, you'll find the VTNT emulation a better choice, and you'll still fall back to ANSI when connecting to a system that doesn't support VTNT.
File Services
SFU provides additional file service connectivity beyond the native FTP client and server in Windows 2000. The addition of NFS client and server allows native connectivity in a way that looks and feels natural to both UNIX and Windows 2000 users.
By using the seamlessly integrated NFS client, you can map exported file systems from your UNIX servers just as if they were native Windows 2000 shares, using either the UNIX server:/export format or the Windows \\server\share format. And the NFS server allows you to share the file resources with your UNIX systems or with other NFS clients, including Windows 2000 clients. Let's look at NFS client first.
The NFS Client
When you install the NFS client, it adds an applet to the Control Panel for administering NFS client settings. Open Control Panel and double-click Client For NFS to open the Client For NFS Properties window shown in Figure 21-4. The following sections detail the options you can select to administer the NFS client settings.
Authentication Set your authentication options according to the type of UNIX system and environment you'll be connecting to. The following are options on the Authentication tab:
- NIS Appropriate in a large enterprise where NIS is already installed.
- PCNFSD Appropriate for all other environments. The PC NFS daemon server can be either on one of the UNIX servers or on a Windows 2000 NFS server.
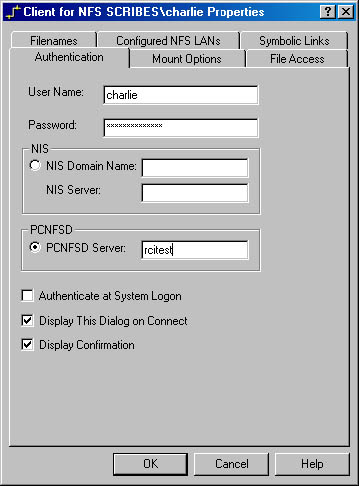
Figure 21-4. The Authentication tab of the Client For NFS Properties window.
The following additional settings are available:
- Authenticate At System Logon Automatically verify password and user name for NFS connections at initial logon. Off by default, this option can slow the logon if connectivity problems occur but presents users with a more transparent environment.
- Display This Dialog On Connect When selected, users will be prompted for logon credentials to connect to an NFS server. They will be prompted for each connection, giving them the option to select alternate authentication. A nuisance, normally, but a useful setting if your default authenticator is down.
- Display Confirmation Each connection displays a confirmation dialog box before actually connecting. Usually a nuisance except when debugging a problem.
Mount Options The Client for NFS Properties window, shown in Figure 215, allows you to specify the size of read and write buffers (the default is 64 K), initial timeout, number of retries, and whether to use hard or soft mounts. Unless you have a compelling reason to change these settings, you should leave them alone. They are optimal for connections that will support them and will automatically fall back if necessary.
There are three additional mount settings in the Client for NFS Properties window:
- Enable Version 3 Remote Write Caching When selected, write requests will be written to the remote server's cache rather than forcing a file system to write immediately. This can speed up performance substantially but carries the usual caveats and should be enabled only where the server supports it and is suitably protected by an uninterruptible power supply (UPS).
- Enable Locking When selected, and when supported by the remote server, files opened by the client will be locked until you close them.
- Enable Caching When selected, read requests are cached locally, reducing the number of calls to the remote hard disk.

Figure 21-5. The Mount Options tab of the Client For NFS Properties window.
File Access Permissions The default file access permissions for the NFS client are Read, Write, and Execute for the user (owner) of the file, but only Read and Execute for the Owner group and for other users (equivalent to a umask of 022).
Filename Mapping You can map how new filenames are created and how existing filenames are mapped between the remote NFS server and your NFS client, as shown in Figure 21-6. The choices for filenames you create from the client are as follows:
- Preserve Case (No Conversion) Appropriate only if you use NFS primarily as a network storage resource but won't have to use the files created from the UNIX environment, where mixed-case filenames can be a nuisance.
- Convert To Lower Case The preferred choice when you'll be using files from both Windows 2000 clients and UNIX clients.
- Convert To Upper Case The preferred choice when your remote NFS server is on an operating system that prefers or requires uppercase filenames.
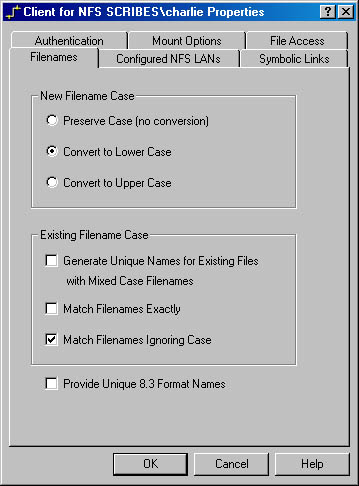
Figure 21-6. The Filenames tab of the Client For NFS Properties window.
The choices for mapping to existing filenames are the following:
- Generate Unique Names For Existing Files With Mixed Case Filenames Appropriate when there may be mixed-case filenames stored on the server. UNIX is fully case sensitive.
- Match Filenames Exactly Search for filenames preserving case sensitivity. Appropriate when mixed-case filenames may exist and when different files with identical names except for the case may exist.
- Match Filenames Ignoring Case Search for filenames ignoring case sensitivity. Appropriate and useful when the file may have been created with a mixed case, or when the program looking for it may expect a particular case.
- Provide Unique 8.3 Format Names Useful when you may need to access the files from an older 16-bit application that doesn't understand long filenames. Applies to both new and existing files.
![]()
NOTE
In a mixed environment where users will be accessing files from both Windows and UNIX, you'll find that setting filename mapping to convert automatically to lowercase but to match by ignoring case will provide the least disruption to both communities of users.
Configuring NFS LANs Before your NFS client can effectively browse the network for exported (shared) file systems, you need to configure your NFS LAN. You have two choices for configuring NFS LANs: FavoriteLAN and named broadcast LANs. You should use broadcast LANs to divide your network into logical segments to limit the broadcasts to only a specific portion of your network and cut down network traffic.
You can create a single FavoriteLAN that has the NFS servers you connect to most frequently. You enter these servers by name or IP address, regardless of which segment they are on. By using a FavoriteLAN, you limit the amount of network broadcast traffic and speed up connecting to your preferred resources. To create a FavoriteLAN and add a server to it, follow these steps:
- Open the Client for NFS window and click the Configured NFS LANs tab to display it, as shown in Figure 21-7.
- Click the Add button to open the Add LAN dialog box, shown in Figure 21-8.
- Click the Add Server To Favorite LAN option button, and then click OK to open the NFS Hosts dialog box, shown in Figure 21-9.
- Click the Add button to open the Add Host dialog box, shown in Figure 21-10. This will let you enter an NFS host either by name or by IP address.
- Type in either the name or the IP address. The other will be returned automatically.
- Click OK to return to the NFS Hosts dialog box shown in Figure 21-9. You can add additional hosts at this time or click OK a few times to add the NFS host and log on to it.
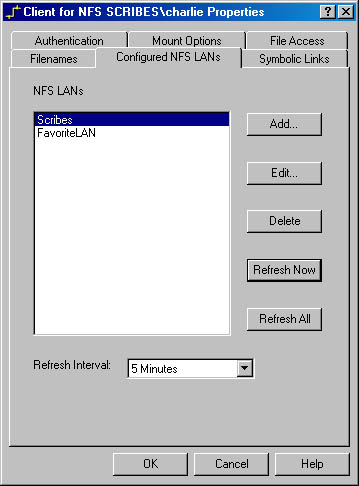
Figure 21-7. The Configured NFS LANs tab of the Client For NFS Properties window.
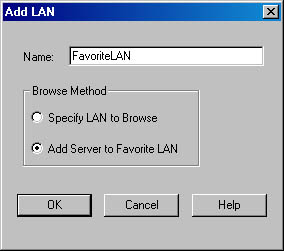
Figure 21-8. The Add LAN dialog box.
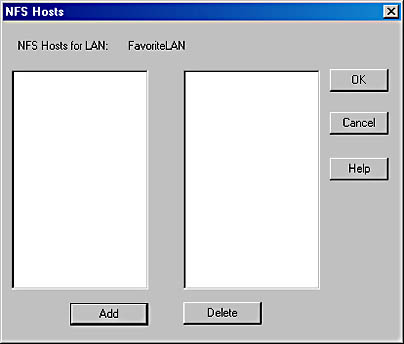
Figure 21-9. The NFS Hosts dialog box.
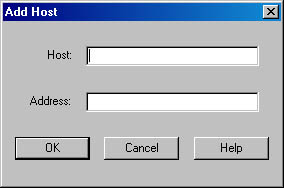
Figure 21-10. The Add Host dialog box.
If the logon is successful and you have confirmation dialog boxes enabled, you'll see a message similar to that shown in Figure 21-11. If your name and password weren't authenticated, you'll see the message in Figure 21-12. You can try again or accept the anonymous logon. If you accept the anonymous logon, you'll still have access to the NFS host but only whatever access has been allowed for anonymous users.
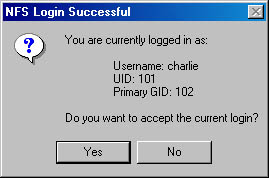
Figure 21-11. The NFS Login Successful dialog box.
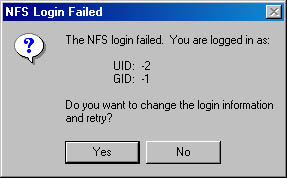
Figure 21-12. The NFS Login Failed dialog box.
Creating and using a named broadcast LAN is much the same process as using a FavoriteLAN, except that you must know something about the network segment on which the broadcast LAN resides. To create a broadcast LAN, follow these steps:
- Open the Client for NFS window and click the Configured NFS LANs tab to display it, as shown in Figure 21-7. Click the Add button to open the Add LAN dialog box, shown in Figure 21-8.
- Type a name for the LAN segment you're adding and select the Specify LAN To Browse option button to open the Broadcasting dialog box shown in Figure 21-13.
- Specify the LAN address and subnet mask, or type in the broadcast address directly. The LAN Address and LAN Subnet Mask boxes will clear once the Broadcast Address box has been filled in. This is normal.
- Select the broadcast parameters, timeouts, and so on. The defaults are a good starting point, and you should modify them only if you know why you are modifying them and what the consequences are.
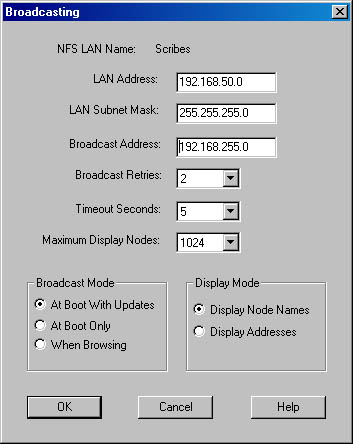
Figure 21-13. The Broadcasting dialog box.

TIP
To speed up the boot process, change the Broadcast Mode to When Browsing. However, this will slow down your initial browsing for NFS hosts, especially on large networks.
- Once you've set your options, click OK and the LAN segment will be added to your NFS LANs.
- Set the refresh interval to an appropriate figure for your environment. The default value is five minutes, which is reasonable on a large network where the available hosts might change frequently. On smaller, or static, networks, you may find it advantageous to lengthen this interval substantially to reduce broadcast traffic on the network.
- Once you've added all the LAN segments you want, click OK. You might get a success or failure logon message, as shown in Figures 21-11 and 21-12, and then you'll be prompted for a reboot. Save up your changes to do them all at once, because you're going to have to reboot before they'll take effect.
![]()
MORE INFO
See the Microsoft Windows 2000 Resource Kit (Microsoft Press, 1999) for more information on broadcast addresses, subnets, and TCP/IP masks.
Symbolic Links Symbolic links are a way for a file or directory to exist in one physical location but to be seen as existing in another location or locations. When a symbolic link references a file or directory that's local to the machine where the link is located, Client for NFS doesn't need to do any special manipulation to follow the link. But you can also create symbolic links on an NFS server that point to files or directories that actually reside on a remote machine.
To resolve these links, Client for NFS must have a mapping file that identifies the actual machine to which the link points. This mapping file can reside on the local client machine, or it can be located centrally on the network for easier administration. The mapping file is an ASCII text file and has this format:
# Lines beginning with a # sign are comments and are ignored mnt \machine\export |
Use the Symbolic Links tab to set your options.
CAUTION
By default, Client for NFS doesn't resolve or display unresolved links. It also won't allow a rename or a delete on a symbolic link. You should enable the Rename or Delete options of symbolic links only if you fully understand the consequences and know what mechanism or program will be doing the renaming or deleting. If you delete a symbolic link and replace it with a file of the same name, it will no longer be a symbolic link. Two files will now exist on the NFS server: the original file in its original location, and the replacement file in the link location.
Connecting to an NFS Export Connecting to an NFS export is the same as connecting to any shared file system resource on the network. Using Microsoft Windows Explorer, you'll find an NFS Network in addition to the Microsoft Windows Network and any other networks you have configured under My Network Places, as shown in Figure 21-14.
When you want to connect to an exported NFS file system, you can use standard Windows syntax (\\server\share) or standard UNIX syntax (server:/share). Using standard UNIX syntax is somewhat faster since it immediately resolves to the native NFS syntax and bypasses the need to look for a conventional Windows share of the same name.
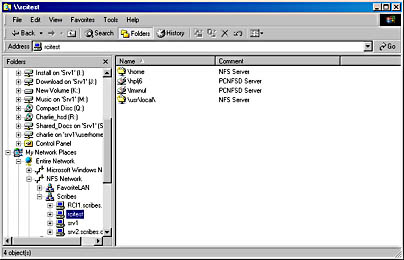
Figure 21-14. An integrated NFS client.
You can also use the command-line Net Use commands to connect to a particular resource directly if you know where it is. For example, to map the next available drive letter to the exported /home file system on server1 of NFS server, you could use either of the following commands:
net use * server1:/home net use * \\server1\home |
The NFS Server
You can use the robust SFU NFS server to provide resources from your Windows 2000 machines to any machine on your network that supports NFS. You could even use it to export file systems to other Windows 2000 machines running SFU NFS client, although we'd generally recommend that you stick to native Windows 2000 networking for that. The following sections describe the options available for NFS configuration.
Shares Shares are created using the Control Panel's Server for NFS Configuration shown in Figure 21-15. You can share either individual directories or an entire drive. You can't share a subdirectory of an already shared resource, since NFS doesn't support this, so you'll want to plan your shares to make sure you share from as far up the tree as necessary. Each drive letter is shared as the top of a file system.
In the UNIX environment, all file systems are viewed as being subdirectories of the root file system. Because Windows 2000 doesn't have this concept of a single root file system, each disk drive letter is shared as a separate file system. Driveletters in the form "D:" are converted to the syntax "/D/". So the share of your F:\UserHome folder would be visible to NFS clients on the network as: /F/UserHome. To create an NFS share, follow this procedure:
- Open Server for NFS Configuration from Control Panel. The dialog box shown in Figure 21-15 will display.
- Type in the drive and folder you want to share (export, in NFS-speak), as shown in Figure 21-16—where we're adding a share of the D: drive. You can't add an alias for it until the share is successfully created.
- Select the Allow Anonymous UID option if you want to support anonymous mounts of this share. Don't select Symbolic Links Supported unless you really need this support—it imposes a significant performance penalty.
- Click Share, and you'll be prompted for the permissions on the share, as shown in Figure 21-17.
- Accept the default permissions unless you know you need to limit access to this share point. Generally, we recommend using the underlying file system permissions to manage security, leaving share permissions wide open.
- Click OK to return to the Share Options tab. Make any additional setting changes you need to here.
- Click Advanced Options to see available advanced options. The defaults are correct for almost all situations. If you know you need to set certain settings explicitly for your environment and you know what all the settings mean, you can change them; otherwise, leave well enough alone. Click OK to close the Advanced Export Options dialog box.
- Click OK to create the share and make it available to other systems.
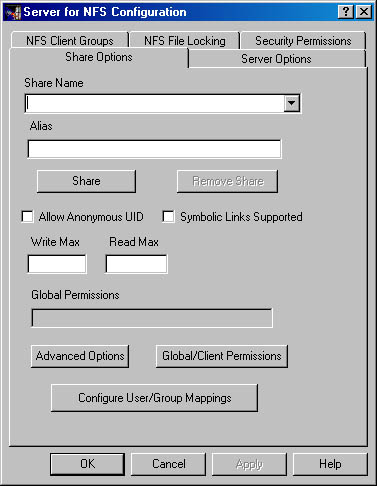
Figure 21-15. Server for NFS Configuration.
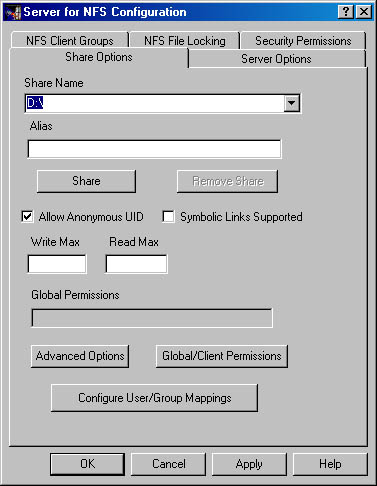
Figure 21-16. Adding a share name.
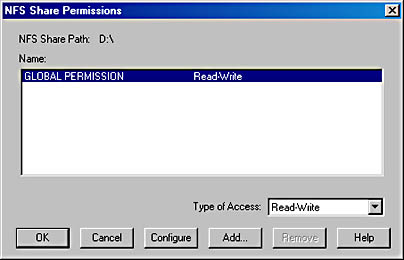
Figure 21-17. The default permissions on an NFS share—global Read-Write.
NFS Share Aliases You can create an alias for an NFS share to make your Windows 2000 NFS shares look more like what a UNIX user would expect to see. Keep in mind that NFS aliases require a reboot to take effect, so you should first create all your share points and then add all the aliases after the fact to reduce the number of reboots required. To create an alias, follow these steps:
- Open Server for NFS Configuration from Control Panel. The dialog box shown in Figure 21-15 will display.
- Select the share for which you want to create an alias from the Share Name drop-down list.
- Type an alias into the Alias text box. Don't use a leading slash (/)—it will be added automatically when the alias is made available.
- Click the Server Options tab and make sure the Return Alias Name box is selected. This ensures that broadcast queries for available exports to the NFS server will return the alias name, not the full share name.
- Click Apply and the alias will be created. You'll get a warning message that reminds you that a reboot is required before it will take effect. If you have other aliases to create, click OK on the message box and continue. If you're done making aliases, click OK on the message box, then click OK on the dialog box to exit Server for NFS Configuration.
Client Groups Server for NFS provides a mechanism for managing permissions and shares by groups of computers, known as Client groups. By creating Client groups, you can export (share) file system resources to specific groups of computers without having to specify each individual computer each time. This ability also improves management and administration by letting you manage a group's members from one location.
Changes to group membership (and thus permissions) are automatically changed for each shared NFS resource that references that client group. To create Client groups, follow this procedure:
- Open Server for NFS Configuration. Click the NFS Client Groups tab to display it, as shown in Figure 21-18.
- Click the Add Group button to add a new group. This will open the New Group dialog box, shown in Figure 21-19. Type in a name for the group that describes the group of computers and click OK.
- Add members to the group by clicking the Add Member button to open the New Member dialog box, shown in Figure 21-20. Type in either the IP address or the name of the client computer that will be added to the group and click OK.
- Continue adding members to the group until you're finished. Then click Apply to make this group immediately available and to continue working in Server for NFS Configuration, or click OK to make the group available.
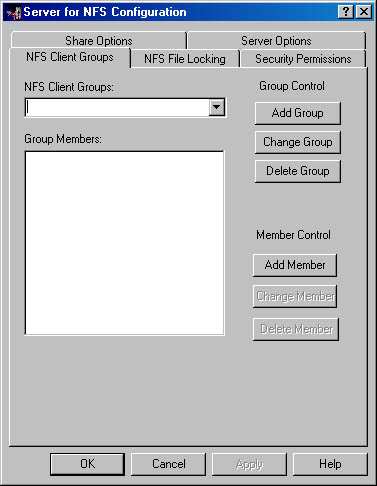
Figure 21-18. The NFS Client Groups tab of the Server For NSF Configuration dialog box.
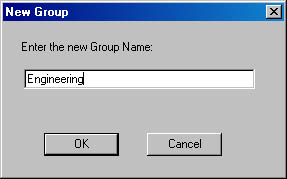
Figure 21-19. The New Group dialog box.
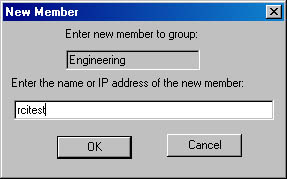
Figure 21-20. The New Member dialog box.
File Locking You can enable file locking for NFS clients, and you can enable it on a system-wide basis, being propagated both locally and across the network. The NFS File Locking tab of Server for NFS Configuration is shown in Figure 21-21. By default, locking is turned off, but if you expect to use applications across the NFS mount that require file locking, you'll probably want to enable it. Any changes to file locking require a reboot, so plan accordingly.
Security Server for NFS uses access control entries to simulate the permissions that are typical in the UNIX and NFS world. You can, however, inhibit certain behaviors that are normally possible in the UNIX permission set but not generally done in Windows 2000 or Windows NT. Specifically, you can inhibit the ability of an NFS client to deny access to the owner and group of a file. You can also set permissions for objects to more closely match the way Windows 2000 manages them by selecting the Implicit Permissions option and by selecting FULL Control (Group) and FULL Control (World), as shown in Figure 21-22.
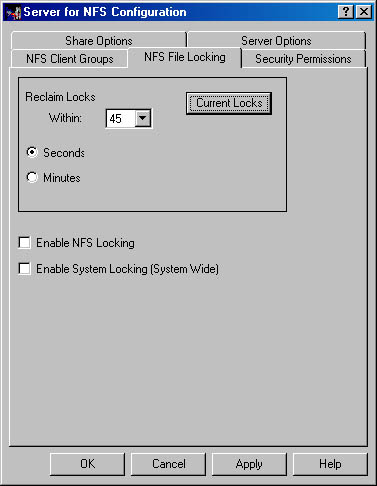
Figure 21-21. The NFS File Locking tab.
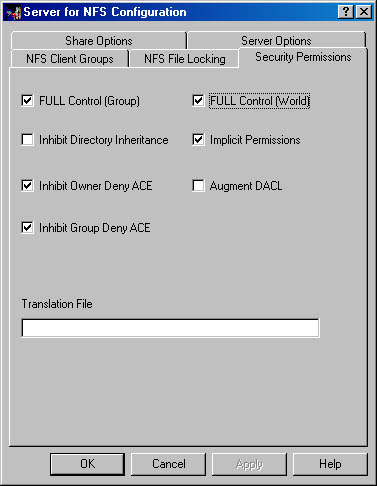
Figure 21-22. The Security Permissions tab.
CAUTION
The UNIX and Windows 2000 security models have inherently different permissions sets. Any attempt to align them is merely an approximation.
Usability Services
UNIX users expect a bevy of command-line utilities that don't exist in the Windows 2000 world. However, SFU includes only a limited subset of the more common UNIX utilities based on the Mortice Kern Systems (MKS) Toolkit, including the MKS Korn shell to facilitate sharing scripts. If you require a full set of UNIX utilities, an MKS add-on (MKS Toolkit Services for UNIX Update Edition) provides the rest of the MKS Toolkit and more than 200 UNIX utilities.
The SFU utilities break down into four basic categories: file and directory utilities, text utilities, programming utilities, and security-related utilities. In each case, the most critical ones are available, but if you expect to use scripts from the UNIX world in Windows 2000, you'll likely find this list insufficient to meet your needs unless you're careful in crafting the script or you take advantage of the included Perl programming utility to jump beyond the limits of the Korn shell.
File and Directory Utilities The file system utilities included in SFU are as follows:
- mkdir Creates a directory. With the -p switch, will create missing directories if necessary to create the target directory.
- mv Moves files and directories.
- cp Copies files and directories.
- rm Removes (deletes) files and directories.
- rmdir Removes directories if they are empty.
- ls Lists files and directories.
- touch Changes various dates and times associated with a file or files.
- ln Creates a link to a file or files.
- find The full UNIX find command.
- tee Pipes a copy of the standard output of a program to one or more files.
Text Utilities The text utilities included in SFU are as follows:
- vi Provides a full emulation of the standard UNIX file editing utility.
- wc (word count) Counts the number of words, bytes, characters, or lines in a file or standard input.
- sort Sorts and merges files or standard input according to a rich set of criteria.
- tail Displays the last n lines of a file (10 lines by default).
- head Displays the first n lines of a file (10 lines by default). Reverse of tail.
- more Displays a file page by page. (This is actually closer to the UNIX "less" utility, supporting bidirectional movement.)
- sed The streams editor.
- cat Concatenates.
- grep Gets regular expression. The SFU implementation supports egrep (extended grep) and fgrep (fast grep) as well.
Programming Utilities The programming utilities included in SFU are as follows:
- sh The Korn shell.
- Perl Practical Extraction and Reporting Language. Version 5.004_04 of Perl.
Security-Related Utilities The security utilities included in SFU are as follows:
- chmod Changes the access permissions of the specified files or directories. Change mode.
- chown Changes the owner (and, optionally, the group) of the specified files or directories. Change owner.
![]()
REAL WORLD Utilities in Other Implementations
Both the full MKS Toolkit and the Interix subsystem include a far greater group of utilities than those that come natively with SFU. Interix also includes its own implementation of telnet (which is licensed per user, unfortunately, adding substantially to the cost). The MKS Toolkit includes several graphical utilities, including a rather good graphical version of vi and a number of other utilities that lend themselves well to a graphical implementation. Both MKS and Interix include versions of tar that will write to tape or floppy disk much as a UNIX administrator would expect.
EAN: 2147483647
Pages: 366
- ERP Systems Impact on Organizations
- Enterprise Application Integration: New Solutions for a Solved Problem or a Challenging Research Field?
- Healthcare Information: From Administrative to Practice Databases
- A Hybrid Clustering Technique to Improve Patient Data Quality
- Relevance and Micro-Relevance for the Professional as Determinants of IT-Diffusion and IT-Use in Healthcare