Shared Folders
After examining the Distributed file system, Removable Storage, and Remote Storage, discussing sharing folders on the network or the Internet sounds a bit commonplace. Nevertheless, sharing folders is important and we're going to tell you how to do it anyway. So there.
Using the Shared Folder Snap-in
You can administer shared folders in Windows 2000 in two ways. You can right-click a shared folder in Windows Explorer and choose Sharing from the shortcut menu, or you can use the Shared Folders MMC snap-in. The Shared Folders MMC snap-in provides a way of viewing all of the file shares at once, along with the current connections and open files. Windows Explorer doesn't. Therefore, we're going to talk about the Shared Folders MMC snap-in now, and we'll talk about Windows Explorer later, in the "Configuring Web Shares" section.
To use the superior Shared Folders tool, follow these steps:
- Open the Computer Management MMC snap-in from the Administrative Tools folder on the Start menu, or enter %SystemRoot%\System32\Compmgmt.msc in the Run dialog box or at a command prompt.
- Expand the Shared Folders folder in the console tree (Figure 16-26).
- Use the Shares, Sessions, and Open Files folders to view the current file shares on the system you're managing and to see how much activity the shares are getting.

Figure 16-26. The Shared Folders tool in the Computer Management console.
Setting Up Shared Folders
Windows 2000 makes it easy to share a folder or volume on the system with other users on the corporate network. Just follow these steps:
- In the Computer Management console, open the Shared Folders folder in the console tree.
- Right-click the Shares folder and choose New File Share from the shortcut menu.
- In the Create Shared Folder dialog box shown in Figure 16-27, click the Browse button to locate or create the folder you want to share.
- Enter the name you want to give the file share. This name should ideally be DNS and NetBIOS compatible for the best interoperability with downlevel and non-Microsoft clients.
- Enter a description for the shared folder in the Share Description box, and then click Next.
- Optionally, specify the Share Level permissions for the folder, and then click Finish.
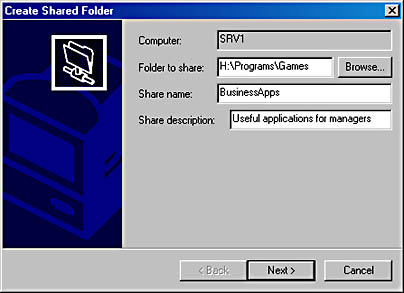
Figure 16-27. The Create Shared Folder dialog box.
![]()
REAL WORLD Setting Permissions
We strongly recommend that you implement NTFS file-level permissions instead of share-level permissions. Using share-level permissions alone isn't secure enough in most instances, and using both introduces an unacceptable level of complexity.However, there are some exceptions to this rule; for example, you might want to permit all users to access a volume in a certain subfolder but allow only a certain group to access the root directory. (Administrators can always access the root folder for a drive by connecting to the drive's hidden administrative share, for example, C$.) In this instance, you could create two file shares: one at the subfolder level with no share-level security and one at the root-folder level with share-level security to allow only the specified group access.
Somewhat more useful is the ability to hide file shares by adding the dollar sign ($) character to the end of the share name. This notation allows any user to connect to the share—provided he or she knows the share name. Once users connect, they're still bound by NTFS security permissions, but this can be handy for storing useful power tools that an administrator might want to be able to access from a user's system and user account. File security isn't really an issue—you just don't want users mucking around with the files.
Ending Folder Sharing
To stop sharing a folder on the network, follow these steps:
- In the Computer Management console, open the Shared Folders folder in the console tree, and then open the Shares subfolder.
- Right-click the shared folder you want to stop sharing and choose Stop Sharing from the shortcut menu.
- Click OK.
Disconnecting Users
If you need to disconnect users from the server for some reason—say to close off the server while you update the files—follow these steps:

CAUTION
Be kind to your users and warn them before disconnecting them. Disconnecting a user who is working on a file can cause data loss and resultant ill feelings.
- Open Shared Folders in the Computer Management console, and then open the Sessions subfolder.
- Right-click the user you want to disconnect, and choose Close Session from the shortcut menu.
- To disconnect all sessions, right-click the Sessions folder and choose Disconnect All Sessions from the shortcut menu.
- To close an open file, click the Open Files folder, right-click the file you want to close, and then choose Close Open File from the shortcut menu.
- To close all open files, right-click the Open Files folder and choose Disconnect All Open Files from the shortcut menu.
Limiting Simultaneous Connections
You can limit the number of simultaneous user connections you want to allow to a shared folder so that a given shared folder doesn't overburden the server with user connections. To do so, follow these steps:
- Open Shared Folders in the Computer Management console, and then open the Shares subfolder.
- Right-click the shared folder you want to limit access to, and then choose Properties from the shortcut menu.
- To place no limit on the number of connections you allow to the shared folder (other than that set by the number of licenses you have), select the Maximum Allowed option on the General tab, as shown in Figure 16-28.
- To manually limit the number of connections you want to allow to the shared folder, enter the number of connections you want to allow into the Allow box, and then click OK.
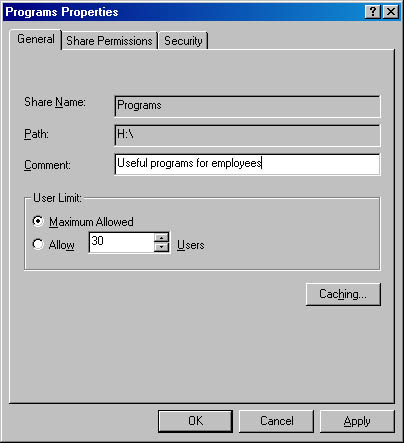
Figure 16-28. The General tab of a shared folder's Properties dialog box.
![]()
NOTE
Windows 2000 Professional supports a maximum of 10 simultaneous users.
Setting Permissions
As mentioned previously, you really shouldn't use share-level permissions in most instances unless you're not using NTFS file-level security. Share-level permissions allow or deny access to a shared folder depending on the user's group membership and the security settings of the file share. File-level security, on the other hand, has a much more granular level of control, providing the ability to grant or deny users and groups the ability to perform a wide range of actions on both folders and individual files. Since you would normally use NTFS permissions in a situation where security is important, we generally don't recommend setting share-level permissions. You can do it, however, so here's how. (You can also change NTFS permission using this procedure, which is kind of handy.)
- Open Shared Folders in the Computer Management console, and then open the Shares subfolder.
- Right-click the shared folder you want to set permissions for, and then choose Properties from the shortcut menu.
- Click the Share Permissions tab to set share-level permissions for the folder.
- Click the Security tab to set NTFS file-level permissions for the folder.
See Chapter 9 for more information on setting NTFS permissions.
Configuring Web Shares
If you have IIS installed on the system, you have the ability to share any folder on the system with all Web users on the intranet that can access the server. Typically, Web shares are set up with IIS, but you can also do it quickly using Windows Explorer. Follow these steps:
- Open Windows Explorer, right-click the folder or drive you want to share on the Web, and choose Properties from the shortcut menu.
- Click the Web Sharing tab.
- Choose the Web site you want to share the folder on from the Share On drop-down list box.
- Select the Share This Folder option, and then in the Edit Alias dialog box that appears (Figure 16-29), enter the folder name you want to use for the share. Note that the alias you enter is appended to the Web site's name: http://myserver.mycompany.com/alias.
- Set the access permissions for the folder by selecting check boxes in the Access Permissions section of the dialog box. (It is important to set these access permissions, especially if the server is visible on the Internet.)
- Use the Application Permissions options to choose which level of permissions you want to grant to applications in this folder, and then click OK.
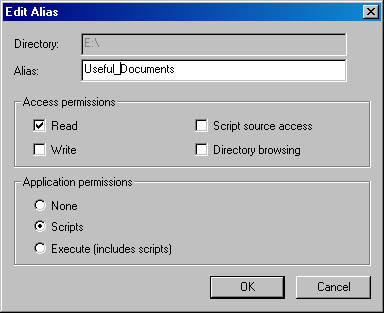
Figure 16-29. The Edit Alias dialog box.

TIP
For more thorough control over the Web shares, launch the Internet Services console from the Administrative Tools folder on the Start menu. See Chapter 27 for more information.
EAN: 2147483647
Pages: 366