System Requirements Smart Devices Extensions is the integrated development environment (IDE) through which developers target the .NET Compact Framework. It is included with Visual Studio .NET version 7.1 or later, Enterprise Developer and Enterprise Architect Editions. To run Visual Studio .NET 7.1 Enterprise Developer or Enterprise Architect, you need a system with the minimum specifications outlined in Table 1.1. In addition, you need to have a supported device with which to run your programs. The .NET Compact Framework is compatible with every device certified to run the Pocket PC operating system. To target the SmartPhone platform, developers must first update Visual Studio with the SmartPhone add-on pack, available from Microsoft. Details about the SmartPhone add-on pack are discussed in Chapter 16, "Deploying a .NET Application." The Development Process Using Smart Device Extensions The most straightforward way to develop for the .NET Compact Framework is to use the Smart Device Extensions in Visual Studio .NET 7.1. Simply an extension for Visual Studio 7.1, Smart Device Extensions introduces new project types that allow you to target Windows CE devices supporting the .NET Compact Framework, such as the Pocket PC. This means using Smart Device Extensions makes developing applications for Windows CE as easy as developing applications for Windows 2000 or XP. If you have ever developed an application by using previous versions of Visual Basic, then you will be instantly comfortable with the Smart Device Extensions for Visual Studio. Smart Device Extensions is smart enough to compile your application so that it specifically targets the .NET Compact Framework. When you run your code for the first time on a new device, Smart Device Extensions chooses the correct flavor of the .NET Compact Framework for your device and installs it for you automatically. Table 1.1. System Requirements for Visual Studio .NET 2003 | AREA | REQUIREMENT | | Operating system and RAM | Windows 2000 Professional; 96MB RAM, 128MB recommended Windows 2000 Server; 192MB RAM, 256MB recommended Windows XP Professional; 192MB RAM, 256MB recommended Windows XP Home; 96MB RAM, 128MB recommended Windows .NET Server 2003; 192MB RAM, 256MB recommended | | Hard disk space | At least 900MB on system drive (where the \WINNT or \WINDOWS directory resides) and approximately 4.1GB free on installation target drive | | Processor speed | Minimum Pentium II 450MHz or equivalent; Pentium III 600MHz or greater recommended | | Device connectivity | ActiveSync 3.5 or greater | USING WINDOWS XP HOME EDITION Although you can install Visual Studio .NET on a system running Windows XP Home Edition, you will not be able to develop programs that host Web Services without adding a Web server, such as IIS, to your system. |
IF YOUR DEVICE ISN'T LISTED IN TABLE 1.2 It is also possible to develop for a wide range of Windows CE devices that are not officially supported, if you are willing to explore the work-arounds needed to get managed code to run on these unsupported devices. The "Targeting Nonstandard Devices" section will discusses how to get your managed code to run on an unsupported device. This section gets technical, and if you have a supported device, you can safely skip it. |
Accessing the Smart Device Extensions occurs automatically when you create a new application for a Pocket PC or Windows CE device or when you open a previously created Pocket PC or Windows CE application. A project that targets a Pocket PC or Windows CE device is called a Smart Device Application. Creating a New Application for Pocket PC Devices The easiest way to introduce the Smart Device Extensions is by example. We'll create a simple "Hello World" style application by using both Visual Basic .NET and C# in the following tutorials. The steps in both tutorials are nearly identical, so to keep the tutorials compact, we'll look at the process of creating a Visual Basic project in great detail, then at just what to do differently to create a C# project. IF YOU HAVEN'T USED VISUAL STUDIO BEFORE It is assumed that you have worked inside the Visual Studio IDE and are familiar with deploying and debugging your applications. If you are not familiar with the Visual Studio IDE, you should carefully follow the examples later in this chapter and consider an introductory book on Visual Studio .NET. Using the Smart Device Extensions is so similar to standard desktop development in Visual Studio .NET, you will be able to apply what you learn in an introductory book to the Smart Device Extensions. |
In this first set of steps, we'll work with Visual Basic: -
When Visual Studio .NET first launches, it displays the Start Page, as shown in Figure 1.2. To create a new project, click the button labeled New Project near the bottom of the screen; use the pull-down menu by selecting File, New, Project; or use the key combination Ctrl+Shift+N. Figure 1.2. The Start Page is shown when Visual Studio first launches.  INSTALL SMART DEVICE PROGRAMMABILITY When you first install Visual Studio .NET 7.1, be sure to select installation of Smart Device Programmability, as shown in Figure 1.1. Figure 1.1. Be sure to select Smart Device Programmability when installing Visual Studio. 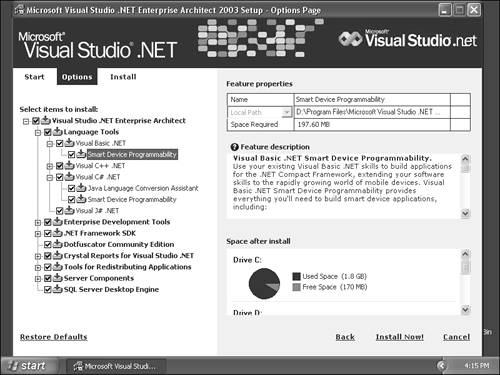 |
-
(For Visual Basic only) After you click New Project, a dialog appears showing the types of projects available. Select the Visual Basic Projects folder and the Smart Device Application template, as shown in Figure 1.3. Provide a name and location for the new application and then press the OK button. Figure 1.3. The dialog for creating a Visual Basic Smart Device Application has you select a folder and a template.  -
The next dialog, shown in Figure 1.4, the Smart Device Application Wizard, allows you to select more options for the new project. They are divided into two categories. Figure 1.4. Select a target platform and an application template.  "What platform do you want to target?" This category lets you select what kind of device you want to target. The Pocket PC selection targets the Pocket PC platform, which means your application will run on all devices that support the Pocket PC operating system, including SmartPhones. The Windows CE selection lets you target a variety of devices other than those running the Pocket PC version of the Windows CE operating system. For the tutorial, we'll target the Pocket PC platform. "What project type do you want to create?" The choices here are Windows Application, Class Library, Non-graphical Application, and Empty Project. We'll choose Windows Application. This type of project sets up the main form automatically and provides the designer environment that makes it easy to add more controls. WORKING WITH WINDOWS CE DEVICES The first release of Smart Devices Extensions is aimed specifically at Pocket PC devices because they are so abundant. The Windows CE selection lets intrepid developers target a wider variety of devices, but there are pitfalls, which we discuss in the "Targeting Nonstandard Devices" section. |
The Class Library project is used to create a dynamic link library (DLL) for the .NET Compact Framework. The Non-graphical Application lets users create a console mode application, which is useful on Windows CE devices that offer a command prompt. The Non-graphical Application project sets up a minimal amount of startup code so that users can drop in their own code without setting up a main class. Finally, the Empty Project creates a blank source code file into which developers must enter all of the code to set up the user interface by hand. -
After we make the selections as shown in Figure 1.4 and click OK, Visual Studio automatically activates the Smart Device Extensions and brings up the Forms designer, shown in Figure 1.5. The Forms designer is almost exactly the same as the designer used in desktop projects, so we won't dwell on it here. Figure 1.5. The Forms designer appears after a project is created.  -
To the left of the Forms designer is a small button labeled Toolbox. Clicking this button brings up the Toolbox, as shown in Figure 1.6. Figure 1.6. The Toolbox for Smart Device Application projects is very similar to that for desktop applications.  -
Every item in the Toolbox is a control that is available to developers for the .NET Compact Framework. Most of the controls are related to Winforms, and they are discussed in detail in Chapter 3, "Designing GUI Applications with Windows Forms." For our tutorial we will select a TextBox, drag it onto the form, and then select a button and drag it onto the form. Figure 1.7 shows the result. Figure 1.7. After both controls are on the form, Form1 in the HelloWorld project looks like this.  -
Now double-click Button1, and the IDE brings up the code editor with the cursor blinking in the Button1_Click method. Whatever code is entered there is executed when Button1 is clicked. We now enter some Visual Basic code, as shown in Figure 1.8. Figure 1.8. Visual Studio displays the code view after the button in the Form editor is clicked.  -
So far, the experience has been very much like developing for the desktop, and that is the point of Smart Device Extensions and the .NET Compact Framework. The project is now ready to be compiled and deployed to the device. To deploy to the device and run the application, select Debug, Start Without Debugging. Visual Studio first compiles the source code and then shows the Deploy SmartDeviceApplication dialog, as in Figure 1.9. Figure 1.9. Before deploying an application to a device, Visual Studio shows the Deployment dialog.  -
Choosing to deploy to the emulator runs the program on your desktop computer inside an emulator window. For the tutorial we choose to deploy to the actual Pocket PC Device, so we select it (not the Default selected in Figure 1.9) and then click Deploy. Make sure that your device is connected via ActiveSync before deploying to it. -
Visual Studio installs the .NET Compact Framework and launches your application on the device. If you click the button, you will see the message "Hello World," as shown in Figure 1.10. Figure 1.10. The device emulator runs the HelloWorld application.  Now that you have briefly toured how to create and run a managed application on devices, we will move on quickly to more advanced material. We assume the reader is savvy enough with the Visual Studio environment to become comfortable with it quickly once having seen the basics of creating an application for the .NET Compact Framework. THE .NET COMPACT FRAMEWORK IS AUTOMATICALLY INSTALLED When a project is deployed to the device, the .NET Compact Framework is automatically installed to the device if it is not already present. Large-scale deployment of a completed application to customers in a marketplace or an enterprise environment entails special considerations, which are discussed in Chapter 16, "Deploying a .NET Application." |
HelloWorld for C# Compared to the Visual Basic sequence, only steps 2 and 6 are different in the process of building a HelloWorld example for C#. For step 2 we must choose a C# project for Windows instead of Visual Basic, as shown in Figure 1.11 (compare to Figure 1.3). For step 6 we must insert a line of C# code instead of a line of Visual Basic code, as shown in Figure 1.12. Figure 1.11. This figure shows what step 2 of the tutorial looks like for a Smart Device Application written in C#.  Figure 1.12. This figure displays the C# code to insert for step 6 of the tutorial.  The rest of the steps are the same because regardless of the language used, the applications target the .NET Compact Framework. The controls available in the ToolBox are virtually unchanged, since they are part of the Winforms implementation in the .NET Compact Framework. The completed project files for the tutorials are on the companion CD-ROM in the folders SampleApplications\Chapter1\HelloWorld_VB and SampleApplications\Chapter1\HelloWorld_CSharp. Opening an Existing Smart Device Extensions Project Opening an existing Smart Device Extensions project is no different from opening any other kind of project within Visual Studio .NET. Simply select File, Open, Project and select a project; otherwise , choose a recent project from the Start Menu.  |