Device Drivers (Drivers) Overview
|
| < Day Day Up > |
|
Device drivers are software files that contain instructions that allow the OS to interact with hardware. For example, it takes one or more mouse drivers for the OS to understand what to do when you move the mouse. The printer driver tells the printer what to do when you click Print. Almost all devices need some type of driver in order to operate, so virtually every new device comes with a driver disk or disks. Windows also contains a large selection of drivers for all types of hardware.
Some devices are so important that generic drivers are available immediately after powering on the computer. These are the video and keyboard drivers. Generic drivers for these devices are built into the BIOS. That is because, barring the presence of devices used by those with certain disabilities, a computer is useless without a monitor running at least at some point during its operation, and cannot be controlled without a keyboard. A generic driver is a driver that will work with many or all of its class of devices, but will usually not allow for full functionality of a particular device. To illustrate this, you might notice that, while booting, your monitor might display larger text and few colors. Then, toward the end of boot-up, you'll see much better color and smaller, sharper text. That is because the generic drivers that allow for video as soon as the machine is powered on aren't designed to take advantage of the full capabilities of the video card and monitor. Once the device- specific drivers are loaded into memory, later on in the boot process, you should see more colors and greater resolution. You can find more information about video in Chapter 8, "Video, Sound, Modems, and Network Adapters."
Drivers are also usually specific to the OS version, or version group. In many cases, a driver will work in all versions of Windows 9x, while another driver will work with Windows 2000 and XP. In some instances, there is one driver for all of these versions, and in others, there is a separate driver for each version. This all depends on the individual device.
You will notice that many devices come with "software." Usually, this includes both drivers to make the device operational and programs to make them functional. For example, a CD-RW drive with just its device driver installed will work only as a CD-ROM drive. To be able to "burn" (record) CDs, you need a program that will give you controls that allow you to use the device for all of its intended purposes. Often, the software that ships with a hardware device includes one or more third-party programs that are certified by the device manufacturer to be compatible with that device. The drivers to operate the device, and sometimes drivers for competing devices, are included in the program. However, some devices, most notably printers, come with software that is designed by the printer manufacturer solely for that device. And in some cases, Windows will have built-in software components that can be used to perform the tasks of the hardware device. For example, the most recent versions of Windows Media Player™ can be used to burn multimedia CDs on a CD-RW.
Installing Drivers
All of the versions of Windows discussed in this book are PnP OSs. Often disparagingly called "Plug and Pray" when introduced in Windows 95, Plug and Play refers to the capability of a device to be recognized and installed automatically by the OS without the user having to manually configure the resources used by the device. A computer's BIOS, OS, and the device all have to be Plug and Play compatible for Plug and Play to work; nearly every PC BIOS, OS, and virtually every device sold since Windows 95 became common is so compatible. If everything is working as it should, Windows will automatically detect any newly installed Plug and Play device and attempt to install the drivers for it.
| Note | Manufacturer's installation instructions always supercede the instructions in this chapter in case there are any differences. |
Installing a driver is part of installing a device. In fact, when Windows messages refer to "installing or uninstalling a device," they mean primarily installation and uninstallation of the drivers for that device. Here are the most common ways that device drivers are installed on Windows PCs:
Automatically by Windows: Windows detects the device on bootup and installs the drivers for it.
Almost automatically by Windows: Windows detects the device and prompts for the location of the driver. The user supplies the disk or location of the driver files on the hard drive, and answers the prompts.
Manufacturer-supplied installation CD: The installation CD starts automatically upon insertion. The user follows the prompts to install the software. Often, there is more than one program to install in this situation.
Installation program on the hard drive: The user runs the program, usually by double-clicking, and installation proceeds in the same manner as the previous method.
When installing or reinstalling a driver, make sure you know where the drivers are. If they are on a floppy or CD, make sure you know which drive the disk is in along with the path to the driver files. If the drivers are on the hard drive, which is common if you downloaded them from the Internet, make sure you know the path to the files.
| Tip | If you download a file from the Internet, make sure to navigate to a folder that you can easily find when prompted for a location. Otherwise, Windows might direct the file to a hidden temporary Internet folder that is almost impossible to find, even if you know where to look and your system is configured to show hidden and system files. |
Reinstalling a Driver
One very common problem that occurs with PCs is for a device to stop working correctly or at all. In most cases, there is nothing wrong with the hardware; instead, the driver has become corrupted. Corrupted drivers can sometimes even affect the functioning of the entire computer.
There are various degrees of reinstalling drivers. Try these in order if you haven't solved the problem:
-
Reinstall the existing driver.
-
Uninstall and reinstall the driver.
-
Uninstall the driver from your system and reboot. When Windows restarts, it should detect the new hardware and start to install the drivers again.
If you have the documentation and driver disks from a device, follow the provided directions. For example, corrupted drivers are common with Hewlett-Packard printers. Tutorial 2.2 describes a typical case of reinstalling a printer driver.
Tutorial 2.2: Reinstalling Printer Software
Make sure you have the driver disk or have downloaded the file before proceeding with these steps:
-
In Windows XP with the standard Start menu, go to Start > Printers and Faxes. In all other versions, go to Start > Settings > Printers.
-
Right-click the icon for the printer you want to uninstall and select Delete from the pop-up menu that appears.
-
Follow the prompt to confirm deletion.
-
Insert the driver disk or execute (run) the installation file on the hard drive.
-
Follow the prompts to install the printer software.
In other situations, follow the procedures outlined in Tutorial 2.4a, Reinstalling a Known Driver in Device Manager, or Tutorial 2.4b, Letting Windows Select the Best Driver to Install. The procedures vary slightly with different versions of Windows.
| Note | The one place where all or almost all drivers can be accessed is Device Manager. There are many ways to get to Device Manager, not all of which can be used on every computer, depending on Windows version or configuration. A few methods are described in Tutorial 2.3. If none of these methods applies to the computer you're working on, please search Windows' Help for Device Manager. |
Tutorial 2.3: Accessing Device Manager
-
Windows 9x: Right-click the My Computer icon on the desktop and select Properties from the pop-up menu that appears. Click the Device Manager tab.
-
Windows 2000 and XP: Right-click the My Computer icon on the desktop and select Properties from the pop-up menu that appears. Click the Hardware tab, and then the Device Manager button. In XP, you might be able to right-click My Computer in the Start menu to view the pop-up menu.
-
All versions: You can access Device Manager through the System applet in Control Panel. See Tutorial 2.1 for instructions for opening Control Panel.
| Note | Some computer owners rename My Computer to their own names. |
Tutorial 2.4A: Reinstalling a Known Driver in Device Manager
-
Follow the appropriate procedure described in Tutorial 2.2 to access Device Manager.
-
In Device Manager, click the "+" sign next to the category of hardware whose driver you want to reinstall. One or more devices appear under the category name.
-
Double-click the name of the device. The device's Properties page appears.
-
Click the Driver tab. The driver page appears. You will have various options here, depending on the Windows version.
-
Click the Update Driver button. You'll be prompted to search for a suitable driver or to select a driver from a list, except in XP, which will prompt you to install a driver automatically or to select from a list. If you have a driver disk, insert it now.
-
Follow the instructions for your system:
-
Windows 9x and 2000: Select the "Display a list..." or "No. Select driver from list" option button and click Next.
-
Windows XP: Select the "Don't Search..." option button and click Next.
A list of drivers might appear in the window.
-
-
The existing driver usually appears first in this list. If you want to reinstall it, click Next and follow the remaining prompts. If you have inserted a disk, or know where you can find the driver on the hard drive, click Have Disk.
-
If you know the path to the driver, enter it in the text box. To browse for the driver, click Browse, and then locate the driver. In case the driver is on your desktop, know that the default path to the desktop in Windows 9x is C:\Windows\Desktop. In Windows 2000 and XP, the default path is C:\Documents and Settings\[logged-on username]\Desktop. Once you find the file, its name should appear in the text box. Note that only a file with the extension ".inf" will be considered a driver.
-
Click OK and follow the remaining prompts.
If you get warning messages, consider them carefully. Some Windows warning messages are critical (but see the note immediately following Tutorial 2.4b).
Tutorial 2.4B: Letting Windows Select the Best Driver to Install
-
Follow Steps 1 through 5 of Tutorial 2.4a.
-
In the Update Device Driver wizard that appears, select the option button appropriate for your version:
-
Windows 95/98: Select the "Yes (Recommended)" option button that answers the question, "Do you want Windows to search for the driver?"
-
Windows Me: Select the "Automatically search for a better driver (Recommended)" option button.
-
Windows 2000: After clicking Next, select the "Search for a suitable driver for my device (Recommended)" option button.
-
Windows XP: Click the "Install the software automatically (Recommended)" option button.
Then, click Next.
-
-
Windows 9x and XP start the search at this point. If Windows doesn't find a driver, it prompts you to search in other locations. Windows 2000 allows you to specify a location here. If you don't, it will search the hard drive only.
-
If you haven't inserted a disk and Windows has found a driver it says will work, follow the prompts to install that driver. If you have inserted a disk, or Windows hasn't located a suitable driver, and you know where the driver is, browse or otherwise specify the location of the file. Then, follow the prompts to install or not install the driver.
| Note | If Windows warns you that a driver might not be suitable for your hardware, don't attempt to install it. However, Windows might give you a message that says that the driver is not digitally signed. While a driver with a digital signature will almost certainly work, other drivers intended for the specific Windows version will probably work also. You can ignore this particular warning in the vast majority of cases. |
If using one of these methods doesn't solve the problem, the next step is to uninstall the device and then reinstall. The procedure is similar to that in Tutorial 2.4a. In Windows 9x, select the device in Device Manager and click the Remove button. Follow any prompts you see, and then click the Refresh button. In 2000 and XP, right-click the device and click Uninstall from the pop-up menu. Then, close Device Manager. The Hardware tab of the System applet should be visible. Click the Hardware Wizard button and go through the wizard. Follow all the prompts. Then, run Add/Remove Hardware in Control Panel and install the driver following the directions in Tutorial 2.4a.
The last thing to try before suspecting bad hardware is to uninstall the device following the methods just mentioned. Then, restart the computer. Windows should recognize the device as newly installed and start the process to install the driver. If you have an installation program disk, cancel the Windows installation and run the installation program after the computer has finished rebooting.
If you have tried all of these things and the device still doesn't work, there is a good chance that the device is broken. Uninstall the device again, only this time, shut down the computer and physically remove the device. If you have a similar device handy that you know is good, you might want to try to install it. If the newly installed device works, that is more evidence that the previously installed device is defective. Then, obtain a permanent replacement device and install as directed. For more information on installing devices, see the chapter in this book appropriate to the device you want to install.
Rolling Back a Driver
In case there is a new problem with the computer after the installation of a new driver, Windows XP gives you the option of "rolling back the driver." Double-click the device name in Device Manager and click the Rollback Driver button on the property sheet. The previous driver will be reinstalled.
| Note | Occasionally Windows will automatically select the wrong driver for the OS. For example, one customer reported that he attempted to install an MPX chipset-based network adapter on a Windows 95 machine, but despite following the directions, the network adapter didn't work. It turned out that Windows pulled drivers for the wrong OS off the network card's installation CD. We fixed the problem by removing the wrong driver, manually selecting the driver in the CD's /drivers/win95 directory, and restarting the computer. |
Obtaining Device Drivers
Computer technicians often spend a great deal of time searching for drivers. Many times, the driver disks are lost, and other times, upgrading the OS requires new drivers. Additionally, new drivers can often improve the functionality of existing devices (but sometimes, new drivers can cause problems too).
On the CD There are some standard locations to find drivers. The first place to look is the Web site of the device manufacturer. See the Industry Contacts document on the accompanying CD-ROM for a list of manufacturer contact information. Some Web sites make it easier to find driver downloads than others do. Note that a high-speed Internet connection is extremely valuable when downloading large files. If you don't have access to such a connection, and you need a large file, you might be better off attempting to order a disk from the manufacturer, if available. The cost usually isn't prohibitive, but you'll have to wait for delivery.
Another good source for drivers is Windows itself. For example, an old printer might come with drivers only for 9x and previous versions. If you need that printer to work with 2000 or XP, run the Add Printer Wizard in the Printers folder (see Tutorial 2.2 for instructions on accessing the Printers folder). If Windows doesn't install the device automatically, you will eventually be able to reach a page allow- ing you to select the device manufacturer and model name/number. Sometimes, you'll need to insert the Windows disc in the drive for Windows to use this driver, unless you browse for the appropriate files. In Windows 9x, these are often in C:\Windows\Options\Cabs. A driver for a close model number might or might not work with your hardware. For example, an HP DeskJet 660 driver will work with an HP DeskJet 672C printer.
This procedure isn't limited to printers. Run the Add Hardware Wizard (or equivalent) from Control Panel to install other types of devices in the same way.
Microsoft also keeps a huge selection of drivers. If you search Microsoft.com for "drivers," you'll get a wealth of pages where you can find drivers, including third-party companies that sell drivers.
When you download drivers, there are different types of files you can download. Some downloads are compressed files in .zip form, requiring you to have a program such as WinZip (winzip.com) or Stuffit Expander™ (free from aladdinsys.com) to expand. More common is the executable file. These files have the .exe extension and must be run, usually by double-clicking the icon. These come in two types: the setup program and the self-extracting zip file. If the file is a setup program, once executed, usually by double-clicking the icon, it will immediately start the process of installing the device driver and perhaps the operating program. If it is a self-extracting zip file using WinZip, you'll see a text box displaying the destination path of the extracted files. Figure 2.11 shows this process. Change the path to a folder that you can easily locate, such as the desktop. Note that you do not need to have WinZip to extract the files from this type of file—a dedicated WinZip program is part of the file.
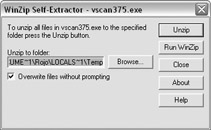
Figure 2.11: A WinZip self-extracting file.
Occasionally, you'll run a self-extracting file and see a command prompt or MS-DOS prompt window. To be able to locate the extracted files after extraction, create a new folder and put the self-extracting file in this folder before running it. The extracted folders and files will be placed in the new folder as well.
Often when you download files from a self-extracting file, you'll see folders bearing the names of various OSs and versions. You can delete any folders for OSs that you won't be using, such as Windows 3.1, OS/2, Solaris, and so forth. One title you might see is Win32. This refers to 32-bit Windows OSs, which include all of the versions covered in this book. You install these drivers using the Windows Add/ Remove Programs applet in Control Panel, or by navigating to the drivers when Windows has detected the new hardware on boot.
Chipset Manufacturers
If you searched everywhere else for a driver but had no luck, there is one more place to try: the chipset manufacturer. A chipset is the set of integrated circuits used on a particular device, and is often made by a manufacturer other than the device manufacturer. Look at the device and try to read the name and numbers on the larger chips. If the item is identified in Device Manager, it sometimes is identified by chipset rather than by device manufacturer. If that fails, search on the Internet (we recommend google.com) for information about the device; you can often find the chipset manufacturer and model number from the device manufacturer's Web site. You can also run a diagnostic program such as Micro-Scope (micro2000.com) or PC Certify (pccertify.com) to identify the hardware. This is especially helpful on a laptop, which you will be unlikely to open.
Locating the chipset manufacturer and model number is no guarantee that the manufacturer's Web site will have a driver, and if it does, that the driver will work with your device—but it's certainly worth a try.
Device Status
When you look in Device Manager, you might sometimes see a yellow question mark or exclamation point, or a red "x" next to a device listing (see Figure 2.12). The red "x" or yellow exclamation point indicates a resource conflict (discussed later in this section), a problem with the device and/or its driver, or that the device has been disabled in Device Manager. The yellow question mark indicates that Windows has detected a newly installed device but cannot determine the nature of that device. Use the procedures described earlier in this section to diagnose and remedy the problem.
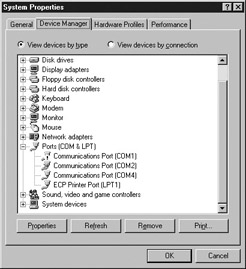
Figure 2.12: Device Manager indicating problematic hardware.
| Tip | If you see the "This device is working properly" comment on a device's property page, don't count on it. The device might or might not be working properly. However, a comment stating that there is a problem with the device will always be correct. |
Device Manager Resources
Every device uses some of the computer's resources. Resources, in Device Manager, are computer functions that allow devices to operate. More than one device attempting to access the same resource at the same time is called a resource conflict, which we discuss later in this section.
There are four types of resources in Device Manager:
IRQ or IRQL (Interrupt ReQuest Line): For a device to operate, it has to "interrupt" whatever the processor is doing to get the processor to do its part in performing the task. An IRQ is a channel for the device to use to interrupt the processor. There are a limited number of IRQs built into the motherboard. Each device must be assigned an IRQ on installation to do its job. If more than one device attempts to access the same IRQ at the same time, the computer will lock up (freeze and have to be powered down and restarted) because of this resource conflict. This is a rare occurrence with Plug and Play, but it can happen with certain old expansion cards. Older versions of Windows didn't do as good a job preventing resource conflicts as newer ones do. Many older devices have jumpers (electrical connectors that can be moved to different places for the purpose of changing configuration), or microswitches (very small mechanical switches that serve the same purpose). Figure 2.13 shows a card with both jumpers and microswitches. Some devices are designed to work only on certain IRQs, so if another device is on that IRQ, it will have to be changed to another IRQ. If that is not possible, one of the devices might have to be replaced. For the past three or so years as of this writing, computers have been able to reliably share IRQs to some extent. However, IRQ sharing can occasionally be problematic. Figure 2.14 shows the Resource View in Device Manager.

Figure 2.13: Jumpers and microswitches.
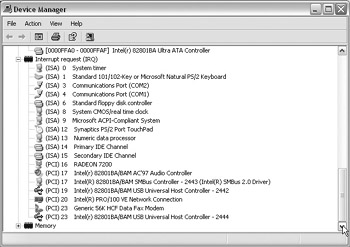
Figure 2.14: Device Manager IRQ View in newer computer.
For many years, usable IRQs were limited to 14, numbered 00 through 15, but with 02 and 09 not available. After all the usual devices were added to the required system devices, very few free IRQs were left. Only recently has the number of IRQs been increased to 24 (see Figure 2.14). Considering the capabilities of the USB and IEEE 1394 (FireWire) interfaces, which can accept a practically limitless number of devices, 24 IRQs should be all a PC will ever need.
Input/Output Address (I/O Address): Every device on a computer needs an address just as every building in a city needs an address. These addresses help locate the devices on a computer, and correspond to actual solder traces on the motherboard. They are often confused with memory addresses, but they are actually not related. They are measured in hexadecimal (hex) numbers, which is a system that makes huge numbers take up less space when displayed or written. If you remember different base numbers in grade school and high school math, such as base 6 or base 2 (binary), you will understand hex numbers, which are base 16. Instead of adding another digit after number 9, hex numbers continue with A through F. For example, F hex is equal to 16 in decimal (base 10); 11 in hex is 17 in decimal. You can use the Windows Calculator, Scientific view, to easily convert hex numbers to decimal, and vice versa, although there's not usually a reason to do so. The main thing you need to know is that, like IRQs, I/O addresses must be unique on a given computer.
Memory Addresses: Memory Addresses are a way to specify the exact location in the system's main memory that a device accesses. They are also measured in hex numbers and cannot be duplicated on the same system.
Direct Memory Access (DMA) Channels: Direct Memory Access is a system that allows a device to access memory directly without having the processor manage that memory access. Despite the fact that this saves processing power, this is not widely used, and each computer needs only a few DMA channels, one of which is used by the DMA controller itself. On many systems, only the floppy controller uses DMA, so DMA channel conflicts are rare. However, any hardware that does support DMA should be configured to use it.
Resolving Resource Conflicts
Any time two or more devices are assigned the same resource without being managed by Windows' IRQ sharing, there is a resource conflict. If the devices attempt to access the same resource at the same time, a lockup is likely to occur. Lockups are situations in which the computer suddenly stops responding. The first sign of this is usually that the mouse pointer won't move. You'll also notice that the cursors stop blinking, and keys depressed on the keyboard have no effect. These symptoms can sometimes happen temporarily, however, so there is an easy test to determine if the computer is really locked up (as long as your keyboard has a working Num Lock or Caps Lock light): press the <Num Lock> or <Caps Lock> key on the keyboard. If the light doesn't go on or off, you can bet that your computer is locked up. If the Num Lock light responds, wait a minute or two to see if the computer starts responding again, and then try the Num Lock test again. If the computer is truly locked up, the only alternative is to shut off the power to the computer and reboot. You can shut off the power on all newer computers (those with a soft power switch) by pressing and holding the power switch for several seconds until the power goes off. A soft power switch is one that activates an electronic circuit to start or stop the computer, as opposed to a mechanical switch that simply shuts power on and off by opening or closing the circuit. On computers with mechanical switches, simply pressing the button once will do the trick. Many computers have a mechanical power supply switch on the back that can be used. If all else fails, turn off the surge suppressor/power strip switch, or pull out the plug.
Reconnect the power, if disconnected, and restart the computer. To avoid another lockup, go into Safe Mode. Safe Mode is a mode of Windows in which only essential hardware is activated. This will allow you to resolve many problems with a greatly reduced risk of the computer locking up in the middle of your efforts. Follow the instructions in Tutorial 2.5a or b as applicable to boot into Safe Mode.
Tutorial 2.5a: Booting into Safe Mode in Windows 9x
-
As soon as the computer powers back on, press and hold the <F8> key. This should call up the Windows Startup menu. If this doesn't work, try pressing <F8> repeatedly, or consult the documentation for the computer on the Internet, if available.
-
Enter the number for Safe Mode and press <Enter>. The computer should then boot into Safe Mode. In Windows 9x, ScanDisk will probably run to detect and repair errors on your hard drive that result from powering down the computer without shutting down Windows. Go ahead and wait for ScanDisk to run. If you don't have time, you can cancel ScanDisk and run it later—the sky won't fall.
If you miss the opportunity and Windows starts to boot into normal mode, press <Ctrl> + <Alt> + <Delete> to restart the computer and try again. To do this, press and hold <Ctrl> and <Alt> simultaneously; then, while they're still depressed, press <Delete>.
Tutorial 2.5b: Booting into Safe Mode in Windows 2000 and XP
After restarting power, watch for a black screen with the message "Starting Windows." Underneath will be a message that says, "For troubleshooting and advanced startup options for Windows ____, press F8." You'll have to press <F8> in the few seconds that the message appears. Once the progress bar starts, it is too late and you'll have to press <Ctrl> + <Alt> + <Delete> as described in Tutorial 2.5a to restart and try again. Some configurations cause systems not to show any of these messages. In this case, repeatedly press <F8> as soon as it starts to boot. Figure 2.15 shows the Windows Startup menu.
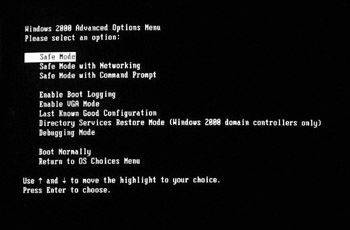
Figure 2.15: Windows 2000 Startup menu.
Assuming you can successfully boot into Safe Mode, you can then open Device Manager and attempt to resolve the resource conflict. If you can't even boot into Safe Mode, see Chapter 11 for troubleshooting information. You can manually assign resources through Device Manager, but it's generally better to let Windows make resource assignments if possible. If you have legacy expansion cards that work only on one IRQ, or cards that have jumpers or DIP switches to select between only two IRQs, you'll have to do a bit of planning to resolve the conflict. Make the selection to view devices by resource in Device Manager. In 9x, select My Computer in the Device Manager Window and click the Properties button below. Then, make sure the Interrupt Request (IRQ) option button is selected. In 2000 and XP, click "Resources by type" in the View menu. This displays a list of IRQs and the devices assigned to them. Then, make a note (literally—write it down on paper) of all devices in which a yellow exclamation point indicates a problem. By double-clicking each of these devices and then the Resources tab on the dialog box that appears, you'll see which resources the device is using, and a list of conflicts on the bottom of the dialog box. If you don't see the resources used, click the Manual configuration button and the conflict list should appear. Write down all this information. Then, review the list of IRQs for unused numbers, noting that there are certain IRQs that are reserved and cannot be reassigned, and that some devices must have certain IRQs and I/O addresses and can accept no others. Then, write down a list of problem devices and plan for them to use free IRQs and I/O addresses. Configure manually in the Resources tab of the device's Properties dialog box by clearing the "Use automatic settings" check box, highlighting the Resource type in the Resource settings windows, and clicking the Change Setting button, as shown in Figure 2.16. Note that many devices will not let you change settings, and often the Automatic settings check box is dimmed (grayed out). Table 2.1 lists typical resource reservations on a typical 16 IRQ computer.
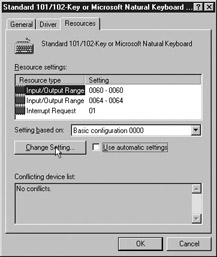
Figure 2.16: Changing resources manually.
| IRQ | Device | I/O Address Range |
|---|---|---|
| 00 | System timer | 0040 – 0043 |
| 01 | Keyboard controller | 0060 and 0064 |
| 02 | Unavailable | ----- |
| 03 | COM 2 | 02F8 – 02FF |
| 03 | COM 4 | 02E8 – 02EF |
| 04 | COM 1 | 03F8 – 03FF |
| 04 | COM 3 | 03E8 – 03EF |
| 07 | LPT1 | varies |
| 08 | Real-Time Clock | 0070 – 0071 |
| 13 | Numeric Data Processor | 00F0 – 00FF |
| 14 | Primary IDE Controller | 01F0 – 01F7, 03F6 |
| 15 | Secondary IDE Controller | 0170 – 0177, 0376 |
| Tip | If you can't seem to get the resource conflict solved, check in the BIOS to make sure that PnP is enabled. Sometimes, PnP can be shut off spontaneously. |
As you can see, there aren't many other available IRQs, and some of the ones not listed might be taken by other devices. If you have taken an A+ course, you probably know that the COM port resource assignments are almost set in stone. However, there are not many devices that use COM ports 1 through 4 these days. Internal modems use internal COM ports, which we discuss in Chapter 8. Certain PDAs, UPSs, and external modems use COM ports, but some of these devices also use USB or other interfaces. Therefore, unless the user has and needs multiple COM ports, they could be disabled in Device Manager or in the BIOS, freeing up their resources. Some machines have multiple parallel (LPT) ports. These are good for many printers and scanners; however, most or all parallel port scanners have pass-throughs allowing you to connect the scanner to the computer's parallel port and a printer to the scanner's pass-through parallel port, while using only one IRQ. Therefore, unless the user needs more than one parallel port, additional LPT ports can be disabled as well. Of course, if there is no IRQ shortage or problem with resource conflicts, it is best to leave the configuration as is. In other words, if it ain't broke, don't fix it.
If you still have resource conflicts, you can remove (uninstall) all Plug and Play devices with conflicts and reboot the computer. Depending on the Windows version, you might be asked to reboot after each device is recognized and reinstalled. Reboot as soon as you are prompted. You might have to try many different configurations until you eliminate all the conflicts.
|
| < Day Day Up > |
|
EAN: 2147483647
Pages: 175