Understanding Volume Levels
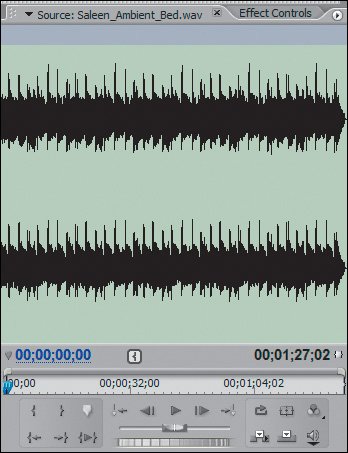
| When you first record or import an audio clip, it has audio information that is measured in decibels (dBs) when played back. Using the Audio Mixer's VU meters you can quickly see the waveform value for the audio or monitor the volume. To monitor your audio clip with the waveform display, open the audio only clip in your Source Monitor. If the clip is a linked audio and video file, open it in the Source Monitor but toggle the Take Audio/Video button to Take Audio Only (Figure 9.4) so that only the waveform is displayed. To view the waveform for your audio files in the timeline, expand the audio track and be sure that the track is set to Show Waveforms. When looking at the waveform, tall waveforms denote stronger sound with a higher dB, and short waveforms reflect quieter sound with a lower dB. Figure 9.4. You can tell this audio clip is a stereo file, because the Source Monitor displays two waveform values Although the waveform is a nice visual representation, the VU meters give you more accuracy. To monitor your audio clip with VU meters, you must first add the clip to your sequence, then look at the VU meters registering in the Audio Mixer or the new Audio Master Meters panel (Figure 9.5). Figure 9.5. In Premiere Pro 2.0 you can see the VU meters two different ways: in the Audio Mixer panel or with the new meters-only Audio Mixer Meters panel. This new panel can be opened and docked into any frame of your workspace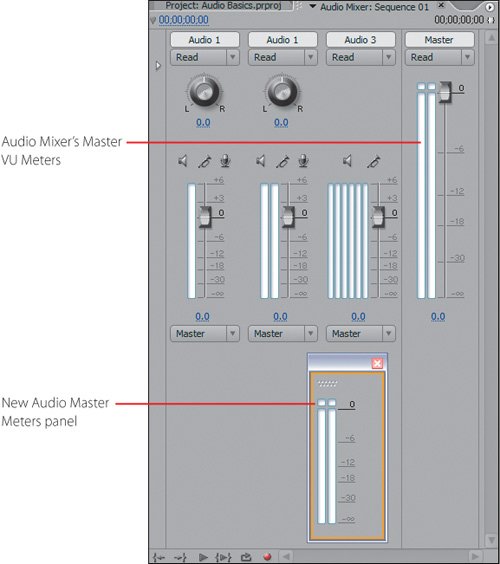 Loud audio registers close to 0dB, and quiet audio registers down around -18dB. The VU meters are essential for monitoring your audio levels so that they do not exceed their ceiling and begin to distort or degrade. If your audio is too loud (shown by red ticks in the VU meters), it will play back with clicks, pops, and other artifacts. If your clip is too quiet, you might get your first clue in the waveform display: The clip doesn't have tall waveforms. When you monitor the clip more closely in the Audio Mixer's VU meters, you can see its exact dynamic dB levels as it plays back. So, what do you do if your clip is too loud or too soft? You can alter the playback volume level from three controls:
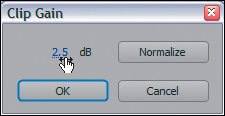
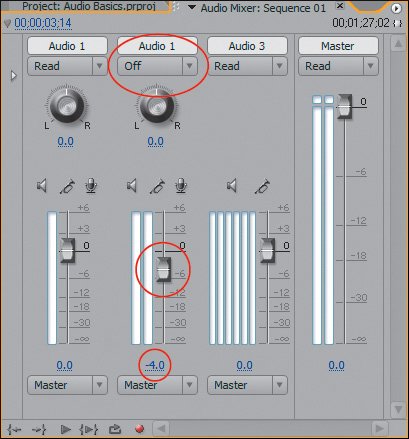
Keep in mind that when you make a Clip Volume or Clip Gain adjustment, Premiere does not alter the display of the file's waveform. Although your audio sounds louder after you adjust Clip Volume or Clip Gain, its waveform doesn't look any larger than it originally did. That's just how Premiere Pro works so far. Clip Gain and Normalizing Your AudioBefore you add an audio clip to your sequence you can increase or reduce its volume by adjusting the Clip Gain. Say you import a quiet audio clip. Select the clip in the Project panel, then choose Clip > Audio Options > Audio Gain to access the Clip Gain dialog (Figure 9.6). For your quiet clip, increasing the dB setting (the Gain) boosts its audio signal accordingly. Setting the dialog's hot text to 5.0dB boosts the audio signal by 5.0dB. Clicking and dragging the hot text to the left reduces the Gain and trims audio levels by whatever negative value you assign. To apply your setting to the clip, click OK. Figure 9.6. In the Clip Gain dialog, you can assign a positive or negative Gain value by adjusting the hot-text dB value. You can also apply an "intelligent gain" by clicking the Normalize button Clicking the Clip Gain dialog's Normalize button achieves a very useful result: Premiere Pro provides a recommended Gain value for your clip. Premiere examines the entire dB value for the audio file selected, and it determines how much it can increase or decrease the dB so that the strongest signal does not peak or exceed the ceiling level (0dB) in any portion of the clip. Once you click Normalize, Premiere updates the Gain value in the hot-text field with a recommended value for proper adjustment. Click OK to apply the Gain value to the clip. Notes When normalizing a clip with dB levels that exceed 0dB, the Clip Gain dialog yields negative gain adjustment values so that you can reduce the strength of the signal. Remember that if your audio does exceed the 0dB ceiling, the source file probably is clipped and has some added artifacts. In these cases, lowering the volume doesn't make it sound better, just less noticeable. If you have damaged audio files, you can do a lot of fixing and adjusting in Adobe Audition. Although you can access the Clip Gain dialog when a clip is selected in the timeline, there is a major benefit to making Gain adjustments to the master clips in the Project panel. When you adjust the Clip Gain of the master clip, Premiere adheres to and respects that adjustment every time you add an instance of the clip to the timeline. Normalize your audio clips in the Project panel before adding them to the timeline. If you already have instances of a clip in the timeline and you adjust the master clip in the Project panel, the Gain value of the clips in the timeline does not update. Clip VolumeSay you need a track of bird sounds to accompany video of a flock of birds flying across a field and directly over the head of your subject in front of the camera. Your field recording came out at a low level, and when you import the clip into Premiere the birds sound as if they're miles away. To fix this, you first boost the Gain to increase the signal strength. Now when you add the clip to your sequence, you can lower the Clip Volume at the start of the sequence (so the birds sound as if they are at the far end of the field) and increase it at the end (so they sound as if they surround the viewer as well as the subject). These adjustments can be made by tweaking the clips' volume handles in the Timeline panel (Figure 9.7). Tip In Premiere Pro, hold your mouse over a clip in your sequence to display that clip's information in the tool tip window. If gain adjustments have been made, you can see that information when holding the mouse over an audio clip in your active Timeline panel. Figure 9.7. With the Audio 2 track showing the default Volume, the yellow volume line reflects the currently assigned levels. Using the Pen tool, you can click and add handles to the level to adjust the clip volume dynamically. Here the clip fades in to its normal 0dB clip volume, then fades out. Note the Pen tool and tool tip next to it that yields the -oodB value for the keyframe handle beneath it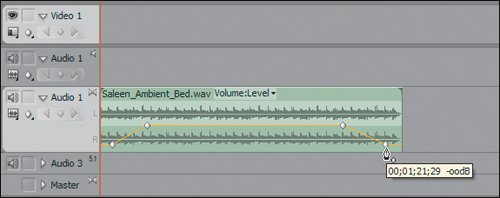 To review, Gain adjustments boost or reduce the basic signal level of your audio file, before and sometimes after it has been added to a sequence. Clip Volume is the means by which you adjust the volume level of a specific clip instance in a sequence. Clip Gain is independent from the Clip Volume so Clip Gain adjustments do not affect a clip's Clip Volume setting. No matter what Gain settings you apply, a clip's Volume displays at the default of 0dB until you adjust Clip Volume. This independence also means, for example, you could increase the Gain to add strength to the audio signal, then bring the Volume down just a little. Empty space on a video track is displayed as pure black. Empty space on an audio track registers as complete silence, or -oodB. The same way adding a cross dissolve to the head of a video clip fades it up from black, adding an audio dissolve to the head of an audio clip fades the audio up from complete silence to its assigned clip volume. One way to increase the Volume of an audio clip in a sequence is to select the clip in the Timeline panel and open the Effect Controls panel. As you remember from Chapter 8, "Effect Controls Basics," Volume is a Fixed effect for audio clips. When you adjust the volume properties of a clip in the Effect Controls panel, position the CTI where you wish to make the change and twirl down the Level slider for volume (Figure 9.8). To increase the entire clip's volume, make sure Toggle Animation (the stopwatch icon) is off, then make your adjustment. To keyframe volume fades and adjustments, turn Toggle Animation on and then assign keyframes with the desired Volume levels at the appropriate points in the clip's boundary. Figure 9.8. With the adjusted clip from Figure 9.7 selected from the timeline, its effects properties become available in the Effect Controls panel. Because the volume level has a number of handles with different values, the Toggle Animation button is active. With the CTI on top of the first keyframe handle, you can see that it has a value of -oodB, which is complete silence. Notice how the new Value graph in the timeline area of the Effect Controls panel mirrors the same fade levels as the Timeline panel from the previous figure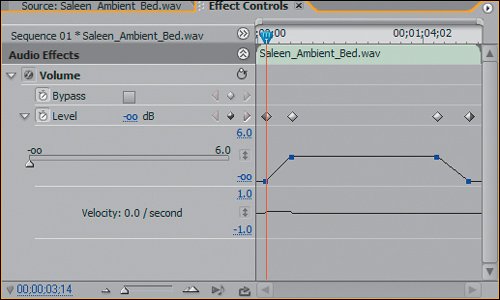 If you prefer, you can adjust a clip's Volume in the Timeline panel with the Pen tool; press P with the timeline active (Figures 9.9a and b). First, toggle the audio track display to Show Clip Volume, and Premiere will display every clip's volume in that track. To adjust a static level, you can click and drag when the Pen tool displays the horizontal volume line. Dragging up increases the volume and down decreases. If you want to add keyframes with different level values, press the Ctrl key and click the Pen tool on the volume line to add a keyframe handle at the assigned position. Click on the keyframe, and drag it up or down to raise and lower the volume. Adjusting the Clip Volume level is useful for removing specific sections or unwanted sounds. Figures 9.9a and b. With the track displaying Show Clip Keyframes: Volume:Level, you can use the Pen tool to raise a static value between two volume handles (a) or click and modify a single keyframe handle (b). Notice how the tool tip tells you precisely how much you have increased or decreased the level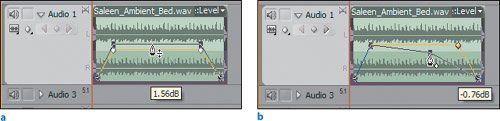 In the "Advanced Audio Techniques" section,Chapters 17 to 21, you will explore clip volume adjustments and much more. Track VolumeClip Gain and Clip Volume are specific to individual clips, but Track Volume adjusts the volume level of an entire track. You can adjust Track Volume from its default of 0dB in the Audio Mixer panel or the timeline. In the Audio Mixer panel, use the volume faders at the bottom of each track panel. The position of the fader reflects the level of the associated track. For a static adjustment, turn the Automation mode Off and then drag the fader up or down to increase or decrease the dB level (Figure 9.10). Figure 9.10. With the Automation mode for Audio 2 set to Off, you can make uniform track volume or panning adjustments that affect the entire track. Here the track volume for Audio 2 was turned down by 4dB, meaning all the audio in Audio 2, no matter how loud at the clip level, was reduced by 4.0dB at the track level Be careful: If you performed any Automation or if you keyframed track volume or effect values, setting the Automation mode to Off deletes all of the keyframes for the entire track. To make adjustments to the track in the Timeline panel, toggle your audio track display to Show Track Volume or Show Track Keyframes and adjust accordingly with the Pen tool. Raising values above the center volume line increases the dB, and dragging below it decreases dB. Notes Automation is the equivalent of keyframing effects, only it is done live as the audio tracks play. To fade the volume at specific points, switch the track into one of three Automation modes and press Play. Now, when the timeline plays back, you can make live adjustments to the audio track's parameters. Premiere saves these adjustments, writing them as keyframes to the adjusted parameter. Automation is very powerful as you can watch, listen, and make adjustments at the same time. You'll learn more about it in Chapter 20, "Mixing Your Audio." |
EAN: 2147483647
Pages: 200