Track Content Area
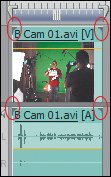
| To the right of the track headers is the track content area, where all your editing work gets done. As you remember, the track header area determines how the track content area looks and what tracks are targeted for editing. Your video tracks are above the center gray line, and the audio tracks are below. At the right edge of the timeline are two scroll barsone for video and another for audioso you can scroll your video and audio tracks separately. Below the tracks, the horizontal scroll bar helps you navigate to different points in your sequence (Figures 5.19). Figure 5.19. The track content area is surrounded by the horizontal scroll bar on the bottom, the vertical track scroll bars on the right, and the zoom controls just below the track header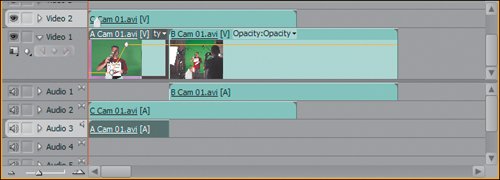 To zoom in or out of your tracks, use the zoom controls in the lower-left corner of the Timeline panel. Clicking on the small mountains zooms out, while clicking on the big mountains zooms in. Dragging the slider in the direction of either mountain achieves the same result. Pressing the + or - key also zooms in and out, respectively. Every zoom keystroke updates the feedback of the zoom view as well. Now it's time to move into the primary content area of the Timeline panel. The best place to start is with the behavior of video tracks. Video TracksYour track view, display style, and keyframe viewing mode dictate what is seen in each video track. Figures 5.20 shows the results of different view settings. Figure 5.20. You can display your tracks in four different views. Video 1 displays the clip's name only. Video 2 displays frames. Video 3 is set to Head Only and its keyframes are set to Motion:Scale. Video 4 has Show Head and Tail. All three tracks except Video 3 are displaying the default Keyframes:Opacity video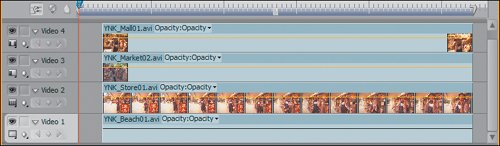 All video tracks have the same video properties with unique adjustable opacity and motion settings, which was not the case in previous versions of Premiere. You can have unlimited video tracks in a sequence and the hierarchy of what's visible goes from the top of the stack down. This means that although the Video 1 track is your primary editing track, if you place a clip above Video 1 on the Video 2 track 2, it will cover the content on Video 1. Titles will go on Video 2, and the edited clips will be beneath the titles on Video 1. If you stack clips and wish to expose what's beneath, reduce the opacity of the top clips to reveal the lower ones. In Figure 5.20, only Video 4 is visible in the stack, because they are all on top of each other. If you were to reduce the opacity of Video 4, you would start to see Video 3 beneath it. Another new track feature in Premiere Pro is the ability to add transitions to every track of audio and video. If you want to fade in a title on Video 2, you would place a one-sided cross dissolve transition on the head of the title. Because black is the blank space color of the timeline, if there is nothing beneath the title on Video 1, the title would fade up from black (Figures 5.21). If there is a clip of media beneath the title, the title will fade up on top of the media. Figure 5.21. The title on Video 2 has two transitions: one at its head and one at its tail. With nothing beneath the title, the sequence will transition from black to the title then back to black at the end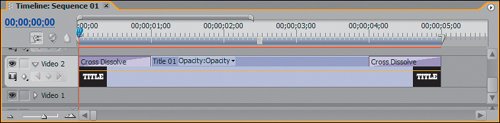 The look of a track in the content area can tell you a lot. The next sections examine a number of indicators found in the content area. Locked TracksLocked tracks have a hash mark indicator throughout the entire track (Figures 5.22). No media can be moved, selected, or added to a locked track. Figure 5.22. Video 1 is locked. You cannot apply edits to it, target it, or select or move clips in it Out of SyncIf the audio portion of an audio and video clip becomes shifted out of sync with the video portion (or viceversa), a red indicator box appears in the corner of the clip (Figures 5.23). The indicator box tells you how many seconds and frames out of sync the media is. Figure 5.23. The red indicator for the linked audio and video states that the clips are out of sync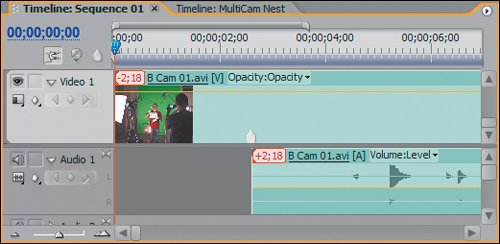 Right-click in the box to reveal two options: Move Into Sync and Slip Into Sync (Figures 5.24a through d). Moving into sync physically moves the clip back to the position where the media was originally. Slip into Sync attempts to shift the media. Although the media will be offset physically still, Premiere updates the material in the audio and video so that it is back in sync but separated. Figures 5.24a through d. If you choose Move Into Sync, Premiere slides the media over to realign it and get back into sync (a and b). Choosing Slip Into Sync preserves the timeline postion by slipping the source material in the clip into sync (c and d). To perform a slip edit, you must have additional head and/or tail clip material than what has been edited with the clip into the timeline Notes When you capture a clip with both audio and video from your DV device, the clip plays back in the Source Monitor with both audio and video synchronously. When you drag an instance of the clip into the timeline using both the audio and video, the audio and video are "linked" together so that the audio is in sync with the video. You easily can find linked audio and video clips because the color of both clips is the same. If either the audio or video portion of the clip changes independently, then an icon displays revealing their sync status. Clip Effect KeyframesIf you expand a track and turn on keyframe viewing, all clips will have a little drop-down Effects menu within the body of the clip. The drop-down menu displays the name of the selected effect parameter. This drop-down menu lets you toggle between the different effects and their parameters, so that you can decide which keyframes you want to view. Because you can have multiple effects assigned to one clip, you navigate between the effects and their keyframable parameters from this menu. All clips that have additional effects applied to them will have a purple line beneath the name area. Clip MarkersClip markers appear as upward arrows in the boundary of a clip when a track is expanded. When you are dragging clips in the Timeline panel, clip markers will be identified as an edge that can be snapped to. This is very helpful when you are building your edit, as you can place markers in the exact positions where you want media added. When you add your media with Snapping on, you can place the media exactly where you initially determined. You cannot double-click on clip markers in the timeline to assign marker settings; only timeline markers can have assigned comments, chapter numbers, and so on. Media BoundariesWhen you open a clip in the Source Monitor, it can have up to four defined parameters: Media In and Media Out, which are the first and last frames of the media, as well as Video In and Video Out, which correspond to assigned In and Out points. Sometimes your Media In and Video In will be the same value, because you started capturing at exactly the first frame you wanted to use in your edit. In the track content area, a clip that begins at its Media In has a darkened upper-left edge. A clip that ends at its Media Out has a darkened upper-right edge (Figures 5.25). These darkened edges are known as dog ears. The dog ears mean that you cannot extend or drag left or right to reveal more material from the clip because more material does not exist. Figure 5.25. As the dog ears on the clip's head and tail indicate, this timeline clip instance is using the entire duration of the master clip it references Audio TracksAudio tracks can be one of three different types: mono, stereo, and 5.1 surround. You can place audio files into a track with matching settings only. In other words, place only stereo clips in stereo tracks, mono in mono tracks, and 5.1 in 5.1 tracks. If you drop a mono clip into a project with only stereo tracks, you must drag it to the gray pasteboard area at the bottom of the panel; Premiere will create a new mono track. In regards to viewing audio track content, where video tracks display icons of video frames, audio tracks display the waveform values of the audio in the track. Audio Display ModesAudio tracks display the corresponding channel information of the clips they contain. Mono tracks reveal single-channel waveform files, stereo tracks show dual-channel files, and 5.1 surround has six-channel files. Because stereo and 5.1 require a lot of space to display their waveform information, you will often find yourself expanding these tracks and shifting the timeline view emphasis to focus more on audio (Figures 5.26). You can accommodate this workflow quickly by creating a Workspace layout that moves your panels accordingly. Waveforms will either be on or off for your audio track. Figure 5.26. Just because audio tracks have only two display modes (waveforms on and off) doesn't mean that they can't be resized independently! It is far more appropriate to increase your audio track sizes and zoom in on each to get as much detail as possible from your waveform image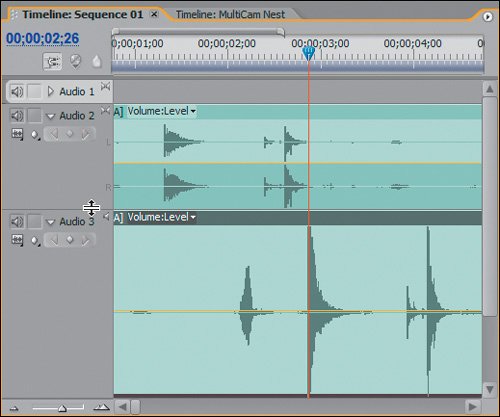 Audio: Clip Versus TrackWith audio tracks, you have the ability to look at clip effects and keyframes at either the clip level or the track level. Selecting Clip reveals the same drop-down effects menu as it does with video. Selecting track-based keyframes reveals a thick gray bar at the top of the track with a drop-down effect menu listing the parameters. The drop-down menu resides at the head of the track so you must navigate back to the beginning to define the parameter that you wish to view or adjust. Audio VolumeThe volume setting will be a thin orange wire that sits somewhere around the middle of your waveform. The wire sits in the middle because that is where the 0dB setting is. Raising the wire increases the volume, and lowering it reduces the volume (Figures 5.27). (More on editing and adjustable audio parameters in Section III, "Advanced Audio Techniques.") Figure 5.27. Audio 1 displays the clip volume; Audio 2 displays track volume. Because clip content cannot be added to the Master track, it also reveals an orange track volume wire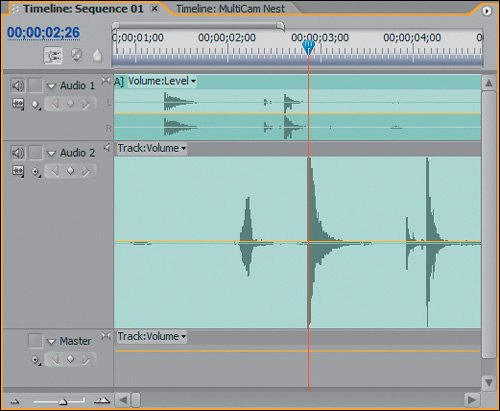 Master TrackThe audio Master track is not a track into which clips can be placed. The Master track is strictly for raising, lowering, or adding effects to the master mix down of your audio tracks (Figures 5.28). Figure 5.28. Because the Master track is track based, you can choose between viewing the track volume and the track (effect) keyframes If you expand the Master track, you will notice that it only allows you to display track-based keyframe parameters. Think of all your audio tracks as being funneled into the Master track that then turns things up, turns them down, and adds a reverb or any other effect. The final mix of your audio will pass through your Master track, which can always be monitored by looking at the levels in the VU Meters of the Audio Mixer panel. No matter what type of tracks your sequence containsmono, stereo, or 5.1 surroundit will always be mixed down and played back in whatever channel type the Master track is set to. Tip Because transitions can be applied to all tracks of audio and video, you should use the audio cross fade transitions to fade your audio up and down. Instead of fiddling with volume keyframes, just drop the transition on the beginning or end of the clip and adjust its duration. |

EAN: 2147483647
Pages: 200
- Assessing Business-IT Alignment Maturity
- Measuring and Managing E-Business Initiatives Through the Balanced Scorecard
- A View on Knowledge Management: Utilizing a Balanced Scorecard Methodology for Analyzing Knowledge Metrics
- Governance in IT Outsourcing Partnerships
- The Evolution of IT Governance at NB Power