| To create a good sound mix with some layered effects, you are going to add a few sound effects files into the overall mix with the voiceover and music you have been working on in the last few chapters. 1. | Open the Submix_Start.prproj from the APPST2 Lesson Files/Chapter 20 folder. You'll notice that the workspace I used for this project has a healthy size for the height of the timeline and height and width of the Audio Mixer. You can organize your workspace so that you have a good amount of space for a tall timeline and a wide Audio Mixer.
When mixing audio, be sure to allocate enough space for the Audio Mixer and the audio track portion of your timeline. In my default workspace for this project, I collapsed one video and two audio tracks that weren't going to be manipulated during the lesson.
| | | 2. | Choose File > Import, browse to APPST2 Lesson Files/Chapter 20/SFX, and click Import Folder. You will be importing all the files contained in this folder if you choose the Import Folder option. Once the folder is imported, double-click and open the SFX subfolder in the Project window. For each clip in the Project panel, choose Clip > Audio Options > Audio Gain, then click Normalize in the resulting dialog. Adjust the Gain value hot-text field based on these recommendations for the following clips:
Chains: 6.6dB
Clank: 0.9dB
Drill: 12.2dB
Electric Motor: 7.7dB
Fairy Dust: 8.0dB
WaterCrash: -1.2dB
First, you import the desired files, then you get their individual Gain levels up so that you have a nice strong signal. The Chains file has one instance where the audio exceeds 0dB, so Premiere recommends you normalize it at 0dB. Because you are not going to use a section that is too loud, you will still want to bring up the Gain to 6.6dB.
| | | 3. | Toggle the Track Output off for both the VO track and the Music track. Drag and drop the WaterCrash.mp3 file into the gray area below the audio tracks to create a new track for the clip. Position it at timeline marker 1 (Figure 20.1). Right-click in the new track's header area, and rename the track FX Smoke.
Figure 20.1. With Snapping turned on in the timeline, you can drag an added file into the timeline and still position it exactly where you want it to be placed when the new track is created. The upward snapping arrow indicates snapping to the marker position 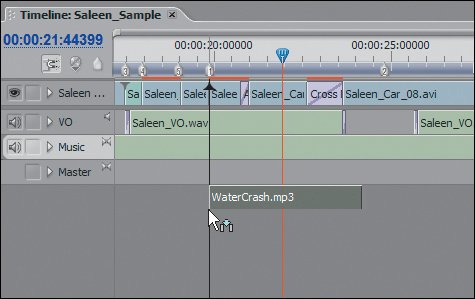
By turning off the other audio tracks, you can focus solely on the new effect's sound and position. I previously identified this clip position, but as you proceed, you can take liberties shifting it to better suit the edit. Once you rename the track, if the entire track name does not display, you can drag the right edge of the track header to the right to make it wider.
Tip When performing menu-based actions that are difficult to navigate to, you can set the menu command to a quick keyboard shortcut. To assign a Keyboard shortcut to Audio Gain go to Edit > Keyboard Customization. In the resulting dialog, select Application from the drop-down menu, twirl down Clip > Audio Options, and then click on Audio Gain to highlight it. Click in the blank Short Cut column to the right and hold down Shift+G on your keyboard. If Shift+G is not being used by any other shortcut, then you have just assigned it to be used to be the shortcut for Audio Gain. Click OK. | | | 4. | Add an effect to the WaterCrash clip. Open the Effects panel, and from the Audio Effects/Stereo folder, drag and drop the EQ effect onto the WaterCrash.mp3 instance in the timeline. Select the clip instance in the timeline, and open the Effect Controls panel. From the Custom Setup for the EQ effect listing, activate all five frequencies and enter the following values:
Low: 52Hz, -20dB
Cut Off Mid1: 91Hz, 10.2dB
Mid2: 775Hz, 6.8dB
Mid3: 918Hz, 7.2dB
High: 3801Hz, -20dB,
Cut Off Output: -6.6dB
You will be doing track mixing later, but at times like this a clip effect does the job quickly and easily. The sound of the water crashing needs to resemble a sound that emphasizes the car passing through the cloud of smoke. Although this is slightly exaggerated by the water sound, it does the trick once the EQ has been tweaked.
For this step, the goal was to take a sound that resembles the idea being explored and then manipulate it with a filter or two, to get it sounding more appropriate. With the EQ effect, the WaterCrash clip no longer sounds like water, taking on a new personality instead. Setting the Output level in the EQ Custom Setup reduces the overall volume of the clip instance, so there's not much more tinkering to do.
Tip If your Effect Controls panel is cutting the custom setup in half, remember you can expand the panel to display the effect settings only by clicking the top-right double arrow to hide the Timeline view. Once it displays the double arrows pointing left, the same button can be clicked to get the Timeline view back. | | | 5. | Drag and drop the Fairydust_2.wav file into a new track at timeline marker 2. Rename the new track FX Fairy. Right-click on the Fairydust_2 instance in the timeline, and select Speed/Duration. Slow down the speed of the clip to 80%, and click Maintain Pitch. With the Fairydust_2 clip instance in the timeline selected, choose Clip > Audio Options > Render and Replace (Figure 20.2).
Figure 20.2. With the Fairydust_2 clip selected after the speed change has been applied, choosing Render and Replace processes the speed change of the clip and creates a new clip instance that does not require processing 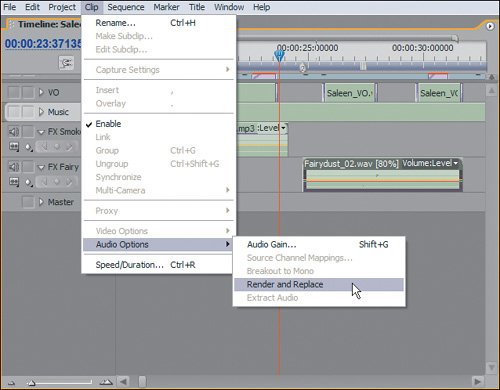
Because you are going to apply an effect on top of the Fairydust_2 clip after you have adjusted its speed, every time you want to play back and preview with effect adjustments you will have to render the audio. By selecting to render and replace the speed-changed Fairydust_2 clip, you are creating a new clip instance that is processed already at the adjusted speed. This means that applying and adjusting effects to the replaced clip will be played back in real time.
Notice that the visual waveform information in the clip was enhanced as well, because the previous Audio Gain setting you assigned to the Fairydust_2 file is getting rendered along with the speed change. Because Premiere Pro does not update the waveform when you make a gain adjustment, you may want to consider using Render and Replace to get more waveform information from gained files.
| | | 6. | Apply the stereo Delay effect to the new replaced FX Fairy_Fairydust_02.wav in the timeline. Use the default setting, adjusting only the Feedback to 50%. Delay should be 1.000 seconds and Mix 50%.
Adding the Delay effect further enhances and alters the fairy dust effect. While it seems a bit too loud and a bit obtuse, you will shape its panning and fading in the next lesson.
| | | 7. | Right-click in the track header area, and add four mono tracks and one mono submix track. Rename the mono tracks FX Shop1, FX Shop2, FX Shop3, FX Shop4, and rename the submix track Sub Shop. Next, follow Table 20.1 to add the clips into the proper positions. Your sequence should look similar to Figure 20.3.
Table 20.1. Mono Tracks to Add | | In | Out | Timeline |
|---|
Track | File | Point | Point | Marker |
|---|
FX Shop1 | Chains.wav | 02;17 | 03;09 | 3 FX | Shop2 | Electric_Motor.wav | 04;00 | 04;28 | 4 FX | Shop3 | Clank.wav | 01;02 | 02;04 | 4 FX | Shop4 | Drill.wav | 04;13 | 05;08 | 5 |
Figure 20.3. Both the Fairydust and WaterCrash clips display the purple clip effect line, which means effects are applied to those individual clips. At the marker positions 3, 4, and 5 the FX Shop tracks clearly display the stacked effects that make up some ambient shop noises 
Although you may take a few liberties with shifting the In and Out points and placement of the subclips, it is first important to label all the tracks in your audio mix so that when you work in the Audio Mixer you can easily distinguish between the tracks. Because there are four sound effects placed in close proximity, it is wise to keep each sound effect on a different track, not only for spatial position, but in terms of mixing flexibility. By having each effect on its own track, you have greater control and fewer adjustments if each track accommodates one specific effect type. This is obviously the case with the voiceover file cut up on its own track.
Tip Sending tracks to a submix track is a very easy way of ganging together clips with effects and controlling them with one easy slider. | 8. | Expand your Audio Mixer so that you can see the Effects/Sends area. In each of the four new Mono FX tracks, click in the top blank drop-down menu in the Sends area and select Sub Shop from the list that appears (Figure 20.4).
Figure 20.4. The bottom half of the Effects and Sends area of the Audio Mixer allows you to send the signal from one track to be processed by another track. Using the drop-down menu, you can send to a submix track (such as Sub Shop, chosen here) or your Master track, or you can create a new submix track 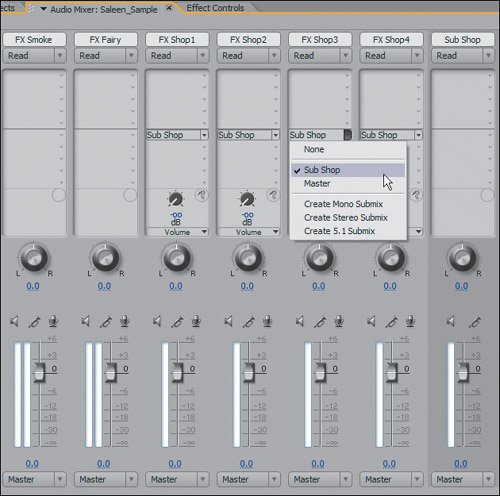
This step redirects the processing of the new Mono tracks through the submix track. Now if you apply one effect to the Sub Shop Submix track, all the Mono FX tracks will be processed with that effect.
Tip Here's a tip on how to quickly preview and loop specific sections of your timeline with the Audio Mixer: Create two timeline In and Out points, one at the beginning of the area you want to preview and one at the end. (Position the Edit Line, and press I to set the In point, then reposition and press O for an Out point.) Click the Loop button in the Audio Mixer, and then click Play. Because you have a defined timeline In/Out instance, looping will occur within those boundaries. When tweaking track effects in their effect interface, you can get live looping playback of your adjustments when you are in this mode. | | | 9. | In the Sub Shop submix track, apply the track-based Reverb effect. Right-click on the Reverb effect listing, and select the Church preset. In each of the FX Shop tracks, set the Send Volume value to 0.00dB (Figure 20.5).
Figure 20.5. Increasing or decreasing the Send Volume affects the overall level of the track volume being processed by the submix track. If you want one track to be a bit lower in the mix, for example, reduce the Send Volume. Keep in mind, the default Send Volume is always -oodB when you first send a track to a submix track; you must manually adjust each track to your desired volume. The tool tip calls out the value for the send parameter 
Because all four FX Shop tracks are being sent to the submix Sub Shop track, they will be processed with whatever effects are applied to the Sub Shop track. The volume level of the individual tracks will be based on the value of the Send Volume in each of the sent tracks. To give the sound effects a good spatial sound (as if they occurred in a large bright car shop), you can select the Church preset. Once all of the tracks are being sent with a solid volume level, the group of clips takes on a new shape in the mix.
| | | 10. | For each FX Shop track, make the following volume adjustment below each of the associated Volume faders:
FXShop1: -3.7dB
FX Shop2: -3.4dB
FX Shop3: 0.6dB
FX Shop4: -2.8dB
Then, in each of the FX Shop tracks, change their Output controls from Master to Sub Shop (Figure 20.6).
Figure 20.6. The VU meter lines reflect the ceiling of the audio being played back. As you can see, the audio is under the 0dB mark in the master mixer and the color is in the safe green range. (Yellow indicates safe but loud audio; red is too loud.) Assigning the Output controls for each of the Shop effect tracks to the submix track allows you to control their panning properties and overall volume with one slider and one panning knob instead of four sliders and four panning knobs 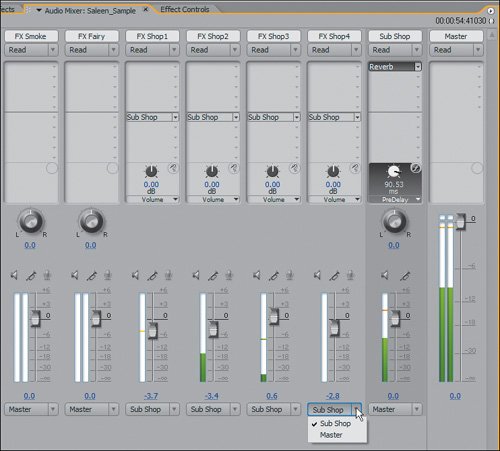
By first adjusting the track volume for each track you mix the volume level for the track to find its optimum volume, in this case ensuring that each track does not exceed or come too close to the 0dB ceiling. By assigning the Stem (Track Output Assignment) controls to the Sub Shop you are then enabling the submix track to control the volume and panning properties of all four Shop tracks in unison. After you get your individual clips to the exact dB level that you want, you can then easily begin mixing all of the individual tracks with one volume slider and panning knob. The technical term for this is stemming.
| | | 11. | Toggle on the Track Output Audio for your VO and Music tracks. Play back the sequence to get a sense of the volume adjustments that will be necessary in the next lesson.
By sending certain tracks to be processed and controlled by the submix track, you have the ability to position and place clips on top of each other while still allowing the clips to have the same effect processing. An additional advantage is that within the submix paradigm, you can still boost or tweak each sent track individually to further add depth to the mix. If you want to increase the volume of an individual element, you can adjust the gain of that individual track with its Volume slider. If you want to add an EQ effect to one of the tracks, you can apply that effect within the track. The resulting audio from the track-plus-effect will be processed by whatever track it is sent to with whatever effects are applied to the track.
A good way to think about Sends and submixing is to visualize an effects track that does not contain clips or media, just effects. Using a Send, you can send a physical track with content to use the effects of the submix track. Depending on how much volume from the physical track you send, the sound of the track will either be low and subtle or loud and obvious.
|
|