| For this example, you will create two Web services, POClient.jws and POService.jws , where PO is the acronym for a purchase order. As the name suggests, POClient.jws will pass data to POService.jws , which will create the purchase order and return a purchase order number. You will first secure the POService.jws Web service by applying transport security using one-way SSL and HTTP basic authentication and then check how to use two-way SSL. Next , you will apply message-level security by using WebLogic Workshop's implementation of WS-Security, tweak its features, and analyze the output. Finally, you will authorize access to POService.jws by using role-based security. Figure 10.2 depicts the security architecture used in this example. Figure 10.2. Security architecture used in the example. 
Here are the steps in detail: -
Create a new application in Workshop by choosing File, New, Application from the main menu. A Workshop application is just an exploded Java 2 Enterprise Edition (J2EE) application?hat is, an Enterprise Archive (EAR) file.
-
Choose the Default Application option. Click the Browse button to browse to the directory in which you want to create the application?or example, C:\apps . You can also type the path yourself in the Directory text box. Then type a name for the application in the Name text box?or example, SecureApp (see Figure 10.3). Figure 10.3. Naming the new application. 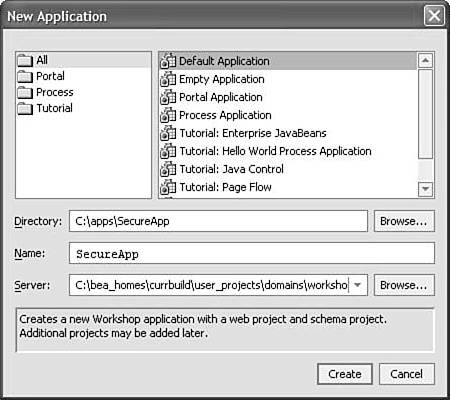 A Web project named SecureAppWeb is created by default in the application. A Web project in WebLogic Workshop is a J2EE Web application. -
Create a new folder in the SecureAppWeb project by right-clicking the project and choosing New, Folder. Name the folder securePackage (see Figure 10.4). Figure 10.4. Naming the folder.  -
Create a new Web service in the securePackage folder by right-clicking the folder and choosing New, Web Service. Name the Web service POService.jws (see Figure 10.5). Figure 10.5. Naming the new Web service.  -
A Web service in Workshop has two views: Design View and Source View. Design View provides a graphical representation of the Web service, and Source View enables you to view the source. You can move between these two views by choosing the appropriate tab at the bottom of the central window in the Workshop IDE or by using the options in the View menu. Add a method to the Web service by right-clicking the service in the Design View, as shown in Figure 10.6. To add a method, you can also choose Insert, Method or drag the Method icon from the Palette window in the lower-left corner of the IDE to the Web service's Design View. Rename the method submitPO (see Figure 10.7). Figure 10.6. Adding a method to POService.jws . 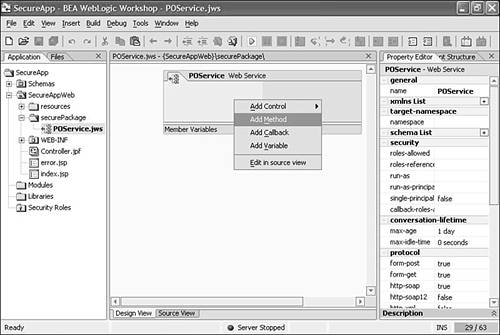 Figure 10.7. Renaming the method. 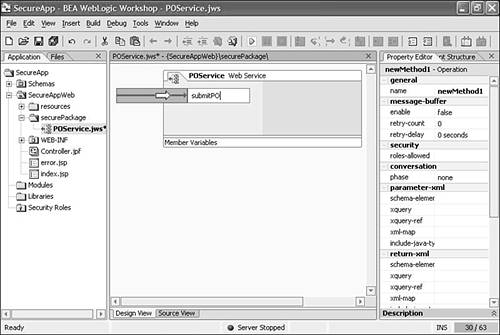 -
Switch to the Source View. There, you see the source shown in Listing 10.1. Listing 10.1. POService.jws Created by Default package securePackage; public class POService implements com.bea.jws.WebService { /** * @common:operation */ public int submitPO() { } } Note The Workshop runtime uses the Javadoc annotation at the top of the submitPO method to generate the underlying support for Web services, such as SOAP-to-Java marshalling. As you can see, these annotations are automatically generated when you add a method in the service's Design View. The same holds true for any property you change in the service's Design View. -
Create a static inner class called POBean in POService.jws and provide an implementation for the submitPO method. You can copy the source code shown in Listing 10.2 into the file.
Listing 10.2. Fully Implemented POService.jws package securePackage; public class POService implements com.bea.jws.WebService { public static class POBean { public POBean(String itemName, int itemQuantity, double itemPrice) { this.itemName = itemName; this.itemQuantity = itemQuantity; this.itemPrice = itemPrice; } public POBean(){}; public String itemName; public int itemQuantity; public double itemPrice; } /** * This is an exposed method that users will be able to invoke. * @common:operation */ public int submitPO(POBean poBean) { // Code for entering the purchase order in the database return 1; } }
Transport Security Now you're ready to implement transport-level security and basic HTTP authentication for the Web service: -
Locate the deployment descriptors named web.xml and weblogic.xml , which are present in the WEB-INF directory within the SecureAppWeb project (see Figure 10.8). In a J2EE-compliant Web application, such as the SecureAppWeb project, the web.xml and weblogic.xml deployment descriptors are used to specify deployment-specific properties, which are read and interpreted by the underlying WebLogic Server at deployment time. These descriptors include security- related properties such as use of SSL and HTTP authentication, which you will use in this example. Figure 10.8. The web.xml deployment descriptor in the SecureAppWeb/WEB-INF directory. 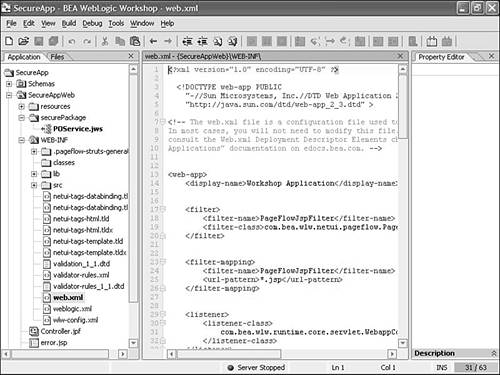 -
Double-click the web.xml file so that it shows up in the central window. Add security constraints to it by pasting the code shown in Listing 10.3 just above the last </web-app> element. Listing 10.3. Security-Related Elements in the SecureAppWeb/WEB-INF/web.xml Deployment Descriptor <security-constraint> <display-name>Security Constraints</display-name> <web-resource-collection> <web-resource-name> Secure Resources </web-resource-name> <url-pattern> /securePackage/POService.jws </url-pattern> <http-method>GET</http-method> <http-method>POST</http-method> </web-resource-collection> <auth-constraint> <role-name>GoodRole</role-name> </auth-constraint> <user-data-constraint> <transport-guarantee> CONFIDENTIAL </transport-guarantee> </user-data-constraint> </security-constraint> <security-role> <description>Role description</description> <role-name>GoodRole</role-name> </security-role> You add the following four important properties here: -
The <url-pattern> element identifies the service(s) to be secured based on the URL pattern. -
The <auth-constraint> element specifies the security role to which the access is restricted. You need to add users to this role to provide them access to the secured services. -
The <transport-guarantee> element restricts access to the HTTPS protocol by specifying a value of CONFIDENTIAL or INTEGRAL . -
The <security-role> element defines the security role. -
Map the role named GoodRole to a user in weblogic.xml by adding the following elements just after the start of the <weblogic-web-app> element. At this time, the user may or may not be an existing user in the realm used by the underlying WebLogic Server instance: <security-role-assignment> <role-name>GoodRole</role-name> <principal-name>GoodUser</principal-name> </security-role-assignment> -
If the user named GoodUser does not exist in the current realm of the server on which this application will be deployed, you must create one. To add a user, start the server that the Workshop IDE is pointing to. By default, the IDE points to the BEA-HOME /weblogic81/samples/domains/workshop domain, where BEA-HOME is the directory you chose as BEA Home Directory while installing WebLogic Platform. Choose Tools, WebLogic Server, Start WebLogic Server to start the server. A pop-up window, as shown in Figure 10.9, indicates the progress in the server startup process. After the server starts, open the WebLogic Server console by clicking Tools, WebLogic Server, WebLogic Console. The default username and password are both weblogic . Figure 10.9. WebLogic Server startup progress window.  Add a user to the out-of-the-box default realm myrealm by clicking the Configure a New User link in the Security, Realms, myrealm, Users screen on the WebLogic Server console, as shown in Figure 10.10. Figure 10.10. Adding a user using the WebLogic Server console. 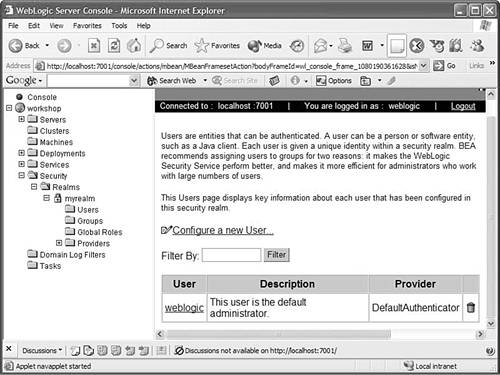 Name the user GoodUser and enter any password?or example, weblogic . The default minimum length required of a password is eight characters (see Figure 10.11). Figure 10.11. Adding the username and password for the new user. 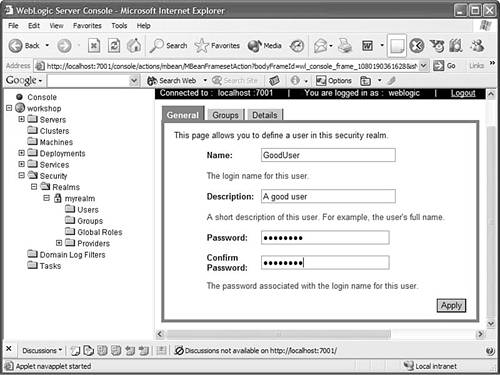 -
Right-click the POService.jws Web service and generate a service control (JCX) file. A control file is a client-side proxy for a Workshop Web service. The default name of the generated file is POServiceControl.jcx . The control file, by default, contains the following annotation: @jc:location http-url="POService.jws" The value is the endpoint URL of POService.jws , relative to the service control file. Because the service is in the same directory as the control file, the relative URL is just the filename. To configure this control proxy to send an HTTPS request to the service, change this relative URL to an absolute HTTPS URL as follows : /** @jc:location http-url="https://localhost:7002/SecureAppWeb/ securePackage/POService.jws" */ When you try to modify the file the first time, Workshop pops up the warning shown in Figure 10.12. Figure 10.12. Warning on modifying auto-generated service control file.  Click OK to proceed. Accepting this message just means that the next time you modify and save your JWS file, the JCX file will not be automatically updated. You can regenerate the control file by right-clicking the JWS at any time. The control file then looks like Listing 10.4, followed by the WSDL at the bottom. Listing 10.4. POServiceControl.jcx package securePackage; /** @jc:location http-url="https://localhost:7002/SecureAppWeb/securePackage /POService.jws" jms-url="POService.jws" * @jc:wsdl file="#POServiceWsdl" */ public interface POServiceControl extends com.bea.control.ControlExtension, com.bea.control.ServiceControl { public static class POBean implements java.io.Serializable { public java.lang.String itemName; public int itemQuantity; public double itemPrice; } /** * This is an exposed method that users will be able to invoke. * @jc:protocol form-post="false" form-get="false" */ public int submitPO (POBean poBean); static final long serialVersionUID = 1L; } -
Look at the service endpoint URL in the WSDL, at the bottom of the POServiceControl.jcx file, which is the value of the location attribute in the <soap:address> element. Notice that it specifies the HTTP protocol by default: <service name="POService"> <port name="POServiceSoap" binding="s0:POServiceSoap"> <soap:address location="http://localhost:7001/securePackage/POService.jws"/> </port> </service> To ensure that the endpoint URL for the POService specifies the HTTPS protocol in its WSDL file, copy the following text in the wlw-config.xml file in the WEB-INF directory: <wlw-config xmlns="http://www.bea.com/wlw/runtime/core/config"> <protocol>http</protocol> <hostname>localhost</hostname> <http-port>7001</http-port> <https-port>7002</https-port> <jws> <class-name>securePackage.POService</class-name> <protocol>https</protocol> </jws> </wlw-config> Note that this step is not mandatory to run the example, because you have changed the service endpoint URL in the previous step by modifying the value of the jc:location http-url annotation in the POServiceControl.jcx file. -
Create another Web service named POClient.jws to call the first service. Right-click the securePackage folder and choose New, Web Service to create the service. Then rename it POClient.jws . Drag and drop POServiceControl.jcx into the Design View of the POClient.jws file (see Figure 10.13). Figure 10.13. POClient.jws . 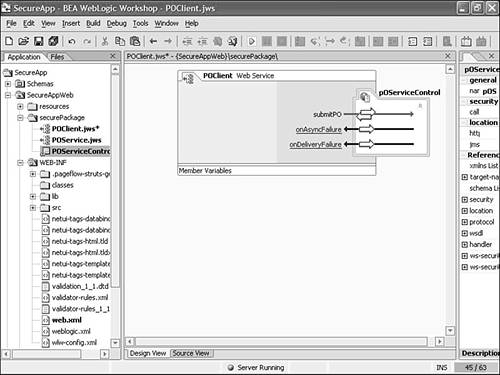 In the Data Palette window, which is at the bottom right of the IDE screen by default, you can see the methods and callbacks exposed by the control. Drag and drop the submitPO() method to the Design View window at the center of the screen. -
Switch to the Source View and check that Workshop has automatically generated the source shown in Listing 10.5. Listing 10.5. POClient.jws Created by Default package securePackage; public class POClient implements com.bea.jws.WebService { /** * @common:control */ private securePackage.POServiceControl pOServiceControl; static final long serialVersionUID = 1L; /** * @common:operation */ public int submitPO(securePackage.POServiceControl.POBean poBean) { return pOServiceControl.submitPO(poBean); } } -
Make the following changes in the Control file: -
Create an instance of POBean to pass to the control's submitPO method. -
Change the signature of the submitPO method to accept the username and password. -
Set the username and password on the control. This username and password are encoded and passed as HTTP headers to the service. The HTTP basic authentication method is used here. The code for the service is shown in Listing 10.6. Listing 10.6. Fully Implemented POClient.jws package securePackage; import securePackage.POServiceControl.POBean; public class POClient implements com.bea.jws.WebService { /** * @common:control */ private securePackage.POServiceControl pOServiceControl; static final long serialVersionUID = 1L; /** * @common:operation */ public int submitPO(String username, String password) { POBean poBean = new POBean(); poBean.itemName = "Metal sheets"; poBean.itemQuantity = 1; poBean.itemPrice = 100.00; // Code for specifying the username and password pOServiceControl.setUsername(username); pOServiceControl.setPassword(password); return pOServiceControl.submitPO(poBean); } } -
Build and run the Web service by clicking the Start button on the IDE, which is a small blue triangle in the icon tray at the top, or by choosing Debug, Start from the menu. Workshop's built-in browser pops up. On the Test Form tab, you can enter the username and password in text boxes.
-
Enter an incorrect username and password and click the submitPO button to invoke the method (see Figure 10.14). The authentication fails and a SOAP fault is returned, which you can see in the logs (see Figure 10.15). Figure 10.14. Entering an incorrect username and password in the Workshop Test Browser.  Figure 10.15. SOAP request and response logs in the Workshop Test Browser on passing an incorrect username and password. 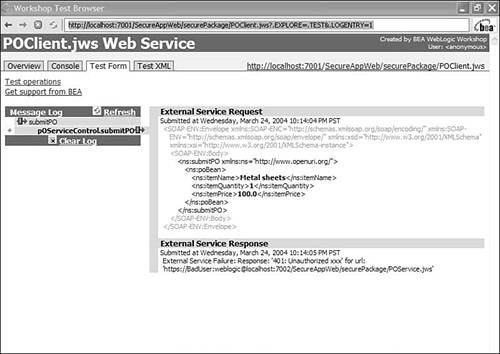 The Message Log tab has two sub-tabs. Click the submitPO tab and scroll to the bottom to see a message containing the following string: "String:Response: '401: Unauthorized xxx' for url: 'https://GoodUser:weblogic1@localhost:7002/ SecureAppWeb/securePackage/POService.jws'" -
Enter GoodUser as the username and its corresponding password. Now the service can be accessed successfully, and the log containing the SOAP request and response appears as shown in Figure 10.16. Figure 10.16. SOAP request and response logs in the Workshop Test Browser on passing the correct username and password. 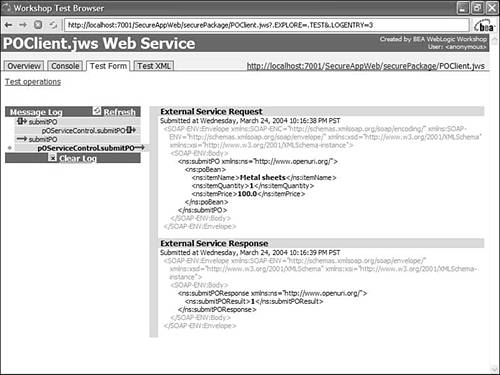 This example showed the use of one-way SSL with basic authentication. Similar to the API for setting the username and password on a Control file, Workshop also provides an API for setting a certificate for using two-way SSL, in which the client authenticates itself using a certificate. The following sample shows how to set the client-side certificate on the control:
pOServiceControl.useClientKeySSL( true ); pOServiceControl.setClientKeyAlias( "mykey" ); pOServiceControl.setClientKeyPassword( "password" ); pOServiceControl.setClientKeyStoreLocation ("c:/bea/weblogi81/server/lib/mycacerts"); pOServiceControl.setClientKeyStorePassword( "password" );
Message-Based Security As mentioned previously, WebLogic Workshop supports all three security artifacts provided by WS-Security: tokens, XML Encryption, and XML Signature. Both the client side (that is, the service control) and the server side (that is, the Web service) should reference a WS-Security policy file ( *.wsse ) to use WS-Security. For this next example, you will add two WS-Security policy files to the securePackage folder: one for POService.jws and the other for POServiceControl.jcx . Let's walk through the steps required: -
Create a WS-Security policy file in the securePackage folder by right-clicking the folder and choosing the Other File Types option. Then choose the Web Services, WS-Security Policy file option. Name the file POServiceSecurityPolicy.wsse (see Figure 10.17). Figure 10.17. Naming the WS-Security policy file.  The following code is generated by default in the file: <?xml version="1.0" ?> <wsSecurityPolicy xsi:schemaLocation="WSSecurity-policy.xsd" xmlns="http://www.bea.com/2003/03/wsse/config" xmlns:xsi="http://www.w3.org/2001/XMLSchema-instance"> </wsSecurityPolicy> -
Paste the code shown in Listing 10.7 into the file. Listing 10.7. POServiceSecurityPolicy.wsse <wsSecurityPolicy xsi:schemaLocation="WSSecurity-policy.xsd" xmlns="http://www.bea.com/2003/03/wsse/config" xmlns:xsi="http://www.w3.org/2001/XMLSchema-instance" xmlns:xsd="http://www.w3.org/2001/XMLSchema"> <wsSecurityIn> <!-- Incoming SOAP message must be accompanied by a valid username and password. --> <token tokenType="username"/> <!-- Incoming SOAP messages must be encrypted with POService.jws's public key. The alias and password to access the POService.jws's decrypting private key in the keystore are provided by the <decryptionKey> element below. --> <encryptionRequired> <decryptionKey> <alias>mycompany</alias> <password>password</password> </decryptionKey> </encryptionRequired> <!-- Incoming SOAP messages must be digitally signed with the sender's private key. The sender's public key is used to validate the signature. --> <signatureRequired>true</signatureRequired> </wsSecurityIn> <wsSecurityOut> <!-- Accompany the SOAP message with a valid username and password --> <userNameToken> <userName>GoodUser</userName> <password type="TEXT">weblogic</password> </userNameToken> <!-- Encrypt the SOAP message with the recipient's (POClient.jws) public key. Only the recipient's private key can decrypt it. Ensures the confidentiality of the SOAP message. (This process requires that the sender's keystore already contains a digital certificate containing the recipient's public key.) --> <encryption> <encryptionKey> <alias>client1</alias> </encryptionKey> </encryption> <!-- Sign the SOAP message with the sender's (POService.jws) private key. Only the sender's public key can validate the signature. Ensures the authenticity of the sender, i.e., that the sender is in fact the source of the SOAP message. --> <signatureKey> <alias>mycompany</alias> <password>password</password> </signatureKey> </wsSecurityOut> <!-- Look for the samples_mycompany.jks keystore in the default location, the server domain root, in this case, BEA_HOME\weblogic81\samples\domains\workshop. --> <keyStore> <keyStoreLocation>samples_mycompany.jks</keyStoreLocation> <keyStorePassword>password</keyStorePassword> </keyStore> </wsSecurityPolicy> In addition to the bold comments in the policy file, here is a brief explanation of the various elements: -
<wsSecurityIn> specifies what security enhancements you expect in the incoming SOAP. For the service POService.jws , it indicates the security credentials/encryption/signature expected in the SOAP request from the client control. -
<token> means that the incoming message should have a token. The two possible token types are UsernameToken and X509Token . Use UsernameToken in this example. -
<decryptionKey> contains the alias and password of the private key that will be used to decrypt the incoming message. -
<signatureRequired> states whether the incoming message should be signed. -
<wsSecurityOut> specifies how you want to secure the messages being sent out on the wire from your Web service. -
<usernameToken> contains the username and password that should be sent with the outgoing message. -
<encryption> specifies the alias of the public key used to encrypt the message. -
<signatureKey> is the private key used to sign the outgoing message. -
<keystore> points to a keystore, which stores all the public/private keys and certificates referred to in that policy file. The location and password of the keystore are specified as subelements of the <keystore> element. The use of tokens, Encryption, and Signature are independent of each other. You can use one, some, or all of them simultaneously . -
Reference the POServiceSecurityPolicy.wsse file from the POService.jws file by adding the filename to the ws-security-service property in the Property Editor (see Figure 10.18). Figure 10.18. Referencing POServiceSecurityPolicy.wsse from POService.jws . 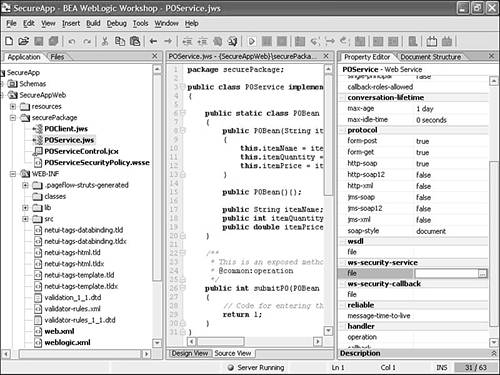 Click the ellipses button on the right end of the ws-security-file property text box to open the window shown in Figure 10.19. Type the name of the WSSE file and click OK. Figure 10.19. Naming the referenced WS-Security policy file.  This step adds the following annotation to the top of the JWS file: /** * @jws:ws-security-service file="POSecuritySecurityPolicy.wsse" */ A green squiggly line appears below the WSSE filename. Pointing the mouse to this filename shows the following warning message: WARNING: Passwords in the ws-security-policy file are in clear text format (i.e. unencrypted). SUGGESTION: See Topic "Securing WS-Security passwords" in help for strategies for securing passwords in policy files You can refer to the documentation as mentioned for help in encrypting the passwords in the WSSE file. -
You have already created a server-side WS-Security policy file that defines the security enhancements expected by POService.jws in the incoming SOAP request and the security enhancements added to the outgoing SOAP response. Now you need to make sure that the client sends a SOAP request with corresponding security additions and can decipher the secure response sent by the server. Hence, you must create a corresponding WS-Security policy file for POServiceControl.jcx on the client side. Name it POControlSecurityPolicy.wsse . The <wsSecurityOut> element of this file states the security enhancement for the outgoing SOAP request to POService.jws and, hence, corresponds to the <wsSecurityIn> element in the server side's policy file named POServiceSecurity.wsse . Similarly, the <wsSecurityIn> element of this file corresponds to the <wsSecurityOut> element of the POServiceSecurity.wsse file. Now paste the code shown in Listing 10.8 into the file. Listing 10.8. POControlSecurityPolicy.wsse <wsSecurityPolicy xsi:schemaLocation="WSSecurity-policy.xsd" xmlns="http://www.bea.com/2003/03/wsse/config" xmlns:xsi="http://www.w3.org/2001/XMLSchema-instance"> <wsSecurityOut> <!-- Accompany the SOAP message with a valid username and password --> <userNameToken> <userName>GoodUser</userName> <password type="TEXT">weblogic</password> </userNameToken> <!-- Encrypt the SOAP message with the recipient's (POService.jws) public key. Only the recipient's private key can decrypt it. Ensures the confidentiality of the SOAP message. (This process requires that the sender's keystore already contains a digital certificate containing the recipient's public key.) --> <encryption> <encryptionKey> <alias>mycompany</alias> </encryptionKey> </encryption> <!-- Sign the SOAP message with the sender's (POClient.jws) private key. Only the sender's public key can validate the signature. Ensures the authenticity of the sender, i.e., that the sender is in fact the source of the SOAP message. --> <signatureKey> <alias>client1</alias> <password>password</password> </signatureKey> </wsSecurityOut> <wsSecurityIn> <!-- Incoming SOAP message must be accompanied by a valid username and password. --> <token tokenType="username"/> <!-- Incoming SOAP messages must be encrypted with POClient.jws's public key. The alias and password to access the POClient.jws's decrypting private key in the keystore are provided by the <decryptionKey> element below. --> <encryptionRequired> <decryptionKey> <alias>client1</alias> <password>password</password> </decryptionKey> </encryptionRequired> <!-- Incoming SOAP messages must be digitally signed with the sender's private key. The sender's public key is used to validate the signature. --> <signatureRequired>true</signatureRequired> </wsSecurityIn> <!-- Look for the samples_client.jks keystore in the default location, the server domain root, in this case, BEA_HOME\weblogic81\samples\domains\workshop. --> <keyStore> <keyStoreLocation>samples_client.jks</keyStoreLocation> <keyStorePassword>password</keyStorePassword> </keyStore> </wsSecurityPolicy> -
Run the POClient.jws Web service, which will in turn call POService.jws , by providing a valid username and password. The service will run successfully, and you will see the same SOAP messages in the log that you saw before applying WS-Security. However, this does not mean that these were the messages sent over the wire! This simplified message is shown just to prevent the underlying complex message from showing up in the Message log every time the service is run. For analysis purposes or just for curiosity , if you would like to view the actual message payload, you need to restart the underlying WebLogic Server from the command line and provide the verbose parameter as in C:\bea\weblogic81\samples\domains\workshop> startWebLogic verbose assuming that your BEA home directory, where the WebLogic Server is installed, is C:\bea . Now when you run the POClient.jws service, it will output debug messages to a file called workshop_debug.log , which is present in the WebLogic Server domain directory, C:\bea\weblogic81\samples\domains\workshop , for the Workshop samples domain. -
The SOAP request message I found in my workshop_debug file is shown in Listing 10.9. I have added comments to help you understand the details. Elements in the message use URI reference IDs to point to other elements within the message.
Note Notice the three pairs of reference IDs in Listing 10.9. The first pair is shaded. The second pair is boxed. The third pair is indicated with white text on a black background. These typographical conventions are intended to help you quickly spot these ID pairs and have no other purpose.
Listing 10.9. WS-Security?nabled SOAP Request Message <SOAP-ENV:Envelope xmlns:SOAP-ENC="http://schemas.xmlsoap.org/soap/encoding/" xmlns:xsi="http://www.w3.org/2001/XMLSchema-instance" xmlns:xsd="http://www.w3.org/2001/XMLSchema" xmlns:SOAP- ENV="http://schemas.xmlsoap.org/soap/envelope/"> <SOAP-ENV:Header> <wsse:Security xmlns:wsse ="http://schemas.xmlsoap.org/ws/2002/07/secext" SOAP-ENV:mustUnderstand="1"> <!-- Presence of EncryptedKey element means that the symmetric key used for encryption of this message has been encrypted using the public key of the recipient --> <xenc:EncryptedKey xmlns:xenc="http://www.w3.org/2001/04/xmlenc#"> <!-- The algorithm used for encrypting the symmetric key is the asymmetric rsa-1 5 algorithm --> <xenc:EncryptionMethod Algorithm="http://www.w3.org/2001/04/xmlenc#rsa-1_5"/> <!-- KeyInfo element defines the public key of the recipient --> <dsig:KeyInfo xmlns:dsig="http://www.w3.org/2000/09/xmldsig#"> <dsig:KeyName> CN=MyCompany, OU=Development, O=MyDevTeam, L=Sealand, ST=WA, C=US </dsig:KeyName> </dsig:KeyInfo> <!-- CipherValue element in CipherData element contains the encrypted symmetric encryption key --> <xenc:CipherData> <xenc:CipherValue>T7XFvXJuVC9E7QcpRrxFOEcpEEr9BY5FaRkfFegZpdbmpf+ GbyZQKF+mmQfwoFVXjiAXEmPWxfrhH9ePURAKHPoJTEWOx9lvl5vgD+f5heXAM/SpDIAv4y mwQd+za4ngZXif8JwWwyvuyASsoCHhnG+KMsBog+n5hnOrwteviT8= </xenc:CipherValue> </xenc:CipherData> <!-- The ReferenceList points to the SOAP-ENV:Body which is being encrypted --> <xenc:ReferenceList> <xenc:DataReference URI="#Id-+ FglEUcUjcIRrOwvJ3BuBw/e "/> </xenc:ReferenceList> </xenc:EncryptedKey> <!-- The wsse:BinarySecurityToken element represents the public key of the client which can be used to validate the digital signature stored in the dsig:SignatureValue element. We can see that it is being referenced by the dsig:Reference element in dsig:KeyInfo within dsig:Signature --> <wsse:BinarySecurityToken xmlns:wsu="http://schemas.xmlsoap.org/ws/2002/07/utility" ValueType="wsse:X509v3" EncodingType="wsse:Base64Binary" wsu:Id="Id-  "> MIICRTCCAa6gAwIBAAIEPrBeaTANBgkqhkiG9w0BAQUFADBnMQswCSqGSIb3DQEBBQUAA4 GBAKgcU99Prrz37UgiTp5NTX4oLDPM+HBmETQB9EnQPDPZ829tsHsPymM42Pe2Qk4TNM/+ ZIdbrFRSft64WWHYjr8K8uBR9F7/a1WyJmiNPE3wkiZlM140HjV8l0fAfwR2d+cdB0RvJpwLx/ onTxFcnMlCzJfUUp5mFHzebkw19/WD</wsse:BinarySecurityToken> <!-- Presence of dsig:Signature element shows that this message is digitally signed. --> <dsig:Signature xmlns:dsig="http://www.w3.org/2000/09/xmldsig#"> <dsig:SignedInfo> <dsig:CanonicalizationMethod Algorithm="http://www.w3.org/2001/10/xml-exc-c14n#"/> <dsig:SignatureMethod Algorithm="http://www.w3.org/2000/09/ xmldsig#rsa-sha1"/> <!-- T he dsig:Reference element refers to the SOAP-ENV:Body element, indicating that the SOAP-ENV"Body element (which is already encrypted in this case) has been signed --> <dsig:Reference URI="#Id- "> MIICRTCCAa6gAwIBAAIEPrBeaTANBgkqhkiG9w0BAQUFADBnMQswCSqGSIb3DQEBBQUAA4 GBAKgcU99Prrz37UgiTp5NTX4oLDPM+HBmETQB9EnQPDPZ829tsHsPymM42Pe2Qk4TNM/+ ZIdbrFRSft64WWHYjr8K8uBR9F7/a1WyJmiNPE3wkiZlM140HjV8l0fAfwR2d+cdB0RvJpwLx/ onTxFcnMlCzJfUUp5mFHzebkw19/WD</wsse:BinarySecurityToken> <!-- Presence of dsig:Signature element shows that this message is digitally signed. --> <dsig:Signature xmlns:dsig="http://www.w3.org/2000/09/xmldsig#"> <dsig:SignedInfo> <dsig:CanonicalizationMethod Algorithm="http://www.w3.org/2001/10/xml-exc-c14n#"/> <dsig:SignatureMethod Algorithm="http://www.w3.org/2000/09/ xmldsig#rsa-sha1"/> <!-- T he dsig:Reference element refers to the SOAP-ENV:Body element, indicating that the SOAP-ENV"Body element (which is already encrypted in this case) has been signed --> <dsig:Reference URI="#Id-  "> <dsig:Transforms> <dsig:Transform Algorithm="http://www.w3.org/2001/10/xml-exc-c14n#"/> </dsig:Transforms> <dsig:DigestMethod Algorithm="http://www.w3.org/2000/09/xmldsig#sha1"/> <dsig:DigestValue>VZ8Wd+Mw2wuXVjWW/sXrF4zW+yE=</dsig:DigestValue> </dsig:Reference> </dsig:SignedInfo> <dsig:SignatureValue>cG9hUTE4dUSnjCH287TbDbwM1pJq1gmQexd8lu6Ktx2tNBwZfI vscgJkFk0Ly7nf9CGXWd5W4ng5UcTwjY00U2Bxgh37YvXzCjmfb+l5DzxZSiOxRvCFmAeHi0Oy j+bb8yXVMIQjPBb1lemnHXVXdqDkL5aYtWMCCP85Eyc+O7M=</dsig:SignatureValue> <!-- The KeyInfo points to the public key of the client that can be used to validate the signature. In this case, the public key is the wsse:BinarySecurityToken above in the page --> <dsig:KeyInfo> <wsse:SecurityTokenReference> <wsse:Reference URI="#Id- "/> </wsse:SecurityTokenReference> </dsig:KeyInfo> </dsig:Signature> <!-- UsernameToken contains the username and password sent over the wire for authentication . Note this is different from the HTTP BASIC authentication credentials, which if used, is part of the HTTP header not the SOAP:Header --> <wsse:UsernameToken xmlns:wsu=http://schemas.xmlsoap.org/ws/2002/07/utility wsu:Id="Id-mov1HAgSeynOrd4SpjaBKdFS"> <wsse:Username>GoodUser</wsse:Username> <wsse:Password Type="wsse:PasswordText">weblogic</wsse:Password> </wsse:UsernameToken> </wsse:Security> </SOAP-ENV:Header> <SOAP-ENV:Body Id="Id- "> <!-- The SOAP body is encrypted using a symmetric algorithm "aes128-cbc" --> <xenc:EncryptedData xmlns:xenc="http://www.w3.org/2001/04/xmlenc#" Id="Id-+ FglEUcUjcIRrOwvJ3BuBw/e " Type="http://www.w3.org/2001/04/xmlenc#Element"> <xenc:EncryptionMethod Algorithm="http://www.w3.org/2001/04/xmlenc#aes128-cbc"/> <!-- CipherValue element within CipherData element contains the encrypted SOAP body content --> <xenc:CipherData> <xenc:CipherValue>p1hd0mhmmkPJALDACivYd7LFvDDtN1xxp3HGexiIDtPrj+jAWxn7vrAj +uhDeGwoZzx+waGBNhggXCzl6g0VrWPXEMepzwEY5YBzs8+pLJtdlk73yKGeNmmdyXHU1+i7ufCh r0Rh9XMcLfnOqPx9aFcaOL0v4bYrE3psFB+fgwnt2ujO+StVK/yCRefH76Hhep0CLJq/zE0M4zPD 0w2KNfG+C9X2hf8a2dND216GHuHI6ZT7vEXUXMDdsIrEgqSKWegK19S6p3FCUwjuUlaXI5FF4Gom SwG8JmdBzHjfmq8=</xenc:CipherValue> </xenc:CipherData> </xenc:EncryptedData> </SOAP-ENV:Body> </SOAP-ENV:Envelope> "> <dsig:Transforms> <dsig:Transform Algorithm="http://www.w3.org/2001/10/xml-exc-c14n#"/> </dsig:Transforms> <dsig:DigestMethod Algorithm="http://www.w3.org/2000/09/xmldsig#sha1"/> <dsig:DigestValue>VZ8Wd+Mw2wuXVjWW/sXrF4zW+yE=</dsig:DigestValue> </dsig:Reference> </dsig:SignedInfo> <dsig:SignatureValue>cG9hUTE4dUSnjCH287TbDbwM1pJq1gmQexd8lu6Ktx2tNBwZfI vscgJkFk0Ly7nf9CGXWd5W4ng5UcTwjY00U2Bxgh37YvXzCjmfb+l5DzxZSiOxRvCFmAeHi0Oy j+bb8yXVMIQjPBb1lemnHXVXdqDkL5aYtWMCCP85Eyc+O7M=</dsig:SignatureValue> <!-- The KeyInfo points to the public key of the client that can be used to validate the signature. In this case, the public key is the wsse:BinarySecurityToken above in the page --> <dsig:KeyInfo> <wsse:SecurityTokenReference> <wsse:Reference URI="#Id- "/> </wsse:SecurityTokenReference> </dsig:KeyInfo> </dsig:Signature> <!-- UsernameToken contains the username and password sent over the wire for authentication . Note this is different from the HTTP BASIC authentication credentials, which if used, is part of the HTTP header not the SOAP:Header --> <wsse:UsernameToken xmlns:wsu=http://schemas.xmlsoap.org/ws/2002/07/utility wsu:Id="Id-mov1HAgSeynOrd4SpjaBKdFS"> <wsse:Username>GoodUser</wsse:Username> <wsse:Password Type="wsse:PasswordText">weblogic</wsse:Password> </wsse:UsernameToken> </wsse:Security> </SOAP-ENV:Header> <SOAP-ENV:Body Id="Id- "> <!-- The SOAP body is encrypted using a symmetric algorithm "aes128-cbc" --> <xenc:EncryptedData xmlns:xenc="http://www.w3.org/2001/04/xmlenc#" Id="Id-+ FglEUcUjcIRrOwvJ3BuBw/e " Type="http://www.w3.org/2001/04/xmlenc#Element"> <xenc:EncryptionMethod Algorithm="http://www.w3.org/2001/04/xmlenc#aes128-cbc"/> <!-- CipherValue element within CipherData element contains the encrypted SOAP body content --> <xenc:CipherData> <xenc:CipherValue>p1hd0mhmmkPJALDACivYd7LFvDDtN1xxp3HGexiIDtPrj+jAWxn7vrAj +uhDeGwoZzx+waGBNhggXCzl6g0VrWPXEMepzwEY5YBzs8+pLJtdlk73yKGeNmmdyXHU1+i7ufCh r0Rh9XMcLfnOqPx9aFcaOL0v4bYrE3psFB+fgwnt2ujO+StVK/yCRefH76Hhep0CLJq/zE0M4zPD 0w2KNfG+C9X2hf8a2dND216GHuHI6ZT7vEXUXMDdsIrEgqSKWegK19S6p3FCUwjuUlaXI5FF4Gom SwG8JmdBzHjfmq8=</xenc:CipherValue> </xenc:CipherData> </xenc:EncryptedData> </SOAP-ENV:Body> </SOAP-ENV:Envelope>
Now let's tweak some features in WS-Security and analyze the results. First, change the username specified in POControlSecurityPolicy.wsse to BadUser as follows:
<userNameToken> <userName>BadUser</userName> <password type="TEXT">weblogic</password> </userNameToken>
This means that POServiceControl.jcx will pass in the user BadUser in its outgoing SOAP request to POService.jws (see Figure 10.20). Now pass the username GoodUser and its password to POClient.jws and run the submitPO method. Figure 10.20. Error log on setting an incorrect username and password in POControlSecurityPolicy.wsse . 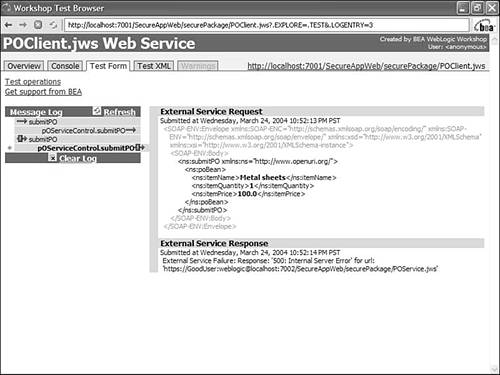
POClient.jws sets the valid username and password in the POControlSecurity.jcx control. The HTTP basic authentication then succeeds on the server side. However, the WSSE user authentication fails because POControlSecurityPolicy.wsse does not have a valid user in the <userToken> element. Next, remove the <signature> element from the POControlSecurityPolicy.wsse file. This means that the SOAP request sent by the control will not be signed. Now run the method and provide the valid username ( GoodUser ) and password. Note that the server requires the message to be signed, due to the presence of the following line in the <wsSecurityIn> element in the POServiceSecurityPolicy.wsse file:
<signatureRequired>true</signatureRequired>
Because the client request is not signed, the service returns an HTTP 500 error. You can see the error stack trace containing the string
String:Response: '500: Internal Server Error' for url: 'https://GoodUser:weblogic@localhost:7002/SecureAppWeb/securePackage/ POService.jws'
by clicking the submitPO link in the Message log (see Figure 10.21). Figure 10.21. Error log received after sending an unsigned message to POService.jws . 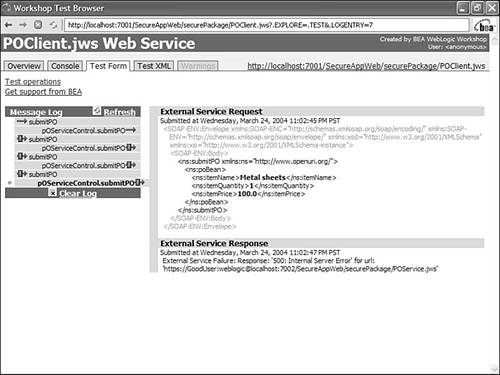
You can see that multiple layers of security are at work here. Although the request cleared the first layer of HTTP basic authentication due to the valid username and password, the request could not be processed because it was not signed. Therefore, the method execution fails. Now change the value of the <signatureRequired> element in the POServiceSecurityPolicy.wsse file to false . This means that the POService no longer requires the message to be signed. The method now runs successfully. Change the <password> element value in the POControlSecurityPolicy.wsse <signature> element to any value other than the original password value?or example, badpassword:
<signatureKey> <alias>client1</alias> <password>badpassword</password> </signatureKey>
When you run the service, a java.security.UnrecoverableKeyException error shows up because the control is now unable to recover its private key from the keystore to sign the outgoing message (see Figure 10.22). Figure 10.22. Error log received after setting an incorrect keystore password in POServiceSecurityPolicy.wsse . 
You can see an error stack trace containing the following by clicking the submitPO tab under the Message Log tab:
<error> <faultcode>JWSError</faultcode> <faultstring>SERVICE FAULT: Code:com.bea.wlw.runtime.jws.wssecurity.exception.WLWWSSEException String:java.security.UnrecoverableKeyException: Cannot recover key Detail: END SERVICE FAULT</faultstring> </error>
Now test how message-based security helps ensure the integrity of the message. You can test this security by modifying the message during transport and checking whether the server side can detect that the message has been corrupted. For this example, you will use a TCP sniffer tool, Apache's TCPMON, to intercept and modify the message. TCPMON is bundled with Apache's AXIS, which you can download from http://ws.apache.org/axis/. Because TCPMON cannot intercept SSL-encrypted messages, you can disable HTTPS to perform this test: -
Configure TCPMON to listen on port 8000, for example, and act as a listener to the hostname and port where your WebLogic Server instance is listening; in this case, they are localhost (127.0.0.1) and 7001, respectively (see Figure 10.23). Figure 10.23. The TCPMON Admin window.  -
To disable HTTPS communication to POService.jws, change the <transport- guarantee> element value in the WEB-INF/web.xml file from CONFIDENTIAL to NONE : <transport-guarantee>NONE</transport-guarantee> -
To route the HTTP request from POServiceControl.jcx to port 8000, where TCPMON is listening, change the jc:location annotation in POServiceControl.jcx from /** * @jc:location http- url="https://localhost:7002/SecureAppWeb/securePackage/PO Service.jws" jms-url="POService.jws" to /** * @jc:location http- url="http://localhost:8000/SecureAppWeb/securePackage/PO Service.jws" jms-url="POService.jws" -
Run the POClient.jws Web service by passing a valid username and password. The service will run successfully, and you will see the message shown in Figure 10.24 in the TCPMON logs. As you can see, the response received has an HTTP status of 200, which means it's a valid response. Figure 10.24. SOAP request and response logs in TCPMON. 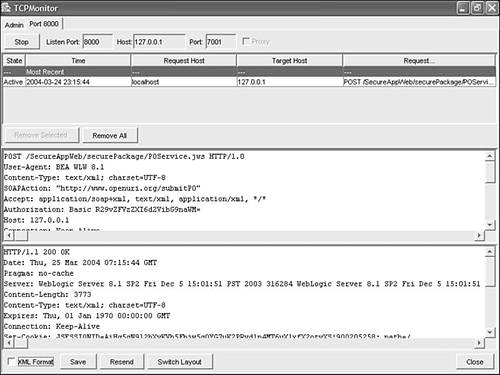 -
Change the HTTP request by modifying any of the elements in it; for example, change the first element in the <xenc:CipherValue> element. Then send this request to POService.jws by clicking the Resend button (see Figure 10.24).
-
The server detects that the message has been corrupted and returns an HTTP 500 error showing the underlying com.bea.wlw.runtime.jws.wssecurity. exception.WLWWSSEException . A sample HTTP response that can be seen in TCPMON's response window is shown in Listing 10.10.
Listing 10.10. SOAP Response Message in TCPMON Logs HTTP/1.1 500 Internal Server ErrorDate: Tue, 27 Jan 2004 03:28:41 GMTPragma: no-cache Server: WebLogic Server 8.1 SP2 Fri Dec 5 15:01:51 PST 2003 316284 Content-Type: text/xml; charset=UTF-8 Expires: Thu, 01 Jan 1970 00:00:00 GMT Set-Cookie: JSESSIONID=AVap4tbLVQpswtd1wEiXwmG1nrSxIJxgsy6F OJzsQP3nk9JnxqbI!-842907816; path=/ Cache-Control: no-cacheConnection: Close <?xml version="1.0" encoding="UTF-8"?> <SOAP-ENV:Envelope SOAP-ENV:encodingStyle=http://schemas.xmlsoap.org/soap/encoding/ xmlns:SOAP-ENV="http://schemas.xmlsoap.org/soap/envelope/" xmlns:xsi=http:// www.w3.org/2001/XMLSchema-instance xmlns:SOAP-ENC="http://schemas.xmlsoap.org/soap/encoding/"> <SOAP-ENV:Body><SOAP-ENV:Fault> <faultcode> SOAP-ENV:Client </faultcode> <faultstring> EJB Exception: ; nested exception is: com.bea.wlw.runtime.jws.wssecurity.exception.WLWWSSEException: weblogic.xml.security.encryption.EncryptionException: Invalid key data length - with nested exception: [com.rsa.jsafe.JSAFE_InvalidKeyException: Invalid key data length] </faultstring> <detail><![CDATA[ java.rmi.RemoteException: EJB Exception: ; nested exception is: com.bea.wlw.runtime.jws.wssecurity.exception.WLWWSSEException: weblogic.xml.security.encryption.EncryptionException: Invalid key data length - with nested exception:[com.rsa.jsafe.JSAFE_InvalidKeyException: Invalid key data length]
Role-based security can be used to provide authorization either for the Web service as a whole or for a specific Web service method. A Web service (JWS) file in Workshop compiles to an Enterprise JavaBean (EJB). Hence, the roles referred to within a JWS to provide authorization, using the role-based security annotations, such as roles-allowed and run-as , are the roles defined at the EJB or application tier . In this next example, you will create them in the application.xml file, which is in the SecureApp/META-INF directory. Because these roles are defined for authorization at the application tier, they are different from the roles defined in the web.xml and weblogic.xml deployment descriptors, which are used for authentication at the HTTP tier. To authorize access to POService.jws based on role-based security, you will define another role named ManagerialRole , with a corresponding user named Manager , in the EJB tier and restrict access to the submitPO() method to this role. You will also add this role to the allowed roles in the HTTP tier. Therefore, Manager will have access at both the HTTP tier and EJB tier, but GoodUser will have access only at the HTTP tier and hence will fail the authentication check at the EJB tier. Here are the steps in detail: -
To define a Security role called ManagerialRole at the application level with the principal name Manager , right-click Security Roles and then select Create a New Role. Type ManagerialRole in the Name text box and enter a description. Check the Use Custom Principal Name check box and type Manager as the user?hat is, principal name (see Figure 10.25). Then click OK. Figure 10.25. Naming the role.  The following entries are automatically generated in the application.xml and weblogic-application.xml file part of the META-INF directory of the SecureApp application: application.xml --------------------- <security-role> <description>Managerial role</description> <role-name>ManagerialRole</role-name> </security-role> weblogic-application.xml -------------------------------- <security> <security-role-assignment> <role-name>ManagerialRole</role-name> <principal-name>Manager</principal-name> </security-role-assignment> </security> -
Click the roles-allowed property within the security group in the Property Editor while in the Design View of POService.jws and add the name ManagerialRole (see Figure 10.26). Figure 10.26. Specifying roles-allowed for POService.jws . 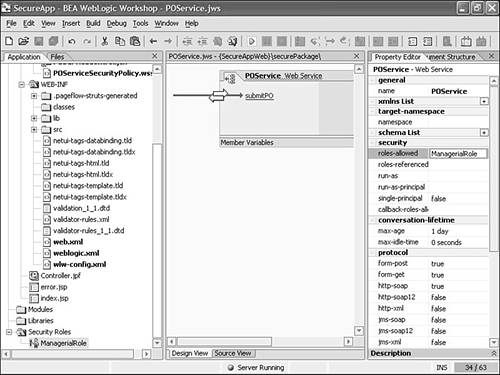 This step restricts access to methods in POService.jws at the EJB tier. The annotation generated in the file looks like this: /** * @common:security roles-allowed="ManagerialRole" */ Similarly, you can specify the other role-based properties provided by Workshop: roles-referenced and run-as . -
Allow access to Manager at the HTTP tier by defining a role named ManagerialRole in the web.xml deployment descriptor: <security-role> <description>Managerial role</description> <role-name>ManagerialRole</role-name> </security-role> -
Add ManagerialRole to the <auth-constraint> element along with GoodRole . This allows any user in ManagerialRole to access POService.jws : <auth-constraint> <role-name>GoodRole</role-name> <role-name>ManagerialRole</role-name> </auth-constraint> -
Add the user named Manager to the role named ManagerialRole in the weblogic.xml deployment descriptor: <security-role-assignment> <role-name>ManagerialRole</role-name> <principal-name>Manager</principal-name> </security-role-assignment> -
Define a user named Manager in the current realm myrealm of the WebLogic Server instance using the WebLogic Server console just as you defined the user named GoodUser .
-
Run the POClient.jws service specifying GoodUser and the corresponding password. The service fails with an error containing the following statement: [EJB:010160]Security Violation: User: 'GoodUser' has insufficient permission to access EJB: type=<ejb>, application=SecureApp, module=.workshop/ SecureAppWeb/EJB/POService_-u1lc40qoq4el, ejb=StatelessContainer, method=submitPO, methodInterface=Local, signature={com.bea.wlw. runtime.core.request.Request}. You receive this message because access to methods in POService.jws is restricted to the role ManagerialRole . -
Run the service again, this time passing Manager and the corresponding password, and check that it runs fine.
|