Disk Quotas
| | ||
| | ||
| | ||
Disk quotas restrict users' disk spaceeither on their local workstations or on your servers. Disk quotas are necessary because, without them, one user can monopolize an entire volume on a server by taking up all its disk space.
The underlying code for Windows NT disk quotas has been around since the Stone Age of the computer world Windows NT 3.1 to be exactbut the interface never made its way out of Redmond. Until now.
| Note | Don't take my word for itcheck out the Knowledge Base article Q103657. |
Microsoft's scheme for disk quotas in Windows 2003 is Per User/Per Volumethe same as it was for Windows 2000. Since a disk volume appears in Windows Explorer as a drive letter, you can just as easily think of it as Per User/Per Drive Letter. Quick Quotas in Windows 2003 entail but one improvement over Windows 2000. That is, Quick Quotas can charge disk quotas to users on files that are open as well as files that are closed. In Windows 2000, the files were only charged to the user when the files were closed.
This has several ramifications and limitations. First, there is no centralized "Quota Administrator" in Active Directory. You can't set up quotas centrally to say "On every server in the Corp.com domain, Johnny Badguy gets 20MB." Nor can you say "In total, on every server in the Corp.com domain, Johnny Badguy's total used disk space shall never be more than 200MB." Maybe some day, but not today. Some third-party independent software vendor is going to make a killing figuring out how to restrict a user's quota per domain or per forest. However, I made the challenge in the initial writing of this chapter some years ago, and today it's still not done.
| |
The quota system figures out who is over quota based on the File Ownership attribute, which is only available under NTFS. Thus, only NTFS drives can be monitored for quotas.
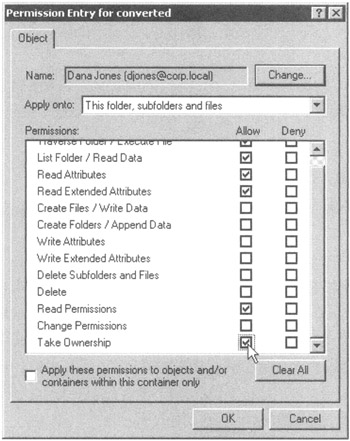
At this point, you might be scratching your head and thinking that this is perhaps a good time to run the convert utility on any partitions housing user data. But beware: converted FAT to NTFS partitions do not automatically assign ownership to the user who seemingly owns the folder. Rather, the administrator becomes the owner of all files on the converted partition. In this case, the user who owns the file can actually take ownership of the file in two ways:
-
Standard taking ownership
-
Taking ownership the easy way
You can give the user's folder the Take Ownership right in the Permission Entry dialog box as shown here:
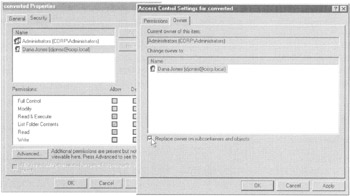
When a user logs on, they can then do the following:
-
Open Windows Explorer.
-
Right-click the folder, and choose Properties from the shortcut menu to open the Properties dialog box.
-
Click the Security tab, and then click the Advanced button to open the Access Control Settings dialog box.
-
Click the Owner tab, select their username, click the "Replace Owner on Subcontainer and Objects" check box, as shown here, and click OK.
Between you and me, I bet there's a greater chance of the New York Mets winning the Super Bowl than any of your users figuring out that sequence!
A much better way to dictate ownership is through one of the following third-party tools.
Chown.exe You can get this tool, which is distributed by MKS Sortware, in three ways:
-
By accessing the APPS/POSIX subfolder on the Windows 2000 Resource Kit CD
-
By downloading the evaluation version at www.datafocus.com/eval/
-
By copying it from the Microsoft Services for Unix 3.5 download (www.microsoft.com/sfu).
The command syntax is as follows :
Chown.exe -R Djones d:\data\converted_directory
Here, -R signifies you are working on a directory, Djones is the username to be assigned ownership, and d:\data\converted_directory is a directory that is now on an NTFS drive.
Subinacl.exe You'll find subinacl.exe on the Windows 2000 Server Resource Kit CD. This is the Swiss Army Knife of permissions altering. If you want to change the ownership of the d:\data\converted_directory directory, as we just did, the syntax is:
subinacl /file d:\data\converted_directory\*.* /setowner=CORP\Djones
You must specify the domain name in the short NetBIOS form of CORP, not the FQDN Windows 2000 DNS style name of, say, corp.com.
Ownership also plays another role when users print to the printing subsystem; they are essentially spooling an additional file embedded with their ownership information. If you restrict the partition that houses the print spooler too tightly with disk quotas, users might hit their limit and hence not be able to print. Usually, this isn't a problem because most configurations have the spooler on the C: drive and a user's data volume on the D: drive. Since Windows 2000 uses Per User/Per Volume criteria, affecting the D: drive with quotas, yet performing the print spooling from the C: drive, leaves printing functions unaffected.
However, if you use Group Policy to assign quotas, you could potentially restrict users from printing and other functions quite by accident . This could happen because the Group Policy actions affect all NTFS partitions on the affected system, as explored in the section "Enable Disk Quotas" later in this chapter.
Ownership information is also important if multiple users share the same file on a common share. For example, Frank and Harry both have Read and Write access to the SalesFigures share on the D: volume. Frank's quota on the D: volume is 10MB, and Harry's quota is 30MB. Frank creates a new Excel worksheet, puts in three figures, and closes the file. The file size is 200Kb. Harry then opens the Excel worksheet, adds 5 million new figures, and closes it. Now the file is 9.98MB. That 9.98MB is charged to Frank's quotabecause he created the file and is the owner.
| |
Quotas and Groups
As previously stated, the quota scheme is Per User/Per Volume. There is no way to leverage Active Directory security groups to deny the writing disk data. In other words, you cannot say, "The engineers ' share, which is on the D: volume, can only grow to 300MB." Frustratingly, it's only Per User/Per Volume.
To add insult to injury , the underlying code is there to verify against group quota checking. For instance, the Administrators group is exempt from quotas by default. You can change this default behavior (for administrators only), as in the example in the later section "Apply or Exempt Quotas for a Specific User."
It's sad that quotas are only Per User/Per Volume, and but you can change this using third-party tools.
| Tip | Writer Christa Anderson has a neat trick for (more or less) performing disk quotas on a per-group basis. The article is here http://www.windowsitpro.com/Windows/Article/ArticleID/43195/43195.html . Windows IT Pro magazine articles are read-only for subscribers. Check today and find out! |
Designing and Implementing a Quota Strategy
Setting up quotas on a volume is easy. First, you must decide on your strategy. You have three:
-
Apply a default quota to anyone who owns any files on the volume.
-
Apply specific quotas to specific users who own files on the volume.
-
Apply a default quota to anyone who owns any files on the volume and apply or exempt a specific user to a quota on the volume.
To set up quotas on a volume, follow these steps:
-
Open Windows Explorer on a server.
-
Right-click the drive letter, and choose Properties from the shortcut menu to open the Properties dialog box.
-
Click the Quota tab, as shown in Figure 9.35.
-
Click the Enable Quota Management check box to display the other options.
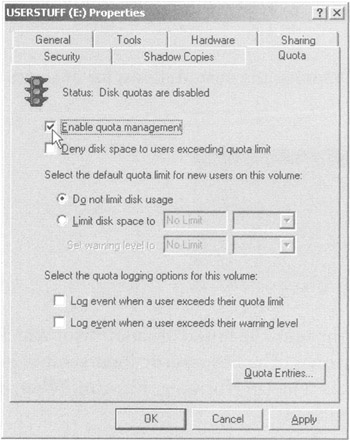
Figure 9.35: You modify the options on the Quota tab for each drive letter.
Warn or Restrict?
There are two schools of thought regarding quotas. One school says that, once warned , users will actually remove some unwanted files once a line in the sand has been drawn with regard to space. The other school says that users never delete anything from the time they're born until the time they're dead, and no wimpy warning message is going to stop them from writing more data. With that in mind, you need to choose your school of thought.
The options on the Quota tab are a little confusing. Let's take a look at them.
Do Not Limit Disk Usage This disables a general warning level and hard limit for users on the server. You can still set limits for specific users on the server via the "Quota Entries " button (explored in the "Apply or Exempt Quotas for a Specific User" section).
Limit Disk Space To Enabling this setting restricts the user to a certain amount of disk space.
Set Warning Level To Instead of restricting the user right away, you can specify a warning limit. When the user hits the warning limit, they get a message. Usually, it's a good idea to set the warning at 80 percent of the actual hard quota.
The final two check box options are found under the "Select the Quota Logging Options for This Volume section. They are "Log event when a user exceeds their warning level" and "Log event when a user exceeds their quota limit." Instead of enforcing a quota limit right away, you might want to monitor usage for a period of time, gathering a baseline of disk usage. It's true, however, that you'll have to spend some quality time with the server's log files to determine which users have gone over the set threshold.
Remember that, by default, the numbers you specify in the "Limit Disk Space to" and the "Set Warning Level to" entries affect all users who write any files to the volume. Once you've set up your defaults, click Apply to open the Disk Quota dialog box, as shown in Figure 9.36.
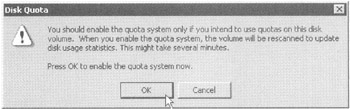
Figure 9.36: Once you apply Quota Defaults, the system looks for all users on that volume who own files.
When you click OK, the quota system runs through the initial calculation of which users own which files on the volume and how much they own. The little traffic light symbol in the Quota Properties dialog box changes from red to yellow when performing this scan. When it's finished, it will change to green, and quotas will be activated.
Apply or Exempt Quotas for a Specific User
Usually, the needs of the many outweigh the needs of the few. But occasionally someone makes a legitimate request for exemption, such as your friend in the Accounting Department who promised you he'd burn more CDs of MP3 junk he downloaded from Kazaa for you on his lunch hour .
If you want to bump up or drop down a quota for a specific user or exempt them from quota analysis completely, start by clicking the "Quota Entries " button in the Quota tab of the Properties dialog box to open the "Quota Entries for Local Disk" dialog box. Now follow these steps:
-
To enter a specific quota for a user or group of users, choose Quota ˜ New Quota Entry. You'll then be prompted to enter the name of the user. Once you do, you'll see the "Add New Quota Entry" dialog box, as shown in Figure 9.37.
-
You can now set a specific quota or no quota for that user, as shown in Figure 9.37. To exempt the user from the quota, click the "Do Not Limit Disk Usage" button.
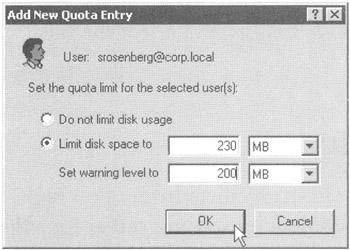
Figure 9.37: In the Add New Quota Entry dialog box, set a specific user's quota differently from the defaults.
Once all users are entered, you can see which user is using how much disk space, as shown in Figure 9.38.
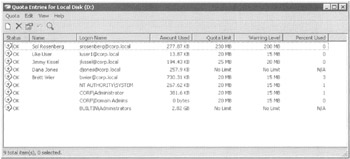
Figure 9.38: You can get a bird's-eye view of who's using how much disk space.
Import and Export Quota Entries
Although it's true that there's no way to set quotas so they apply over multiple servers, you can do the next best thing. You can export the list of users and quotas that you set up in the previous section to a file. You can then take that file to another server and import it. Voil ! Instant disk quotas. There's no way to keep the two lists in sync. If you change one entry, the other server doesn't know about it. But this is a good way to move the exemptions list from one server to another quickly.
To export the list of quota entries, follow these steps:
-
In the Quota Entries dialog box, select the quota entries you want to export. (Click and entry, hold down the Control key, and select additional entries.)
-
Choose Quota ˜ Export.
-
In the "Export Quota Settings" dialog box, provide any filename you want (with or without an extension) and select Save.
-
On the server to receive the list, choose Quota ˜ Import and select the file.
That's it.
Using Group Policy to Affect Quotas
Certain aspects of the quota system can be embraced from edicts from upon high. However, I think it's better to use the fine-stroke quill of individual server settings rather than these settings, which are more like a two-inch-thick Magic Marker. You might, find them useful, however.
You'll find the policy settings for Disk Quotas in Computer Settings ˜ Administrative Templates ˜ System ˜ Disk Quotas, as shown in Figure 9.39.
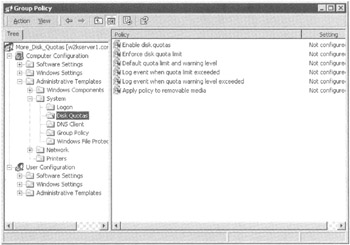
Figure 9.39: You can use policy settings to dictate quotas on specific machines.
Enable Disk Quotas
This entry is analogous to "Enable Quota Management," as shown in Figure 9.35. Once this policy setting is enabled, all NTFS volumes on those computers that this policy setting affects will be part of the quota management system. Even administrators sitting at the local server will not be able to turn off the management once this policy setting is set. If this setting is disabled, disk quotas cannot be turned on, and even administrators sitting at the local server will not be able turn them on. By default, this setting is not configured, meaning that administrators can set up the quota system (or not) as they please .
Enforce Disk Quota Limit
This setting corresponds to the "Deny Disk Space To Users Exceeding Quota Limit" check box in the Quota tab in the Properties dialog box, as shown in Figure 9.35 earlier in this chapter. If this policy setting is enabled, users are denied space if the quota is reached. Administrators cannot clear the "Deny Disk Space To Users Exceeding Quota Limit" check box once this is set. If this policy setting is disabled, users can cross the "line in the sand" at will.
By default, this setting is not configured, meaning that administrators can choose to deny or not deny as they please.
Pair this policy setting with the next, Default Quota Limit and Warning Level , to set realistic warnings. Otherwise, the only limit is the physical space on the volume.
Default Quota Limit and Warning Level
This entry, as shown in Figure 9.40, corresponds to the "Limit Disk Space to" and "Set Warning Level to" entries as shown in Figure 9.35, earlier in this chapter.
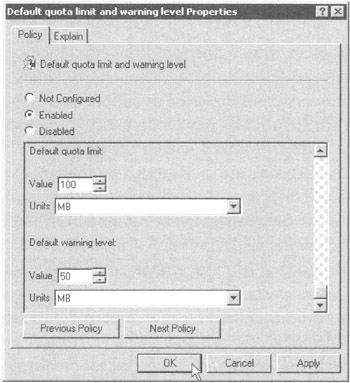
Figure 9.40: You can set the default disk warning and disk limit of the affected computers.
Simply enter the desired values in the "Default Quota Limit" and "Default warning level" fields. These entries apply for every NTFS volume on the affected computer.
In the event that this policy setting is applied after disk quotas are manually set up on a system, this policy setting overlooks current users (users who already own files on the volume) as well as users who explicitly have applied quotas or are exempt from them, as defined in the Quota Entries dialog box.
If this policy setting is not configured or is disabled, it is assumed that there is no limit to a user's space. Therefore, the warning and limit are ostensibly set to the maximum space available on the volume.
Log Event When Quota Limit Exceeded and Log Event When Quota Warning Level Exceeded
You might not be quite ready to put up the electric fence that prevents users from writing more files should their quotas be exceeded. You might want to simply log the actions for trend analysis. Enable this policy setting to generate the log entry; afterward, administrators cannot clear the corresponding check box. Disable the policy setting to guarantee no log entries.
Apply Policy to Removable Media
By default, JAZ, ZIP, and CD drives are exempt from quotas. Enable this policy setting to force the same compliance for removable media. Only NTFS formatted media can be affected by this policy setting.
| | ||
| | ||
| | ||
EAN: 2147483647
Pages: 110