Mandatory Profiles
| | ||
| | ||
| | ||
Mandatory Profiles enable the administrator to assign a single user or multiple users the same, unchanging user experience regardless of where they log on and no matter what they do. In non-mumbo-jumbo terms, Mandatory Profiles ensure that users can't screw things up. When you use Mandatory Profiles to lock down your users, you guarantee that the Desktop, the files in the profile, and the Registry continues to look exactly as they did when they were set up.
Mandatory Profiles are great when you have a pesky user who keeps messing with the Desktop or when you have general populations of userssuch as call centers, nurse's stations , or library kiosks on whom you want to maintain security.
Once the Mandatory Profile is set for these people, you know you won't be running out there every 11 minutes trying to fix someone's machine when they've put the black text on the black background and clicked Apply. Actually, they can still put the black text on the black background and click Apply, and it does take effect. But when they log off or reboot (if they can figure out how to do that in the "dark"), the values aren't preserved. So, voila! Back to work!
You can create a Mandatory Profile in two wayseither from a Local Profile (or locally cached profile) or from an existing Roaming Profile. I recommend creating your Mandatory Profile from a local (or locally cached) profile. By default, if you try to dive into an existing Roaming Profile folder on the server, you are denied access, as shown in Figure 8.10 earlier in this chapter. The system utilizes the %username% variable and automatically sets up permissions such that only the user specified can access that folder. To dive in, you have to take ownership of the entire subfolder structure first and then give yourself permission to access the folder.
In the next sections, you'll find the steps for both methods .
| Note | If you previously set up the Add the Administrators Security Group to Roaming User Profiles policy setting, you won't need to worry about not being able to dive into the profile. Note, however, that the policy setting must be placed before the Roaming Profile is placed. |
Establishing Mandatory Profiles from a Local Profile
The first thing to do when trying to establish the Mandatory Profile is to log on locally to any Windows 2000 or Windows XP machine as a mere mortal user (without an existing Roaming Profile), make the modifications you want, and log off as that user.
Now that you have a local (or locally cached) profile that you want to use as your Mandatory Profile, follow these steps:
-
Log on as Administrator to the machine that houses the local (or locally cached) profile.
-
Click Start, and then right-click My Computer and choose Properties from the shortcut menu to open the System Properties dialog box.
-
Click the Advanced tab, and then click the Settings button in the User Profiles section to open the User Profiles dialog box (as seen previously in Figure 8.6).
-
Click the "Copy To" button to open the "Copy To" dialog box, and then enter the full path plus a folder for the common users, as shown in Figure 8.20. This example has \\WinDC01\profi1es\al1nurses . The Allnurses folder is automatically created under the Profiles share.
-
Click the Change button in the "Permitted to Use" section, to open the "Select User or Group" dialog box and change the default from the original user to Everyone, as shown in Figure 8.20. This lets everyone use the profile in the domain.
-
Click OK to actually copy the profile and to close the "Copy To" dialog box.
-
Click OK to close the System Properties dialog box.
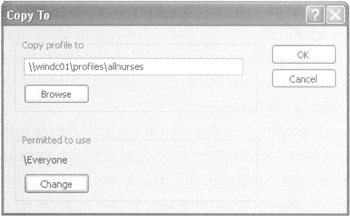
Figure 8.20: Use the Copy To dialog box to copy one profile for many users.
Next, use Explorer to locate the share we created earlier, named Profiles. Inside the Profiles directory, you should now see the Allnurses folder. Locate the NTUSER.DAT and rename it to NTUSER.MAN , as shown in Figure 8.21.
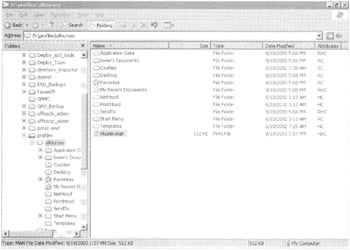
Figure 8.21: Change a Roaming Profile to a Mandatory Profile by renaming NTUSER.DAT to NTUSER.MAN .
| Tip | Because NTUSER.DAT is hidden by default, you might have to change the default view options. In Explorer, choose Tools ˜ Folder Options to open the Folder Options dialog box. Click the View tab, click the "Show Hidden Files and Folders" button, clear the "Hide File Extensions for Known File Types" check box, and click OK. |
Finally, in the Properties dialog box, change the profile path of all the users who are to use the profile to \\WinDC01\profiles\allnurses , as shown in Figure 8.22.

Figure 8.22: Point all similar users to the new Mandatory Profile.
Since you copied the profile to the server with permissions for Everyone to use, you'll also want to modify the NTFS permissions of the Allnurses folder under the Profiles share to make sure it's protected. You might choose to protect the Allnurses folder by setting the Permissions as shown in Figure 8.23.
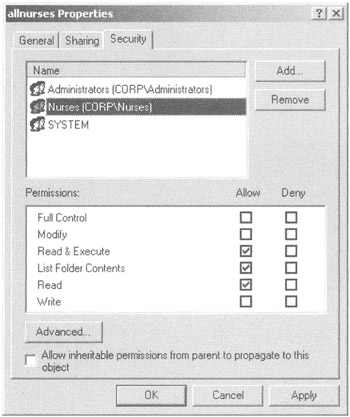
Figure 8.23: You can prevent people from inadvertently modifying the newly established profile.
Mandatory Profiles from an Established Roaming Profile
You might not be able to use a local (or locally cached) profile to generate the Mandatory Profile. This might be because you enabled the Delete Cached Copies of Roaming Profiles policy setting, and there are no locally cached profiles for you to use. In this case, you'll need to log in as Administrator on the server that houses the Roaming Profile, locate the profile folder, and take ownership of it. You can then copy the profile to another folder and have the user take back ownership of the folder. In this case, we'll take ownership of a profile for a user named garyd. To take ownership of a user's Roaming Profile, follow these steps:
-
Log on at the server as Administrator.
-
Locate the user's profile folder, right-click it, and choose Properties from the shortcut menu to open the User Properties dialog box.
-
Click the Security tab. You should get a message stating that the user is the only one with access to their own folder.
-
Click the Advanced button on the Security tab to get the "Advanced Security Settings" dialog box. Next, click the Owner tab.
-
Select Administrator (or Administrators) from the list, click the "Replace Owner on Sub-containers and Objects" check box (as shown in Figure 8.24), and then click OK.
-
You will be prompted to confirm that you want to take ownership. Select Yes and wait until you have ownership.
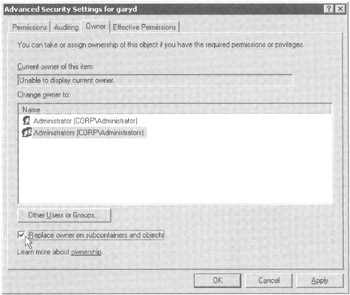
Figure 8.24: Take ownership of the folder.
You can now rename the folder to a sensible name and then rename the NTUSER.DAT file to NTUSER.MAN . Last, point each user account to use this new profile, specifically pointing each account to the profile as shown in Figure 8.22 earlier in this chapter.
Since everyone now has Full Control (inherited from the parent), you might want to restrict access to the profile, similarly to that seen in Figure 8.23 earlier in this chapter.
| Note | You might need to add the Administrator account or the Administrators group to the ACL of the folder and let the permissions flow downward in order to be able to see the contents. In some extreme cases, you might also need to log off and back on as Administrator to get another access token. |
Forced Mandatory Profiles (Super-Mandatory)
Mandatory Profiles might not always be soif the server is down or a user unplugs their network cable, the Mandatory Profile does not load. Indeed, the user will get the Local Default User Profile. This could be a potential security problem and possibly a violation of your corporate policy.
In instances like this, you need to determine if it's more important that a user logs on (and gets the Default Local User Profile) or that, if they don't get the Mandatory Profile, they don't get to log on at all. Microsoft calls this type of profile "Super-Mandatory." In Figure 8.21 earlier in this chapter, we used a folder named Allnurses as our Mandatory Profile folder. We can take this to the next step and ensure that no users using the Allnurses folder can log on unless they can connect to the share on the server.
To force users to use the Mandatory Profile, or lose logon capability, simply follow these steps:
-
Create a Mandatory Profile as described earlier, including renaming the NTUSER.DAT to NTUSER.MAN .
-
Rename the entire folder from Allnurses to Allnurses.man.
-
Change the affected users' Profile tabs to point to the new location, such as \\WinDC01\profi1es\allnurses.man , as shown in Figure 8.25.
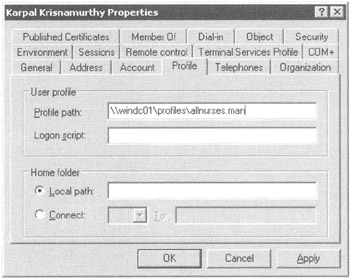
Figure 8.25: You can force a Mandatory Profile if absolutely necessary.
Once the forced Mandatory Profile is introduced onto a system, the system always checks to see if the Profile is available. If the forced Mandatory Profile is unavailable, the user is not permitted to log on.
| Note | Technically, you can couple a Mandatory Profile with the Log Users Off When Roaming Profile Fails policy setting to create the same effect. However, the method detailed here is preferred. |
| | ||
| | ||
| | ||
EAN: 2147483647
Pages: 110