Securing Workstations with Templates
| | ||
| | ||
| | ||
In many environments, it's important to ensure that collections of workstations have the same level of security. What good is it if one machine is locked down tight when the bad guys can simply move along to another machine to get on to your network? The "out of the box" security on Windows 2000 and Windows XP machines may or may not be adequate for your environment.
You'll need tools to ensure environment-wide security. The Security Templates MMC snap-in and the Security Configuration and Analysis tool are your partners for generating a baseline of security. You can use these tools to "tattoo" the Registry of the computer to make it more difficult to attackboth on and off your network. After you define your security goals with these tools, you can use Group Policy to easily ensure that all affected machines embrace the same baseline for security.
To get started, we'll load the appropriate snap-ins. In this exercise, we'll use one MMC and load the two snap-ins on a Windows XP Professional machine while logged on as a local administrator. After we load the MMC snap-ins, we'll use the tools to become familiar with the predefined templates and start locking down some of our machines.
Before we get too far along in this section, here's the scoop: You'll be using these exercises to lock down your Windows XP (and, optionally , your Windows 2000) machines. Although you can perform these procedures for Windows 2003, I advise against using this procedure to lock down your Windows 2003 machines. That's because in the next major section, "The Security Configuration Wizard for Windows 2003/SP1," I'll show you a technique that is faster and works specifically for Windows 2003 servers. That is, the procedure in that section won't work for Windows XP or Windows 2000 machines, so use the information in this section for them.
| Note | This exercise assumes you're loading the snap-ins at a Windows XP Professional machine, though you can certainly perform a similar exercise at a Windows 2000 machine. |
-
Choose Start ˜ Run to open the Run dialog box, and in the Open box, enter MMC and press Enter to fire up a "naked" MMC.
-
Choose Console ˜ Add/Remove Snap-in to open the Add/Remove Snap-in dialog box.
-
Click Add to open the Add Standalone Snap-in dialog box.
-
Locate and add the Security Configuration and Analysis and Security Templates snap-ins by scrolling through the list and clicking "Add." Add each snap-in individually, so they'll both be on your MMC palette.
-
Click Close to close the "Add Standalone Snap-in" dialog box.
-
Click OK to close the "Add/Remove Snap-In" dialog box
When finished, your MMC should look like that in Figure 6.21.
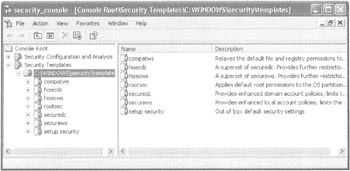
Figure 6.21: The Security Configuration And Analysis and Security Templates nodes are loaded in the MMC. The available security templates are listed here.
Security Templates
To get multiple machines to embrace a collection of security settings, you'll roll your proposed settings into what is called a security template. A security template is nothing more than a collection of security settings wrapped up in an easy-to-deploy, text-based .inf file. Once you have the .inf file locked and loaded the way you want, you can leverage Group Policy to assert your will across your enterprise.
You leverage security templates that come from many sources:
-
Some templates are built into Windows. These predefined templates exist for workstations, servers, and domain controllers, and they range in intensity from "default security" to "highly secure."
-
You can create your own security templates from scratch or use the predefined templates as a jumping-off point to create your own.
-
Microsoft and other noted third parties have their own collection of security templates for your use. More on third-party templates in a bit.
In these next sections, we'll take a look at the predefined templates and see what they can offer us. We'll then plan a lockdown of our own machines by customizing a template (leveraging one of the predefined templates). Once we actually lock down our machines by applying our templates, we'll see if our lockdown was successfulusing both the graphically provided MMC snap-in tools and the command-line interface.
Finally, in the last section, we'll use the template we customized to lock down multiple machines at once using the broad stroke of Group Policy.
Security templates are supposed to help you set a baseline of security upon a gaggle of systems. Let's take a quick look at the available templates within Windows.
| Warning | I would encourage you to not actually do anything with these templates until you read all the way through this section. |
Default Security for Windows 2003 and Windows XP
If a machine is a "fresh install." three templates define the default "out of the box" security for a Windows XP or Windows 2003 Domain Controller or a Windows 2003 member server. On Windows XP, you'll find delftwk.inf in the c:\windows\inf folder. The system used this file when it was being born to set the out-of-the-box settings.
On Windows 2003, you'll find defltdc.inf and defltsv.inf in c:\windows\inf folder. These templates define the baseline security for Windows 2003 Domain Controllers and Windows 2000 servers. The DCFirst.inf template is used to populate the first Windows 2003 Domain Controller with the default Account Policies (Password policy, Account Lockout policy, and Kerberos policy.)
Additionally, if a Domain Controller is upgraded from NT 4 or Windows 2000, a different set of security is placed on that machine. The templates used by an NT 4 system are called DCup.inf , and the templates used by Windows 2000 are called DCup5.inf . An NT 4 Terminal Server Edition or Windows 2000 machine with Terminal Services/Application mode will run Dsupt.inf to write its default configuration settings. The system automatically uses these files, which are discussed here only for reference. You shouldn't need to touch them again after the system uses them.
Incremental Security Templates
You can use several predefined security . inf template files as a jumping-off point. Rather than use them as is, you can modify them to suit your specific requirements. Indeed, you'll see how to leverage an existing template a bit later in this chapter.
The supplied templates tighten or loosen a workstation, server, or DC (whichever the specific case may be), using the Security Configuration and Analysis MMC snap-in or the secedit command-line tool. (Both are described in detail later in this chapter.) You can see the provided incremental security templates listed in the Security Templates node as seen in Figure 6.21 earlier in this chapter.
Before we look at how to apply these .inf files to workstations, let's briefly examine each template (based on machine type) and see what it's supposed to do.
| Warning | This information in this section is specific to Windows 2003 and Windows XP and is not compatible with Windows 2000. When upgraded from NT 4, Windows 2000 machines need to be enhanced with "Basic" templates that are not listed here. For more information on Windows 2000 and security templates, see the previous edition of this book. Other helpful resources are on TechNet at http://support.microsoft.com/?kbid=234926 . An additional reference to Windows 2000 templates is at the end of this chapter in the "Final Thoughts" section. |
Domain Controller .inf Template Files
These .inf settings apply to Windows 2003 Domain Controllers.
securedc Increases the security required in the Password policy and Account Policy, bumps up the amount of auditing that occurs on the Domain Controller, and increases some Event Log settings, such as the size . This template doesn't modify any file or Registry ACLs (Access Control Lists).
hisecdc Chokes off all communications with downlevel machines by turning off NTLM communication. Only those machines that use NTLM v2 or Kerberos will be able to communicate with any machines to which this template is applied.
| Note | You can find certification guidelines for applications at www.microsoft.com/windowsserver2003/partners/isvs/cfw.mspx . |
| Warning | Applying the Hisecdc.inf template to Domain Controllers is dangerous and can prevent clients from authenticating to your Domain Controllers. |
XP Professional .inf Template Files
These settings apply to Windows XP Professional machines.
compatws Applications must pass certification guidelines to be considered "Windows Logo"compliant. Sometimes, an older application does not follow the new rules once it's up and running. Use this template to allow some older applications (such as Office 97), which are not Windows Logo certified, to run properly when mere mortals in the Users group run them.
This template elevates the permissions of the Users group by modifying common Registry keys, files, and folders. Often, administrators will give in and grant users who complain about incompatible applications admission into the Power Users group. Applying this template should satisfy their needs without putting them in the Power Users group. Because of this, this template removes all users and groups from the Power Users group.
You can see this behavior for yourself. As an administrator, load Word 97 with the Office 97 spelling check feature onto an NTFS volume on a Windows 2000 or Windows XP machine. Then, log back on as a regular user and, using that Word 97 installation, try to run the spelling utility. As a regular user , you cannot because certain files must be read/ writeable to the installation point of Office 97 (usually under Program Files). Apply this template, and your woes disappear. The compatws.inf template modifies NTFS permissions on the Program Files folder so that mere mortals can modify the settings.
securews These settings increase the security required in the Password policy and the Account Policy, bump up the amount of auditing that occurs on the workstation, and increase some Event Log settings such as the size. This template doesn't modify any file or Registry ACLs.
hisecws This template turns off NTLM communication and allows only communication with other machines that are running NTLM v2 or Kerberos. NTLM v2 is available on Windows 2000, Windows 2003, and Windows XP machines and on Windows 9x machines and Windows NT 4 machines that have the Directory Services client installed. Kerberos is available only on Widows 2000 machines (and higher). Like the compatsw template, all users and groups are flushed from the Power Users group. A note of caution here: The hisecws.inf template turns off NTLM authentication and allows communication only with other machines that are running NTLM v2 or Kerberos.
| Tip | Microsoft gives you a nitty-gritty look at the provided templates at http://tinyurl.com/47e5u and in KB 816585 (for Windows 2003) and KB 309689 (for Windows 2000). |
Other Security Template Sources
There are several places that you locate additional templates to use on your systems.
Security Templates from Uncle Bill On Microsoft's website, you'll find two publications that work in tandem to help administrators secure both Windows 2003 and Windows XP: "Windows Server 2003 Security Guide" and "Threats and Countermeasures: Security Settings in Windows Server 2003 and Windows XP." At last check, it can be found here: http://tinyurl.com/dkbu . The download include several ready-to-use security templates that will go a long way to help you secure your environment. You'll find new templates for Domain Controllers, IIS, IAS, member server, print servers, client systems, and more! Just three words say it all: Great job, Microsoft.
An older work from Microsoft, the "Windows 2000 Hardening Guide," contains tips as well as security templates. You can find it at http://tinyurl.com/anm1 .
| |
Depending on how a machine was born or upgraded, two templates will be different from machine to machine: DC security.inf and setup security.inf . The contents of DC security.inf are created "on the fly" when you upgrade or create a Domain Controller from scratch. During DCPROMO, a combination of defltdc.inf, dcfirst.inf , and defdcgpo.inf are used to configure the system; then DC security.inf is generated. The setup security.inf template is created on the fly when you upgrade or create a member machine from scratch.
These templates contain a snapshot of some of the security that was configured on the system just prior to performing an upgrade or running DCPROMO. (They'll contain default settings if you performed a fresh install.) This can be particularly helpful if something fails to work after an upgrade or DCPROMO. You can look inside these files to determine what the previously set security was on that system and try to adjust it on the new system.
The templates listed in the previous section won't affect User Rights Assignments that were specifically added to your machine. However, applying the setup security.inf and DC security.inf templates resets the changed User Rights Assignments to the defaults (or your previous configuration.). If you want to do this, my advice is to restore only the specific area you want; don't apply the whole template lock, stock, and barrel. You can see how to do this via the secedit command's /areas switch (described in Table 6.3). Usually, you don't want to roll back your entire security to the defaults. Rather, you can pick and choose which sections you want to restore.
| Area | Where to Find |
|---|---|
| SECURITYPOLICY | Sets all security settings inside the template, except for the Restricted Groups, User Rights Assignment, Registry Keys, File Services, or System Services |
| GROUP_MGMT | The Restricted Groups branch in the template |
| USER_RIGHTS | The Local Policy ˜ User Rights Assignment in the template |
| REGKEYS | The Registry branch in the template |
| FILESTORE | The File System branch in the template |
| SERVICES | The System Services branch in the template |
| |
Security Templates from Uncle Sam Two U.S. governmental agencies have each provided their take on some proper security templates.
-
The National Security Agency has free advice and templates for securing Windows XP and Windows 2000 and even some NT, Cisco, and e-mail server advice at http://www.nsa.gov/snac/ .
-
The National Institute of Standards and Technology (NIST) has some templates to help secure Windows 2000 and Windows XP at http://csrc.nist.gov/itsec/guidance_W2Kpro.htm and http://csrc.nist.gov/itsec/guidance_WinXP.html .
Your Own Security Templates
Now that you know which built-in templates perform which functions, you have three options:
-
Apply a built-in template as is to a workstation.
-
Create your own template from scratch, and apply it to a workstation.
-
Modify a built-in template that is already close to what you want to suit your needs, and then apply it to a workstation.
In this section, we'll primarily explore the third option, which essentially covers the skills required to utilize the other two options as well.
You might want to copy the default templates for safekeeping. You can copy them from the \%windir%\security\templates folder to a floppy, another folder, a partition, or a computer. However, other Windows XP machines in your environment probably hold the default versions of these files as well, so it is relatively easy to get them back.
Creating a Fresh Template from Scratch
To create your own template, in the Console Root folder just right-click the default folder under Security Templates and choose "New Template" from the shortcut menu, as shown in Figure 6.22. You would then give your new template a name .
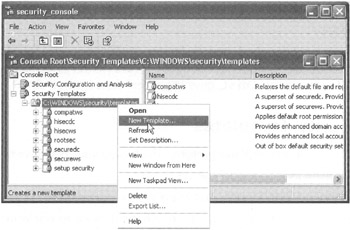
Figure 6.22: You can create your own security templates if desired.
When you do this, no security features are defined. This could mean a lot of manual labor handcrafting the template to your heart's desire . The rewards are great, however, as you'll know exactly what is and what is not defined. When you define your own templates, you can either specify a setting on the target or keep the default setting on the target.
Reusing an Existing Template
Instead of going through the laborious task of handcrafting every Account Policy, Event Log setting, and Registry setting (to name a few), you can use one of the existing templates and modify it to suit your needs.
For instance, you might want to increase the security above and beyond what the hisecws.inf provides as follows :
-
Turn off the Indexing Service. (Only administrators can turn it on.)
-
Place the Repair folder (where the Registry backup lives) under stronger lock and key.
In this example, we'll modify the hisecws.inf template. To use that template as a jumpingoff point, right-click it and save it under a different name, for example, hisecws_plus.inf . Your hisecws_plus.inf template should show up as an additional entry in the list next to the other templates seen in Figure 6.22.
Modification 1: Stop the Indexing Service
First, we'll disable the Indexing Service at startup. When disabled, this process won't kick off unless an administrator manually turns it on or a process running in the system context turns it on. Follow these steps (which you can also use to disable other services):
-
Drill down into hisecws_plus ˜ System Services ˜ Indexing Service.
-
Double-click Indexing Service to open the "Indexing Service Properties."
-
Click the "Define this Policy Setting in the Template" check box.
-
You can optionally select the "Edit Security" button to modify the security settings. You don't really have to change anything to enforce this policy. Though, for completeness, you could add the Domain Administrators group to ensure that they always have Full Control. If you want, add the Domain Administrators group, then select "Full Control" from the list of properties, and click OK.
-
Click the "Disabled" radio button if it is not already selected.
-
Click OK to close the Template Security Policy Setting dialog box.
The Indexing Service is now disabled, as shown in Figure 6.23.
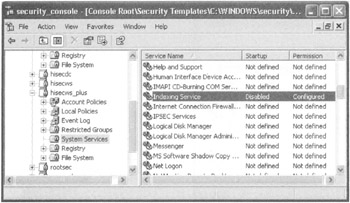
Figure 6.23: The Indexing Service has been set to be disabled.
Modification 2: Tweak the Repair Folder
The Repair folder within Windows contains a backup of your Registry data. The files in this folder need to be well protected to ensure that password-cracking programs and the like are not run against the files, exposing the sensitive passwords.
To protect the Repair folder from prying eyes, follow these steps:
-
Drill down into hisecws_plus ˜ File System. Right-click File System and choose Add File from the shortcut menu to open the Security dialog box.
-
Locate the %systemroot%\Repair folder (usually c:\windows\repair).
-
You'll be prompted to edit security for this folder.
-
You can deny local users and add the HR-OU-ADMINS group, as shown in Figure 6.24.
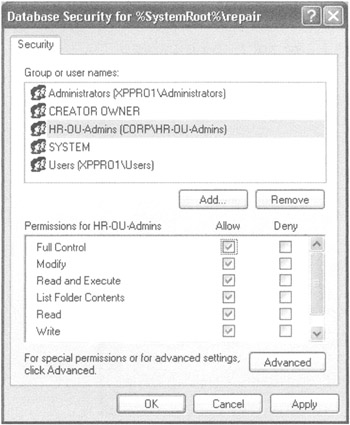
Figure 6.24: Use the Security dialog box to allow or deny access to specific folders.
For this example, we want to ensure that the members of our own HR-OU-ADMINS group can access the files at any time. When you click OK in the Security dialog box, you are presented with several choices.
-
If you choose "Propagate Inheritable Permissions to all Subfolders and Files," any files or subfolders will receive these NTFS permissions by inheritance only. If there are explicit ACLs on the files or folder, they will not be overwritten.
-
If you choose "Replace Existing Permission on All Subfolders and Files with Inheritable Permissions," all current permissions on all affected files and folders are wiped out and replaced with what you have here. This is the default setting.
-
If you choose "Do Not Allow Permissions on this File or Folder to Be Replaced," you're asking the operating system not to allow normal inheritance to flow from upper-level folders down to this folder. This option is not valid if an upper-level folder has the "Replace Existing Permission on All Subfolders and Files with Inheritable Permissions" setting.
In this instance, we'll choose the defaults, and click OK to exit the Template Security Policy Setting dialog box.
Now that you've created your templates, you can leverage them to create a safer, tighter, more secure computing environment. The next section will show you how to apply your template to a workstation.
| Warning | Be sure, at this point, to right-click the hisecws_plus.inf template and select Save. If you don't, your settings could be lost. |
The Security Configuration and Analysis Snap-In
The Security Configuration and Analysis snap-in has one purpose: to compare a template with the currently defined settings on a target machine. If the security doesn't match, the Security Configuration and Analysis snap-in can force the settings defined inside the template to be thrust upon the target computer.
The Security Configuration and Analysis snap-in performs an apples-to-apples comparison between the guidelines you set up in the template and what's currently running on the target machine. If there are holes in the target machine, you have two choices: live with the holes, or plug up those holes with the template.
Creating a Baseline
The first step in creating a baseline is to create a database to hold the results of your comparison. You've already loaded the Security Configuration snap-in alongside the Security Templates snap-in on a sample workstation in your domain at the beginning of this chapter, so we're ready to proceed. If you didn't load the two snap-ins on a sample workstation in your domain, do so now.
To create our database, follow these steps:
-
Right-click Security Configuration And Analysis snap-in, and choose Open Database from the shortcut menu to open the "Open Database" dialog box.
-
Since we're using the hisecws_plus.inf template, you might want to be consistent and enter hisecws_plus . sdb in the "File Name" field, though you're certainly not obligated to. Additionally, it's usually best to house the .sdb file in the same location as the .inf file so you can find it easier later. Press "Open" when you've entered in a name.
-
The "Import Template" dialog box appears. Select your hisecws_plus.inf template file.
| Warning | You will get inconsistent baseline results if you try to run the templates meant for workstations against a server or domain controller. Remember, the templates are geared toward specific types of machines. |
Once the database is generated, the right pane changes to show you the path of the database, as shown in Figure 6.25.
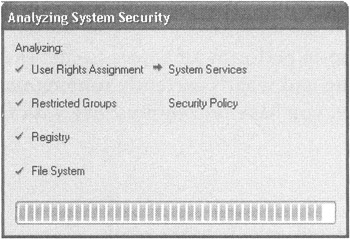
Figure 6.25: The security analysis checks out the six categories of security.
You are now ready to analyze the current computer.
Run the Analysis on the Current Machine
Once you've got your database that houses the sum of the security settings set up, you are ready to analyze the machine against a template. Follow these steps:
-
Right-click the Security And Configuration Analysis snap-in, and choose "Analyze Computer Now" from the shortcut menu to open the "Perform Analysis" dialog box.
-
A default temporary log location is specified in the "Perform Analysis" dialog box. It really doesn't matter what the name is. Click OK to run the analysis, which is shown in Figure 6.26.
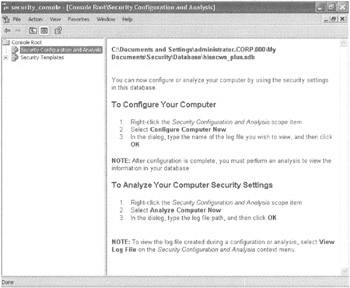
Figure 6.26: The right pane changes to reflect your database path.
When the analysis is complete, the right pane in the Security Configuration And Analysis snap-in changes to a style similar to that of the Security Templates snap-in.
Analyzing the Results
You can analyze the results in two ways.
-
You can use the graphic user interface of the Security Configuration and Analysis tool to drill down and double-check that the settings you specified in the template are, indeed, being applied or not being applied to the current workstation.
-
You can paw through the log file by hand and see what it came up with.
The former is much less painful, but there are reasons, described in the "Using the Log File to Find Differences" section, that you might want to paw through the log files.
You can check for the changes that were present in the original hisecws.inf template or the modifications you made, such as the NTFS restrictions in the %systemroot%\repair folder.
Graphically Displaying Differences
Lots of settings are configured within the hisecws_plus.inf template. For example, in the Security Configuration and Analysis snap-in, drill down to Local Policies ˜ Security Options. You'll see the following possibilities when graphically analyzing the results:
-
If the setting has a green checkmark, the template you used has a definition, and the computer has a setting that already matches. In other words, this computer is compliant with your guidelines for this setting.
-
If the results have a big red X, the template has a definition, but the computer you're analyzing either doesn't have a setting or the setting doesn't match.
-
If the results don't have either a green checkmark or a big red X (only the little 1s and Os icon), the computer has a setting, but nothing is defined in the templateso there's technically no "problem."
-
If the results have a big red exclamation mark, the setting wasn't analyzed . This can happen for one of two reasons:
-
The item was not originally defined in the baseline policy.
-
An error (for example, Access Denied) occurred when querying the item.
-
As Figure 6.27 shows, many Security Options have a big red X, meaning that they were defined in the template but the test machine is not compliant.
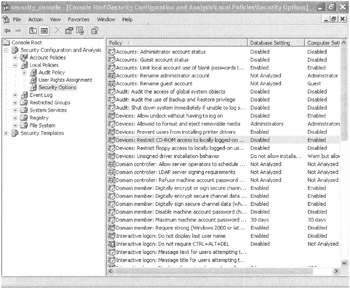
Figure 6.27: A big red X indicates that the machine is not complying with specific settings in the template.
Using the Log File to Find Differences
You might want to rerun the analysis, but save the log file in an easy-to-get-to location, such as the c:\temp folder. You can then open and read the log in any text editor, such as Notepad or WordPad. You can, if you're feeling adventurous, paw through the file and manually locate the changesthough this is messy and cumbersome. If you want to go the nongraphical route, you can sometimes speed things up by using your text editor's search feature to find all instances of "Mismatch."
If you're particularly command-line savvy, use the FINDSTR.EXE command to sift through the hisecws_plus.1og and output just those lines that contain the word "Mismatch."
Applying the Template
Now that you know which attributes your target machine does and does not subscribe to, you're ready to apply the template. You can do so in two ways: graphically, via the Security Configuration and Analysis snap-in tool, or via the command-line tool, secedit .
| Warning | If you want to heavily armor your test machine, go ahead and apply the template. Else, cancel out now. |
Graphically Applying the Template
After you perform the baseline analysis using the Security Configuration and Analysis snap-in tool, you can apply the settings to your test machine. To do so, right-click the Security Configuration and Analysis snap-in tool and choose "Configure Computer Now " from the shortcut menu. An analysis is not technically required before applying the template, but it's highly recommended so that you know where you currently stand. You'll be prompted for a location to save the log file.
At this point, the computer is configured to the settings you specified in the template. You could, if desired, rerun the analysis phase to see if the application took place. When you see the red Xs change to green checkmarks, you'll know the application was successful.
Using secedit to Analyze and Apply the Template
You can use secedit in Windows 2003, Windows XP, and Windows 2000 if you want to write batch files that analyze or apply the policy as we did with the graphical Security Configuration and Analysis tool.
USING SECEDIT TO ANALYZE
You can use secedit to analyze the template against the computer's database at any time. To start secedit in analyze mode, you'll need to know the parameters it takes. The following is a sample command line (to be typed all on one line):
secedit /analyze /db c:\temp\hisecws_plus.sdb /cfg c:\windows\security\templates\hisecws_plus.inf /log c:\temp\hisecws_plus.log /verbose
Let's break this command into bite- sized chunks .
The secedit /analyze chunk requires a /DB parameter, which you must point toward an existing .Sdb database. If no database exists, secedit creates a new one on the fly. In this case, we're specifying /DB to use the file and path of c:\temp\hisecws_plus.sdb. This assumes that c:\temp exists. (It may not.)
If you want to generate a new database on the fly, you'll need to specify the /CFG parameter to point toward your . inf template file, say c:\windows\security\temp1ates\hisecws_plus.inf . Use the /log flag to specify a location and name for your log, for instance, c:\temp\hisecws_plus.log .
Optional parameters are /verbose , which spells out in detail the status, or /quiet , which spits out nothing. The verbose parameter can be useful in debugging situations, and quiet can be useful in batch files when you don't want anyone to know anything is happening.
Now that you understand the command and its parameters, open a command shell and type the secedit command, as shown in Figure 6.28.
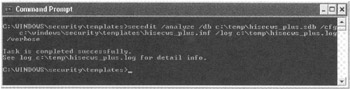
Figure 6.28: Use the secedit command to perform batch analysis.
You can analyze the data in two ways, as discussed earlier. You can do so graphically, using the Security Configuration and Analysis tool, or you can use the log at c:\temp\hisecws_plus.log . To analyze the data graphically, right-click the Security Configuration and Analysis tool, and choose Open Database from the shortcut menu. To analyze the data using Notepad or another text editor, open c:\temp\hisecws_plus.log .
USING SECEDIT TO GENERATE A ROLLBACK TEMPLATE
The Windows 2003 version of the secedit command can do something that the Windows XP and Windows 2000 secedit command cannot. It can be used to create a new template that can be used if you want to rollback after a botched template application. Here's the trick though: you must do this before you actually apply the template (next step).
To run secedit in this mode, you'll need to know the appropriate parameters. A sample command line using secedit to generate a rollback template on a Domain Controller might be:
secedit /generaterollback /db c:\temp\anyname.sdb /cfg c:\windows\security\templates\securedc.inf /rbk c:\save_my_bacon
In this example, we use the /cfg command that we're about to apply the securedc.inf template. And, should we need to roll back, it will create the file rollback_before_securedc.inf to roll back to the state before we applied the securedc.inf template (again, you'll see how to apply templates in the next step).
Here's the big warning though (first of two): if you later decide to apply another security template, you'll need to run this command again . If you need to perform a rollback, simply apply the security templates back in order such that the most recently created is applied first, and so on back to the first one that was created.
The second big warning is that the resulting template will not have data sufficient to rollback file or registry ACLs. These templates will rollback everything else though.
Again, note, however, that Windows XP doesn't have the /generaterollback switch, so, unfortunately , you can't use it here, before the next step.
USING SECEDIT TO CONFIGURE
You can use secedit to configure the machine using the template you defined. To run secedit in configure mode, you'll need to know the appropriate parameters. The following is a sample command line:
secedit /configure /db c:\temp\hisecws_plus.sdb /cfg c:\windows\security\templates\hisecws_plus.inf /log c:\temp\hisecws_plus.log /verbose
Again, let's break the command into bite-sized chunks. The secedit /configure chunk requires a /DB parameter, which you must point toward an existing .sdb database, say, c:\templatecopy\hisecws_plus.sdb .
Use the /CFG parameter to point to your .inf template file, c:\templatecopy\hisecws_plus.inf . If you don't specify a /CFG entry, secedit applies the currently stored template in the database specified in the /DB parameter.
Use the /log flag to specify a location and name for your log, for example, c:\temp\hisecws_plus.log .
Use the /overwrite switch to overwrite the current information in the database with the information in the security template.
The secedit can also surgically replace a specific area in the template to the target machine. Use the /areas switch to isolate and specify one or several areas, as shown in Table 6.3.
To specify multiple areas, you can simply string them together (with a single space between each one), such as /areas REGKEYS SERVICES . To apply all areas, don't specify the /areas switch, since they'll all apply by default. Optional parameters are /verbose , which spells out in detail the status, or /quiet , which spits out nothing at all.
The use of the parameter /cfgc:\temp\hisecws_plus.inf is optional because we already used that .inf file to create our .sdb database in the last step.
Once this process is complete, your system is as secure as the template file dictates.
| Tip | If you get an "Access is Denied" error, try closing the MMC snap-in in order to close the file lock on the .sdb database. |
| Tip | You can learn more about the secedit command by opening a command shell and typing secedit /? . |
Applying Security Templates with Group Policy
You could schlep around to each workstation or server and run secedit with the /configure switch. This works reasonably well in stand-alone environments, if you only need to tie down a handful of machines, or if you're still in an NT 4 domain or a Novell environment and haven't yet upgraded to Active Directory. But a much more common scenario occurs when you want to enforce the same required security setting on multiple machines simultaneously . This requirement is typical at call centers, nursing stations , and public kiosks .
Group Policy's mission is to make broad-stroke enforcement a piece of cake, and this instance certainly qualifies.
Let's say you want to deploy the hisecws_plus.inf template on all the computers in an OU named Nurses Computers OU. Follow these steps:
-
Ensure that the Nurses Computers OU exists. (We're making it up for the sake of example here.)
-
Move all machines to be affected by this security edict into the Nurses Computers OU.
-
Copy the hisecws_plus.inf template from the workstation to a location accessible to the server. You can do this in several ways. The goal is to get the hisecws_plus.inf template that you generated on the workstation over to the server. You can use a network share, e-mail, or even a floppy! When you transfer the file, simply place it into any folder on the server you desire. The best location is the Domain Controller's c:\windows\security\templates folder.
-
Create a new GPO and link it to the Nurses Computers OU. This GPO will be used to import the settings inside the hisecws_plus.inf template you created. Give the GPO a descriptive name, such as "Force hisecws_plus.inf ."
Once you're editing the GPO, drill down to Computer Configuration ˜ Windows Settings ˜ Security Settings. To utilize any security .inf template, simply right-click Security Settings (as shown in Figure 6.29) and choose "Import Policy " from the shortcut menu.

Figure 6.29: Drill down into the Security Settings, right-click, and then import a template.
-
Select the policy you want to use by pointing the file requester toward the hisecws_plus.inf file and selecting it. You'll also notice a "Clear this Database Before Importing" check box:
-
When this check box is checked, the current Security settings are replaced with those that you defined in the custom .inf template.
-
When this check box is unchecked, only the attributes you specifically modified are changed. In other words, the state is maintained in those attributes that have no definition.
-
-
You can ensure that the template was imported correctly by verifying that the changes you modified in the hisecws_plus.inf template are reflected. For instance, when modifying the hisecws_plus.inf template, make sure the %systemroot%\repair folder is listed. You can even dive in and inspect the settings.
-
When ready, close the Group Policy Object Editor.
Now, you are ready to reboot the machines affected by the Nurses Computers OU, or you can wait (maximally) 16 hours until the machines embrace the new security settings you specified in the GPO. Afterward, you can verify that the settings you specified in the hisecws_plus.inf template are indeed being reflected and locked down across all machines in the OU.
| | ||
| | ||
| | ||
EAN: 2147483647
Pages: 110