Creating Your Own Custom ADM Changes
| | ||
| | ||
| | ||
Now that you have seen all the premade ADM templates you can choose from, it is time to dive in and make some custom changes. You might have many items on your "custom hot-rod" hit list. Maybe you want to change the background color of a target computer, or maybe you want customize Windows Explorer. To make these custom changes, you'll need to create your own custom ADM entry. You can do so in three ways:
-
Edit an existing ADM template and add your own custom changes. This can be complicated because you need to add your custom entry in just the right place in the existing ADM template. In other words, if you don't want to dig through someone else's code, try one of these other options.
-
Create a new single ADM template to contain all your custom Registry changes.
-
Create one ADM template for each unique change.
The best approach is really the second or third. First, you really don't want to pore over the ADM code and inject your own in just the precise location. Next , and more important, the ADM template files can, and often are, updated by service pack releases. If this happens, your custom changes would likely be wiped out.
| Tip | The ADM templates that come with Windows are chock full of good examples. You can cut the code from the built-in ADM files and copy it to new ADM files. |
Creating Your Own Custom ADM Template
For our custom hot-rod example, we'll modify the Windows startup sounds. This customization will work for Windows 2000, Windows XP, and Windows 2003 systems. By default, the start-up sound is set to the Windows Logon Sound. By altering this setting through a Group Policy Object, you can make it anything that you like or turn it off.
For this example, we will walk through the steps to add this alteration to an existing ADM template:
-
Using Notepad or some other text editor, create a new file called set_sounds.adm . Don't forget that Notepad likes to append .txt to everything, so be sure you really set the name to set_sounds.adm , not set_sounds.adm.txt .
-
Locate the startup sound in the Registry:
-
HKEY_CURRENT_USER\AppEvents\Schemes\Apps\.Default\SystemStart\.Current
-
| Warning | Because this Registry key is not one of the two Policies keys we indicated earlier, it will become a tattooing preference. |
The next thing to determine is whether this Registry change is for the User or Computer Configuration node. We can clearly see from the Registry path that this is a user setting, because it is located in the HKEY_CURRENT_USER handle key. The opening syntax for all Registry punches that affects HKEY_CURRENT_USER is Class User .
-
You must now put the custom ADM change into the ADM template you just created. The syntax for this is straightforward and detailed in "ADM Template Syntax" on this book's website. For now, don't worry about the syntax; simply insert the following code into your ADM template as shown in Figure 5.4.
CLASS USER CATEGORY Sounds POLICY "Sound to hear when starting windows" KEYNAME "Appevents\Schemes\Apps\.Default\SystemStart\.Current" PART "What sound do you want?" EDITTEXT REQUIRED VALUENAME "" END PART END POLICY END CATEGORY
-
Save the file and copy it to c: \windows\inf .
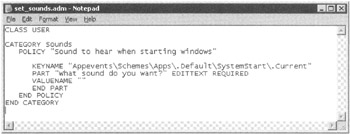
Figure 5.4: Here is your new set_sounds.adm ADM template with the Sound portion of the Registry being manipulated.
After you have the new custom ADM file in the \windows\inf folder, add the file as we did in Figure 5.2 earlier in this chapter. Now you can drill down into User Configuration ˜ Administrative Templates ˜ Sounds. However, you'll notice that no policy is shown.
To make it show, continue on to read the next section.
Viewing Old-Style Preferences
If you load additional ADM templates into the Group Policy Object Editor (as shown in Figures 5.1 and 5.2 earlier in this chapter), you won't see the entries for the old-style preferences. To see old-style preferences, you need to turn on this capability. In the Group Policy Object Editor, select the Administrative template for either Computer or User (as they work independently for this setting), and then choose View ˜ Filtering to open the Filtering dialog box, as shown in Figure 5.5.
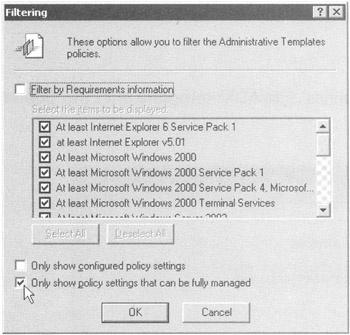
Figure 5.5: To see old-style preferences, clear the "Only show policy settings that can be fully managed" check box.
By default, the "Only show policy settings that can be fully managed" check box is checked. This is a safety mechanism that prevents old-style tattooing policies from being visible.
After you turn on the ability to see the preferences within the interface, you'll notice that icons for old-style preferences have a red dot on them. This is to indicate that this preference is added to the Group Policy. After you can see the red-dot old-style preferences, you can see the change you made to your own ADM template, as shown in Figure 5.6.
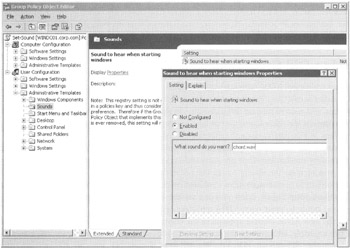
Figure 5.6: The Group Policy Object Editor shows your new custom start sound preference setting for Windows.
After the new ADM change appears in the Group Policy Object Editor, you need to configure it. For this example, let's change the setting to chord.wav , as shown in Figure 5.6. Enter the new sound file in the "What Sound Do You Want?" field. Remember, you can change this to any . wav file on the client system. Or you could disable it altogether by selecting the Disabled option.
The final step is to have the client log on and confirm that they get the sound that you configured. Figure 5.7 shows the resulting Windows XP Professional computer and the new configuration of chord.wav for the startup sound.
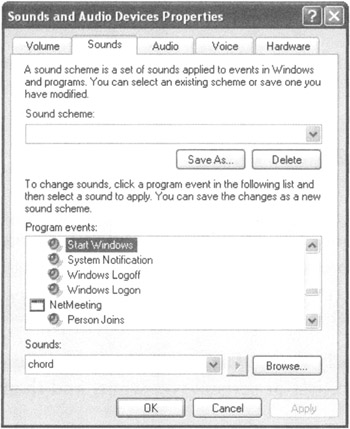
Figure 5.7: Your Windows XP and Windows 2000 clients should embrace this preference.
| Warning | Don't forget to move the user into the OU that is affected by a GPO that holds this ADM template. |
| | ||
| | ||
| | ||
EAN: 2147483647
Pages: 110