Apache Configuration
Once you have Apache successfully installed and serving web pages using the default configuration, you will most likely need to customize the configuration for your particular needs. The general features of Apache that can be configured are the global environment, such as the web document root and the TCP/IP port that Apache will use; dynamic shared object (module) control, such as support modules for programming languages that Apache can use to generate dynamic web pages; reducing the system security risks of the web server and controlling access to specific documents; support for the Common Gateway Interface (CGI), virtual hosts, and user home directories; and the location and format of logs that Apache generates.
The Apache httpd main configuration file is httpd.conf, a plain text file in the UNIX tradition. If installed from Linux packages, the location of httpd.conf is /etc/apache/, /etc/apache2/, or /etc/httpd/. If compiled and installed manually as shown earlier in this chapter, httpd.conf will be located in /usr/local/apache2/conf/.
Elements and Syntax of httpd.conf
When you first encounter the default httpd.conf file that is installed for you, you will notice how long a file it is. You’ll notice that most of the lines begin with the # (pound) symbol; all these lines are comments, another common element of UNIX configuration files. The comments explain the various options and directives. These are the commonly changed options and directives in httpd.conf (for the 2.x branch of Apache):
ServerRoot The top of the directory tree under which the server’s configuration, error, and log files are kept.
Example: ServerRoot "/usr/local/apache-2 .2.0"
Listen Allows you to bind Apache to specific IP addresses and/or ports, instead of the default. Sometimes it is desirable to have run Apache on a port other than the standard port 80, for instance, if another web server is already running on port 80.
Example: Listen 8080
User/Group The name (or number) of the user/group to run httpd as. These are important directives for security purposes. A compromised web server could be used to read and write in privileged areas of the file system. So it’s usually encouraged to use a dedicated or nonprivileged user and group for running httpd. On Linux systems on which Apache has been package installed, the Apache user and group are preset to www-data or apache. If you have manually compiled Apache, you will need to set the user and group to suitable values. Recommended values for user and group are nobody and nogroup, respectively
Example: User nobody
Example: Group nogroup
DocumentRoot The directory out of which you will serve your HTML documents. The URLs that Apache serves are relative to this document root. For example, if your DocumentRoot is set to /usr/local/apache-2.2.0/htdocs, and your server’s fully qualified domain name is pryor.acme.com, and you saved the file about.html to the /usr/local/apache-2.2.0/htdocs directory, then the URL for about.html would be http://pryor.acme.com/about.html.
Example: DocumentRoot "/usr/local/apache-2.2.0/htdocs"
Directory Each directory to which Apache has access can be configured with respect to which services and features are allowed and/or disabled in that directory (and its subdirectories). Each directory-specific configuration in httpd.conf is enclosed by an opening <Directory directory_name> tag and a closing </Directory> tag. The following example <Directory> entry for the DocumentRoot comes from a default httpd.conf after a manual compile of Apache.
Example:
<Directory "/usr/local/apache-2.2.0/htdocs"> # The Options directive is both complicated and important. Please see # http://httpd.apache.org/docs/2.2/mod/core.html#options # for more information. # Options Indexes FollowSymLinks # AllowOverride controls what directives may be placed in .htaccess files. # It can be "All", "None", or any combination of the keywords: # Options Filelnfo AuthConfig Limit # AllowOverride None # # Controls who can get stuff from this server. # Order allow, deny Allow from all </Directory>
DirectoryIndex Sets the file that Apache will serve if a directory is requested. This file is usually called index.html. After you install Apache, you should find the default index.html file already installed in the DocumentRoot. After Apache is installed and started, when the home page URL http://localhost is requested, it is the index.html file in DocumentRoot that is actually served by Apache. In the following example, index.htm and index.php are also made valid directory index files.
Example:DirectoryIndex index.html index.htm index.php
Include Allows you to include external configuration files to add extra features or to modify the default configuration of the httpd server. The location of the external configuration files are specified relative to the DocumentRoot. The following example includes the external configuration file, httpd-userdir.conf, which enables users to serve web pages from their home directories by saving HTML files to the ~/public_html directory If the DocumentRoot is set to /usr/local/apache-2.2.0, the Include directive here expects to find httpd-userdir.conf as DocumentRoot/conf/extra/httpd-userdir.conf.
Example: Include conf /extra/httpd-userdir. conf
User Directories
An often-used feature of Apache is the aforementioned user directories feature to allow users to serve web pages from their ~/public_html directories. The Apache module needed to enable user directories, mod_userdir, is usually compiled statically into the httpd executable. Whether the external userdir configuration file, httpd-userdir.conf, is “Included” in httpd.conf or whether user directories are enabled directly in httpd.conf, the needed configuration directives for user directories are as follows, assuming that user home directories are under /home:
# UserDir: The name of the directory that is appended onto a user's home # directory if a -user request is received. # UserDir public_html # # Control access to UserDir directories. # <Directory /home/*/public_html> AllowOverride AuthConfig Filelnfo Options </Directory>
With user directories enabled, a user such as jdoe can create a personal home page by creating the file /home/jdoe/public_html/index.html. If jdoe has a user account on a UNIX host called pryor.acme.com that runs Apache with user directories enabled, jdoe’s personal home page would have the URL http://pryor.acme.com/~jdoe.
Virtual Hosts
A less well-known, but particularly useful, feature of Apache is its ability to support virtual hosts. With virtual hosts, a single UNIX host running Apache can serve multiple web sites with unique subdomain names. For example, the Products and Research Departments of acme.com can use the pryor.acme.com UNIX host to host both the http://products.acme.com/ and http://research.acme.com/web sites. This can be done by configuring Apache on pryor.acme.com with the products.acme.com and research.acme.com virtual hosts. Additionally, the two host names, products.acme.com and research.acme.com, must be associated with pryor.acme.com’s IP address on the acme.com domain name server (DNS). Configuration directives in httpd.conf on pryor.acme.com for the products.acme.com and research.acme.com virtual domains would need to include these lines:
NameVirtualHost 192.168.2.150 # 192.168.2.150 is the hypothetical numeric IP address for pryor.acme.com <VirtualHost 192.168.2.150> ServerName products.acme.com Serveralias products DocumentRoot /usr/local/apache2/htdocs/products </VirtualHost> <VirtualHost 192.168.2.150> ServerName research.acme.com Serveralias research DocumentRoot /usr/local/apache2/htdocs/research </VirtualHost>
CGI Support in Apache
The means for creating dynamic web content for things such as web applications are continually increasing. The Common Gateway Interface (CGI) was one of the first methods used for executing external programs that related to web pages, and it is still a well-used method due to its relative simplicity, as well as the continued popularity of the Perl language, which has traditionally been used to develop CGI programs. (Perl has been called the “duct tape of the Internet” because it is so widely used in web application development, mostly in the form of CGI programs.) CGI is a standard for interfacing external applications with information servers, such as HTTP or web servers. A CGI program is executed in real time so that the output it generates can dynamically become part of the HTML code that is served by a web server such as Apache. Common uses for CGI programs include providing access to a search engine or a database and parsing information that is entered into web forms. (See Chapter 27 for more about CGI scripts.)
There is a standard location for CGI scripts under Apache’s installation root directory.
If Apache was installed using Linux packages, the standard location for CGI scripts is typically /var/www/cgi-bin. Otherwise, if Apache was manually compiled and installed from the source code as prescribed in this chapter, the location would be /usr/local/apache2/cgi-bin. There is a httpd.conf directive called ScriptAlias that creates an alias for the cgi-bin directory to make cgi-bin accessible relative to the DocumentRoot. An example for an Apache installation on Linux follows:
ScriptAlias /cgi-bin/ "/var/www/cgi-bin/"
The ScriptAlias directory will contain the CGI programs that a web browser can request. The CGI programs run on the same server that Apache is running. CGI programs under Apache can be written in any programming language that is capable of determining the values of the UNIX environment variables. Common languages used for CGI programs include Perl, Python, and even C. The following shell script code is a quick CGI script that illustrates how an external program can be used to dynamically generate HTML code that Apache can serve on the network:
#!/bin/sh echo 'Content-type: text/html' echo echo "<html><head><title>Hello World</title>" echo "</head><body><hl>Hello World</h1></body></html>"
The script uses the standard Bourne shell built-in echo command. The first echo serves to inform the calling web browser of the output type (text/html) that will follow. The last two echo commands surround the string, “Hello World” with HTML code to display “Hello World” on the web browser title bar and in the web browser main window. As root, try saving this code to a file called hello_world.cgi in the directory that follows the ScriptAlias directive in httpd.conf, say /var/www/cgi-bin. CGI programs are called by the Apache httpd process. So this .cgi file needs to be made readable and executable for the user (apache, wwwdata, or nobody) that owns the Apache process. The quickest way is to use the chmod command:
# chmod o+rx hello_world.cgi
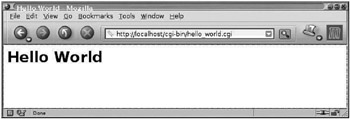
To actually call this CGI script, use a web browser on the Apache server machine to view the URL, http://localhost/cgi-bin/hello_world.cgi. The resulting browser window should resemble Figure 16–3.

Figure 16–3: Output of hello_world.cgi in browser window
If the test CGI script can be successfully executed, your Apache installation should be ready to support more useful and high-quality CGI programs such as web discussion boards, weblogs, and wikis, many of them written in Perl and open sourced. Note that recent advances, such as FastCGI and mod_perl, have addressed performance issues that have been associated with running CGI programs.
CGI Security and Suexec
The impact of a web server on system security should always be a concern because an improperly configured web server can give anyone with a web browser undesirable read access to areas of a web server machine’s file system. This is why it is always recommended that Apache processes be owned by unprivileged users such as nobody. The security of CGI programs is of particular concern because of the potential for abusing CGI programs to write to file systems and to gain remote root access on web server machines. A web programmer should employ good programming practices so that CGI cannot be exploited to compromise system security With CGI programs there is also the question of access security As stated before, CGI programs are called from Apache, which is typically owned by a nonprivileged user such as www-data, apache, or nobody. In the preceding example, we made the hello_world. cgi executable (which was owned by root) world-readable so that the Apache process could read and execute it. Making any CGI program world-readable is problematic; some CGI programs need to have user IDs and passwords embedded in them. If the CGI program needs to read files from an Apache subdirectory, that subdirectory and its contents would also need to be made world-readable, and in some cases, world-writable. It is better to change the ownership of the CGI script to www-data, apache, or nobody, that is, to change the ownership to be the same as the Apache process user, and make it readable and executable for that user only. For the hello_world.cgi example, if the Apache process owner is nobody, you would want to run as root:
# chown nobody hello_world.cgi ; chmod 700 hello_world.cgi
You would also want to change the ownership and access modes of any Apache subdirectories and files to make them accessible to only nobody if they need to be accessed by hello_world.cgi.
Suexec
The suexec feature of Apache, which was introduced in version 1.2, allows for more flexible CGI access control. The use of suexec is particularly suited for private CGI programs that nonroot users are using or testing in their Apache user directories, ~/public_html. Normally, CGI programs run with the same user ID and privileges as Apache httpd. But with suexec enabled, Apache allows CGI programs to run with the user ID of the user who owns the CGI program. For instance, the user jdoe is testing the Perl CGI script myscript.pl that he has saved as ~/public_html/cgi-bin/myscript.pl on the pryor.acme.com UNIX host. Since jdoe is the owner of myscript.pl, when Apache executes myscript.pl through suexec, it will run with user ID jdoe instead of the normal CGI user (nobody, www-data, or apache). Because myscript.pl runs with user ID jdoe, it is able to access files and directories that are owned by jdoe; consequently, there is no need to make these files and directories world-readable or -writable, enhancing security. Suexec also performs several security checks on CGI programs before it runs them. It should be noted that for a normal user such as jdoe to be able to use Apache to serve CGI program out of the ~/public_html/cgi-bin directory, a <Directory> entry such as the following must be added to httpd.conf:
<Directory "/home/jdoe/public_html/cgi-bin"> Options +ExecCGI SetHandler cgi-script </Directory>
After Apache is restarted on pryor.acme.com, jdoe will be able to test his myscript.pl script by using a web browser to request the URL, http://pryor.acme.com/~jdoe/cgi-bin/myscript.pl.
Password-Protected Web Pages with Basic Authentication
Apache provides a way to do simple password protection of selected web pages. This can be done using the Basic HTTP Authentication method. The easiest way to restrict access using one username and password requires you to create two hidden text files. The first file is called .htaccess and is placed in the directory you wish to restrict access to. For example, if the restricted directory is /usr/local/apache2/htdocs/restricted/, you would create the .htaccess file in that directory with the following possible contents:
AuthUserFile /usr/local/apache2/lib/.htpasswd AuthGroupFile /dev/null AuthName "Access restricted. Please log in." AuthType Basic <LIMIT GET> require user AcmeRestricted </LIMIT>
The bottom three lines indicate that only users who log in as AcmeRestricted will be able to access the directory that the .htaccess file is in. The top line that begins with AuthUserFile contains the location of the password file for AcmeRestricted. The AuthGroupFile line is used when you want to have multiple usernames. In this case, there is only one user name, so we point this line to /dev/null. The third line is the title of the authentication message box that would pop up in a web browser when the /usr/local/apache2/htdocs/restricted/ directory is requested. The fourth line indicates that this uses Basic Authentication.
The second file to be created is the .htpasswd file that is referred to in the first line of .htaccess. The htpasswd command that is part of the Apache installation can be used to generate the .htpasswd file. To create the .htpasswd file needed for this example, the command would be
# /usr/local/apache2/bin/htpasswd −c /usr/local/apache2/lib/.htpasswd AcmeRestricted
When you run this command, you will be prompted to type in the password, which will be encrypted using the UNIX crypt function and inserted into the .htpasswd file. The restricted directory and also .htaccess and .htpasswd must be made readable for the Apache httpd process, which would typically mean making them readable for the nobody, www-data, or apache user.
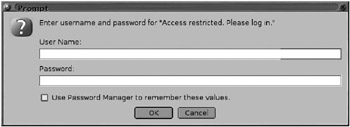
Figure 16–4 shows the expected authentication login window that would be popped up by a web browser if Basic Authentication is set up correctly for the restricted directory.

Figure 16–4: Apache’s basic authentication login window
Apache allows the use of more secure authentication methods beyond Basic Authentication. The Apache documentation recommends using at least HTTP Digest Authentication, which is provided by the mod_auth_digest module, though the documentation also states that Digest Authentication is still in an “experimental” state.
Apache and LAMP
Apache is an integral part of what has become an important web application development platform called LAMP, an acronym whose letters stand for Linux, Apache, MySQL, and Perl/Python/PHR The acronym is sometimes shortened to AMP since Apache, MySQL, and Perl/Python/PHP can run on all UNIX variants, not just Linux. The widely used MySQL database management system provides the back-end data storage for LAMP applications. In these LAMP applications, Perl/Python/PHP are used to write CGI programs or CGI-like programs that are executed by the Apache web server to interact with users (the web front end) and access data stored in MySQL (the database back end). Popular examples of LAMP applications are news/discussion forums such as Slashdot (http://slashdot.org/), content management systems such as PHP-Nuke (http://www.phpnuke.org/), and wiki engines such as Mediawiki (http://www.mediawiki.org/).
The most widely used language in LAMP applications is PHP (http://www.php.net/). Unlike Perl or Python, PHP was developed with web applications in mind. PHP was originally designed to be used in conjunction with a web server, to act as a filter that takes a file containing text and PHP instructions and converts it to HTML for display on a web browser. The most common way of running PHP programs in Apache is not through CGI, but through an Apache module that interprets PHP language instructions that are embedded in HTML documents. This section will step through the proper installation of the PHP module for Apache and should also give a general idea of how third-party Apache modules are built and integrated using apxs, the Apache Extension Tool mechanism.
On Linux distributions and BSD variants such as FreeBSD, installing PHP support for Apache is usually just a matter of installing the available PHP binary packages. On UNIX platforms on which you have manually compiled and installed Apache yourself, you will need to compile and install PHP with Apache support. The steps required to compile PHP and integrate it with Apache follow. Unless otherwise noted, you should be able to perform these steps as a normal (nonroot) user.
Step 1: Obtain the PHP Source Code
First, obtain the PHP source code from http://www.php.net/. As of mid-2006, the latest bzip2compressed tar archive for Apache was php-5.l.4.tar.bz2, so the following examples will assume that you have downloaded and saved php-5.1.4.tar.bz2 to a source directory The PHP tar.bz2 archive needs to be unarchived using the following command:
$ bzip2 −dc php-5.1.4.tar.bz2 | tar −vxf
This will extract the contents of the tar.bz2 archive into a new subdirectory called php-5.1.4.
Step 2: Configure the Source Code, Build, and Install
You should enter the new php-5.1.4 subdirectory that was just created. The INSTALL file found in the php-5.1.4 subdirectory contains useful information for building PHP to work with various web servers including Apache. The PHP build process begins with the included GNU autoconf system’s configure script. The configure script’s options can be viewed as follows:
$ ./configure --help | less
Assuming you are installing PHP in /usr/local/php-5.1.4, the following is a run of the configure script with the appropriate --prefix command switch and also the --with-apxs2 and --with-mysql command switches to interface with an existing Apache installation and an existing MySQL installation, respectively:
$ ./configure --prefix=/usr/local/php-5.1.4 \ --with-apxs2=/usr/local/apache2/bin/apxs --with-mysql
The --with-apxs2=/usr/local/apache2/bin/apxs command-line switch calls the Apache apxs tool, which is used for building and installing extension modules for Apache. The PHP build process uses apxs to build an Apache dynamic shared object (DSO) for PHP, which can then be loaded into the Apache web server at run time (through a directive in the Apache httpd.conf configuration file) to support the PHP language. The –with-mysql command switch will configure the PHP build to build PHP with MySQL database-specific support.
A successful run of configure will generate Makefiles to build and install PHP. After this you must run the make and make install commands. The build of PHP using make will take considerably longer than the build of Apache. The make install command must be executed as root:
$ make (after becoming root) # make install
The make install command will copy the compiled PHP executables, libraries, directory structure, and data files into the installation root directory that you specified with the configure --prefix command and option described previously, for example, /usr/local/php-5.1.4. In addition, the make install command will copy the PHP dynamic shared object or module called libphp5.so to the Apache module directory, for example, /usr/local/apache2/modules.
PHP options belong in a file called php.ini, which should be created in the just-created /usr/local/php-5.1.4/lib directory The PHP source code directory includes a default php.ini called php.ini-dist that can be copied into the PHP installation directory with the following command:
# cp php.ini-dist /usr/local/lib/php.ini
Step 3: Configure Apache Support for PHP
Apache needs to be configured to load the PHP module (libphp5.so) at startup to support the PHP language. This is accomplished by adding a Load directive to Apache’s httpd.conf file as follows:
LoadModule php5_module modules/libphp5.so
If you configured the PHP build with the --with-apxs2=/usr/local/apache2/bin/apxs option, this LoadModule line is automatically added to httpd.conf when you run make install as root in the PHP source directory
You also need to configure Apache to parse certain filename extensions as PHP. Most commonly, Apache is configured to parse the .php (and sometimes .phtml) extension as PHP by adding the following line to httpd.conf:
AddType application/x-httpd-php .php .phtml
As with other UNIX network services, when you change httpd.conf, you should restart Apache. If the Apache SysV init script was installed as /etc/init.d/apache2, you can restart Apache with the following command:
# /etc/init.d/apache2 restart
With the PHP module loaded, Apache will recognize and execute PHP programs that are embedded in HTML files that have a .php filename extension. The following is a simple PHP example file that will print “Hello World!” in a web browser window, followed by a call to the phpinfo() function to print the PHP configuration:
<html> <head> <title>Very simple PHP program</title> </head> <body> <?php print 'Hello World!'; phpinfo(); ?> </body> </html>
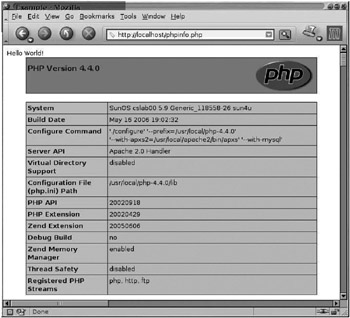
If you save this HTML/PHP code to a file such as phpinfo.php under your Apache document root and load it using a web browser, you should see output similar to Figure 16–5, which will indicate that PHP has been installed correctly as an Apache module. Your Apache installation should now be ready to use a rich library of freely available PHP-based web applications that use MySQL as a data back end.

Figure 16–5: PHP configuration information from phpinfo()
Apache Configuration Front Ends
The size and complexity of Apache’s configuration file, httpd.conf, can be daunting for beginning administrators. One way to manage the complexity of large UNIX configuration files has been to split the configuration file up into smaller parts and use “Include”-type statements in the main configuration file to bring the parts together into a whole. This approach makes the configuration system more modular. This is an approach that is being frequently used in mainstream Linux distributions. In these Linux distributions, the Apache httpd.conf can be just a container that “Includes” several other files.
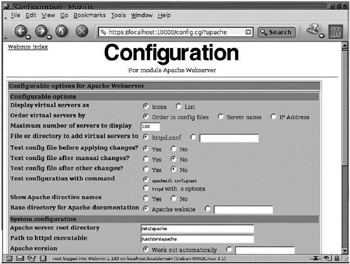
An additional measure that can be taken to manage the complexity of large configuration files is to use some type of configuration “front end” that consists of a graphical user interface or web browser interface that displays Apache’s configuration options as graphical menus and drop-down items. Comanche (http://www.comanche.org/) is a graphical user interface application that can be used to configure Apache on UNIX platforms. Webmin (http://www.webmin.com/) is one of the better-known web browser-based front ends. Though Webmin is a general-purpose UNIX system administration interface, it has many standard modules to configure and administer common system services, including Apache. The browser window in Figure 16–6 shows a part of the web interface that Webmin provides to configure the core features of Apache as well as Apache’s bundled modules.

Figure 16–6: Configuring Apache through Webmin
EAN: 2147483647
Pages: 316