6.3 Adding Global Image Functions
| You have probably noticed that our apImage<> class does not include the image processing functions. We decided that the image class should only contain the absolute essentials. At first we were only going to offer set() and make the operations, such as add() , be functions rather than methods . However, set() and add() are so similar in appearance that we decided to keep them in the class interface.
For example, how do we go about copying an image? Is it possible to copy just a section of the image? To answer these questions, we need to analyze what copying an image really entails. We will take the lessons we learn from copying images and apply them to almost all of our image processing functions. Our generic interpretation means that these functions become more difficult to write, but they also become much more powerful to use. 6.3.1 Copying an ImageThere are three ways that images can be copied :
You might be tempted to implement a different version of copy() for each method. The semantics of method 1 differs from methods 2 and 3, but if we can design a solution for method 3, we can use it to solve method 1 as well. We have already seen that in method 3, the source and destination images do not have to be the same pixel type. This is a very desirable feature because certain image conversions are very common operations. For example, look at the conversion from a color image to a monochrome image: apImage<apRGB> image1; ... apImage<Pel8> image2; copy (image1, image2); There is a more complicated case we need to consider. What happens if the destination image is not null? In other words, what should the behavior of copy() be if both the source and destination images are valid? Most imaging software packages will probably discard whatever is stored in the destination image and replace it with a copy of the source image. Doing so makes the implementation of copy() easier, but it does not address what the user is asking for. Our interpretation of the problem is quite different:
You might wonder if all this is really necessary for a copy() function. The answer is yes, because we want to offer this type of functionality for any image processing function that looks like: template<class T1, class S1, class T2, class S2> void func (const apImage<T1,S1>& src, apImage<T2,S2>& dst); If we offer this functionality for some arbitrary function func() , we should have the same functionality for copy() , since it takes the identical form. Computing the overlap between two images is easy. Mathematically, we want to compute the intersection between the source image boundary and the destination image boundary. The result is an apRect that specifies which pixels should be processed . apRect has an intersect() method that will compute the overlap for us: template<class T1, class S1, class T2, class S2> void func (const apImage<T1,S1>& src, apImage<T2,S2>& dst) { ... apRect overlap = src.boundary().intersect (dst.boundary()); if (overlap.isNull()) return; // Restrict processing to this region apImage roi1 = src; roi1.window (overlap); apImage roi2 = dst; roi2.window (overlap); // Run our function on the pixels in roi1 and roi2 ... } As you can see, we determine the pixels that need to be processed by computing the image windows ( roi1 and roi2 ) that contain the intersection of the two images. Although this code is fairly simple, we do not want to duplicate it in every image processing function. Instead, we create a small framework to off-load most of the work, so new image processing functions can be added without having to worry about all the math. This framework also provides a consistent interface for each function. We are calling this a framework because we need more than one class to add this capability. Each class handles a specific type of image processing function, also referred to as an image filtering function. Usually this corresponds to the number of image arguments required by the function, but it can also include other parameters. We almost chose to use function objects, but decided in our own implementation to maximize code reuse between similar classes of image processing functions. For information on function objects, see [Stroustrup00]. 6.3.2 Processing Single Source ImagesSingle source image processing operations take a single source image and produce a single destination image. We provide a number of single source image processing operations, including:
operator+= and operator-= might not look like single source operations, but these operators take a single image and add or subtract it to the destination image. Single source image processing operations have the following form: template<class T1, class S1, class T2, class S2> void func (const apImage<T1,S1>& src, apImage<T2,S2>& dst); We provide a general class, apFunction_s1d1 , that you can use to easily add your own single source image processing functions. (Note that we have chosen to make this class name descriptive, rather than concise , because it is used internally by developers. We reuse this naming convention when we provide a similar class, named apFunction_s1s2d1 , for two source image processing functions.) apFunction_s1d1 lets us logically divide the processing operations, each as a separate method. We have made some of those methods virtual so that we can derive new classes from apFunction_s1d1 to handle custom requirements. In general, we cannot assume that the same intersection region is applied to both the source and destination images, so we keep these regions separate. We use the apIntersectRects structure, as shown: struct apIntersectRects { apRect src; // Intersection region for source image(s) apRect dst; // Intersection region for dest image(s) }; The apFunction_s1d1 class is shown here. template<class R, class T1, class T2, class S1=apImageStorage<T1>, class S2=apImageStorage<T2> > class apFunction_s1d1 { public: apFunction_s1d1 () : function_ (0) {} typedef void(*Function) (const R&, const apImage<T1,S1>& src1, apImage<T2,S2>& dst1); apFunction_s1d1 (Function f) : function_ (f) {} virtual ~apFunction_s1d1 () {}; void run (const apImage<T1,S1>& src1, apImage<T2,S2>& dst1) { return execute (src1, dst1);} // Executes the image processing function protected: Function function_; // Our process function, if any apImage<T1,S1> roi1_; // roi of src1 image apImage<T2,S2> roi2_; // roi of dst1 image virtual apIntersectRects intersection (const apImage<T1,S1>& src1, apImage<T2,S2>& dst1); { return intersect (src1.boundary(), dst1.boundary());} virtual void execute (const apImage<T1,S1>& src1, apImage<T2,S2>& dst1); virtual void createDestination (const apImage<T1,S1>& src1, apImage<T2,S2>& dst1); virtual void process (); }; apFunction_s1d1 has five template parameters. Four of these parameters are present because there are two images, each requiring two parameters. We have reordered the template parameters because many have default values that applications can simply use. This means that there are really only three parameters we need to consider:
When T1 pixels are manipulated by an image processing function to compute T2 pixels, any temporary storage will use R as the pixel type. There is no default argument for R because this value is highly application-dependent. If you remember, it was our third prototype (separating the image class and image storage) that demonstrated the need for R . R is the first parameter because it must be explicitly defined. apFunction_s1d1 can be used in two different ways, depending on how you want to specify the actual image processing operations. You can either override process() to define your processing function, or you can pass a function pointer to the constructor. We recommend that you pass a pointer because it means that there will be no changes to apFunction_s1d1 , and no need to derive objects from it. It also encourages you to write stand-alone image processing operations that potentially have other uses in your application. You pass a function pointer to the constructor, as shown: typedef void(*Function) (const R&, const apImage<T1,S1>& src1, apImage<T2,S2>& dst1); apFunction_s1d1 (Function f) : function_ (f) {} Function looks a lot like the function that you will actually write (see our func() definition on page 206). The big difference is that the function you write can safely ignore issues, such as image overlap or constructing the destination image if none is specified. Our first argument is a placeholder for the data type for intermediate computations. We would have preferred to specify the first parameter using explicit template instantiation, but the compiler does not accept this. The run() method is the main entry point of apFunction_s1d1 , but it only calls the virtual function, execute() . The execute() method constructs the intersection and performs the image processing operation. execute() is only overridden if the standard rules for computing the image windows changes. We will soon see how image processing operations, such as convolution, require a new definition for execute() . The definition for execute() is shown here. virtual void execute (const apImage<T1,S1>& src1, apImage<T2,S2>& dst1) { // If a null image is passed, return a null image if (src1.isNull()) { dst1 = dst1.sNull; return; } // Exception-safe locking. apImageLocker<T1,S1> srcLocking (src1); // Create the destination if it was not specified. Create an // output image with the same alignment as the input. if (dst1.isNull()) createDestination (src1, dst1); // Lock destination after it is created (if necessary) apImageLocker<T2,S2> dstLocking (dst1); // Compute the overlap between the images apIntersectRects overlap = intersection (src1, dst1); // Return a null image if there is no overlap if (overlap.dst.isNull()) { dstLocking.unlock(); // Unlock the object before assignment dst1 = dst1.sNull; return; } // Work only within the overlap area roi1_ = src1; roi2_ = dst1; roi1_.window (overlap.src); roi2_.window (overlap.dst); // Run the image processing routine. try { process (); } catch (...) { // Add any recovery code here. throw; } } In broad terms, execute() does the following:
The intersection() method does nothing but call a global intersect() function. We added numerous intersect() functions to the global name space to encourage developers to use them for other purposes. The intersect() function is shown here. apIntersectRects intersect (const apRect& src, const apRect& dst) { apIntersectRects overlap; apRect srcOverlap = src; if (!dst.isNull()) srcOverlap = srcOverlap.intersect (dst); overlap.src = srcOverlap; overlap.dst = srcOverlap; return overlap; } We provide the process() function to allow derived classes to define their own processing behavior, if necessary. We create a placeholder variable so that the compiler will call function_ with the appropriate arguments, as shown: virtual void process () { R placeholder; if (function_) function_ (placeholder, roi1_, roi2_); } We have kept this object, and the other objects like it, in a separate file to promote their use. The actual image processing operations are kept in separate files, based on what the functions do. Let's get back to our copy() example and look at how we handle its implementation. We start by designing the actual image processing operation, making sure that its function prototype matches the Function definition in apFunction_s1d1 . We show two implementations of our copy function. Note that neither function requires the template parameter, R , so this parameter is ignored.
The assumption that memcpy() can be used to duplicate pixels is usually, but not always, valid. For example, what if you had an image of std::string objects? It may sound absurd, but it demonstrates that blindly copying memory is not always appropriate. Our final version of copy() , written using the generic ap_copy() , is shown here. template<class T1, class S1, class T2, class S2> void copy (const apImage<T1,S1>& src, apImage<T2,S2>& dst) { apFunction_s1d1<T2,T1,T2,S1,S2> processor (ap_copy); processor.run (src, dst); } As implemented, copy() addresses the issues raised when the source and destination images are specified and the pixel types may or may not be different. Note that T2 is passed as a parameter, R , which defines all of the template parameters; however, the copy function can ignore it. In addition, copy() offers improved performance when the pixel types match. (See the earlier discussion in Section 6.3.1 on page 204.) In the case where the source image is specified and the copy should create the destination image, we can create an overloaded version of copy() to take advantage of ap_copyfast() , as shown. template<class T1, class S1> apImage<T1,S1> copy (const apImage<T1,S1>& src) { apImage<T1,S1> dst; apFunction_s1d1<T1,T1,T1,S1,S1> processor (ap_copyfast); processor.run (src, dst); return dst; } To demonstrate that we can use the STL generic algorithms with apImage<> , we rewrite copy() using std::copy() , as shown. The destination image must be allocated before calling std::copy(), since apImage<> does not support input iterators. template<class T1, class S1> apImage<T1,S1> copy_stl (const apImage<T1,S1>& src) { apImageLocker<T1,S1> srcLocking (src); apImage<T1,S1> dst (src.boundary(), src.alignment()); std::copy (src.begin(), src.end(), dst.begin()); return dst; } While this function may be easier to write, it also slows greatly during execution. Using our 2.0 GHz Intel Pentium 4 processor-based machine, the performance for allocating and copying a 1024x1024 8-bit monochrome image is as follows : copy() takes 4 milliseconds , while copy_stl() takes 16 milliseconds. Both functions produce the identical image as output. 6.3.3 Processing Two Source ImagesMany image processing functions operate on two source images and produce a single output image. We provide the following two source image processing operations:
Let's look at a few of these operations. We can use apFunction_s1d1 as a template to add a new object that computes the intersection of three images (the two source images and the destination image, if any). There are two images that supply source pixels to the image processing function. If a valid destination image is specified, its boundary information helps determine which source pixels to use in the image processing routine. Our new object, apFunction_s1s2d1 , takes on a slightly more complicated form, because there are now two additional template parameters to refer to the additional image used by these operations. This brings the total number of parameters to seven, but for most uses only four are needed. The apFunction_s1s2d1 object is shown here. template<class R, class T1, class T2, class T3, class S1=apImageStorage<T1>, class S2=apImageStorage<T2>, class S3=apImageStorage<T3> > class apFunction_s1s2d1; Let's look at the intersect() method, which is shown here. Note that we have removed a few virtual functions, compared to apFunction_s1d1 , because we do not expect derived classes to be necessary. apIntersectRects intersect (const apRect& src1, const apRect& src2, const apRect& dst) { apIntersectRects overlap; // Setup our src and dst regions we have to work with apRect srcOverlap = src1; srcOverlap = srcOverlap.intersect (src2); if (!dst.isNull()) srcOverlap = srcOverlap.intersect (dst); overlap.src = srcOverlap; overlap.dst = srcOverlap; return overlap; } Now let's look at the add() operation. As we demonstrated with copy() , add() uses the apFunction_s1s2d1 class to add the contents of two images and store the result in a third. ap_add2() is the function that performs this operation. And like copy() , we can ignore the intermediate storage specifier ( R in this case). template<class R, class T1, class T2, class T3, class S1, class S2, class S3> void ap_add2 (const apImage<T1,S1>& src1, const apImage<T2,S2>& src2, apImage<T3,S3>& dst1) { // Operate on each pixel typename apImage<T1,S1>::row_iterator i1 = src1.row_begin(); typename apImage<T2,S2>::row_iterator i2 = src2.row_begin(); typename apImage<T3,S3>::row_iterator i3 = dst1.row_begin(); unsigned int w = src1.width (); const T1* p1; const T2* p2; T3* p3; for (; i1 != src1.row_end(); i1++, i2++, i3++) { p1 = i1->p; p2 = i2->p; p3 = i3->p; for (unsigned int x=0; x<w; x++) *p3++ = add2<T3> (*p1++, *p2++); // *p3++ = *p1++ + *p2++; } } ap_add2() iterates row by row, and uses our generic add2() function to construct each destination pixel. We use add2() so that we can easily handle overflow detection (if we use apClampedTmpl<T> as parameters), or other optimizations based on pixel type. The user-callable functions are now easy to write. The only assumption that we make is with operator+ , where the destination image is given the same pixel type and alignment as the first image specified. The implementation of add() and operator+ is shown here. template<class T1, class T2, class T3, class S1, class S2, class S3> void add (const apImage<T1,S1>& src1, const apImage<T2,S2>& src2, apImage<T3,S3>& dst1) { apFunction_s1s2d1<T3,T1,T2,T3,S1,S2,S3> processor (ap_add2); processor.run (src1, src2, dst1); } template<class T1, class T2, class S1, class S2> apImage<T1,S1> operator+ (const apImage<T1,S1>& src1, const apImage<T2,S2>& src2) { // Get our types from the first parameter apImage<T1,S1> dst; add (src1, src2, dst); return dst; } 6.3.4 Processing Images with Neighborhood OperatorsA neighborhood operator is one where the content of many source pixels affects the contents of a single destination pixel. One of the most common types of neighborhood operations is called convolution . In convolution, the value of a pixel in the resulting filtered image is computed as a weighted sum of its neighboring pixels. The matrix of weights used in the summing operation is called a kernel . We provide the following convolution kernels :
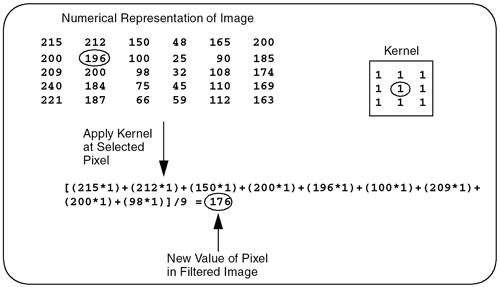
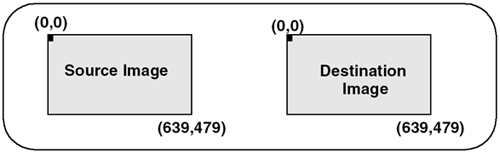
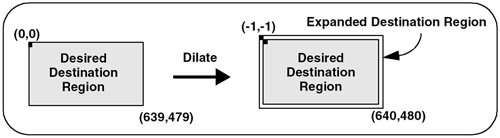
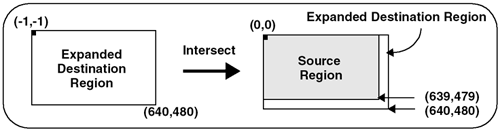
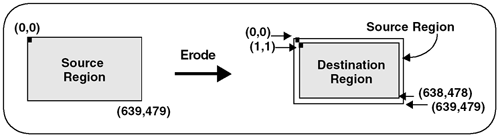
Low-Pass Kernel for Noise EliminationNoise in an image may come from such phenomena as photographic grain. Noise often appears as random pixels interspersed throughout the image that have a very different pixel value than those pixels immediately surrounding them (or the neighboring pixels). Figure 6.6 illustrates the application of a noise-smoothing filter. Figure 6.6. Low-Pass Averaging Filter There are many different algorithms for smoothing noise in an image. Noise in an image generally has a higher spatial frequency because of its seeming randomness. We use a simple low-pass spatial filter to reduce the effects of noise through an averaging operation. Each pixel is sequentially examined and, in the 3x3 kernel we use, the pixel value is determined by averaging the pixel value with its eight surrounding neighbors. Given a point ( x , y ) we average nine pixels in a 3x3 neighborhood surrounding this point. This 3x3 kernel is shown here. This kernel is sequentially centered over each pixel. The value of each pixel and its surrounding neighbors are multiplied and then summed. Finally, the average value is computed using the following formula: D(x,y) = (S(x-1,y-1)+S(x,y-1)+S(x+1,y-1)+ S(x-1,y) +S(x,y) +S(x+1,y)+ S(x-1,y+1)+S(x,y+1)+S(x+1,y+1)) / 9; Figure 6.7 shows how this kernel is used to reduce the noise on a single pixel in an image. Figure 6.7. Low-Pass Filter This function is easy to write, until you consider the boundary conditions. Consider a source image with an origin of ( , ). In Figure 6.7, the origin has a pixel value of 215 . To compute the destination point in the filtered image at ( , ), our equation shows that we need information from pixels that do not exist (for example, S(-1,-1) ). We cannot compute a pixel when the data does not exist. This boundary condition can be handled in a number of different ways. One very common solution is to set all boundary pixels to (black). We recommend a different, more generalized solution that has several advantages. By effectively optimizing the problem to determine which pixels are needed to compute the destination (or filtered) image, our solution allows developers to ignore complicated boundary solutions. Here's how it works. We compute the intersection of the source and destination image, taking the size of the kernel into account. Our intersection() function computes which pixels to process. In our example, the kernel size is 3 (using the 3x3 kernel above). The intersection() function assumes the kernel size is odd, making it possible to center the kernel over the pixels to process. The function is as follows: apIntersectRects intersect (const apRect& src, unsigned int xKernelSize, unsigned int yKernelSize, const apRect& dst) { apIntersectRects overlap; if (xKernelSize < 1 yKernelSize < 1) return overlap; // Expand the dst region to indicate pixels we would "like" // to have in our image. int xExpansion = (xKernelSize-1) / 2; int yExpansion = (yKernelSize-1) / 2; apRect dstRegion = dst; dstRegion.expand (xExpansion, yExpansion); // The source pixels we'll use is just the intersection apRect srcRegion = src; srcRegion = srcRegion.intersect (dstRegion); // We're done if there is no overlap or the overlap // area is not big enough. if (srcRegion.isNull() srcRegion.width() < xKernelSize srcRegion.height() < yKernelSize) return overlap; // The destination pixels we'll have is handled by // shrinking (i.e. eroding) the source region dstRegion = srcRegion; dstRegion.expand (-xExpansion, -yExpansion); overlap.src = srcRegion; overlap.dst = dstRegion; return overlap; } As you can see, this function is very different from the simple intersection operations we have written so far. Let's apply this function using an example with our 3x3 kernel. Assume that both the source and destination images have an origin at ( , ) and are 640x480 pixels in size as shown in Figure 6.8. Figure 6.8. Source and Destination Images
This says what we already know: if the source and destination images are the same size, there is a one pixel border surrounding the destination image that cannot be computed. Under common operating conditions, these calculations result in a long, but simple, result. It has much more utility when you need to process a region of interest of a larger image. With larger images, the destination image can often be filled with valid results, since the source image contains all of the necessary pixels. Our neighborhood processing is similar to the one source image, one destination image case we discussed earlier. Our image processing class, apFunction_s1d1Convolve , is derived from apFunction_s1d1 to take advantage of our modular design. Besides taking additional parameters, this object overrides the member functions that compute the intersection and creates a destination if none was specified. We can write a general purpose convolution routine by writing our processing function to take an array of kernel values and a divisor. For example, the following kernel is what our image framework uses to compute a low-pass averaging filter: 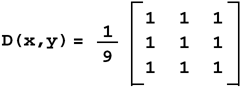 template<class R, class T1, class T2, class S1, class S2> void ap_convolve_generic (const R&, const apImage<T1,S1>& src1, const char* kernel, unsigned int size, int divisor, apImage<T2,S2>& dst1) { typename apImage<T1,S1>::row_iterator i1 = src1.row_begin(); typename apImage<T2,S2>::row_iterator i2 = dst1.row_begin(); typename apImage<T1,S1>::row_iterator i1k; unsigned int h = src1.height() - (size-1); unsigned int w = src1.width() - (size-1); const T1* pk; const char* k; T2* p2; R sum; unsigned int x, y, xk, yk; for (y=0; y<h; y++, i1++, i2++) { p2 = i2->p; for (x=0; x<w; x++) { sum = 0; i1k = i1; k = kernel; for (yk=0; yk<size; yk++) { pk = i1k->p + x; for (xk=0; xk<size; xk++) sum += static_cast<R>(*pk++) * (*k++); i1k++; } if (divisor == 1) *p2++ = apLimit<T2> (sum); // Prevent wrapping else { sum /= divisor; *p2++ = apLimit<T2> (sum); // Prevent wrapping } } } } As you can guess, convolution is a fairly slow process, at least when compared with simple point processing routines. This function is somewhat dense and needs some further explanation.
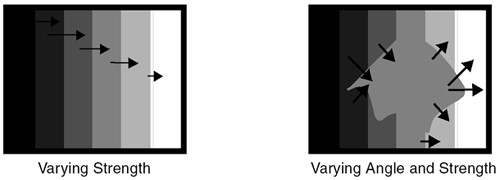
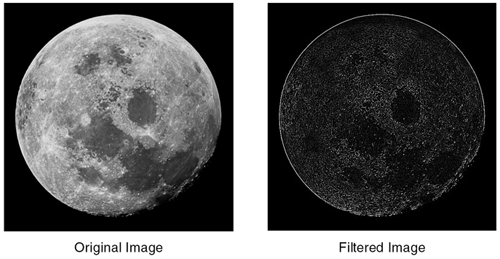
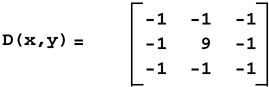
Fortunately, all of these details are hidden. To perform convolution, you can simply call the convolve() function and explicitly specify R . Its definition is shown here. template<class R, class T1, class T2, class S1, class S2> void convolve (const apImage<T1,S1>& src1, const char* kernel, int size, int divisor, apImage<T2,S2>& dst1) { apFunction_s1d1Convolve<R,T1,T2,S1,S2> processor (ap_convolve_generic); processor.run (src1, kernel, size, divisor, dst1); } Our example using an averaging low-pass filter now looks like the following: apImage<Pel8> src ... apImage<Pel8> dst; char kernel[] = { 1, 1, 1, 1, 1, 1, 1, 1, 1 }; convolve<Pel32> (src, kernel, 3, 9, dst); If you call convolve() without specifying a value for R (i.e., as in convolve<Pel32> ), the compiler will generate an error to remind you to add one. Laplacian Kernel for Sharpening EdgesThe edge of an object is indicated by a change in pixel value. Typically, there are two parameters associated with edges: strength and angle . The strength of an edge is the amount of change in pixel value when crossing the edge. Figure 6.12 illustrates strength by the length of the arrows. The angle is the angle of the line as drawn perpendicular to the edge. Figure 6.12 illustrates angle by the direction of the arrows. Figure 6.12. Edge Definition There are many methods for sharpening edges. A very effective and simple image processing technique is to ignore the angle and use the strength to sharpen the edges. You can accomplish edge sharpening by using a Laplacian mask (or kernel) in a convolution operation on the image. The Laplacian kernel generates peaks where edges are found. Our framework provides the following Laplacian kernel: 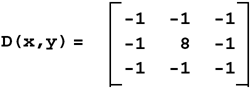 If we sum of all the values in the kernel, we see that they sum to zero. This means that when this kernel is run over a constant, or slowly varying image, the output will be zero or close to zero. However, when the kernel is run over a region where strong edges exist (the center pixel tends to be brighter or darker than surrounding pixels), the output can be very large. Figure 6.13 illustrates the application of an edge sharpening filter. Figure 6.13. Laplacian Filter We can write a function that is similar to ap_convolve_generic , but uses this specific Laplacian kernel, as shown. template<class R, class T1, class T2, class S1, class S2> void ap_convolve_3x3laplacian (const R&, const apImage<T1,S1>& src1, const char* /*kernel*/, unsigned int /*size*/, int /*divisor*/, apImage<T2,S2>& dst1) { typename apImage<T1,S1>::row_iterator i1 = src1.row_begin(); typename apImage<T2,S2>::row_iterator i2 = dst1.row_begin(); unsigned int h = src1.height() - 2; unsigned int w = src1.width() - 2; const T1* p1; const T1* pk; T2* p2; R sum; unsigned int x, y; // Elements to skip from end of one row to start of next unsigned int pitch = (i1->bytes / sizeof (T1)) - 3; for (y=0; y<h; y++, i1++, i2++) { p1 = i1->p; p2 = i2->p; for (x=0; x<w; x++) { sum = 0; pk = p1 + x; sum -= *pk++; sum -= *pk++; sum -= *pk++; pk += pitch; sum -= *pk++; sum += (*pk++) * 8; sum -= *pk++; pk += pitch; sum -= *pk++; sum -= *pk++; sum -= *pk++; *p2++ = apLimit<T2> (sum); // Prevent wrapping } } } Many of the function arguments are ignored. By keeping the arguments identical for any filtering routine, we can reuse our framework with only the expense of a few wasted parameters. Note that this function still works for arbitrary pixel types. Although we have hard-coded the kernel operator into the function, we have made no additional assumptions about the pixel type. The function works as follows:
While this function efficiently processes monochrome data types, it is slower for color images. To address this issue, we can take advantage of template specialization and we can define a special version of ap_convolve_3x3laplacian that works with apRGB (an 8-bit RGB image). To do this, we not only unroll the two inner loops, but we also explicitly compute the RGB values. This function is not difficult to write and it produces a dramatic increase in speed, as shown here. template<> void ap_convolve_3x3laplacian (const apRGBPel32s&, const apImage<apRGB>& src1, const char* /*kernel*/, unsigned int /*size*/, int /*divisor*/, apImage<apRGB>& dst1) { apImage<apRGB>::row_iterator i1 = src1.row_begin(); apImage<apRGB>::row_iterator i2 = dst1.row_begin(); unsigned int h = src1.height() - 2; unsigned int w = src1.width() - 2; const apRGB* p1; const apRGB* pk; apRGB* p2; apRGBPel32s sum; unsigned int x, y; // Elements to skip from end of one row to start of next unsigned int pitch = (i1->bytes / sizeof (apRGB)) - 3; for (y=0; y<h; y++, i1++, i2++) { p1 = i1->p; p2 = i2->p; for (x=0; x<w; x++) { sum = 0; pk = p1 + x; sum.red -= pk->red; sum.green -= pk->green; sum.blue -= pk->blue; pk++; sum.red -= pk->red; sum.green -= pk->green; sum.blue -= pk->blue; pk++; sum.red -= pk->red; sum.green -= pk->green; sum.blue -= pk->blue; pk++; pk += pitch; sum.red -= pk->red; sum.green -= pk->green; sum.blue -= pk->blue; pk++; sum.red += 8*pk->red; sum.green += 8*pk->green; sum.blue += 8*pk->blue; pk++; sum.red -= pk->red; sum.green -= pk->green; sum.blue -= pk->blue; pk++; pk += pitch; sum.red -= pk->red; sum.green -= pk->green; sum.blue -= pk->blue; pk++; sum.red -= pk->red; sum.green -= pk->green; sum.blue -= pk->blue; pk++; sum.red -= pk->red; sum.green -= pk->green; sum.blue -= pk->blue; pk++; *p2++ = apLimit<apRGB> (sum); // Prevent wrapping } } } The template<> prefix to the function tells the compiler that this is a specialization. You have to pay careful attention to the arguments, since you are replacing generic parameter types with explicit ones. You will still have to specify the template, R , although this value is hard-coded as apRGBPel32s in the function. It is important that this value is signed, because the Laplacian kernel contains both positive and negative values. There is one more small change to our template specialization for ap_convolve_3x3laplacian . As we discussed in class Versus typename on page 25, we cannot use the keyword typename in our specialization without generating an error. The line from our generic template definition: typename apImage<T1,S1>::row_iterator i1 = src1.row_begin(); must be changed to: apImage<apRGB>::row_iterator i1 = src1.row_begin(); To use the Laplacian filter, you can simply call the laplacian3x3() function and, as with convolve() , explicitly specify the R template parameter. The definition of laplacian3x3() is shown here. template<class R, class T1, class T2, class S1, class S2> void laplacian3x3 (const apImage<T1,S1>& src1, apImage<T2,S2>& dst1) { apFunction_s1d1Convolve<R,T1,T2,S1,S2> processor (ap_convolve_3x3laplacian); char* kernel = 0; unsigned int size = 3; int divisor = 1; processor.run (src1, kernel, size, divisor, dst1); } Table 6.1 shows the performance results when computing the Laplacian of a 1024x1024 apRGB image, with and without specialization, on our Intel Pentium 4 processor-based test platform, running at 2.0 GHz. Table 6.1. 1024x1024 Laplacian Performance Results
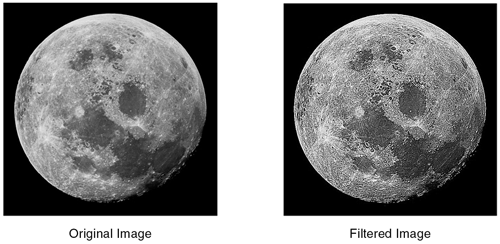
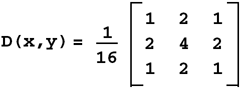
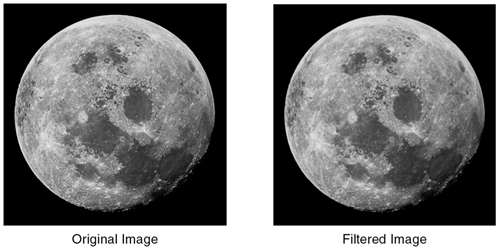
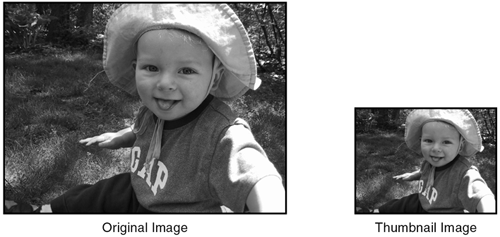
As you can see from the results, this specialization was clearly advantageous. We have removed numerous loops in our RGB specialization, which explains the performance gain. As you would expect, calling any of the three functions produces the identical image as output. High-Pass Kernel for Sharpening EdgesAnother way to sharpen edges, especially those in scanned photographs, is to use a convolution operation with a high-pass kernel. High-pass kernels enhance pixel differences and effectively sharpen edges. Our framework provides the following high-pass kernel: If we sum of all the values in the kernel, we see that they sum to one. This means that when this kernel is run over a constant, or slowly varying image, the output will be very close to the original pixel values. In areas where edges are found (i.e., the pixel values vary), the output values are magnified. Figure 6.14 illustrates the application of a high-pass edge sharpening filter. Figure 6.14. High-Pass Filter Gaussian Kernel for Smoothing EdgesYou can use a convolution operation with a Gaussian kernel to smooth the edges in your image. This technique usually produces a superior result to the low-pass kernel we presented on page 219. Our framework provides the following Gaussian kernel: Like our general convolution kernel, the Gaussian kernel uses summing and averaging to assign new values to pixels in the filtered image. The effect is that the strong edge differences are reduced, giving the filtered image a softer or blurred appearance. This is useful for reducing contrast or smoothing the image to eliminate such undesired effects as noise and textures. Figure 6.15 illustrates the application of a Gaussian edge smoothing filter. Figure 6.15. Gaussian Filter 6.3.5 Generating ThumbnailsWe could not end a section on image processing routines without reviewing our global thumbnail() function in its final form. This is a stand-alone function. thumbnail() always computes the destination image. Figure 6.16 illustrates the application of the thumbnail() function. Figure 6.16. Thumbnail Function The thumbnail() function is as shown. template<class R, class T1, class S1> apImage<T1,S1> thumbnail (const apImage<T1,S1>& src1, unsigned int factor) { apImageLocker<T1,S1> srcLocking (src1); apImage<T1,S1> dst; if (src1.isNull()) return dst; apRect boundary (src1.x0(), src1.y0(), src1.width()/factor, src1.height()/factor); dst = apImage<T1,S1> (boundary, src1.alignment()); typename apImage<T1,S1>::row_iterator s; typename apImage<T1,S1>::row_iterator d; typename apImage<T1,S1>::row_iterator s1; unsigned int w = dst.width (); const T1* sp; T1* dp; R sum; // Iterate over pixels in the destination for (d=dst.row_begin(), s=src1.row_begin(); d != dst.row_end(); d++, s+=factor) { dp = d->p; for (unsigned int x=0; x<w; x++) { sum = 0; s1 = s; for (unsigned int dy=0; dy<factor; dy++, s1++) { sp = s1->p + x*factor; for (unsigned int dx=0; dx<factor; dx++) sum += *sp++; } *dp++ = apLimit<T1> (sum / (factor*factor)); } } return dst; } |

 apImage<Pel8> image1; ... apImage<Pel8> image2 = image1;

EAN: 2147483647
Pages: 59