6.1 Finalizing the Image Components
6.1 Finalizing the Image ComponentsOverall, the time we spent prototyping was very productive. This section describes the final design for the image components within the framework, including:
6.1.1 Image CoordinatesIn Section 1.1 on page 4 we discussed image coordinates by saying that the image origin (0,0) is located at the top left corner of the image. Doing so makes the mapping easier from a pixel coordinate to a physical memory location. This convention is widely used in image processing. We will take this definition one step further and relax the restriction that (0,0) is the top left corner. This allows us to deal with image windows , where a window is a portion of another image. User-defined image coordinates are not discussed in this book. With user-defined coordinates, the user can access images using coordinates that make sense for a particular application. This can be something as simple as redefining the coordinate system, such that (0,0) is located at the lower left corner of the image. Or, it can be as complicated as specifying coordinates in terms of real units, like millimeters. We don't deny that this is a useful feature, but it is also very application-specific. If you need to define your own coordinate system, you can encapsulate this in your own code and transform it to our native coordinates. In the final version of our framework, an image has three properties:
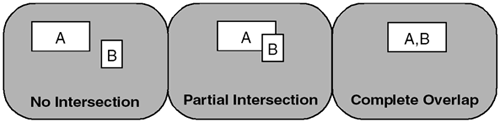
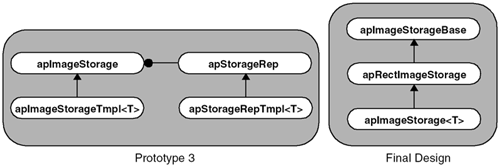
When an image is created, all three values are specified, with the origin typically being (0,0) . To make working with coordinates easier, we create two generic objects to handle points and rectangles. A point is an (x,y) pair that specifies the integer coordinates of a pixel. Our apPoint object is shown here. class apPoint { public: apPoint () : x_ (0), y_ (0) {} apPoint (std::pair<int, int p) : x_ (p.first), y_ (p.second) {} apPoint (int x, int y) : x_ (x), y_ (y) {} int x () const { return x_;} int y () const { return y_;} std::pair<int, int> point () const { return std::pair<int, int>(x_, y_);} bool operator == (const apPoint& p) const { return x() == p.x() && y() == p.y();} apPoint& operator += (const apPoint& p) { x_ += p.x(); y_ += p.y(); return *this;} // Default copy constructor and assignment operators ok. private: int x_, y_; }; We considered using the standard library object, std::pair<>, to represent a pair of coordinates, but we implemented our own point class instead so that we can add exactly what functionality we need. Coordinate information is stored as an int , permitting signed coordinate values. Our application uses apPoint frequently, so we define stream operators for our apBString class, as shown. apBString& operator<< (apBString& stream, const apPoint& point); apBString& operator>> (apBString& stream, apPoint& point); For information on apBString , refer to our earlier discussion on page 88. By defining insertion and extraction operators for our common objects, we can later use them as a persistence mechanism. These functions are very simple, as we can see by looking at the insertion operator: apBString& operator<< (apBString& stream, const apPoint& point) { apBString bstr; bstr << point.x() << point.y(); stream << bstr; return stream; } This function writes a single value, another apBString , instead of writing two separate values to stream . By encapsulating the x and y coordinates inside apBString , we adhere to our standard of writing a single element for each object or datatype. A rectangle describes a point with a width and height. We use this to define the boundary of an image. The width_ and height_ parameters are unsigned int , since they can only take on positive values. A rectangle with an origin at (0,0) , and width_ of 10, and height_ of 10, describes a region with corners (0,0) and (9,9) because the coordinates are zero-based . A null rectangle , a degenerate case where the rectangle is nothing more than a point, occurs when width_ or height_ is zero. Our rectangle object, including inline functions, is shown here. class apRect { public: apRect (); apRect (apPoint ul, unsigned int width, unsigned int height); apRect (apPoint ul, apPoint lr); apRect (int x0, int y0, unsigned int width, unsigned int height); const apPoint& ul () const { return ul_;} apPoint lr () const; int x0 () const { return ul_.x();} int y0 () const { return ul_.y();} int x1 () const { return lr().x();} int y1 () const { return lr().y();} unsigned int width () const { return width_;} unsigned int height () const { return height_;} bool isNull () const { return width_== 0 height_==0;} bool operator == (const apRect& r) const; bool operator != (const apRect& r) const { return !operator== (r);} bool within (const apPoint& p) const; apRect intersect (const apRect& r) const; void expand (int x, int y); // Default copy constructor and assignment operators ok. private: apPoint ul_; // Upper-left-hand coordinates unsigned int width_; // Image width unsigned int height_; // Image height }; Let's discuss a few of the methods in our rectangle object. The intersect() method computes the intersection of two rectangles, producing an output rectangle, or a null rectangle if there is no intersection. This method handles a number of conditions, including partial and complete overlap, as illustrated in Figure 6.2. Figure 6.2. Intersection Conditions The implementation of the intersect() method is shown here. template <class T> const T& apMin (const T& a, const T& b) { return (a<b) ? a : b;} template <class T> const T& apMax (const T& a, const T& b) { return (a>b) ? a : b;} apRect apRect::intersect (const apRect& r) const { // Get the corner points. const apPoint& ul1 = ul (); const apPoint& ul2 = r.ul (); int x = apMax (ul1.x(), ul2.x()); int y = apMax (ul1.y(), ul2.y()); int w = apMin (ul1.x()+width(), ul2.x()+r.width()) - x; int h = apMin (ul1.y()+height(), ul2.y()+r.height()) - y; if (w < 0 h < 0) { // No intersection return apRect (); } return apRect (x, y, w, h); } The within() method tests whether or not a point is inside the rectangle. It returns true if the point is inside or on the border. The implementation of within() is shown here. bool apRect::within (const apPoint& p) const { apPoint lr (ul_.x() + width_, ul_.y()+height_); return (ul_.x() <= p.x()) && (lr.x() > p.x()) && (ul_.y() <= p.y()) && (lr.y() > p.y()); } The expand() method increases the size of the rectangle by adding a specific quantity to its dimensions. This method is very useful when performing image processing operations that create output images larger than the original image. Note that you can also pass in negative values to shrink the rectangle. The implementation of expand() is shown here. void apRect::expand (int x, int y) { if (!isNull()) { ul_ += apPoint (-x, -y); width_ += 2*x; height_ += 2*y; } } 6.1.2 Image StorageOur third prototype (Section 3.2.6 on page 60) contributed the concept of separating image storage from the image class. After working with many examples, we realized that this prototype was still lacking the ability to handle certain details. The details that we now address in the final design include:
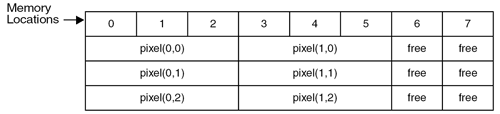
Final DesignThe final design partitions image storage into three pieces, as illustrated in Figure 6.3. Figure 6.3. Image Storage Final Design apImageStorageBase is the base class that describes the rectangular boundary of any storage object. For rectangular images, it describes the valid coordinates for pixels in the image. If you extend the framework to implement non-rectangular images, you would describe the minimum enclosing rectangle surrounding the region. apRectImageStorage extends apImageStorageBase to manage the storage for rectangular images. apRectImageStorage is not a template class; instead, it allocates storage based on the number of bytes of storage per pixel and a desired memory alignment for each row in the image. By making this a generic definition, apRectImageStorage can handle all aspects of image storage. apImageStorage<T> , however, is a template class that defines image storage for a particular data type. Most apImageStorage<> methods act as wrapper functions by calling methods inside apRectImageStorage and applying a cast. Let's look at these components in more detail in the following sections. We start by looking at apImageStorageBase . This base class only has an understanding of the boundary surrounding the image storage. class apImageStorageBase { public: apImageStorageBase (); apImageStorageBase (const apRect& boundary); virtual ~apImageStorageBase (); const apRect& boundary () const { return boundary_;} int x0 () const { return boundary_.x0();} int y0 () const { return boundary_.y0();} int x1 () const { return boundary_.x1();} int y1 () const { return boundary_.y1();} unsigned int width () const { return boundary_.width();} unsigned int height () const { return boundary_.height();} // Default copy constructor and assignment operators ok. protected: apRect boundary_; }; Once the rectangular boundary is specified in the constructor, the object is immutable and cannot be changed. It is designed this way because changing the boundary coordinate information would affect how this object interacts with other images that are already defined. apRectImageStorage is the most complicated object in our hierarchy. It handles all aspects of memory management, including allocation, locking, and windowing. In this section, we describe in detail how this object works. (The full source code is found on the CD-ROM.) Reviewing the protected member data of apRectImageStorage shows us the details of the implementation: protected: mutable apLock lock_; // Access control apAlloc<Pel8> storage_; // Pixel storage Pel8* begin_; // Pointer to first row Pel8* end_; // Pointer past last row eAlignment align_; // Alignment unsigned int yoffset_; // Row offset to first row unsigned int xoffset_; // Pixel offset in first row unsigned int bytesPerPixel_; // Bytes per pixel unsigned int rowSpacing_; // Number of bytes between rows storage_ contains the actual pixel storage as an array of bytes. apAlloc<> allows a number of objects to share the same storage, but the storage itself is fixed in memory. This allows us to create image window s. An image window is an image that reuses the storage of another image. In other words, we can have multiple apRectImageStorage objects that use identical storage, but possibly only a portion of it. To improve the efficiency of accessing pixels in the image, the object maintains begin_ and end_ to point to the first pixel used by the object and just past the end, respectively. Derived objects use these pointers to construct iterator objects, similar to how the standard C++ library uses them. bytesPerPixel_ and align_ store the pixel size and alignment information passed during object construction. Instead of directly specifying the numeric alignment value, eAlignment provides a clean way to specify alignment, as shown. enum eAlignment {eNoAlign=0, eWordAlign=2, eDoubleWordAlign=4, eQuadWordAlign=8, e2ByteAlign=2, e4ByteAlign=4, e8ByteAlign=8, e16ByteAlign=16}; eAlignment has entries using two different naming conventions, giving the user the flexibility of choosing from two popular ones. rowSpacing_ contains the number of bytes from one row to the next . This is often different than the width of the image because of alignment issues. By adding rowSpacing_ to any pixel pointer, you can quickly advance to the same pixel in the next row of the image. xoffset_ and yoffset_ are necessary for image windows. Just because two images share the same storage_ does not mean they access the same pixels. Image windowing lets an image contain a rectangular portion of another image. xoffset_ and yoffset_ are the pixel offsets from the first pixel in storage_ to the first pixel in the image. If there is no image window, both of these offsets are zero. The only remaining protected data member that we haven't described is lock_ . lock_ handles synchronization to the rest of the image storage variables , with the exception of storage_ (because it uses apAlloc<> , which has its own independent locking mechanism). The constructor of apRectImageStorage is as follows : class apRectImageStorage : public apImageStorageBase { public: apRectImageStorage (); apRectImageStorage (const apRect& boundary, unsigned int bytesPerPixel, eAlignment align); Constructing the storage for an image requires the size and location of the image, the pixel depth (i.e., the number of bytes per pixel), and alignment requirements. For example: struct RGB { char r, char g, char b }; apRect rect (0, 0, 2, 3); apRectImageStorage storage (rect, sizeof (RGB), eDoubleWordAlign); creates a 2x3 image, with an origin at ( 0,0 ). Each pixel requires 3 bytes, and the start of each line will have double-word (i.e., 4-byte) alignment, as shown in Figure 6.4. Figure 6.4. Image Storage Alignment Each line in the image requires 8 bytes of storage, although only 6 bytes contain pixel data. The first three bytes hold the storage for the first pixel in the line, and are followed by three more bytes to hold the next pixel. In order to begin the next row with double-word alignment, we must skip 2 bytes before storing the pixels for the next line. We dealt with memory alignment when we introduced apAlloc<> . The arithmetic is the same, except we must apply it to each line, as shown in the implementation of apRectImageStorage() : apRectImageStorage::apRectImageStorage (const apRect& boundary, unsigned int bytesPerPixel, eAlignment align) : apImageStorageBase (boundary), begin_ (0), end_ (0), xoffset_ (0), yoffset_ (0), bytesPerPixel_ (bytesPerPixel), rowSpacing_ (0), align_ (align) { // Round up our row size for alignment purposes. The // enumeration values match our alignment values so we can // cast it and do some bit manipulation. rowSpacing_ = width () * bytesPerPixel_; if (align_ != eNoAlign) { int alignment = static_cast<int>(align_) - 1; rowSpacing_ = (rowSpacing_ + alignment) & (~alignment); } // Allocate our memory. Force our base address to start at a // 8-byte aligned boundary. storage_ = apAlloc<Pel8> (rowSpacing_ * boundary.height (), 8); begin_ = rowAddress_ (y0()); end_ = begin_ + height() * rowSpacing_; } We also use a number of locking functions to synchronize access to both the image storage parameters and the image storage itself, as shown. bool lockState () const { return lock_.lock();} bool unlockState () const { return lock_.unlock();} // Lock/unlock our image state, but not the storage bool lockStorage () const { return storage_.lockStorage ();} bool unlockStorage () const { return storage_.unlockStorage ();} // Lock/unlock our image storage bool lock () const { return lockState() && lockStorage();} bool unlock () const { return unlockState() && unlockStorage();} // Lock/unlock our image state and storage Locking is not a difficult feature to add to an object, but it is important to consider where to use it effectively. In our design, for example, several instances of apRectImageStorage can use the same underlying pixel storage. There is no need to lock access to this storage if we are only manipulating other member variables of apRectImageStorage . lockState() is best used when the state of apRectImageStorage changes. lockStorage() is used when the actual pixel data is accessed. lock() is a combination of the two, and is useful when all aspects of the image storage are affected. These functions are used by derived objects and non-member functions, since locking is a highly application-specific issue.
Using image windows is a powerful technique that lets you change which pixels an instance of apRectImageStorage can access, as shown. bool window (const apRect& window); window() modifies an instance of apRectImageStorage by computing the intersection of the specified rectangle with the rectangle that defines which pixels are managed. This function is not as complicated as it sounds, because the intersect() method of apRect computes the overlap between the window and the original image. Once this is computed, the other variables can be updated, as shown. bool apRectImageStorage::window (const apRect& window) { lockState (); apRect intersect = boundary().intersect (window); if (intersect.isNull()) { // No intersection so make this a null image init (); unlockState (); return false; } // Adjust our boundary and compute the new offset to our // first pixel. xoffset_ += intersect.x0() - x0(); yoffset_ += intersect.y0() - y0(); boundary_ = intersect; begin_ = rowAddress_ (y0()); end_ = begin_ + height() * rowSpacing_; unlockState (); return true; } If the intersection is null, that is, there is no overlap between the rectangles, init() resets the object to a null state. The remainder of the member variables are then updated to reflect the intersection. The window() function only affects local variables, so we call lockState() to lock access to member variables, because we do not also have to lock the underlying image storage. Basic access to pixel data is provided by functions we have seen before: const Pel8* rowAddress_ (int y) const; Pel8* rowAddress_ (int y); protected: const Pel8* getPixel (int x, int y) const; void setPixel (int x, int y, const Pel8* pixel); rowAddress_() is used by derived classes to return the address of the first pixel in a specific row. Derived objects will cast these pointers to their proper type. You use getPixel() and setPixel() in a similar manner. We use the underscore , _ , as a suffix in rowAddress_() to indicate that it is primarily an internal function. Before we introduce the actual storage objects, we need to introduce an iterator that can be used to simplify image processing functions. Like iterators defined by the standard C++ library, our apRowIterator<> object allows each row in the image to be accessed, as shown. template<class T> class apRowIterator { public: struct current { T* p; // Pointer to start of row y int x; // x coordinate of start of row int y; // y coordinate of current row int bytes; // Number of bytes to offset to next row }; apRowIterator () { cur_.p = 0; cur_.x = 0; cur_.y = 0; cur_.bytes = 0;} apRowIterator (T* p, long bytes, long x, long y) { cur_.p = p; cur_.bytes = bytes; cur_.x = x; cur_.y = y;} current* operator->() { return &cur_;} const current* operator->() const { return &cur_;} current& operator* () { return cur_;} const current& operator* () const { return cur_;} apRowIterator& operator++ (); apRowIterator operator++ (int); apRowIterator& operator-- (); apRowIterator operator-- (int); apRowIterator& operator+= (int s); apRowIterator& operator-= (int s); bool operator== (const apRowIterator& i) const { return (cur_.p == i.cur_.p);} bool operator!= (const apRowIterator& i) const { return (cur_.p != i.cur_.p);} private: current cur_; }; Once you obtain an apRowIterator object from an apImageStorage<> object (presented in the next section), you can use it to access each row in the image, as follows: apRowIterator i; for (i=image.begin(); i != image.end(); i++) { // i->p points to the next pixel to process ... } Iterators don't really save us much typing, but they do hide the operation of fetching the address of each line. If we did not have an iterator, we would write something like the following, where T represents the pixel type:
We also create an iterator suitable for accessing every pixel in an image. apPixelIterator is similar in design to apRowIterator , but it is implemented using the standard STL iterator traits. See [Stroustrup00]. This makes the iterator usable by the generic STL algorithms, as shown. template<class T> class apPixelIterator { public: // Standard iteration typedef's typedef std::forward_iterator_tag iterator_category; typedef T value_type; typedef ptrdiff_t difference_type; typedef T* pointer; typedef T& reference; struct current { T* p; // Current pointer to pixel int x, y; // Current pixel coordinates T* end; // Pointer past last pixel in current row int x0; // x coordinate of start of row int width; // Width of row int bytes; // Number of bytes to offset to next row }; apPixelIterator (); apPixelIterator (T* p, int bytes, int x, int y, int width); T* operator->() { return cur_.p;} const T* operator->() const { return cur_.p;} T& operator* () { return *cur_.p;} const T& operator* () const { return *cur_.p;} apPixelIterator& operator++ (); apPixelIterator operator++ (int); bool operator== (const apPixelIterator& i) const { return (cur_.p == i.cur_.p);} bool operator!= (const apPixelIterator& i) const { return (cur_.p != i.cur_.p);} private: current cur_; }; apImageStorage<> is a template object, derived from apRectImageStorage , that defines image storage for arbitrary datatypes. Its definition is shown here. template<class T> class apImageStorage : public apRectImageStorage { public: typedef apRowIterator<T> row_iterator; typedef apPixelIterator<T> iterator; apImageStorage () {} apImageStorage (const apRect& boundary, eAlignment align = eNoAlign) : apRectImageStorage (boundary, sizeof (T), align) {} const T* rowAddress (long y) const; T* rowAddress (long y); // Returns a pointer to the first pixel in the specified row // Not thread-safe. Clients need to lock storage // Throws apBoundsException if the argument is not in range const T& getPixel (int x, int y) const; const T& getPixel (const apPoint& point) const; void setPixel (int x, int y, const T& pixel); void setPixel (const apPoint& point, const T& pixel); // Gets or sets the specified pixel. Thread-safe. virtual ~apImageStorage () {} // row iterators. Not thread-safe. Clients need to lock storage row_iterator row_begin (); const row_iterator row_begin () const; row_iterator row_end (); const row_iterator row_end () const; // pixel iterators. Not thread-safe. Clients need to lock storage iterator begin (); const iterator begin () const; iterator end (); const iterator end () const; }; This object builds upon its base class. You can continue to access pixel data using getPixel() and setPixel() , but you can also access a row of data by using rowAddress() , or a row or pixel iterator. Our row_begin() and row_end() iterators use a typedef called row_iterator to hide direct references to apRowIterator<> . Likewise, our begin() and end() iterators use a typedef called iterator to hide direct references to apPixelIterator<> .
Although the full comments are in the source code, we left a few critical ones in the code snippet to indicate those member functions that synchronize access to the image data and those that do not. Our decision about what functions should lock is based upon efficiency. getPixel() and setPixel() lock both the object and the memory because these functions are fairly inefficient to begin with. No locking is built into the other functions, and you are responsible for determining the appropriate locking. Proper locking also requires us to catch any exceptions that are thrown, as we do in our definition of getPixel() : template<class T> const T& apImageStorage<T>::getPixel (int x, int y) const { static T pixel; lock (); try { const Pel8* p = apRectImageStorage::getPixel (x, y); memcpy (&pixel, p, sizeof (T)); } catch (...) { unlock (); throw; } unlock (); return pixel; } On page 188, we will see how to dramatically simplify getPixel() by using an exception-safe locking object.
Most functions that operate on apImageStorage<> objects will require some form of record locking. This is true for functions that modify both the state of the object and the underlying pixels. Writing a function that calls lock() and unlock() is not difficult, but you need to consider how exceptions influence the design; otherwise , it is quite possible that when an exception is thrown, the lock will not be cleared because the function does not terminate properly. One solution is to add a try block to each routine to catch all errors, so that the object can be unlocked before the exception is re-thrown. An easier approach is to construct an object that uses the same RAII technique we describe on page 136, as shown. template<class T> class apImageStorageLocker { public: apImageStorageLocker (const apImageStorage<T>& image) : image_ (image) { image_.lock();} ~apImageStorageLocker () { image_.unlock();} private: const apImageStorage<T>& image_; // No copy or assignment is allowed apImageStorageLocker (const apImageStorageLocker&); apImageStorageLocker& operator= (const apImageStorageLocker&); }; Our apImageStorageLocker<> implementation locks only apImageStorage<> objects, although it wouldn't be hard to create a generic version. Here is how it works. When an apImageStorageLocker<> object is created, a reference to an apImageStorage<> object is stored and the object is locked. When the apImageStorageLocker<> object is destroyed , the lock on apImageStorage<> is released. You can see how powerful this simple technique is when it is used within another function. For example, getPixel() explicitly handles the locking and unlocking in its implementation. This function can be greatly simplified with the use of apImageStorageLocker<> , as shown. template<class T> const T& apImageStorage<T>::getPixel (int x, int y) const { static T pixel; apImageStorageLocker<T> locker (*this); // Exception-safe locking const Pel8* p = apRectImageStorage::getPixel (x, y); memcpy (&pixel, p, sizeof (T)); return pixel; } As you can see, we create a temporary instance of apImageStorageLocker<> on the stack. When getPixel() goes out of scope, either because of normal completion or during stack unwinding of an exception, the lock is guaranteed to be released. In the source code, we provide two generic functions: copy() and duplicate() . copy() moves pixels between two images, while duplicate() generates an identical copy of an apImageStorage<> object. Because we are dealing with template objects, our copy() function copies image pixels from one data type to another, as shown. void copy (const apImageStorage<T1>& src, apImageStorage<T2>& dst, bool fastCopy = true) Our design of copy() has the following interesting features:
The copy() implementation is shown here. template <class T1, class T2> void copy (const apImageStorage<T1>& src, apImageStorage<T2>& dst, bool fastCopy = true) { if (src == dst) return; // Exception-safe locking apImageStorageLocker<T1> srcLocker (src); apImageStorageLocker<T1> srcLocker (dst); if (src.boundary() != dst.boundary()) dst = apImageStorage<T2> (src.boundary(), src.alignment()); typename apImageStorage<T1>::row_iterator i1; typename apImageStorage<T2>::row_iterator i2; unsigned int w = src.width (); int bytes = w * src.bytesPerPixel (); const T1* p1; T2* p2; if (typeid(T1) == typeid(T2) && fastCopy) { // We're copying like datatypes so use memcpy for speed for (i1=src.row_begin(), i2=dst.row_begin(); i1 != src.row_end(); i1++, i2++) { p1 = i1->p; p2 = i2->p; memcpy (p2, p1, bytes); } } else { // We have to do a pixel by pixel copy for (i1=src.row_begin(), i2=dst.row_begin(); i1 != src.row_end(); i1++, i2++) { p1 = i1->p; p2 = i2->p; for (unsigned int x=0; x<w; x++) *p2++ = static_cast<T2>(*p1++); } } }
6.1.3 Pixel TypesIn addition to the standard C data types that are used in image processing applications, a robust image processing framework must also handle the following complexities:
Basic Data TypesIn our image framework, the pixel type is specified as a template parameter. In reality, there are only a few common data types that most image processing applications need. Here are the basic types used in image processing: typedef unsigned char Pel8; // 1-byte typedef unsigned short Pel16; // 2-bytes typedef unsigned int Pel32; // 4-bytes (Unsigned) typedef int Pel32s; // 4-bytes (Signed) These names are very descriptive since they refer to pels (picture elements, or pixels) and there is no confusion when used in image processing applications. Most images captured from monochrome sensors are represented using the Pel8 data type. Some sensors have more sensitivity and output 10 or 12 bits of information. In that case, we would use a Pel16 to store the image. RGB Data TypePixels in color images are usually represented by RGB triplets. We showed a simple implementation of an RGB triplet during the prototyping stage. The following simple structure is not sufficient for our final design:
We need to have the ability to write statements like the following: apRGBTmpl<Pel8> rgb1, rgb2, rgb3; ... rgb3 = rgb1 + rgb2; Instead of defining a separate structure for each type of RGB image, we define apRGBTmpl<> , where the template parameter is the data size of the red, green, and blue component. In apRGBTmpl<> we add basic operators, as well as conversion functions between a color and monochrome pixel, as shown. template<class T> class apRGBTmpl { public: T red; T green; T blue; apRGBTmpl () : red(0), green(0), blue(0) {} explicit apRGBTmpl (T v) : red(v), green(v), blue(v) {} apRGBTmpl (T r, T g, T b) : red(r), green(g), blue(b) {} apRGBTmpl (const apRGBTmpl& s); apRGBTmpl<T>& operator= (const apRGBTmpl& src); template<class T1> apRGBTmpl (const apRGBTmpl<T1>& s); template<class T1> apRGBTmpl<T>& operator= (const apRGBTmpl<T1>& src); apRGBTmpl& operator= (const T& c) operator T () const // Conversion to monochrome apRGBTmpl<T>& operator+= (const apRGBTmpl<T>& s); apRGBTmpl<T>& operator-= (const apRGBTmpl<T>& s); apRGBTmpl<T>& operator*= (const apRGBTmpl<T>& s); apRGBTmpl<T>& operator/= (const apRGBTmpl<T>& s); apRGBTmpl<T>& operator+= (const T& s); apRGBTmpl<T>& operator-= (const T& s); apRGBTmpl<T>& operator*= (const T& s); apRGBTmpl<T>& operator/= (const T& s); }; The complete implementation can be found in imageTypes.h on the CD-ROM. You will notice that we added functions, such as operator apRGBTmpl<T2> , to make it easy to convert between different RGB types. Clamping Object for OverflowOverflow is usually not an issue when an application uses mostly int and double data types. However, when you use the smaller data types, like unsigned char , you have to be very aware of overflows. What happens to the pixels that overflow the storage? What usually happens is that the output will wrap, just like any mathematical operation on the computer. This behavior has never seemed correct when dealing with image processing functions. After all, if a value of 0 is black and 255 is white, 255+1 should be stored as 255 and not 0. This clamping behavior is also called saturation .
We think a better design for image processing is to use clamping as the default, while also keeping the original wrapping behavior available if desired. Keep in mind that there is an execution cost associated with clamping, and this may not always be tolerable. The clamping operation is applied to every pixel that is processed , so the cost increases as the size of the image increases. For example, to detect and correct an overflow condition in a variable value larger than a Pel8 looks like this: Pel8 b = value > 255 ? : 255 : static_cast<Pel8>(value); In order for our design to handle the overflow issue, our code must partition this functionality so that it can be integrated into image processing functions. If you are not careful, this can get very difficult, because the overflow check must be made prior to the conversion to the final pixel type. If you allow the compiler to make an implicit conversion before any overflow checks are made, you will not be able to clamp the output values at their limits, and your checks will be wasted.
In order to get the behavior that you want, clamping must be designed into the image processing routines. The hard way to solve this problem is to have two versions of every routine: one that clamps the output data, and one that wraps. The easier way is to use templates to define new pixel types that not only define the size of each pixel, but also specify the clamping behavior. You want to be able to use an apImage<Pel8> that defines an image using byte storage with the usual overflow behavior (wrapping). You also want an apImage<apClampedPel8> that defines an image using byte storage, but employs clamping. This solution requires three pieces:
Clamping FunctionsTo clamp a value at the limits of a data type, we must know the limits. With C, we used #include <limits.h> to get this functionality. With C++, we can use #include <limit> . The std::numeric_limits class gives us everything we need. We can easily determine the minimum and maximum values for a data type by querying the static functions of this object, as shown: Pel8 minvalue = std::numeric_limits<Pel8>::min(); Pel8 maxvalue = std::numeric_limits<Pel8>::max(); We do not use these limits directly; rather, we encapsulate them in one of our own objects, apLimitInfo<> . We are doing this because some of our data types, such as apRGB , have no std::numeric_limits defined. Instead of defining 30 or so constants and static methods, we decided it was easier to define only what we need. If you insist on using std::numeric_limits , you can define your own implementation for any new types, and then replace our references to apLimitInfo<> . The apLimitInfo<> definition is as shown. template<class T> class apLimitInfo { public: static apLimitInfo<T> sType; T minValue; T maxValue; private: apLimitInfo (T min, T max) : minValue (min), maxValue (max) {} }; apLimitInfo<> gives us a common place to define limit information for any data type. The definitions for a few of the data types are shown here. template<> apLimitInfo<Pel8> apLimitInfo<Pel8>::sType (std::numeric_limits<Pel8>::min(), std::numeric_limits<Pel8>::max()); template<> apLimitInfo<apRGB> apLimitInfo<apRGB>::sType ( apRGB(std::numeric_limits<Pel8>::min(), std::numeric_limits<Pel8>::min(), std::numeric_limits<Pel8>::min()), apRGB(std::numeric_limits<Pel8>::max(), std::numeric_limits<Pel8>::max(), std::numeric_limits<Pel8>::max())); These may look long, but they are just a machine-independent way of saying: template<> apLimitInfo<Pel8> apLimitInfo<Pel8>::sType (0, 255); template<> apLimitInfo<apRGB> apLimitInfo<apRGB>::sType (apRGB(0, 0, 0), apRGB(255, 255, 255)); We can now construct a simple clamping function to test and clamp the output to its minimum and maximum value. template<class D, class S> D apLimit (const S& src) { return src < apLimitInfo<D>::sType.minValue ? apLimitInfo<D>::sType.minValue : (src > apLimitInfo<D>::sType.maxValue ? apLimitInfo<D>::sType.maxValue : static_cast<D>(src)); } You can use these functions as follows: Pel32 l = 256; Pel8 b = apLimit<Pel8> (l); // b = 255 With this syntax, you explicitly define the type of clamping you desire . In this particular example, the benefits are well worth the added bit of typing. The compiler will generate an error if you neglect to specify the clamping data type. Clamping ObjectWe define an apClampedTmpl<> object to add our clamping behavior. apClampedTmpl<> can be used in place of the Pel8 , Pel16 , Pel32 , and other data types to add our clamping behavior whenever a numeric quantity is used. The apClampedTmpl<> definition is shown here . template<class T> class apClampedTmpl { public: T val; apClampedTmpl () : val(0) {} apClampedTmpl (T v) : val(v) {} operator T () const { return val;} apClampedTmpl (const apClampedTmpl& src) { val = apLimit<T> (src.val);} template<class T1> apClampedTmpl (const apClampedTmpl<T1>& src) { val = apLimit<T> (src.val);} apClampedTmpl<T>& operator= (const apClampedTmpl& src); apClampedTmpl<T>& operator+= (const apClampedTmpl<T>& s); apClampedTmpl<T>& operator-= (const apClampedTmpl<T>& s); apClampedTmpl<T>& operator*= (const apClampedTmpl<T>& s); apClampedTmpl<T>& operator/= (const apClampedTmpl<T>& s); template <class T2> apClampedTmpl<T> operator+ (const apClampedTmpl<T2>& s2); }; We have included conversions between apClampedTmpl<> and our template parameter, T , to make apClampedTmpl<> easier to work with. By providing these operators, the compiler can make whatever implicit conversions are necessary. One last step is to make apClampedTmpl<> look more like a data type by using typedef s, as shown. typedef apClampedTmpl<Pel8> apClampedPel8; typedef apClampedTmpl<Pel16> apClampedPel16; typedef apClampedTmpl<Pel32> apClampedPel32; typedef apClampedTmpl<Pel32s> apClampedPel32s; // This is signed!! Operators and Mathematical FunctionsWe also need to define a number of other global operators and functions that image processing routines will need. An example of the subtraction operator, which subtracts a constant value from apClampTmpl<> , is as follows: template<class T1, class T2> apClampedTmpl<T1> operator- (const apClampedTmpl<T1>& s1, const T2& s2) { apClampedTmpl<T1> dst; dst.val = apLimit<T1> (s1.val - s2); return dst; } Notice that apLimit is used to apply clamping before the result is assigned to the destination pixel type. This gives us the ability to write such code as this: Pel32 longpel = 12345; apClampedTmpl<Pel8> bytepel = 128; bytepel = bytepel - longpel; We now add a few more arithmetic operations that our image processing functions require. We implement two versions of image addition: one version that operates on a generic type, and one version that employs clamping. These are as shown here. template<class D, class S1, class S2> D add2 (const S1& s1, const S2& s2) { return static_cast<D>(s1) + s2; } template<class D, class S1, class S2> D add2 (const apClampedTmpl<S1>& s1, const apClampedTmpl<S2>& s2) { return apLimit<D> (s1.val + s2.val); // d = s1 + s2; } We do the same thing for sub2 , mul2 , and div2 . The C++ standard is very specific regarding which template to instantiate. The generic implementation of add2<> shown here is too similar to the versions that use apClampedTmpl<> objects, causing errors to be generated by the compiler. Instead, we define explicit versions to handle the cases we need and turn the generic version of add2<> into a comment. For example, a version of add2<> that works with 32-bit pixel types is shown here. template<class D> D add2 (Pel32s s1, Pel32s s2) { return static_cast<D>(s1 + s2);} scale() does a simple scaling of the source argument by a floating parameter, as shown here. template<class D, class S> D scale (S& s1, float scaling) { return static_cast<D> (scaling * s1); } We also apply these operations to our RGB data type. Since RGB images require more processing than monochrome images, we built clamping into the RGB image, instead of defining another type. We can see that by looking at the definition shown here. template<class T> class apRGBTmpl { public: ... apRGBTmpl<T>& operator+= (const apRGBTmpl<T>& s) { red = apLimit (red + s.red); green = apLimit (green + s.green); blue = apLimit (blue + s.blue); return *this; } apRGBTmpl<T>& operator+= (const T& s) { red = apLimit (red + s); green = apLimit (green + s); blue = apLimit (blue + s); return *this; } }; template<class D, class S1, class S2> apRGBTmpl<D> add2 (const apRGBTmpl<S1>&s1, const apRGBTmpl<S2>&s2) { apRGBTmpl<D> d; d.red = apLimit<D> (s1.red + s2.red); d.green = apLimit<D> (s1.green + s2.green); d.blue = apLimit<D> (s1.blue + s2.blue); return d; } During the development of generic image processing routines, you should use these functions at every opportunity. What's So Important About Clamping?It may seem like we have gone through great lengths for little benefit. After all, we have mandated that image processing functions do this: dst = add2<T> (s1, s2); instead of this:
The latter is more intuitive, but it is also more prone to error. If we are careful, we can construct operator+ and operator= for the various data types to give the desired behavior. The problem is that the compiler can do almost too good a job at finding a way to compile this line by applying suitable conversions. Because we are dealing with basic data types, like unsigned char , the compiler often has many ways to convert from one data type to another. This makes it easy to write code that does not perform as you expect. If this happens, there is a possibility that the error may not be caught until your testing phase. |

 for (int y=0; y<image.height(); y++) { T* p = image.rowAddress (y); // Address of first pel of line ...
 EAN: 2147483647
Pages: 59