Creating Digital Halftones
Creating Digital Halftones
A halftone is an image in which ink or toner is transferred to paper, and consists of dots on a grid. The resolution, or number of lines per inch (lpi), of a halftone depends on the printer s capabilities. The number of dots on a traditional halftone is finite and depends on the grid s lpi. The tonal densities of an image are determined by the size of the dots ”the larger the dot, the more ink is deposited, and the darker the area appears.
Most low-end ink-jet printers, however, produce a stochastic, or frequency modulated, dot pattern, in which the tonal density is expressed not by the size, but by the number of dots deposited. That s why the resolution claimed by desktop ink- jets (commonly 720 — 1440) is usually higher, though not necessarily better, because the dots are smaller and distributed in a random pattern. When you send an image to a printer, Photoshop, in tandem with the printer driver software, automatically and transparently converts the tonal information contained in pixels into dot density information that the printer s marking engine uses to construct your image. Fortunately, you don t have to do any of the math!
| Note | Before you begin to create an image for print, you should be aware of the necessary ratio of pixels per inch (ppi) to line screen (lpi) to produce quality halftones. For more on this, see Chapter 13, Sizing and Transforming Images. |
Photoshop also has built-in tools that let you convert your images to bitmaps and take over the halftoning process before you send your image to the printer. The term bitmap describes images that are composed of pixels, each containing one bit of information. That means the pixels are either black or white. When you turn an image into a bitmap, Photoshop converts all of the tonal information into a series of black or white elements composed of ”you guessed it ”pixels. You can then print the bitmap on your laser printer as black-and-white line art or as a fully composited halftone. Even better, you can choose from a variety of bitmap types and patterns to produce specialized graphic effects.
You can t directly convert an RGB, CMYK, or Lab image into a halftone. You must first convert your image into Grayscale. Bitmapped images do not support layers , alpha channels, filters, or any operations involving color ”in fact, about the only things you can do with them are invert them or paint on them with black or white. Because they contain only one bit of information per pixel, the file sizes of bitmaps are relatively small.
Choose Image ’ Mode ’ Bitmap to convert your Grayscale. In the Bitmap dialog box (see Figure 17.17), choose a resolution for the bitmap. The higher the resolution, the smoother the elements that define it will be. If you want a one-to-one ratio with your laser printer, set it to the printer s output resolution (commonly 300, 600, 800, or 1200 dpi).
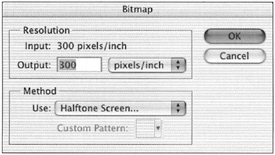
Figure 17.17: The Bitmap dialog box
Next, choose a method from the Use drop-down list:
-
50% Threshold converts the image to a black-and-white, line art bitmap with the midpoint at 128. The difference between this function and the Threshold command discussed earlier in this chapter is that the Threshold command works on color and grayscale images. It converts the image to black-and-white but retains the bit depth and, hence, the editability of the image. Plus, you can control the midpoint level, which lets you determine which pixels will be converted to white and which pixels will be converted to black. Bitmap images, on the other hand, are extremely limited as far as how they can be edited and what Photoshop operations they support. Another drawback is that 50% Threshold simply converts the image to black-and-white by using the midtone pixels of 127 and 128 as the dividing line. In the bigger scheme of things, you might be better off using the Threshold command.
-
Pattern Dither applies a preprogrammed, geometric pattern to define the image s tonality . Unfortunately, it produces rather undesirable results, which have a tendency to close up when output to a laser printer.
-
Diffusion Dither applies a mezzotint pattern to the bitmap. The image is defined by a multitude of stray pixels peppered throughout the image. The effect can pleasantly soften the image but can also darken it. You might want to expose the image to a Levels adjustment to lighten it before you convert it to a bitmap by using the Diffusion Dither option.
-
Halftone Screen is by far the most useful option of the lot. When you choose Halftone Screen, the dialog box in Figure 17.18 appears. Enter a value for the frequency (lpi), angle of the screen, and dot shape.
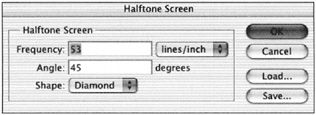
Figure 17.18: The Halftone Screen dialog box -
Custom Pattern uses a pattern that you select from the Pattern list to define the tonality. The results can run from really interesting to incredibly ugly. Smaller patterns usually create effects that are more desirable.
To see variations of the potential results, open an image and apply each option in turn. See Figure 17.19 to get a quick idea of the possibilities. It might be difficult to see some differences at low monitor resolution or when printed to some printers.
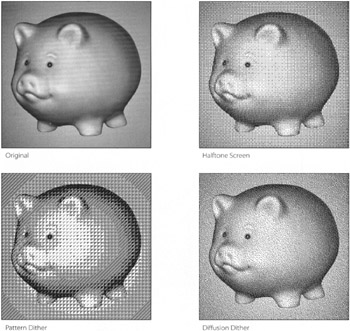
Figure 17.19: The results of converting an image to Bitmap mode by using different methods
| Note | When you view many of these bitmap effects on your monitor at certain sizes, you might see a strangely textured on-screen picture. This phenomenon is called a moir pattern and is a result of the dot patterns of the image clashing with the matrix of the pixels on your monitor. Don t worry, the image will not print with these moir patterns. There is not much you can do about this visual noise except to find a different size in which to view the image. |
EAN: 2147483647
Pages: 355