Applying the Unsharp Mask Filter
You might ask, What is a filter description doing here in the color adjustment chapter? The answer is that the Unsharp Mask (USM) filter is a contrast-adjustment tool that goes hand-in-hand with color correction, and if used properly, it can further enhance the color relationship and contrast of the image and make it really pop. USM exaggerates the transition between areas of most contrast while leaving areas of minimum contrast unaffected. It can help increase the contrast of an image and fool the eye into thinking fuzzy areas of the image are in focus.
To apply the USM, choose Filter ’ Sharpen ’ Unsharp Mask (see Figure 16.30). The USM filter has a preview in which you see a thumbnail version of the image. You can reduce or enlarge the preview by clicking the “ or + signs. This is helpful if you want to compare the affected preview to the original 100%- sized , unsharpened image. Check the Preview box to see the effect on the image itself.
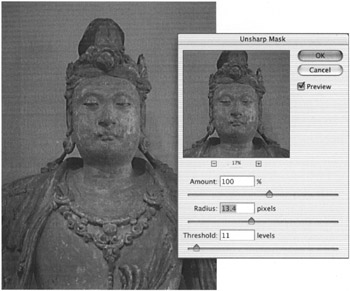
Figure 16.30: An image being sharpened with the Unsharp Mask filter dialog box
You ll have a chance to practice unsharp-masking the image at the end of Hands On 5.
To apply the USM, move one of its three sliders:
Amount By moving this slider or entering a value from 1% to 500%, you determine how much sharpening will be applied. The higher the value, the more the image will be sharpened. Applying only an amount, however, will not sharpen the image. To see the effect, you must also specify a radius.
Radius By moving the Radius slider or entering a value, you control the thickness of the sharpened edge. Lower values produce thinner, sharper edges; higher values produce wider edges with more overall sharpening of the entire image.
Threshold To control the numeric value of adjacent, contrasting pixels, move the Threshold slider. This slider determines how different the pixels must be from the surrounding area before they are considered edge pixels and sharpened. It also restores smooth areas that acquire texture when the amount and radius are applied ”the higher the value, the greater the restoration. Too much threshold will reverse the effect of the USM.
| |
Many of the operations performed in Photoshop today were derived from traditional optical techniques performed in a process camera. Before computers, a special mask was cut to protect parts of images when they were being bumped, or exposed to increase their contrast. This mask would leave important flesh tones and other critical areas unaffected while enhancing the contrast of the most prominent edges to produce the illusion of sharp focus. Because the area within the mask was being protected and the area outside the mask was being sharpened, the term for the process came to be known as unsharp mask . Photoshop essentially performs the same operation, only digitally and with more control and less labor.
| |
The goal in sharpening an image is to apply as much USM as possible without blowing out areas, shifting colors, creating dark or light halos , or amplifying noise and unwanted detail. These flaws can make the image appear garish or artificial. You can avoid most problems by applying one or more of the following methods .
Small-Dose Technique
USM works better in smaller doses. Apply USM several times with smaller settings, keeping the amount and radius lower and the threshold higher. Sharpen gently several times with the same low settings. Press ![]() /Ctrl-F to reapply the filter with the same values, or reduce the values slightly each time.
/Ctrl-F to reapply the filter with the same values, or reduce the values slightly each time.
Keep a close watch on the image as you sharpen it. Sharpen the image until it appears a little too sharp. To see an overall comparison, toggle between the original thumbnail in the History palette (Window ’ Show History) and the last line of the History list where sharpening was applied.
Flesh-Tone Technique
This technique works particularly well on flesh tones. The problem presented by flesh tones when applying any sharpening filter is the tendency to increase the texture of the skin so that it appears rough or porous. To avoid this problem, apply a larger amount and a smaller radius. Keeping the radius low affects only the edge pixels while reducing the sharpening of noise and unwanted detail. Adjust the threshold to eliminate excess texture in the flesh tones and other areas of low contrast.
Lab-Mode Technique
This method is specially designed to avoid color shifts. In essence, you will be applying your sharpening to the brightness information only. Like RGB mode, Lab mode segregates the image data into three channels. In RGB, however, red, green, and blue channels each contain 256 brightness levels. In Lab mode, the information is divided into an a channel (red and green hues), a b channel (blue and yellow hues), and an L , or lightness, channel (the brightness information). The L channel is where the USM will be applied.
Follow these steps to use the Lab-mode technique:
-
Choose Image ’ Duplicate to make a copy of your image.
-
Choose Layer ’ Flatten Image.
-
Choose Image ’ Mode ’ Lab Color to convert to Lab mode. Don t worry, there is no appreciable loss of color information in this conversion as there is when you convert from RGB to CMYK.
-
Choose Window ’ Channels. Target the Lightness channel by clicking its thumbnail.
-
Click the visibility icon next to the composite Lab channel in the Channels palette so that the full-color image is visible in the image window.
-
Choose Filter ’ Sharpen ’ Unsharp Mask.
Move the Amount, Radius, and Threshold sliders to produce the desired effect.
Blending Mode Method
This method produces similar results to the Lab mode technique. It s used to avoid color shifts.
-
Choose Image ’ Duplicate to make a copy of the image.
-
Choose Layer ’ Flatten Image.
-
Duplicate the Background by dragging it to the New Layer icon. Target the new layer.
-
From the Blending mode list in the upper left of the Layers palette choose Luminosity.
-
Choose Filter ’ Sharpen ’ Unsharp Mask.
-
Move the Amount, Radius, and Threshold sliders to produce the desired effect and click OK.
-
You can mitigate the effect by dragging the Opacity slider in the Layers palette to the right to reduce the opacity.
EAN: 2147483647
Pages: 355