Editing Paths
After a path has been drawn, all or part of it can be moved or reshaped. Anchor points can be added or omitted, and corners can be converted into curves or curves into corners. Paths can also be transformed and combined.

The path-editing tools include the Path Selection tool, the Direct Selection tool, the Add Anchor Point tool, the Delete Anchor Point tool, and the Convert Point tool.
Using the Path Selection Tool
The black arrow, the Path Selection tool, selects all the anchor points and segments of a path. You can then reposition the path anywhere on the image by dragging it with this tool.
| Note | Another method of selecting a path is to use the Path Selection tool to click and drag a marquee that touches any part of the path. All the anchor points will appear solid, indicating that the entire path is selected. |
You can duplicate a path by dragging and dropping it with the Path Selection tool and the Option/Alt key depressed (see Figure 9.11).
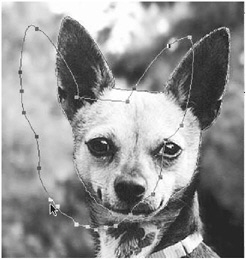
Figure 9.11: Option/Alt-drag with the Path Selection tool to duplicate a path.
Aligning Paths
By using the Path Selection tool, you can automatically align and distribute multiple paths and vector objects such as lines and shapes. You cannot, however, align or distribute shapes that are on separate layers . To align multiple paths, select two or more paths with the Path Selection tool by dragging a marquee that touches the objects, or by Shift-clicking the paths. From the Options bar, choose one of the alignment options shown in Figure 9.12.
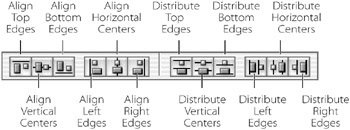
Figure 9.12: Alignment features of the Path Selection tool
The Align choices match up the edges or centers of paths and objects, as follows :
| Top Edges | Aligns the top edges of the path or vector object |
| Vertical Centers | Aligns the vertical midpoints |
| Bottom Edges | Aligns the bottom edges |
| Left Edges | Aligns the left edges |
| Horizontal Centers | Aligns the horizontal midpoints |
| Right Edges | Aligns the right edges |
The Distribute choices position the edges or centers of paths and objects over equal distances, in these ways:
| Top | Distributes the top edges of the path or vector object |
| Vertical Centers | Distributes the vertical midpoints |
| Bottom Edges | Distributes the bottom edges |
| Left Edges | Distributes the left edges |
| Horizontal Centers | Distributes the horizontal midpoints |
| Right Edges | Distributes the right edges |
Figure 9.13 illustrates the difference between aligning and distributing.

Figure 9.13: In the first row, the top edges are aligned. In the second row, the top edges are distributed.
Using the Direct Selection Tool
The Direct Selection tool selects or modifies a segment, or the position of an anchor point, on a path. It is an essential tool for revising and reshaping a path after it has already been drawn.
To select, move, or edit a segment or anchor point, choose the Direct Selection tool. Click on a segment or anchor point to select it. Click and drag an anchor point to reposition it or a segment to reshape it. To deselect a path, click anywhere on the image.
| Note | You can toggle from any of the Pen tools or path-editing tools to the Direct Selection tool by pressing the |
Reshaping Paths
To alter the shape of a path after it has been drawn, follow these steps:
-
Choose the Direct Selection tool.
-
Click an anchor point to select it.
-
Click and drag one of the anchor point s direction handles until the desired shape of the curve is achieved (see Figure 9.14).
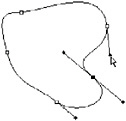
Figure 9.14: Reshaping a path
Editing Anchor Points
After you have drawn a path around an area on the image, you might need to refine it by adding or deleting anchor points. When you do so, you increase your ability to edit the path.
It might be tempting to add dozens of anchor points, to facilitate the drawing of a path. That s not always a good idea, because too many extra points increase the path s complexity and compromise the smoothness of the shape.
Adding and Deleting Anchor Points
To add an anchor point, select the Add Anchor Point tool and click the path. A new anchor point will appear where you ve clicked. To delete an anchor point, select the Delete Anchor Point tool and click an anchor point. The two segments connected by the point will join into one.
Converting Anchor Points
There are two types of anchor points. Smooth points connect curved or straight lines that flow into each other. Corner points connect lines that change direction abruptly. An anchor point can be converted from corner to smooth or from smooth to corner by clicking the point with the Convert Point tool (see Figure 9.15). Click a smooth point, and it converts to a corner point; to convert a corner point, click it and drag out the direction handles until the desired curve is achieved, and release the mouse.
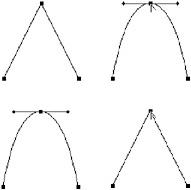
Figure 9.15: Converting (top) a corner to a smooth point and (bottom) a smooth to a corner point
Transforming Paths
Like selection outlines and selection contents, paths can also be modified with the transformation tools. After a path has been drawn, you must select it with one of the arrow tools. If you select it with the Path Selection tool, you can employ any of the transformation operations in the Edit menu (including Free Transform, Scale, Rotate, Skew, Distort, Perspective, or Flip) to edit the entire path. If you select one or more points or segments with the Direct Selection tool, you can apply any of the transformation operations to the selected part of the path.
| Note | To learn how to use Photoshop s transformation features, see Chapter 13, Sizing and Transforming Images. |
Combining Paths
If you have drawn two or more paths that intersect, you can combine them into one path. Select both paths with the Path Selection tool by pressing your mouse button and dragging a marquee that touches both of them or by clicking them in sequence while pressing the Shift key. On the Options bar, click the Combine button. The elements of both paths combine into a group of paths. If you click any member of the group with the Path Selection tool, then all will be selected.
EAN: 2147483647
Pages: 355