A Cross-Platform VPN with PPTP
| | ||
| | ||
| | ||
Users with laptops on the road and computers in their home offices need remote network access. By remote network access, we mean the ability to interact with other machines on your network as if the remote computer were physically attached to the same LAN. Although this is sometimes achieved via dial-up over dedicated phone lines, we'll be looking exclusively at virtual private networking connections (VPNs).
VPNs are popular because they allow users to create a secure, private connection to the company network over inexpensive broadband Internet services or dial-up connections to a local ISP's network access point rather than a long distance connection to a modem rack in the server room.
Linux and Windows Road Warriors: Connecting via PPTP
Any combination of Linux and Windows "road warrior " users might be out there needing access to the company network. We'll show you how to create a unified virtual private network (VPN) that serves all your users on whatever operating system they might be using.
Recall our earlier story:
-
doctors and nurses accounts live in corp.com on server linserv1.corp.com in an OpenLDAP directory service. Linux clients authenticate via LDAP. Windows clients see linserv1 as a Samba-based PDC.
Sales, Marketing, and Human Resources accounts live in ad.corp.com on server windc1.ad .corp.com in an Active Directory service.
The goal is to ensure that all users, wherever their accounts "live," can get connected and authenticated to our corporate network; It shouldn't matter if they decide to use a Linux laptop or a Windows laptop. Take a look at Figure 9.12, which demonstrates our goals for this section.
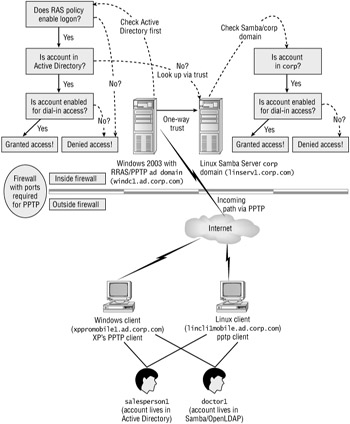
Figure 9.12: Using a Windows 2003 PPTP server, both Windows and Linux clients can log on with either corp domain or ad domain credentials. Now that the trust is in place.
We can permit users using both Linux and Windows clients to log on to the VPN with either corp (Linux) or ad (Windows) credentials.
In the bottom of the figure, you can see that users whose accounts live in Active Directory or OpenLDAP (our Samba PDC) can use whichever client computer they want and get access to our network.
Yes, you're reading that right. Both client types will be connecting to a Windows 2003 PPTP server and running a Microsoft protocol, PPTP (Point to Point Tunneling Protocol).
While PPTP has not been accepted as an Internet standard, it is a published and open protocol that is included with every Windows client. PPTP was built on top of PPP (Point to Point Protocol), a widely accepted Internet standard.
A PPTP client is not included in Fedora Core 3, but it is readily available. Since it's likely that you're already using Microsoft's PPTP as a VPN in production, we're going to stick with that here.
Linux PPTP clients support MSCHAP2, the authentication protocol Windows servers prefer to speak to, and that means that we can enable users to log on with either Windows Active Directory credentials (from the ad domain) or Linux domain credentials (from the corp domain), without reconfiguring the Windows server to accept a less secure method of authentication.
| |
There are alternatives to PPTP. These include the following.
OpenVPN OpenVPN is an up-and-comer based on the same SSL protocol that underlies ssh connections and secure websites . OpenVPN is supported on both Windows and Linux, although Windows support is still lacking in user -friendliness. Since OpenVPN is not standard with Windows, users must install a client program to support it. We also found it quite difficult to authenticate OpenVPN users against both the ad and the corp domains simultaneously . Still, OpenVPN is a straightforward and flexible system that's well worth a look. See http://www.openvpn.org/ for more information about OpenVPN.
IPSEC IPSEC is an open standard that is supported on Windows and Linux. Unfortunately, however, a fully Windows-compatible installation of IPSEC on Linux is currently quite difficult to configure. While there is some support in the Fedora GUI for configuring IPSEC connections, don't get your hopes up too highas of this writing, that GUI is only suitable for creating simple VPN tunnels between Fedora Linux and other Unix systems and is not suitable for use with Windows clients. See the Linux IPSEC HOWTO at http://www.ipsec-howto. org/ for more information about IPSEC.
| |
| |
PPTP is widely deployed. It comes in the box with Windows, and open source implementations exist. Why doesn't everybody use it? Well, security issues have been raised regarding Microsoft's PPTP in the past. A well-known article by Bruce Schneier of Counterpane Systems caused quite a stir in 1998 by pointing out serious cryptographic flaws in the original PPTP implementation. You can read that article at http://www.schneier.com/pptp-faq.html .
However, in the years since, Microsoft has standardized on the much-improved MSCHAP2 authentication protocol and improved other cryptographic aspects of its PPTP implementation. A more recent article by Mr. Schneier acknowledges that this addresses most of the technical flaws:
-
http://www.schneier.com/pptp.html
One lingering concern is the backward compatibility that, by default, Microsoft's PPTP server tries to provide with MSCHAP, thus allowing less secure authentication to be used on the network. However, this is no longer the case in Windows 2003, where MSCHAP is disabled by default.
However, there is still a concern regarding password attacks. Since password hashes do travel "over the wire" in PPTP, there are opportunities for malicious clients to capture the hashes and attack these passwords with fast offline password cracking programs.
Therefore, make it your practice to teach your users to choose passwords that are not vulnerable to dictionary attacks .
A password hacking program, such as the LC5 program found at http://www.atstake.com/products/lc/ , can help you track down weak passwords so you can force your users to change them.
| |
| |
There are some older authentication protocols that shouldn't be used if at all possible. Just for reference, here's a quick rundown of those protocols and why you should avoid using them.
PAP (Password Authentication Protocol) PAP authentication passes the password as cleartext. Obviously, this is not a secure solution, at least by itself. This is the only common method of dial-up authentication in which the password is available to the authentication server in cleartext form. PAP is still somewhat common for PPP (Point-to-Point Protocol) dial-up connections, such as those used to connect to popular ISPs. Here, you need to be worried that the bad guy is tapping the phone line, which is pretty unlikely . But for VPN authentication over the public Internet it's a really bad choice.
CHAP (Challenge Handshake Authentication Protocol) CHAP passes only a hash of the password, based on a unique one-time challenge received from the server. If the hash is intercepted in transit, the party snooping on the connection still doesn't have the means to gain access to the user's account, because a hash mathematically matching that particular challenge will only be valid once.
Unfortunately, CHAP has a serious security flaw. For mathematical reasons beyond the scope of this book, the server can only verify the hash received from the client by keeping a cleartext copy of the password on the server . This is widely agreed to be a bad idea. Databases containing thousands of cleartext passwords have a history of becoming compromised at some point, and then, instead of one user's PAP password being cracked by a patient network sniffer, you have thousands of CHAP passwords cracked wide open. Thus begat MSCHAP.
MSCHAP (Microsoft Challenge Handshake Authentication Protocol) MSCHAP authentication was Microsoft's first effort to fix CHAP's cleartext password storage problem. While similar to CHAP, MSCHAP does not require a cleartext password to be kept on the server. Instead, password hashes are kept as, not coincidentally, the very same password hashes that are used to authenticate users logging into domain member workstations. Alas, MSCHAP had security holes, thus leading to the birth of MSCHAP2.
| |
Setting Up Windows 2003 PPTP Server
It's quite likely that you've already set up a Windows 2003 PPTP server in the real world. However, for testing here in the test lab, let's go through the motions . Then, in the next two sections, we'll make our Windows XP clients connect to it, as well as our Linux clients.
In our example, we're going to set up windc1 as the PPTP server. However, in real life you likely wouldn't do this. Instead, you'd likely set up a dedicated server for this, but in our test cases it'll be okay. Additionally, in real life you would need to forward TCP traffic on port 1723 through the firewall to windc1 and all GRE (Generic Routing Encapsulation or "type 47") traffic as well.
| Warning | Not all hardware based (or software based for that matter) are created equal. Many will let you pass TCP port 1723, which sounds like it should allow you to get PPTP through the firewall. Except that PPTP also uses a special IP payload called GRE (Generic Routing Encapsulation) or "Type 47" traffic. This is a distinct payload type, different from UDP or TCP, used to encrypt other payloads. In short, be sure the documentation of your firewall specifically states that it can allow "Type 47/GRE" traffic. If it doesn't, opening up TCP port 1723 won't matter. |
Configuring PPTP for Windows 2003 Server
Setting up Windows PPTP happens within Windows 2003's Routing and Remote Access (RRAS) console. Contrary to popular belief, you can have incoming PPTP even if your server has only one network card. To configure Windows 2003 PPTP (with only one network card):
-
Click Start
 All Programs
  Administrative Tools
  Routing and Remote Access. The Routing and Remote Access console appears as shown in Figure 9.13.;
 -
Right-click over the server name , and select "Configure and Enable Routing and Remote Access."
-
The Routing and Remote Access Wizard appears. Click Next at the introduction screen for the wizard.
-
At the "Configuration" screen, select "Custom configuration" and select "Next."
-
At the "Custom Configuration" screen, select "VPN access" (and nothing else) and click "Next." At the final page of the wizard, click "Finish." You'll be asked to start the RRAS service. Select "Yes."
-
Once back at the Routing and Remote Access console, right-click over the server name and select "Properties." On the "General" tab, click "Local area network (LAN) routing only" and ensure "Remote access server" is also checked. Click "OK" to return to the Routing and Remote Access console. You may be prompted to restart the RRAS services. Select "Yes" to restart them.
-
Back at the Routing and Remote Access console, right-click the icon labeled "Ports" and select "Properties." Select the line labeled "WAN Miniport (PPTP)" and select "Configure." Ensure "Remote access connections (inbound only)" is checked, as shown in Figure 9.14. While you're here, you can also change the maximum number of inbound connections by entering in a number in the "Maximum ports" spinner if you like. Click "OK" to close the "Configure DeviceWAN Miniport (PPTP)" page. Click "OK" to close the "Ports Properties" page.
-
Back at the Routing and Remote Access console, click the icon labeled "Remote Access Policies." Right-click over the "Connections to Microsoft Routing and Remote access server" policy as shown in Figure 9.15 and select "Properties." On the properties page of the policy, select "Grant remote access permission" as shown in Figure 9.15.

Figure 9.13: PPTP is configured once the configuration of RRAS starts.
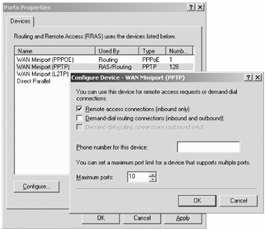
Figure 9.14: Ensure "Remote access connections (inbound only)" is selected.
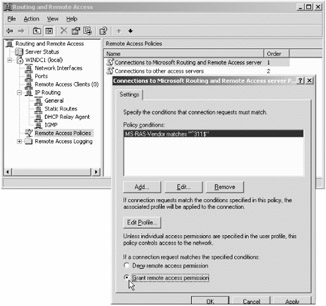
Figure 9.15: Be sure to select the policy and allow people access. By default RRAS denies everyone access.
Enabling Individual Users to Use the PPTP VPN
Now you need to specify each user who has access via VPN. You only need to do this step if your Active Directory domain is in the Mixed functional level. In the course of this book, we never changed it, so Mixed functional level is likely what you still have if you've been working through our exercises. To that end, use Active Directory Users and Computers and select the properties of any user you want to allow via VPN. In Figure 9.16, you can see we've selected salesperson1 's properties then clicked the "Dial-in" tab. Be sure to select "Allow access" or salesperson1 won't be able to log on via the VPN.
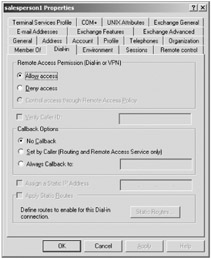
Figure 9.16: Ensure that the user you want to allow to dial in has been expressly assigned "Allow access" on the "Dial-in" tab.
Testing Your Microsoft PPTP VPN with a Microsoft XP Client (for Users in ad.corp.com )
In our examples, we'll assume you've got a machine named xpmobile1. This should not be a domain member workstation living "inside" the 192.168.2.x LAN. Instead, use an external PC that has no physical access to your internal network. A workstation at home connected via a public broadband ISP is a good example.
Such a workstation can only "see" the firewall, nothing else in the test lab. It's up to your firewall to forward PPTP traffic from its public interface back to the private interface where it can find windc1 . This way, when we're able to ping machines inside the firewall, we'll know for certain that the PPTP connection has succeeded because otherwise we wouldn't see them at all! If we used a workstation inside the firewall, we would already be able to ping the systems behind it, and indeed in most cases this would happen without the benefit of the VPN over the existing unencrypted route to the local area network.
To create a VPN connection from xpmobile1 to the PPTP server:
-
Log on to the machine. If the machine isn't joined to the domain, the only account is the local Administrator account.
-
Click Start
 My Network Places. Then in the left hand under "Network Tasks," select "View network connections."
 -
Still under "Network Tasks," select "Create a new connection" to start the "New Connection Wizard." At the first screen of the wizard, select "Next."
-
At the "Network Connection Type" screen, select "Connection to the network at my work-place" and click "Next."
-
At the "Network Connection" screen, select "Virtual Private Network connection" and click "Next."
-
At the "Connection Name" screen, enter the company name, say, corp.com .
-
At the "Public Network" screen, select "Do not dial the initial connection."
-
At the "VPN Server Selection" screen, enter the publicly visible Internet IP address of the firewall box, which must be configured to forward TCP port 1723 and all GRE traffic to windc1.ad.corp.com , as we've mentioned earlier.
-
At the final screen of the wizard, click the "Add a shortcut to this connection to my desktop" check box (we'll reuse this dial-up tool many times) then click "Finish."
From your Windows XP client, you'll be able to enter credentials for any user in Active Directory. For now, enter salesperson1 as shown in Figure 9.17. You can use the password of p@ssw0rd .

Figure 9.17: You can enter credentials as anyone in Active Directory who has been granted the specific right to log on via dial-in.
Once connected, you should get a pop-up balloon, as shown in Figure 9.18.

Figure 9.18: A pop-up balloon for Windows XP shows that you're connected to the VPN.
Now we can verify our success by using the ping command to access a system behind the firewall, which we normally wouldn't be able to find over the Internet:
-
Click Start
 Run. In the "Open" field enter cmd and press Enter. The command prompt appears.
 -
Use the ping command to verify that you can communicate with linserv1.corp.com : ping 192.168.2.202
-
You should see lines similar to the following:
Reply from 192.168.2.202: bytes=32 time=100ms TTL=41
Since you are connecting over the Internet, it is possible that some packets will not come back. That's okay as long as most of them do come through.
Great! We've verified several things:
-
PPTP is working.
-
RRAS policies are allowing clients in.
-
salesperson1 has been granted access to dial-in/VPN in.
-
The firewall is correctly configured to forward PPTP traffic.
-
If your connection is not successful, check the following:
-
If you receive an error message stating that "the VPN server may be unreachable," double-check the Internet (not internal) IP address of your firewall. Then double-check the TCP port 1723 and GRE traffic forwarding rules you have configured on the firewall to forward traffic to windc1.ad.corp.com .
-
Try establishing the connection from a workstation inside the local network, such as xppro1.ad.corp.com . This isn't particularly useful, because traffic will still travel unencrypted on the local network via the default route, but success here means that the firewall is not the problem.
-
Make sure you have specifically enabled dial-in access for the user salesperson1 .
-
Check the event logs on windc1.ad.corp.com .
Okay, so we've logged into a Windows VPN with Windows domain credentials. That's nice, but not very cross-platformnot yet. Now we'll log in using corp domain credentials, demonstrating that users who "live" on our Samba PDC can also access the VPN thanks to our domain trust.
Initially Testing Your Microsoft PPTP VPN with a Microsoft XP Client (For Samba Users in the corp Domain)
We've succeeded in logging in with ad domain credentials. Now let's try it as a user from the corp domain.
Right now, this is a test that should fail. That's because we haven't specifically allowed dial-in access for our individual corp domain users yet. We'll try the test now to see the symptom, then repeat the test after we administer the cure.
Go ahead and double-click the icon on the desktop you created for the dial-up tool. Now enter the credentials of doctor1 , who resides in the corp domain as shown in Figure 9.19. Be sure to specify the corp domain in the "Domain" field. Also enter the password of p@ssw0rd .
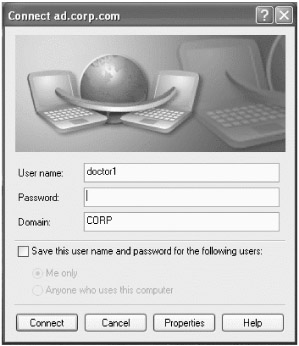
Figure 9.19: Enter credentials for doctor1 , who lives in corp .
When you try this, you will not successfully make a connection, as shown in Figure 9.20.

Figure 9.20: Your Samba accounts need to be specifically granted dial-in access.
Why? Because doctor1 hasn't yet been granted access to "dial-in." The only way we've successfully found to enable this is to use the old-school NT 4 tools we saw previously in Chapter 2. This appears to be an unfortunate gap in the currently available Samba tools: Samba and its LDAP back end will cheerfully store the dial-in "flag," but there is currently no interfacecommand line or otherwiseto set it. There's no documentation about it either. Ouch. This is clearly another opportunity for Enterprising Linux Gurus to improve their karma by adding a rather straightforward new feature.
In the meantime, we'll dive in and solve the problem using the NT 4 tools. As discussed in Chapter 2, these run on a Windows domain member workstation and edit user accounts remotely. As far as they are concerned , Samba is an NT 4 server, which is a neat trick. But before we can set that up, we have to clean up our act a little by creating NT-style "domain groups" corresponding to our Unix doctors and nurses groups.
Creating Samba Domain Groups
Our Samba PDC already has two groups of users, doctors and nurses . That's worked fine for us so far, so you may be scratching your head at this point when we tell you that our groups aren't quite good enough.
What's the trouble? The Webmin LDAP Users and Groups module that we've relied upon in this book does a great job of creating users in such a way that they are valid both as Linux users and as NT-style domain users. However, it doesn't do such a great job with groups. Specifically, it doesn't automatically create a "group mapping" so that each new group is specifically advertised to NT domain members . For most applications, this doesn't matter, but the NT user administration tools do care. We need those tools in this chapter to grant "dial-in" (VPN) privileges to users in the corp domain, since Samba is currently missing native tools (and documentation!) for that purpose. The NT tools will complain with nasty message boxes unless we ensure that the group each user belongs to is advertised as a domain group.
So how do we take care of it? Using Webmin's Samba module, which we've seen many times before. This module allows us to easily create a Samba "group mapping" for any existing Unix group. Follow these steps to create Samba group mappings for the existing doctors and nurses groups:
-
Log into Webmin at http://linserv1.corp.com:10000/ with the username root and the password p@ssw0rd .
-
Click "Servers." The "Servers" page appears.
-
Click "Samba Windows File Sharing." The "Samba Windows File Sharing" page appears.
-
Click "Add and edit Samba groups." The "Samba Groups" page appears.
-
Click "Add a new Samba group." The "Create Samba Group" page appears.
-
In the "Group name" field, enter doctors .
-
From the "Group type" menu, select "Domain Group."
-
In the "Unix group" field, also enter doctors .
-
Click "Create." The "Samba Groups" page reappears.
-
Repeat steps 59 for nurses .
The doctors and nurses groups are now correctly advertised as domain groups in a way that is fully compatible with the NT user administration tools. As we've mentioned, this means we'll be able to grant "dial-in" (VPN) privileges to these users using the NT tools without frustrating error messages.
Leveraging the Old-School NT 4 Tools to Allow Dial-Up Access
In Chapter 2, we used the old usermgr.exe and srvmgr.exe tools to manage Samba because Samba really pretends to be an NT 4 domain. In Chapter 2 we explained that the best course of action is to find an old NT 4 server CD-ROM and rip out the tools by hand. The files will be in the i386 directory in compressed format. All you need to do is use the expand command on two files: usrmgr.ex_ and svrmgr. For example, you'll type:
expand usrmgr.ex_ c:\usrmgr.exe expand srvmgr.exe c:\srvmgr.exe
When you do this, you'll have two uncompressed and ready-to-run files in your c:\ directory. Once you run them on any Windows machine (say, xppro1.ad.corp.com ), you'll be able to manage your Samba domain and provide the appropriate dial-in permission.
| Tip | The executables that worked for us were usrmgr.exe of size 299,280 bytes (date 7/26/1996) and svrmgr.exe of size 211,216 bytes (date 7/26/1996). |
Now, log on to xppro1.ad.corp.com as the administrator of the corp domain. (If you're logged in as anyone else, this won't work, so be sure you're logged in as the administrator of the corp domain.) Then, run usrmgr.exe from wherever you unpacked it.
You'll be able to select the doctor1 "User Properties"; then select "Dial-in" and check the "Grant dial-in permission to user" check box as shown in Figure 9.21.
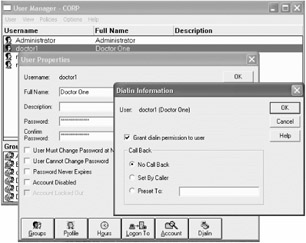
Figure 9.21: Samba users need the "Grant dial-in permission to user" set within the NT 4 User Manager tool.
Click "OK" to close the "Dial-in Information" window, then click "OK" to close the "User Properties" window.
Retrying Your Microsoft PPTP VPN with a Microsoft XP Client (for Samba Users in corp )
Now that we have granted dial-in access, the Windows VPN should be happy with the response it gets from the Samba PDC. Go ahead and double-click the icon on the desktop you created for the dial-up tool. Now enter the credentials of doctor1 , who resides in the corp domain as shown in Figure 9.19. Also enter the password of p@ssw0rd .
Now it should connect you successfully because that user has been granted the right to log on!
At this point, we have access to both domains from Windows. and that's impressive. However, the picture is incomplete without VPN access from a Linux workstation. That's where we're going next.
Connecting to the VPN with a Linux Client
We've made a VPN connection from a Windows client to our Windows PPTP server, using both ad domain and corp domain credentials. This is a great thing, and it is cross-platform in the sense that credentials from both Linux-hosted and Windows-hosted servers are honored. But we need to provide access for our Linux-based clients as well. We can do that using the Linux PPTP client software, which goes by the unsurprising name pptpclient .
We'll begin by installing pptpclient and the software it depends upon. We'll install them on a mobile Linux workstation outside the company network and call that workstation linmobile1 .
Then we'll establish a VPN connection using the friendly GUI provided by pptpclient . We'll do that using both ad and corp domain accounts, showing that accounts from either the Active Directory domain or the Linux-hosted corp domain are accepted for VPN connections from Linux clients.
Installing the PPTP Client Software for Linux
Where does the PPTP client for Linux come from? The Linux PPTP client project has its home page at http://pptpclient. sourceforge .net . A Fedora Core 3 HOWTO is available on that site as well:
-
http://pptpclient.sourceforge.net/howto-fedora-core-3. phtml
| Warning | We'll show the steps needed to install pptpclient in detail, but be sure to consult the official HOWTO for up-to-date links and possible changes to the installation process. The URLs that follow are presented for illustrative purposes, as version numbers will almost certainly have changed. Be sure to bookmark that HOWTO document! |
Installing pptpclient isn't too difficult, but there are a few requirements that must be taken care of first. Specifically, before installing pptpclient , we need to:
-
Install Fedora Linux on a "road warrior" PC, linmobile1 . This will be our Linux-based VPN client.
-
Add support for MPPE (Microsoft Point-to-Point Encryption) to the kernel. MPPE provides encryption for our PPTP connections. Fortunately, installing this kernel module is not difficult thanks to good packaging.
-
Upgrade pppd (the Point-to-Point Protocol daemon) to version 2.4.3 or better, if necessary. PPTP is built upon PPP, and the implementation of PPP included with Fedora Core 3 has difficulties negotiating with Microsoft's VPN server as of this writing.
-
Install a few system libraries and tools that are required by the pptpclient graphical user interface pptpconfig .
We'll begin by installing Linux on linmobile1 .
Installing Fedora Core 3 on linmobile1
linmobile1 , the client machine we'll use in this section, is an Internet-connected PC not located inside the company LAN. For space reasons, we can't go into fanatical detail about the configuration of linmobile1 , but we'll briefly discuss the key differences and the basics of hooking up to a typical home office broadband connection with Linux.
We recommend that you follow the instructions in Chapter 1 for configuring lincli1.corp.com , except that:
-
You should enable DHCP (Dynamic Host Configuration Protocol) rather than specifying an IP address. DHCP is the default choice, so this is not difficult. This permits your cable/DSL modem or home router to assign an IP address to your Linux system.
-
You should also allow DHCP to assign a DNS server address. Again, this is the default choice.
Also, although this is already included in our instructions for configuring lincli1.corp.com , we'll mention that you must select the development packages. Otherwise, you'll have trouble installing the kernel modules needed to provide encryption for our VPN connection.
Once you have successfully installed Fedora Linux on linmobile1 and established a broadband Internet connection, you're ready to install the MPPE kernel module, upgrade pppd , and install other prerequisites that pptpclient depends upon.
Installing the Required Kernel Modules for PPTP on linmobile1
Installing pptpclient used to be difficult. That's because it requires a custom kernel module that adds support for MPPE (Microsoft Point-to-Point Encryption). Without MPPE, PPTP doesn't encrypt, it simply encapsulates.
Installing kernel modules doesn't sound easy, but fortunately, we can take advantage of DKMS (Dynamic Kernel Module Support). DKMS is a framework for easy management of Linux kernel modules that makes installing them a relatively painless operation. DKMS was created and is actively maintained by Dell's Linux support team.
| Note | As of this writing, MPPE has been accepted into the mainstream Linux kernel. This will eventually remove the need for DKMS when installing pptpclient . However, this latest-and-greatest Linux kernel is not included in Fedora Core 3 as of this writing. |
How do we install DKMS, and where do we get the MPPE module that takes advantage of it? Both are available from the poptop project. poptop is a PPTP server that is closely related to pptpclient . Both require the same MPPE support in the kernel, so the pptpclient site refers visitors to the poptop site to download Fedora Core 3-compatible rpms of DKMS itself and the MPPE module that takes advantage of it. You can find the latest links by visiting this page:
-
http://poptop.sourceforge.net/dox/
Click "Downloads." The DKMS and MPPE rpms appear first in the list of files available to download.
| Tip | poptop is a Linux-based PPTP server project, closely associated with pptpclient . Space prevents us from discussing poptop fully. However, you can download a complete write-up on the subject from this chapter's section of our website, www.winlinanswers.com . There you'll learn how to configure a completely Linux-based PPTP server that authenticates against our Samba PDC. You'll also learn how to provide cross-domain authentication against our Active Directory domain when the PPTP server runs on Linux. |
As of this writing , the correct URLs to download these two rpms are as listed here.
For DKMS
http://prdownloads.sourceforge.net/poptop/dkms-2.0.5-1.noarch.rpm
For MPPE
http://prdownloads.sourceforge.net/poptop/kernel_ppp_mppe-0.0.5-2dkms.noarch.rpm
You will definitely want to consult the poptop website for links to the very latest versions. We'll assume these versions in filenames shown in the steps that follow.
| Warning | In previous chapters, we showed you how to use the wget command to download rpm packages, and you may be tempted to use wget to fetch these two files directly to linclimobile1.ad.corp.com from the command line. Alas, downloads from sourceforge.net via wget don't always work well. That's because sourceforge.net always interposes a "choose your preferred mirror site" page and displays an ad or two. Simply using wget will fetch the "choose your mirror" page, not the file you really want. You can work around this by accessing the "choose your mirror" page with your regular browser, clicking the link to download the file from your preferred mirror, and finally copying the URL that appears following the words "your download should begin shortly. If it does not " This link will work with wget . |
Follow these steps to install the MPPE kernel module on linmobile1 :
-
Download dkms-2.0.5-1.noarch.rpm and kernel_ppp_mppe-0.0.5-2dkms.noarch.rpm from the locations listed previously.
-
Move these files to /tmp on linclimobile1.ad.corp.com .
-
Use the following rpm commands to install them:
rpm -i dkms-2.0.5-1.noarch.rpm rpm -i kernel_ppp_mppe-0.0.5-2dkms.noarch.rpm
The preceding steps will produce warnings as follows :
warning: dkms-2.0.5-1.noarch.rpm: V3 DSA signature: NOKEY, key ID 23b66a9d
That's because we don't have a cryptographic key installed to verify the identity of these particular rpms. If this is a major concern for you in a production environment, see Chapter 6 for a discussion of how to install rpm keys.
The second rpm command will produce more extensive output, as various patches are automatically applied and the kernel module is compiled and installed. The final message will be:
DKMS: install Completed.
Now we need to load the module into the running Linux kernel, partly to verify our success and partly so that pptpclient can use it without rebooting. We can do this using a command called modprobe .
modprobe is the standard Linux utility to load a kernel module and all of the modules it depends on "on the fly." We'll ask modprobe to load a special module name, "ppp-compress-18," which automatically loads both MPPE and the PPP modules on which it depends. When this command succeeds, we know that we've installed the MPPE module properly.
To verify the successful installation of the MPPE kernel module, execute this command as root on linmobile1:
modprobe ppp-compress-18 && echo MPPE kernel module loaded
This command will print:
MPPE kernel module loaded
If it does not, consult the output of the rpm commands to determine the cause of the error, make sure you installed both rpms, and check the poptop and pptpclient websites for any changes to the installation process that have been made since this writing.
We're nearly finished with MPPE. The last step is to make sure that MPPE is available again when the server reboots. We'll do that by adding a modprobe command to /etc/rc.d/rc.local , which we've seen before. Commands in /etc/rc.d/rc.local are automatically executed after the rest of the boot process is complete.
To ensure that MPPE support loads every time the server is rebooted, add this line at the end of /etc/rc.d/rc.local :
modprobe ppp-compress-18 && echo MPPE kernel module loaded
We've taken care of the MPPE encryption issue. Are we done? Not quite. PPTP is built upon PPP (Point-to-Point Protocol), and Fedora Core 3 and virtually all other distributions include pppd, an application that is part of the standard implementation of PPP for Linux systems. However, pptpclient requires that we have a more up-to-date version of pppd than Fedora Core 3 currently provides, so we have a little bit of upgrading to do.
Upgrading pppd for Use with PPTP on linmobile1
In Linux, the PPP protocol on which PPTP is based is implemented partly by a program called pppd. (The rest of the implementation is inside the Linux kernel.) pptpclient requires version 2.4.3 or better for best results. Unfortunately, as of this writing, Fedora Core 3 provides only version 2.4.2, but this may have changed by the time you read this. If not, you can work around it by installing an rpm of version 2.4.3 from the poptop site.
Since Fedora Core 3 is constantly updated, we recommend that you first try the following command to check whether you already have version 2.4.3 or better:
pppd --version
As of this writing, this reports :
pppd version 2.4.2
If you also get this result (or an older version), you'll need to visit the pppd rpms page on the poptop website. You can find a current link to this and other related files by visiting http://poptop.sourceforge.net/dox/
Click "Download."
Locate the latest release. As of this writing, this is version 2.4.3-5. You'll want the version for the i386 architecture on Fedora Core 3 (fc3).
Follow these steps to install an updated version of the pppd software on linclimobile1.ad.corp.com :
-
Download ppp-2.4.3-5.fc3.i386.rpm (or the current version) and from the URL just given.
-
Move this file to /tmp on linmobile1 .
-
Use the rpm command to install it. We add the --force option to avoid warnings about conflicts with the version of pppd that ships with Fedora Core 3:
rpm -i --force ppp-2.4.3-5.fc3.i386.rpm
This command should produce no output other than a NOKEY warning.
Installing pptpclient
Now that we have the requirements installed, we'll fetch the actual pptpclient software. We will also need several libraries and utilities that provide a friendly user interface for creating PPTP connections as well as system services needed by that user interface. You can find the current links to these in the pptpclient Fedora Core 3 HOWTO. As of this writing, the required items and their download URLs (where needed) are:
-
pptpclient The actual PPTP client software. Available here (but see the HOWTO for the most up-to-date URL):
-
http://prdownloads.sourceforge.net/pptpclient/pptp-1.6.0-1.i386.rpm
-
-
pptpconfig A user-friendly interface to pptpclient . Available here (but see the pptpclient Fedora Core 3 HOWTO for an updated URL):
-
http://prdownloads.sourceforge.net/pptpclient/pptpconfig-20040722-6.noarch.rpm
-
-
php-pcntl An interpreter for simple user-friendly configuration utilities needed by pptpconfig . Available here (but see the pptpclient Fedora Core 3 HOWTO for an updated URL):
-
http://prdownloads.sourceforge.net/pptpclient/php-pcntl-4.3.10-1.i386.rpm
-
-
php-gtk-pcntl The graphical user interface component for php-pcntl . Available here (but see the pptpclient Fedora Core 3 HOWTO for an updated URL):
-
http://prdownloads.sourceforge.net/pptpclient/php-gtk-pcntl-1.0.1-2.i386.rpm
-
-
libglade A system library required by php-pcntl . This library displays the actual user interface components via the gtk+ library. libglade is standard in Fedora Linux. We'll install and upgrade it using the up2date command.
-
libxml A system library required by php-pcntl . This library provides the ability to read and write files written in XML (eXtensible Markup Language). libxml is standard in Fedora Linux. We'll install and upgrade it using the up2date command.
Follow these steps to install pptpclient and its user interface on linmobile1. Execute all commands shown as the root user:
-
Download pptp-1.6.0-1.i386.rpm from the location just shown.
-
Move this file to /tmp on linmobile1 .
-
Use the rpm command to install it:
rpm -i pptp-1.6.0-1.i386.rpm
This command produces no output on success, except for the NOKEY warning we've seen before.
-
Make sure that certain components of Fedora Linux required by pptpconfig are installed, using the up2date utility:
up2date libglade libxml
-
Download php-pcntl-4.3.10-1.i386.rpm from the location just shown.
-
Move this file to /tmp on linmobile1.ad.corp.com .
-
Use the rpm command to install it:
rpm -i php-pcntl-4.3.10-1.i386.rpm
This command produces no output on success, other than the usual NOKEY warning.
-
Download php-gtk-pcntl-1.0.1-2.i386.rpm from the location just given.
-
Move this file to /tmp on linmobile1.ad.corp.com .
-
Use the rpm command to install it:
rpm -i php-gtk-pcntl-1.0.1-2.i386.rpm
This command produces no output on success, other than the NOKEY warning.
-
Download pptpconfig-20040722-6.noarch.rpm from the location just shown.
-
Move this file to /tmp on linmobile1 .
-
Use the rpm command to install it:
rpm -i pptpconfig-20040722-6.noarch.rpm
This command produces no output on success, beyond the usual NOKEY warning.
We've installed the PPTP client software! Now we're ready to configure it and begin making VPN connections to the Windows VPN server.
Testing pptpclient by Logging In as an Active Directory (ad) User
Configuring pptpclient is made much easier by the user-friendly pptpconfig utility. This utility allows us to create and manage as many VPN connections as we find useful. It is, dare we say it, a darn nice GUI for a Linux application. Now that the utility is installed, we can access it using the standard Fedora menus and use it to connect to the RAS PPTP server on windc1.ad.corp.com . Follow these steps to create a linmobile1 to the VPN :
-
Log into linmobile1.
-
Select the "Applications" menu.
-
Select the "Internet" submenu.
-
Select the "PPTP Client" item.
Note If you are not logged in as root, you will be asked to provide the root password. This is because establishing new network routes is a privilege reserved for root in Linux.
-
The pptpconfig tool then appears. In the next few steps we will configure the fields shown beneath the "Server" tab, as shown in Figure 9.22.
-
In the "Name" field, enter windc1_as_salesperson1 .
-
In the "Server" field, enter the Internet-visible IP address of your router. Although you see 192.168.2.226 in the screen shot, this is only a placeholder. You should use the externally visible address of your router, which must be configured to forward PPTP traffic to 192.168.2.226 as described earlier in this chapter.
-
In the "Domain" field, enter ad .
-
In the "Username:" field, enter salesperson1 .
-
In the "Password:" field, enter p@ssw0rd .
-
Click "Add." An entry for the windc1_as_salesperson1 connection now appears in the "PPTP Client Tunnel List" area.
-
Click the "windc1_as_salesperson1" entry in the "PPTP Client Tunnel List" area.
-
Click "Start." The "pptpconfig tunnel windc1_as_salesperson1" window appears, displaying the status of the connection. After a few moments, the display should resemble Figure 9.23. "Connected" should appear in the lower-left corner of the window.
-
Click "Close" to dismiss the status window.
-
Click "Quit" to close the "pptpconfig tunnel windc1_as_salesperson1 " window. This does not break the VPN connection.
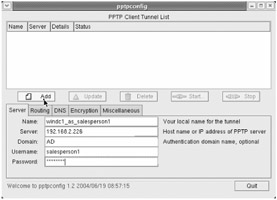
Figure 9.22: You can use pptpconfig to create a new PPTP VPN connection.
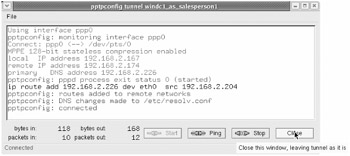
Figure 9.23: You'll see "connected" in the pptpconfig status window up successfully connecting from linmobile1
| Note | What about the other tabs of the "pptpconfig" window? The most interesting tab is "Encryption," which can be used to specifically refuse to connect with various types of authorization and encryption. In our tests, this was not necessary when communicating with a Windows 2003 RAS server. 128-bit MPPE encryption and MSCHAP2 authorization were negotiated by default. |
If the "pptpconfig tunnel windc1_as_salesperson1 " status window does not display "Connected," examine the messages in the window and check the following:
-
Make sure you specified the domain ad (not corp , since we used an ad username) in the "Domain" field.
-
Make sure you loaded the MPPE kernel module and upgraded pppd to version 2.4.3 or better.
-
Check the event logs on windc1.ad.corp.com .
Once you are connected, you can communicate with all hosts on the company network as if your machine were directly connected to it. You can verify this by pinging hosts such as 192.168.2.202, which would otherwise not be accessible from linmobile1 because they are part of the nonpublic network behind the company firewall. Use the ping command from the Linux command line on linmobile1 exactly as you used it in Windows on xpmobile1 .
Great! We've logged into the company VPN using ad domain credentials from a Linux client. Just one more thing left to do: log into the VPN using corp domain credentials from that very same client.
Testing pptpclient by Logging in as Samba (corp) Users
Logging in to the VPN using corp credentials is an important scenario because users hosted on the Linux-based PDC are probably more likely to be logging in from Linux workstations in the first place.
To log into the VPN using corp domain credentials on a Linux workstation, follow the steps in the previous section, substituting the corp domain and the username doctor1 . You'll be adding a second connection description in pptpconfig . The simplest way is to select the windc1_as_salesperson1 connection description by clicking it. Then change the "Name," "Domain," and "Username" fields appropriately and click "Add" to add another connection description. Now you can right-click the new connection description and click "Start" to make a connection.
This connection should work just as smoothly as salesperson1 and the ad domain. If you do have difficulties though, check the following:
-
You must first complete the domain trust creation steps presented in this chapter.
-
As described earlier, you must use the Windows NT tools to enable dial-in access to the doctor1 account in the corp domain.
We're up and running! Both Windows and Linux clients can log into the VPN with either ad or corp domain credentials.
| | ||
| | ||
| | ||
EAN: N/A
Pages: 71