The Extra Mile: SSL Encryption of LDAP Traffic between Linux and Active Directory
| | ||
| | ||
| | ||
We are using Kerberos to encrypt the crucial authentication traffic: user logons and password changes. But it is also sometimes desirable to encrypt less critical LDAP directory services traffic like user listings, home directory paths, full usernames, and so forth.
It is possible to encrypt LDAP traffic using SSL, just as we did when working with a Linux-based LDAP server, but there are some challenges in our path . Since the directory services traffic is of much less concern than password authentication, this is only an "extra mile" security precaution. If you want to, you can skip itbut if you have the time and are very security conscious, then go for it.
The goal is to encrypt LDAP traffic using SSL. To enable SSL encryption of LDAP traffic between Linux clients and Active Directory, we must do three things:
-
Determine whether the Linux client has a new enough version of the OpenLDAP client software. An incompatibility between older versions of the OpenLDAP client software and Active Directory makes SSL encryption between the two impossible . As of this writing, Fedora Core 3 with the available official updates still includes the older version of OpenLDAP, so read that section very carefully before proceeding.
-
Enable SSL on the Active Directory server. This involves creating a domain controller certificate and a Certification Authority on the Windows server, much as we did on the Linux server in the last chapter. Windows and Active Directory make this easy.
-
Configure the Linux client's /etc/ldap.conf file to use SSL and recognize the Windows-based Certification Authority.
Ensuring the OpenLDAP Client Supports SSL with Active Directory
Let's jump right to the end of the story and tell you what we found when we first ran these experiments. We configured the OpenLDAP client and enabled it for SSL encryption. The good news was that we found that the OpenLDAP client talks to Active Directory, and the traffic is encrypted! Yay! Except: Fedora freaks out, and the connection just hangs forever. Ouch!
Of course, the first thing we did was to re-run Fedora's up2date to ensure we had the latest version of OpenLDAP client (and sever) pieces. A new version downloaded, but it wasn't enough to stop the hanging.
Here's the good news: this problem has been fixed in OpenLDAP version 2.2.23, which is available directly from www.openldap.org . Buuut unfortunately , the latest OpenLDAP has not been integrated into Fedora Core 3 yet. As of this writing, it's not available to download via up2date .
Here's where you make a decision about where to go:
-
Option 1 Give up now. It's not a huge deal if LDAP traffic goes unencrypted. What goes unencrypted are lookups into Active Directory. However, the only kinda-bad news is that the dirsearch account's password will be sent across in cleartext.
-
Option 2 Wait until Fedora Core 3's up2date makes OpenLDAP 2.2.23 available or wait until Fedora Core 4 (which should incorporate version 2.2.23 of OpenLDAP).
-
Option 3 Install OpenLDAP 2.2.23 from source. We provide the gory instructions below. And if you do need to upgrade it, you'll also need to rebuild nss_ldap , which is not obvious at first glance.
Again, this is a known problem and has been fixed in later versions of OpenLDAP, but as of this writing Fedora Core 3 doesn't yet incorporate this later version.
Does your version of Fedora Core have OpenLDAP 2.2.23 or higher? Let's find out.
How to Find Out If Your OpenLDAP is New Enough
Here's a command that will tell you whether your version of OpenLDAP is new enough to do the job correctly:
ldapsearch -V
The first line of output should resemble this:
ldapsearch: @(#) $OpenLDAP: ldapsearch 2.2.23 (Mar 10 2005 15:08:18) $
Note the version number in boldface. With versions older than 2.2.23, we do not recommend trying to enable SSL on Linux clients communicating with Active Directory via LDAP.
Fedora Core 4 is slated to include OpenLDAP 2.2.23. If Fedora Core 4 is in your hands, you should be able to use SSL LDAP connections without problems between Fedora and Active Directory.
The Hard Way: How We Verified That Version 2.2.23 or Better Will Work
If Fedora Core 3 doesn't yet offer OpenLDAP 2.2.23 as of this writing, how do we know that version will work? Because we manually upgraded OpenLDAP with unofficial Fedora rpms built by a third party and then rebuilt nss_ldap from source code. We do not recommend that you attempt this yourself unless you are very comfortable installing system software from source code and you have already verified that your newer , fully updated Fedora system does not already have OpenLDAP 2.2.23.
Here are the steps we performed. Again, we don't recommend you follow this procedure unless you are very comfortable upgrading system software and you trust the source of the rpms you use. This is not intended to be an exhaustive guide to installing from source. It is intended to be helpful to experienced users who want to be able to reproduce our tests.
-
We located a source of unofficial Fedora Core 3 rpms for OpenLDAP 2.2.23 at http://openldap.prolocation.net/ .
-
We downloaded and installed all of those rpms except for the openldap-servers-sql rpm, which had an unresolved dependency and is not used in our system. We used the following command to install each rpm, overwriting files installed by the official Fedora OpenSSL rpm. The --force option allows us to overwrite existing files with the contents of the unofficial rpm:
rpm -i --force rpmfilename rpmfilename etc .
-
We upgraded OpenLDAP. Shouldn't we be finished? Nope! Unfortunately, nss_ldap is "statically linked" to OpenLDAP, meaning that we must recompile nss_ldap from source code to take advantage of the upgraded OpenLDAP libraries on the system. We obtained an "SRPM" (source code rpm) for the nss_ldap Fedora package. Source rpms allow us to rebuild binary rpms from source code while still saving a great deal of time compared with building from non-Fedora-specific source code packages. That's because the source rpm " knows " exactly where Fedora keeps configuration files, libraries, data files, and so on. When building from non-Fedora sources we must configure all of those things manually. We fetched the SRPM from the following location, a mirror of Fedora Core 3:
-
http://mirror.web-ster.com/fedora/core/3/SRPMS/nss_ldap-220-3.src.rpm
-
-
Once we had the SRPM, we were able to build binary rpms of nss_ldap linked to the new version of OpenLDAP using this command:
rpmbuild --rebuild nss_ldap-220-3.src.rpm
This builds ordinary "binary" rpms and places them in the folder /usr/src/redhat/RPMS/i386 .
-
Now we finish the job by installing our new nss_ldap binary rpms with these commands:
cd /usr/src/redhat/RPMS/i386 rpm -i --force nss*.rpm
After completing these steps, you will be able to use a secure LDAP connection. The URI in the ldap.conf file will specifically start with ldaps (instead of ldap ) to signify that the connection is secure.
When testing this, be sure to keep a root shell open so that you can undo it if you are not successful. Otherwise your attempts to log in as root and fix the problem will fail when the LDAP connection to the server "hangs" indefinitely.
Enabling SSL for LDAP on the Active Directory Server
Active Directory supports LDAP over SSL, and SSL requires the use of certificates between the client and server. This means you need a Domain Controller x.509 certificate at every domain controller.
To acquire these, we'll need to create an Active Directory Certification Authority. Now, here's the deal: the advice in this section is for testing purposes only.
Creating your Active Directorybased Certification Authority (CA) can be a really, really big deal in your environment. This is definitely not something that should be done by winging it. The definitive guide in this subject area is by Brian Komar in his book titled Microsoft Windows Server 2003 PKI and Certificate Security (MS Press, 2004). Again, we're winging it here for the sake of these examples; but you shouldn't!
Once we create the Enterprise CA, all Domain Controllers in the domain will automatically enroll for a Domain Controller certificate, and that will enable them to use LDAP over SSL.
To create an Enterprise CA on a Windows 2003 server, perform the following steps:
-
Select Start
 Control Panel
  Add or Remove Programs. Once the "Add or Remove Programs" applet appears, select "Add/Remove Windows Components."
 -
Select the check box for "Certificate Services" as shown in Figure 3.15. When you do, you'll be warned that installing a CA prevents you from disjoining this computer from the domain. Select "OK."
-
In the "Windows Components Wizard" at the "Windows Components" screen, click "Next." When you do, you'll be prompted for the "CA Type." Select "Enterprise root CA." You can leave the "Use custom settings to generate the key pair and CA certificate" box unchecked.
-
At the "CA Identifying Information" screen, you'll have to enter one or two pieces of information in order to create a Certification Authority. This is what will enable us to create certificates later. It's a good idea to give this a name that makes sense, say, ADCERTAUTHORITY . An example of our choices is shown in Figure 3.16. When ready, click "Next."
-
At the "Certificate Database Settings" screen, you can specify where Windows will keep the database and log files. Leave the settings at the default and select "Next."
-
You may be prompted to temporarily stop the IIS server. Select "Yes" if prompted.
-
You may also be prompted to allow Active Server Pages to be enabled for IIS. Select "Yes" if prompted.
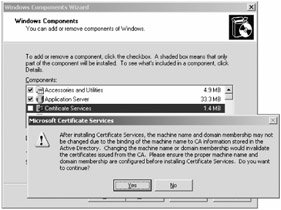
Figure 3.15: For these examples, you'll be installing an Active Directory Certificate Server. In the real world, don't run out and do this without thinking about it first.
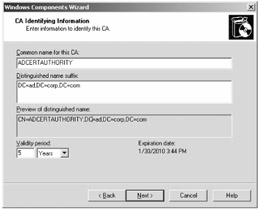
Figure 3.16: Enter some identifying information about your Active Directory CA.
Once finished, you have two options to embrace the new certificate:
-
You can open a command prompt, and type the command gpupdate /force . This should force it to get the certificate.
-
If that doesn't work after about 15 minutes, then I suggest you reboot your Active Directory Domain Controller.
After either of these steps, port 636 should be available to accept encrypted Active Directory traffic.
To Confirm Active Directory can Accept SSL Traffic
One of the tools in the Windows 2003 Support Tools is called LDP and can help you ensure that SSL traffic is ready to be accepted by Active Directory. You can load the Support Tools by double-clicking the suptools.msi file in the \support\tools directory of the Windows 2003 CD-ROM. Once you do that, you're ready to go.
To confirm that you can make an SSL connection:
-
Select Start
 Run, type ldp , and click "OK."
 -
Once LDP launches, select Connection
 Connect. In the "Connect" window, type windc1.ad.corp.com in the "Server" field, as shown in Figure 3.17. Change the "Port" field from 389 to 636 and check the "SSL" check box. Leave the "Connectionless" check box unchecked.
 -
You should receive a message that demonstrates you have connected to the Domain Controller. Using LDP, select Connection
 Bind. Enter our dirsearch username and p@ssw0rd , as well as our domain name, ad.corp.com , as shown in Figure 3.18, and click "OK."
 -
You should get some text in the big gray window that demonstrates that you are authenticated as the dirsearch user. It might look something like this:
res = ldap_bind_s(ld, NULL, &NtAuthIdentity, 1158); // v.3 {NtAuthIdentity: User='dirsearch'; Pwd= <unavailable>; domain = 'ad.corp.com'.} Authenticated as dn:'dirsearch'. -
Using LDP, select View
 Tree. Leave the "BaseDN" field blank and click "OK." In the left pane, you should be able to browse Active Directory's OU structure. And you're doing so, encrypted over port 636.
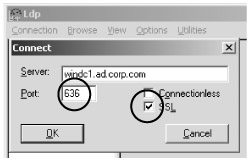
Figure 3.17: Use LDP to connect to the Active Directory server with port 636.
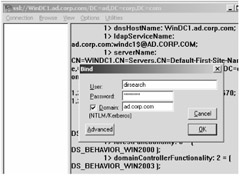
Figure 3.18: Bind to Active Directory using the dirsearch account you created earlier.
To Export the Certificate for Linux Clients
Once your CA is in place and ready to accept SSL traffic over port 636, you need to get a copy of the Certification Authority certificate to your Linux clients. This tells the Linux clients to trust the Domain Controller certificate issued by the CA. To do this, we'll use the super-secret Certificates snap-in. (It must be a secret, because there is no evidence of it on the Start Menu.)
To load the Certificates snap in:
-
Select Start
 Run and type MMC .
 -
At the naked MMC console, select File
 Add/Remove Snap-in. Click "Add," and at the "Add Standalone Snap-in" dialog, select "Certificates" (not "Certification Authority").
 -
At the "Certificates snap-in" dialog, you'll be asked which kind of certificates you want to manage. Select the "Computer account" radio button and click "Next."
-
At the "Select Computer" screen, select "Local Computer," then click "Finish."
-
Back at the "Add Standalone Snap-in" dialog, click "Close."
-
Back at the "Add/Remove Snap-in," click "OK."
Now you'll have the chance to export the public certificate of the Certification Authority (which is valid for all authentications against Active Directory).
To export the necessary certificate:
-
From the "Console Root," drill down to Certificates (Local Computer)
 Personal
  Certificates, as shown in Figure 3.19.
 -
Right-click the "ADCERTAUTHORITY" certificate (not the certificate of the Domain Controller) and select All Tasks
 Export. The Certificate Export Wizard appears. At the "Welcome" screen of the wizard, click "Next."
 -
At the "Export Private Key" screen, select "No, do not export the private key" and click "Next."
-
At the "Export File Format" screen, select "Base-64 encoded X.509 (.CER)." This produces a text file that is readable by Linux clients. Click "Next."
-
Browse to where you can easily get to the file for copying. Give it a filename such as ADCERT1.cer . Click "Next."
-
At the final screen of the wizard, click "Finish."
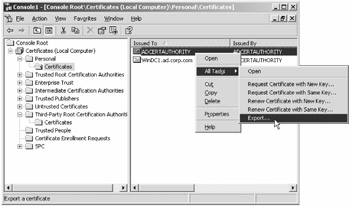
Figure 3.19: Export your Active Directory certificate.
At this point, you'll have to get that certificate over to each of your Linux clients. One method is to use a downloadable tool called psftp. It's an SSH-encrypted way to send files from Windows to Linux machines. You can download psftp from http://tinyurl.com/2r4w .
Here's how it looks to use psftp to transfer the certificate from Windows to, say, the Linux machine named adlincli1 :
C:\downloads>psftp lincli1.corp.com login as: root The server's host key is not cached in the registry. You have no guarantee that the server is the computer you think it is. The server's rsa2 key fingerprint is: ssh-rsa 1024 55:ba:b6:0e:bb:fe:d5:d6:d8:e3:7a:48:e4:f4:ef:ee If you trust this host, enter "y" to add the key to PuTTY's cache and carry on connecting. If you want to carry on connecting just once, without adding the key to the cache, enter "n". If you do not trust this host, press Return to abandon the connection. Store key in cache? (y/n) y Using username "root". root@lincli1.corp.com's password: Remote working directory is /root psftp> cd /etc/openldap Remote directory is now /etc/openldap psftp> put adcert1.cer local:adcert1.cer => remote:/etc/openldap/adcert1.cer
The adcert1.cer is now in the Linux machine's /etc/openldap directory.
Configuring the Linux OpenLDAP Client to Use SSL
Configuring the Linux client to support an SSL-encrypted connection to the Active Directory LDAP server requires just three changes to /etc/ldap.conf . First, we'll change the uri setting from an insecure ldap:// URI to a secure ldaps:// URI. Second, we'll tell the client to be sure to verify the server's SSL certificate with the tls_checkpeer option. And third, we'll use tls_cacert to tell the client about our Windows-based Certification Authority. Although we have covered the tls_cacert option before, it is worth mentioning that we are using the Enterprise Certification Authority we created on our Active Directory server as our Certification Authority (CA), while in Chapter 2 we used a Linux-based CA.
In any real-world enterprise, having just one CA is probably the best choice. After all, not having to install many certificates on each client is the purpose of having CAs. However, for the purposes of this book, it is worthwhile to show how CAs are created and used on both Linux and Windows. It's also worth mentioning that Windows Enterprise Certificate Authorities will automatically create server certificates for all Active Directory Domain Controllers (which is super sweet). Not to mention that Windows 2003 CA's perform auto-enrollment to clients and a whole lot of other features. In short, a Windows CA provides a compelling advantage. If you choose to have only one CA, it might be easiest to choose Windows, at least until the process of administering a CA on Linux becomes significantly more user friendly.
We're ready to secure our LDAP connections. To enable SSL for LDAP connections to Active Directory, follow these steps:
-
To enable SSL encryption, replace this line of /etc/ldap.conf :
uri ldap://windc1.ad.corp.com
with the following line (the only difference is ldaps versus ldap ):
uri ldaps://windc1.ad.corp.com
-
Add the following two lines at the end of the file:
# Verify the server's certificate tls_checkpeer yes # CA Certificate for verification of server certificate tls_cacert /etc/openldap/adcert1.cer
That's it! Your Linux-to-Active-Directory LDAP traffic is now encrypted with SSL. You can verify this by logging into the client, but we strongly recommend that you do the test the following way, just in case you made a mistake and your version of OpenLDAP isn't really new enough to do this:
-
Keep your existing root shell open. You will need it to back out your changes by switching back to an ldap:// URI in /etc/ldap.conf if your attempts to log on hang indefinitely.
-
Use the ssh command to start a remote logon attempt from the workstation to itself. ssh is a useful way to remotely and securely access the shell on other Linux workstations and servers, but we can also use it to connect to the same computer as a useful test. The -l option specifies the user we wish to log in as and is followed by the hostname of the system to log into. For convenience, we are using the special name localhost , which always refers to the same computer you are coming from:
ssh -l salesperson1 localhost
Enter the password when prompted. If your logon is successful, great, you're done! If not, you can debug the problem using exactly the same suggestions made earlier under "If It Doesn't Work" in the "Logging into Active Directory using Linux via LDAP" section. In addition, make sure that you:
-
Enabled SSL on the Active Directory server
-
Exported the Certification Authority's certificate
-
Copied the certificate to the Linux client and placed it in the same location that the tls_cacert option is set to
-
Verified that your version of OpenLDAP is version 2.2.23 or later
| | ||
| | ||
| | ||
EAN: N/A
Pages: 71