What is WMI?
WMI is a management technology. It is designed to bring together many of the various APIs used to access the items on your computer system which you might wish to manage. Without WMI, you would have to learn many different APIs in order to write code to perform any extensive systems management. For example, the file system is accessed through the classes in the System.IO namespace (or, in native Windows terms, through the API functions that lie behind these classes). Managing databases is normally done using the unmanaged ADOX API (which does not have a managed equivalent). There are other classes to control processes and network services. Environment variables are handled through the System.Environment class. In many cases, you will need to drop back to unmanaged code because the .NET Framework classes are not yet rich enough to cover all the features that are accessible through Windows API functions. There are even some low-level tasks for which you may need to directly access the corresponding device drivers. WMI provides a way that tasks of this kind can be presented as part of one unified high-level and object-oriented API.
Under the WMI design, various WMI providers have been written, each of which wraps some native API and exposes it in a form that can be understood by a service known as the WMI object manager. Then, if you want to access the facilities of any of these APIs, you don't need to talk to the API directly - your code simply accesses the object manager instead. That means that there is only one API to learn - the API that is used to interact with the object manager. The object manager and the WMI providers handle the rest. And thanks to the .NET Framework classes in the System.Management namespace (these are the classes that handle communication with the object manager), writing WMI-based managed code is extremely simple. Such code will also use the same idioms that you are used to for managed code in general - collections, events, etc. That can hugely reduce the amount of time that you need to spend learning new APIs, and can lead to more robust code.
There's more, too: a rich callback mechanism. It's very common for applications that perform management-related tasks to want to be notified of changes in the state of the system and other significant events. For example, you might want to know if CPU utilization goes very high or if free disk space drops too far. The trouble is that many native APIs don't support any callback mechanism. For example, there is no Windows API function that allows an application to ask to automatically receive a notification if disk space drops too low - the best an application would be able to do in this scenario would be to check the disk space every so often, which gives you a performance hit, and also can sometimes be complex to code up - especially if you are monitoring the disk space on a different computer. There are many other APIs that have the same problem. The great thing about WMI is that the object manager implements its own polling mechanism - so if you do want to receive notifications, you can inform the object manager of this fact, and it will handle the rest for you, generating notifications as necessary. Doing it this way you still get the performance hit associated with polling, but at least you don't need to worry about having to write the polling code yourself.
Microsoft has supplied a large range of WMI providers - enough that you can already use WMI to interact with virtually any aspect of your environment, including both software and hardware. You can, for example, query for information about the processor and any attached devices, control running Windows services, find out about currently executing processes and threads, as well as drives and file shares on the system - or do the same thing remotely for any other computer on the network, provided of course you have sufficient privilege to do so. And as WMI is becoming more widely implemented, the list of possibilities grows. For example, once you have .NET installed, you can use WMI to configure .NET. You can also use WMI to manage the computer's network connections on Windows XP, though not on earlier operating systems. There's a full list of the Microsoft WMI providers in MSDN, but to give you an idea of what's available, here's a partial list of some of the providers that come with the Windows operating systems.
| Provider | Earliest System this Provider is Supplied With | Allows Access to |
|---|---|---|
| Active Directory Provider | W2K | Active Directory |
| Disk Quota Provider | WXP | Control disk quotas |
| Event Log Provider | NT4 | The Event Log |
| IP Route Provider | .NET Server | Network routing information |
| Performance Counter Provider | W2K | Performance Counters |
| Security Provider | NT4 | NT Security settings |
| Session Provider | NT4 | Network sessions and connections |
| System Registry Provider | NT4 | The Registry |
| Win32 Provider | NT4 | Environment variables, the files system, etc. |
| Windows Product Activation Provider | W2K | Windows Product Activation administration |
The .NET Framework itself also supplies a WMI provider, the so-called Configuration Provider, which is intended to let us configure the CLR. In this chapter we will only be using providers that have been supplied by Microsoft, but it is possible for anyone to write additional providers - indeed, if you have some large application that is configurable, then you would normally be encouraged to write a WMI provider that allows clients to configure the application using WMI.
Although WMI has come with the operating system since Windows ME, if you are intending to work with WMI, you'd be well advised to download the WMI administrative tools. The toolkit is currently available for download from
http://www.microsoft.com/downloads/release.asp?ReleaseID=40804&area=search&ordinal=6.
It includes CIM Studio and the WMI object browser, two very useful HTML files that can be used to browse around and manipulate WMI objects.
Some WMI Demonstrations
In order to use WMI effectively, it's necessary to have some understanding of the architecture. However, before we get bogged down with too many new concepts, I thought it would be nice to have a couple of quick demonstrations of the kinds of things WMI and the System.Management classes can do. One of the examples here changes the volume name of the C: drive, while the other lists all the processors on your machine, displaying the processor type and speed of each. Between them these two examples involve just 13 lines of source code (that's counting the number of C# statements I had to put inside the Main() methods).
First, note that all the examples in this chapter require a using directive for the classes in the System.Management namespace. Furthermore, the classes in this namespace are defined in System.Management.dll, so you'll also need to add a reference to this assembly.
Changing the Volume Label of a Logical Drive
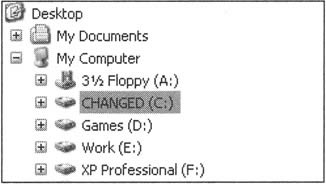
By a logical drive, I mean something that the operating system sees as a drive. That includes each partition on your hard drive(s) as well as other drives such as the floppy drive and CD/DVD/CDRW drives. In other words, everything that appears under My Computer in Windows Explorer.
The following code changes the Volume Label of the C: drive to CHANGED:
static void Main(string[] args) { ManagementObject cDrive = new ManagementObject( "Win32_LogicalDisk.DeviceID=\"C:\""); cDrive.Get(); cDrive["VolumeName"] = "CHANGED"; cDrive.Put(); }
The Volume Label (sometimes called the Volume Name) is the name by which a logical drive is referred to, for example in the Windows Explorer tree view:
Windows Explorer isn't very good at noticing changes in drive volume labels that have been made outside of Windows Explorer itself and updating its display, so you might find if you run the example that the new volume label doesn't appear for a while. You can verify the new label by right-clicking on the drive in Windows Explorer and selecting Properties from the context menu. The dialog that pops up displays the volume label, and is always up to date.
Let's look at how the code for this example works. The first two lines of code, in which we instantiate a ManagementObject instance, really contains the key to how it all works. The System.Management.ManagementObject class is intended to represent any object that can be accessed through WMI.
ManagementObject cDrive = new ManagementObject( "Win32_LogicalDisk.DeviceID=\"C:\"");
The above statement creates something known as a WMI instance or a management object; that is, an instance of a special data structure called a WMI class, which is defined within WMI and which represents the underlying logical drive. This WMI instance is in turn wrapped by a .NET object - a ManagementObject instance. The string passed to the ManagementObject constructor is called an object path and is sufficient to identify the underlying disk drive that we wish to access. In the above code, the WMI class we are dealing with is a class called Win32_LogicalDisk, and the instance is an instance called Device. This means the situation is like this:
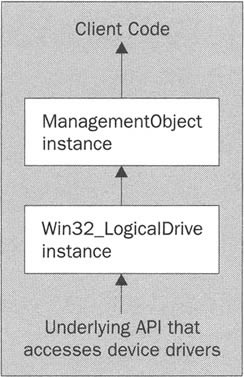
Don't confuse WMI classes with .NET classes. Although there are similarities in concept, WMI classes are very different entities. I'll explain more about what a WMI class is later in the chapter. In the above diagram, ManagementObject is a .NET class, while Win32_LogicalDrive is a WMI class.
The next statement in the C# source code merely makes sure that the WMI instance is correctly initialized with the current state of the logical drive:
cDrive.Get();
Now the volume label of a logical drive is accessible as the VolumeName property of the corresponding WMI instance. We access this property using an indexer because the .NET class, ManagementObject defines an indexer that provides access to properties of the WMI instance:
cDrive["VolumeName"] = "Changed";
Changing the VolumeName property only changes the information in the internal WMI data structure. To actually commit the change to the logical disk itself, we need to call the ManagementObject.Put() method, which updates the underlying object with the current state of the WMI object.
cDrive.Put();
Listing the Processors on the Computer
The code that lists the processors on the machine looks like this.
static void Main() { int totalProcessors = 0; ManagementClass processorClass = new ManagementClass("Win32_Processor"); foreach (ManagementObject processor in processorClass.GetInstances()) { ++totalProcessors; Console.WriteLine("{0}, {1} MHz", processor["Name"], processor ["CurrentClockSpeed"]); } if (totalProcessors > 1) Console.WriteLine("\n{0} processors", totalProcessors); else Console.WriteLine("\n{0} processor", totalProcessors); }
Running this on one of my machines gives this output:
AMD Athlon(tm) processor, 1199 MHz 1 processor
Running through the code, it's a bit more complex than the previous example because we need to enumerate through some WMI instances instead of simply working with a known instance. The WMI class Win32_Processor is the one that we need. However, because the program needs to find out what processors are on the system, we have to work by first connecting to the Win32_Processor class instead of to an instance. A WMI class is represented by the ManagementClass .NET class. Once we have connected to the class, we call the ManagementClass.GetInstances() method to retrieve a collection of ManagementObject instances, each of which represents one of the instances of this class. In my case, I'm running a single-processor machine so only one instance is returned. We use the Win32_Processor.Name and Win32_Processor.CurrentClockSpeed properties to retrieve the information we require.
WMI Architecture
I hinted earlier that WMI is based on a provider model. The overall architecture is shown in the diagram:
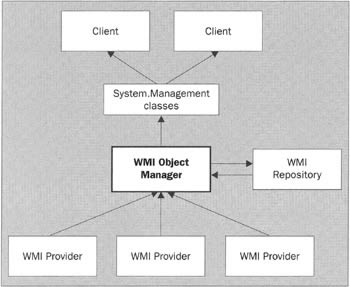
At the top of the diagram we have the clients. These are the programs that wish to perform management tasks. Both of the examples we have just worked through are WMI clients. On the other hand, at the bottom of the diagram are the WMI providers. These are the components that sit between the underlying objects and WMI. We can best illustrate the way it works using an example. We've just seen two C# examples that respectively use WMI to interact with the hard drive and with the CPU. The operations performed by these programs can of course be done using native code, but what Microsoft has done is to write a WMI provider (the Win32 Provider), which, among other things, wraps up these functions and exposes the same functionality via a standard means that is known to WMI (it's actually implemented using COM).
The heart of WMI is the object manager, which acts as the broker between clients and providers. Clients that wish to communicate with WMI providers will contact the WMI object manager with their requests. The object manager handles tasks ranging from directing the request to the appropriate provider, obtaining schema information, and handling events. Because of the way that the object manager handles all routing of requests, clients don't even need to know which provider is ultimately responsible for servicing their request. All the client needs to do is hand a string (the so-called object path) that describes the object or class (such as "Win32_LogicalDisk" or "Win32_Processor") to the object manager, and let the object manager do the rest.
The object manager is generally implemented as a Windows Service, though this is somewhat dependent on which operating system you are running. Windows 9x and ME do not of course support services, so on those machines the object manager is a standard executable. On Windows XP on the other hand, the object manager has actually been incorporated into the SVCHOST process, so that in a sense you can start to regard WMI as part of the operating system itself. The providers are usually instantiated as DLL COM components inside the object manager process, although it is also possible for providers to reside in other processes as .EXE-hosted COM components. All communication with the object manager takes place using COM - there are various COM interfaces specifically designed for this purpose. However, if you are coding with .NET, you don't need to worry about that, since WMI clients can use the System.Management classes instead. Internally, the System.Management classes will be implemented using the COM interfaces that the object manager understands.
It's also possible to write WMI providers using only managed code. The classes in the System.Management.Instrumentation namespace are provided for this purpose. Internally these classes will simply provide implementations of those COM interfaces that the object manager uses to communicate with providers. However, we won't cover writing providers in this book.
One part of the above diagram that we've not yet said anything about is the WMI Repository (also known as the CIM Repository). The repository contains definitions of various WMI classes- it's a way of telling the object manager about most of the classes available, without having to go to providers repeatedly. Although definitions of commonly used WMI classes are stored in the repository, some class definitions may be supplied by a special type of provider known as a class provider. Instances are normally supplied by providers as required, and are not stored in the repository. However, if the data for a particular management object does not change frequently, then it may be stored statically in the repository. Although the repository forms a very important part of WMI architecture, its existence doesn't really affect anything as far as coding up clients is concerned, so I won't say much about it here.
WMI and WBEM
All the discussion so far has referred to WMI as if it is something specific to Windows - which it is. However, WMI also has a basis in a more widely used standard: WBEM (Web-Based Enterprise Management) is an industry standard specifying how information relating to management and configuration objects should be made available. WBEM has been defined by a group known as the Desktop Management Task Force (DMTF, http://www.dmtf.org), and defines the representation of classes and objects, as well as some other items that we haven't yet talked about, such as association classes). However, WBEM deliberately does not define implementation details - that's up to each company that implements WBEM. And WMI, along with the architecture I've just been describing, is Microsoft's implementation of WBEM. Using COM interfaces was Microsoft's choice for WMI, but obviously other implementations of WBEM on other platforms will not be using COM. Just like the WMI repository, the existence of WBEM, while extremely important, has little impact on the actual code that you will write if you write managed WMI clients, so we won't really consider it further.
Like all acronyms, it's largely a matter of personal taste how you pronounce WMI and WBEM, but most people I've worked with on this technology tend to pronounce WBEM as webem, and WMI as woomee (oo as in book) - which has led to one or two in jokes about about how we are working with or writing about 'woomin' - but I won't comment on those.
Security
Given the power of WMI, you may wonder what the security implications are. In order for managed code to use WMI to access or modify any properties on your system, it has to pass three security checks.
-
Firstly, the CLR will prevent code from directly invoking the System.Management.dll assembly in which the System.Management classes are implemented, unless the calling assembly is fully trusted - that's because System.Management.dll is strongly named but does not have the AllowPartiallyTrustedCallersAttribute defined. That's a pretty stiff security requirement! We'll discuss this further in Chapter 12. If you do need partially trusted code to be able to access WMI, you'll need to create an intermediate fully trusted assembly which exposes whatever functionality or WMI objects are required by the partially trusted code.
-
Once code is through to these classes, it hits WMI namespace security. The WMI object manager is able to impose security based on what user accounts are allowed to access which WMI namespaces (we'll examine WMI namespaces soon). This by itself is a fairly crude security check which we won't be concerned with in this chapter. If you do need details, look up the __SystemSecurity class in the WMI MSDN documentation. Suffice to say that if you are running from an administrator account then you shouldn't have any problems running the examples in this chapter.
-
Once you are passed the namespace security check, it's just like using unmanaged code. WMI itself doesn't impose any further security checks, but simply allows the Windows credentials under which the process is running to propagate to the provider and hence to the underlying API functions. This means that the Windows security system will itself detect whether the account has permission to perform the requested action. Any denial of permission here will be propagated back through WMI and manifest itself as an exception in the client process. Hence it is not possible to do anything with WMI unless the running process has permission to do the same thing directly.
The WMI Object Model
As we saw in the earlier examples, the WMI model is based on classes. When we wanted to query the CPU, our code actually interacted indirectly through an instance of the Win32_Processor WMI class, for example. However, in order to understand WMI classes, you're going to have to forget a lot of what you've learned about classes in the context of .NET and other programming languages, since the principles behind WMI classes are rather different from classes in typical languages. In this section we'll go over the concepts that underpin the object model for WMI objects.
WMI Classes and Instances
When you instantiate a .NET class, what you are doing essentially is reserving a piece of memory in the process, which is going to contain certain data that is structured in a certain way. There is no limit to how many instances of a given class you can instantiate (unless some restriction has somehow been deliberately written into the program). There are also no problems with defining identical instances. Suppose you wrote some code like this:
Point x = new Point(10,20); Point y = x;
In normal coding you wouldn't think twice about doing something like this. But code like the above is impossible for a WMI class because a fundamental rule of WMI classes is that no two instances can contain identical data. And there are more surprises in store.
The reason that WMI classes are so different in their behavior is that an instance of a WMI class is a lot more than just a bit of memory with some data in it: it's an abstract representation of some real object on a computer. This object might be a software object (such as a process, a Windows Service or a database connection) or a hardware object (such as a serial port or a CD drive), but it is always some "real" object. And although I said that the WMI instance is a representation of the underlying object, as far as your WMI client code is concerned, you can treat the WMI instance as if it really is the underlying object. That's why you can't have two identical WMI instances - if they were identical, they would in a sense be the same object, which would be silly. Another consequence is that you can't just create or delete a WMI instance in the same casual way you would create a .NET object. The situation is more like this: when you connect to a WMI provider, the instances are already there. You can call methods on them, or get or set properties, or have them raise events. And that's it. Some of the methods in one WMI object may cause a different WMI object to be created, but there is no equivalent of new or of constructors for WMI objects. In a lot of ways, the real analogy is not between a WMI instance and a .NET instance, but between a WMI instance and a .NET static instance - an instance that's returned as a static member of a type, like Color.Blue.
To make this a bit more concrete, let's take as an example the logical drives on a machine. The computer that I'm writing this chapter on has a floppy drive, a DVD drive, and three partitions on its hard drive. That means a total of five logical drives on the local machine. Each of these logical drives is represented by an instance of the WMI class Win32_LogicalDrive. That means on my machine that there are five Win32_LogicalDrive instances. Period. To create another instance would be to create another logical drive, and similarly to delete an instance would be to actually delete a partition - which, unless you have Partition Magic or some similar software installed, is not something that you'd normally do.
Defining Classes - The MOF Language
Let's take a look at the definition of Win32_LogicalDrive. Unfortunately, the definition of this class is complex, so I'm not going to display the whole definition here, but here's a very heavily simplified version showing a few of the properties enough to give you a feel for the principles:
// Simplified from MOF source code. The actual MOF contains many more // qualifiers etc. class Win32_LogicalDisk : CIM_LogicalDisk { [read, key] uint16 string DeviceID; [read] uint16 boolean VolumeDirty; [read, write] uint64 boolean QuotasDisabled; [read] string boolean QuotasIncomplete; [read] boolean uint32 MediaType; // etc. }
This code looks a bit like C++ or C# code, but don't be fooled. It's actually written in a language called MOF (Managed Object Format). The MOF language exists for the sole purpose of defining WMI classes and instances. Despite the superficial similarity to C++/C#, you can't write executable instructions in MOF - only class and instance definitions. Also bear in mind that the definitions in the above code, which look like field definitions, are more properly thought of as properties. WMI classes can contain only two types of member: properties and methods. There are no implementations of the properties or methods - only definitions - because implementation of members is not the purpose of MOF. The implementations will be coded up in the individual WMI providers.
We are not going to use MOF in this chapter, other than as a useful syntax for indicating what is inside a WMI class, but it's worth pointing out that there is even a MOF compiler, mofcomp.exe. If you run mofcomp at the command line, it will compile a file that contains MOF source code, and place the resultant classes and instances permanently in the WMI repository. If you do need to see the full definition of MOF, check out http://www.dmtf.org/standards/cim_spec_v22/index.php.
The items in square brackets in the above code are known as qualifiers. Despite the different name, they play a very similar role to .NET attributes. The [read] qualifier indicates that a property can be read, while [write] indicates it can be written to. Here are a couple of other qualifiers you will encounter:
-
[key] denotes that a property is a key property. Key properties are the ones that uniquely identify the instances. A class must have at least one key property, and any two instances must differ in their values of at least one key property.
-
[abstract] has the same meaning as the abstract keyword in C#: it indicates that no instances of the class exist, and the sole purpose of the class is to allow other classes to derive from it.
The above MOF code snippet shows that Win32_LogicalDisk is derived from a class called CIM_LogicalDisk. This is a common pattern. The WBEM specification included the definitions of a large number of classes (these definitions are known as the CIM v2 class schema). The names of these classes are prefixed by CIM_, which stands for Common Information Model (the original part of WBEM that defines these classes. When Microsoft implemented WMI, they defined a large number of classes by deriving from the equivalent WBEM classes, in order that they could add extra properties and methods, and as a convention they replaced the CIM_ prefix in the class names by Win32_. These Win32_ class definitions are collectively known as the Win32 extended schema.
Inheritance works in much the same way for WMI classes as for other classes: a derived class gets all the properties and methods of its base class, and can add others. One point to bear in mind, however, is that a derived WMI class is regarded as conceptually a completely different object from its base class. What this means that if there are 6 instances of Win32_LogicalDisk on my computer, and you were to ask WMI to retrieve all CIM_LogicalDisk instances, then by default no instances would be found (though you can change this by asking WMI to do a deep enumeration). If these were .NET classes, then you would expect that a CIM_LogicalDisk reference could refer to a Win32_LogicalDisk object, reflecting the idea that a derived class instance is a base class instance plus a bit more - and that assumption might lead you to incorrectly assume that an attempt to retrieve CIM_LogicalDisk instances would also return derived classes. But WMI does not take that viewpoint - in WMI the classes are different classes.
Methods
In general, the WMI object model is heavily based around properties, and for almost all classes the numbers of properties is hugely greater than the number of methods. However, it's worth bearing in mind that some classes do have useful methods, for example to start and stop Windows services, or to reset certain hardware devices. In this chapter we'll focus almost exclusively on properties. If you do need to invoke methods on WMI objects, you'll need to check out the ManagementBaseObject.GetMethodParameters() and ManagementObject.InvokeMethod() methods.
Namespaces and Servers
WBEM has a system for placing classes in namespaces that works a bit like .NET namespaces, albeit with some differences in detail and syntax. To illustrate the way it works, here's the full path name for the Win32_LogicalDrive class on my machine, Strawberry.
\\Strawberry\root\CIMV2:Win32_LogicalDisk
The path starts with the name of the server - that is the computer on which the item is based (although we use the term 'server', it can be any computer, server or workstation). Note that WBEM is based entirely around individual computers - rather than around, for example, domains or networks. After the server name, we run through nested namespace names, separating the namespaces by backslashes. The first namespace is always called root. So the root namespace in WBEM serves the same purpose as the global (unnamed) namespace in .NET. The namespace is separated from the class name by a colon.
As noted earlier, we can also specify individual instances using an object path. Here's the object path of my hard drive:
\\Strawberry\root\CIMV2:Win32_LogicalDisk.Device
To specify the instance, you use the class name, followed by a dot, followed by a listing of the values of the key fields.
There's an alternative syntax for the computer name that specifies the local machine.
\\.\root\CIMV2:Win32_LogicalDisk.Device
You can also leave the server and part or all of the namespace out of the name altogether, in which case you have a relative object namespace. What this relative namespace is relative to is set in .NET as the Management Scope. The Management Scope defaults to \\.\root\CIMV2, so if you omit the server and namespace in an object path, this is where the class or object will be assumed to be. \root\CIMV2 is the namespace in which the CIM V2 schema classes are placed. You'll also find many of the Microsoft classes in there too because one of the rules of WBEM is that derived classes must be placed in the same namespace as their base classes when a class schema is being extended.
One point that it's important to understand is that there is no relationship between namespaces and providers: one provider can implement classes in many namespaces, and it's also fine for many providers to implement different classes in the same namespace. This is exactly analogous to the situation for namespaces and assemblies in .NET, whereby there does not need to be any one-to-one correspondence between a namespace and an assembly.
A WMI client will need to know the namespace in which the object it wants resides (otherwise it can't supply the object path needed to tell the WMI object manager which object it is interested in). As remarked earlier, however, the client does not need to know which provider implemented the class.
System Classes and Properties
One aspect of WMI classes is the presence of a large number of system classes and system properties. These are certain classes that are contained in every namespace, and certain properties that are present in every class, automatically, and implemented by the WMI object manager (the providers don't have to worry about implementing them, nor are they listed in the MOF descriptions of classes). These classes and properties are essential to the operation of WMI. There's little point going over the details of all these classes and properties here - the details are in the MSDN documentation at http://msdn.microsoft.com/library/en-us/wmisdk/wmi/wmi_reference.asp, and you'll also be able to browse through them all if you download and run the WMI browser example that I will present later in the chapter. But to give you a flavor of what these classes and properties are for, here are a couple of examples:
-
Every namespace contains a class called __namespace. The purpose of this class is to allow enumeration of child namespaces in a given namespace. Each namespace contains one instance of this class for every child namespace, with the Name property giving the name of a child namespace. Hence enumerating the instances of this class will tell an application what child namespaces are available.
-
Every instance contains a property called __path. This property gives the full object path of the object. There is also a system property, __class, which gives the name of the class that the instance belongs to.
You'll have gathered from these examples that system classes and properties are identified by two underscores at the start of their names. It is illegal to give names to your own classes that start with two underscores, so this sequence always identifies system classes.
Association Classes
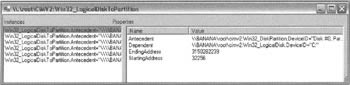
When using .NET classes, it is perfectly normal for classes to contain references to each other, or even for value types to be embedded directly inside other objects or value types. Although in WMI it is possible to define classes that contain member properties that refer to other WMI classes, this is not normal practice. In WMI it is more common to use something called an association class. The sole purpose of an instance of an association class is to indicate that two classes are associated together, and the usual way of doing this is through the association instance containing properties that give the object paths of the related objects. To give an idea of how this works, consider disks again. We've already seen that the Win32_LogicalDisk class represents a logical disk. There is also a class called Win32_DiskPartition, which indicates a partition. Now since you expect that some of the logical drives on a computer are simply disk partitions, there is clearly an association between instances of these classes. This is represented by an association class called Win32_LogicalDiskToPartition. A simplified version of part of the MOF definition for this association class looks like this:
[dynamic, provider("CIMWin32")] class Win32_LogicalDiskToPartition : CIM_LogicalDiskBasedOnPartition { [read, key] Win32_DiskPartition ref Antecedent; [read, key] Win32_LogicalDisk ref Dependent; };
This code shows that each Win32_LogicalDiskToPartition instance contains two properties: Antecedent and Dependent, which respectively store the object paths of the Win32_DiskPartition and the Win32_LogicalDisk object that are associated. For example, on my machine, (as on most computers) the C drive is stored on disk 0 partition 0. This is represented by a Win32_LogicalDiskToPartition instance which links the two corresponding objects together, as shown in the following screenshot. The screenshot comes from the WMIBrowser example that I'm going to introduce soon, and it shows the values of the properties of a given object:
Note that, although Win32_LogicalDiskToPartition uses the names Antecedent and Dependent for the objects it is associating together, there are no rules about what names should be used, so not all association classes use these particular names. There are other WMI association instances that map the other disk partitions to their corresponding logical drives. Since there are also other WMI classes that represent, for example, physical hard drives, CD drives, floppy drives, there are as you might expect, other association classes that link these to logical drives.
In this chapter, we're not going to do any programming that involves association classes, but it's important to be aware of their existence.
Events
WMI defines extensive support for allowing clients to receive notifications when certain events have occurred. Such notifications go by the name events, although you should be wary of confusing these with .NET events. WMI events have virtually nothing in common with .NET events when it comes down to underlying architecture, even though WMI events and .NET events serve the same purpose. However, the System.Management classes do an excellent job of wrapping up the WMI event model with .NET events so that when you write client code, you only need to deal with .NET events and the usual .NET event methodology. Underlying this, the WMI event model is implemented using COM callback interfaces.
WMI events fall into three categories:
-
Timer events - these simply involve WMI notifying the client at fixed intervals of time. They are implemented by the object manager. Since you can achieve similar functionality with the .NET timers, we won't consider these further.
-
Extrinsic events - these are wholly custom events, and are defined and implemented by providers. When the client registers to be notified of these events, the object manager passes the request on to the provider. When the provider detects that the event has occurred, it notifies the object manager, and the object manager in turn notifies the client.
-
Intrinsic events - intrinsic events arguably show the WMI infrastructure at its best. There are certain types of event that are intrinsically recognized by the WMI object manager, and for which the object manager implements its own notification mechanism, which will function even if the relevant provider does not implement callbacks. The events that the object manager recognizes as intrinsic events are creation, deletion, and modification of namespaces, classes, and instances. As an example, suppose some client wished to be notified when the volume label of a logical drive changed. We've already seen that the volume label is a property of a Win32_LogicalDrive instance, so this event falls into the category of modification of an instance. The client would hence pass a request to the object manager to be notified of this event. Now the relevant provider - in this case the Win32 provider - does not have any callback mechanism for this scenario, so the object manager will simulate it, by polling the relevant Win32_LogicalDrive instance at an interval specified by the client. If the object manager detects a change has occurred, it will notify the client.
Although these three formal categories exist in the WMI architecture, the distinction between them is not particularly relevant as far as writing client code is concerned. In a later example I will demonstrate the use of WMI events. The example happens to involve an intrinsic event, but the syntax and coding techniques are no different from those for extrinsic and timer events.
WMI Query Language
So far we've looked at the principles behind WMI classes, instances, and events, but we've not really covered the way that WMI expects a client to request a class, an instance, or an event notification. A WMI client hands the object manager some text in a language known as WMI Query Language, or WQL. The language is based on a subset of the SQL language used for database queries.
It's not absolutely essential to understand WQL in order to perform basic programming in WMI. We've already seen two examples in which no WQL explicitly appeared, but use of WQL is essential in order to perform more sophisticated or high-performance queries. WQL is intended solely for queries - you cannot use WQL to perform updates to data.
To see how WQL can help us, let's go back to our earlier example in which we requested all instances of Win32_Processor. There we used the .NET method, ManagementClass.GetInstances():
ManagementClass processorClass = new ManagementClass("Win32_Processor"); foreach (ManagementObject processor in processorClass.GetInstances()) { It's possible to perform the same operation using WQL - the following code snippet does just the same thing as the previous snippet:
ManagementObjectSearcher processorSearcher = new ManagementObjectSearcher("SELECT * FROM Win32_Processor"); foreach (ManagementObject processor in processorSearcher.Get()) {
The downloadable example code for this chapter includes an example called ListProcessorsExplicitWQL, which does the same thing as the ListProcessors example, but uses the above explicit WQL syntax.
For the above code snippet, there is nothing to be gained by explicitly putting the WQL statement in the source code: all we've achieved is to make the source code more complex. However, in general, making the WQL explicit means you get more freedom to narrow down the search parameters to retrieve exactly the data you want - for example, you can specify which properties of the instances you are interested in, or impose conditions on which instances you want returned. This can bring significant performance gains, and also saves you from having to write C# code that filters out the objects you want from the ones that have been returned, in the case for which you don't just want every instance of a class.
In following sections I'll briefly examine the principles of WQL syntax, and show you how to construct WQL statements. If you need it, the full definition of WQL is in the MSDN documentation.
WQL for Queries
Let's examine the WQL query we've just demonstrated:
SELECT * FROM Win32_Processor
This string requests all instances of the class Win23_Processor.
In standard SQL, the basic query has the format SELECT <column names> FROM <table> WHERE <condition>. WQL uses the same format, but with properties playing the role of columns and classes playing the role of tables. Any condition is used to restrict which instances are returned. Hence the basic WQL query has the syntax:
SELECT <properties> FROM <class> WHERE <condition>
You can write * for the list of properties, which means you get all properties.
Consider the previous ListProcessorsExplicitWQL example. In the query in this example, we asked for all properties, but the example only actually uses the Name and ProcessorSpeed properties. We can make the query more efficient by telling the WMI object manager that these are the only properties we will want:
SELECT Name, CurrentClockSpeed FROM Win32_Processor This query will still return all the Win32_Processor instances, but the WMI instances will have been set up so that these two properties are the only ones available. The full code for the Main() method in the example now looks like this (in the download code, this is available as the ListProcessorsExplicitWQL2 example):
static void Main() { int totalProcessors = 0; ManagementObjectSearcher processorSearcher = new ManagementObjectSearcher( "SELECT Name, CurrentClockSpeed FROM Win32_Processor"); foreach (ManagementObject processor in processorSearcher.Get()) { ++totalProcessors; Console.WriteLine("{0}, {1} MHz", processor["Name"], processor["CurrentClockSpeed"]); } if (totalProcessors > 1) Console.WriteLine("\n{0} processors", totalProcessors); else Console.WriteLine("\n{0} processor", totalProcessors); } Explicitly specifying properties does mean that the object manager has slightly more work to do when parsing the query, but this is balanced by the reduced workload involved in retrieving and returning the WMI objects. If properties have to be populated by sending requests to a remote machine, for example, or by using an API that takes a while to return the results, this saving can be very significant.
Let's look at a couple of examples that illustrate the use of the WHERE clause to impose conditions on which objects are retrieved. The following code retrieves details of all the Windows services that are currently stopped:
SELECT * FROM Win32_Service WHERE State = "Stopped"
On the other hand, the following query will return the account name and domain name of any user account that is disabled but not currently locked out:
SELECT Name, DomainName FROM Win32_UserAccount WHERE Disabled = true AND Lockout = false
WQL for Events
The way that a client notifies the object manager that it wishes to receive an event is by passing it a WQL query string in the same way that it requests references to WMI classes and instances. The big difference is that if a client requests an event, the query string will indicate a class name which object manager recognizes as an event class. To give an example, this is how a client requests to be notified if a modem has been added to the computer:
SELECT * FROM __InstanceCreationEvent WITHIN 20 WHERE TargetInstance ISA "Win32_POTSModem"
The class __InstanceCreationEvent is a system class that indicates that an instance of some other class has been created. Win32_POTSModem is the class that represents a modem, while the WQL ISA operator specifies that an instance must be an instance of the specified class. The __InstanceCreationEvent class has just one property, TargetInstance, which references the object that has been created. The above WQL request asks that, if the object manager detects that a new Win32_POTSModem class has appeared in the WMI repository, it should create an __InstanceCreationEvent instance and return it to the client. The WITHIN 20 clause indicates the polling frequency in seconds. Creating instances is an intrinsic event, and as I mentioned earlier, WMI providers don't generally support intrinsic events, so WMI will need to poll the WMI repository to check whether there are any new instances. WITHIN 20 indicates that this polling should be done every 20 seconds. Clearly the rate you choose will depend on a balance between performance and how quickly the client needs to be notified of events.
Note that an event request will normally begin with SELECT *. For this type of request, the object manager will ignore any listing of properties that appears in place of the *.
The nine intrinsic events are represented by these classes:
| __InstanceCreationEvent | __InstanceDeletionEvent | __InstanceModificationEvent |
| __ClassCreationEvent | __ClassDeletionEvent | __ClassModificationEvent |
| __NamespaceCreationEvent | __NamespaceDeletionEvent | __NamespaceModificationEvent |
It hopefully should be fairly obvious what type of event each class represents!
If you are requesting to be notified of an extrinsic event, then the WQL query string will indicate an event class that is supplied by a provider. In this case there is no need to use the WITHIN clause, since the provider will support event notification, and no polling is necessary.
Here are a couple of other examples of WQL queries. This next one is the string that will be used in an example later in the chapter. It requests to be notified whenever the display resolution of the monitor falls so that the number of horizontal pixels is less than 1024, with a polling interval of 2 seconds.
SELECT * FROM __InstanceModificationEvent WITHIN 2 WHERE TargetInstance ISA "Win32_DisplayConfiguration" AND TargetInstance.PelsWidth < 1024 AND PreviousInstance.PelsWidth >= 1024
Notice that this query is quite sophisticated. It tests not only the new value of the pixel width but also the old value, so that an event will only be generated if the value of this property falls through 1024. In general, for performance reasons you should construct the query to be as restrictive as possible, so you only get the events you are really interested in. The following query is similar but it doesn't test the previous resolution:
SELECT * FROM __InstanceModificationEvent WITHIN 2 WHERE TargetInstance ISA "Win32_DisplayConfiguration" AND TargetInstance.PelsWidth < 1024
This query will generate more events, since it will cause an event to be raised whenever any changes are made to the display configuration properties provided only that the horizontal resolution happens to be less than 1024 after the change, even if the change is unrelated (for example an event will be generated if the resolution is 800x600, and the monitor refresh rate is changed).
Finally, here's an example of a deletion event. This request asks to be notified within 10 seconds when any print jobs are terminated (this could be because the job has finished printing or has been aborted).
SELECT * FROM __InstanceDeletionEvent WITHIN 10 WHERE TargetInstance ISA "Win32_PrintJob"
EAN: 2147483647
Pages: 124