20.9 Creating Custom Actions as Classes
| < Day Day Up > |
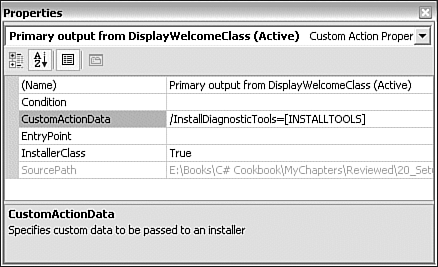
TechniqueThe technique is similar to writing a custom action as an executable project: You write the code, but this time you create it as a DLL project. You add the primary output from this project to the setup project, and then you must use the Custom Actions Editor to add that project as a custom action. The way you set up the custom action properties for a class is slightly different, as shown in Figure 20.18. You'll also notice that the properties that VS.NET provides are slightly different if VS.NET detects that the custom action project is a DLL; for example, there is no Arguments property. Figure 20.18. Properties for a class custom action. The properties in Figure 20.18 are intended to have an analogous effect to those of Figure 20.17. You must set the InstallerClass property to True , and in addition, you specify any custom data using the CustomActionData property rather than the (now nonexistent) Arguments property. The syntax for CustomActionData is slightly different, taking the form /Key=[Value] . Any properties passed in to the installer class are passed in via a StringDictionary object rather than an array. Recall that each element stored in an StringDictionary must be accessed via a key of type string . With the CustomActionData property set as shown in Figure 20.18, you can then access the value of the INSTALLTOOLS property from your code like this: string installTools = Context.Parameters["InstallDiagnosticTools"]; if (installTools == "1") // user did check the INSTALLTOOLS checkbox The StringDictionary containing the custom data is accessible via a property of a property, Context.Parameters . Your class inherits the Context property from a base class, System.Configuration.Installer.Install ; you need to explicitly derive your class from this class, which is defined in the System.Configuration.Install.dll assembly. You should also add the RunInstaller(true) attribute to the class. This work all means that your derived class can be recognized by Windows Installer, which can then instantiate the class and call various methods on it. Besides any custom data, Context also contains certain data governing the general state of the installation process, including whether the installation is controlled by a transaction, whether you are installing or uninstalling, and the name of any log file being used to record the progress of the setup. The Installer class defines various virtual methods, which you can override to provide custom actions at various points. The main such methods appear in Table 20.2. Table 20.2. Some Installer Class Methods That You Can Override
All these methods return void and take one parameter, an IDictionary interface called savedState . This parameter contains some additional information passed in by Windows Installer, although we don't use that information here. For details, you should look up this class in the MSDN documentation. You need to override whichever of these methods you want to add a custom action for. To illustrate what all this information means for your code, Listing 20.2 defines a custom action that writes out a file with data about all the values that Windows Installer has passed to the custom action via the Context property. Listing 20.2 A Custom Action to Write to a File [RunInstallerAttribute(true)] public class Class1 : System.Configuration.Install.Installer { public override void Install(System.Collections.IDictionary stateSaver) { base.Install(stateSaver); StringDictionary sd = this.Context.Parameters; StreamWriter sr = new StreamWriter(@"c:\SampleInstall.txt"); sr.WriteLine(sd.Count.ToString() + " parameters"); if (sd.Count > 0) { foreach (string str in sd.Keys) { sr.WriteLine(str + " : " + sd[str]); } } sr.Close(); } } Note that for Listing 20.2 to compile, you need the following using statements: using System; using System.Windows.Forms; using System.ComponentModel; using System.Collections.Specialized; using System.Configuration.Install; using System.IO; CommentsIt's worth pointing out that the technique shown here scarcely touches on the power of the Installer class. Although we used a class derived from Installer to simply add a custom action, this class is intended to be used by Windows Installer to control many aspects of the install process. |
| < Day Day Up > |
EAN: 2147483647
Pages: 440
