9.3 Creating Custom Controls
| < Day Day Up > |
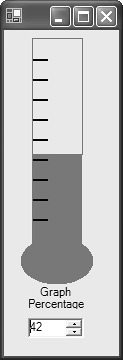
TechniqueCreate a new custom control by clicking on Project, Add Class from the main menu. Select the Custom Control item in the list of Item Templates. Because the control is an owner-drawn control, you are unable to visually design the control using the forms designer. The OnPaint virtual method is automatically overridden in the control's class definition. Use this method to perform the rendering of your control, as shown in Listing 9.2. Listing 9.2 The TemperatureGauge Control Using the OnPaint Method to Render a Thermometer using System; using System.Collections; using System.ComponentModel; using System.Drawing; using System.Data; using System.Windows.Forms; namespace _3_CustomControl { public class TemperatureGauge : System.Windows.Forms.Control { private System.ComponentModel.Container components = null; private int percent = 50; public TemperatureGauge() { // This call is required by the Windows.Forms Form Designer. InitializeComponent(); } protected override void Dispose( bool disposing ) { if( disposing ) { if( components != null ) components.Dispose(); } base.Dispose( disposing ); } private void InitializeComponent() { } protected override void OnPaint(PaintEventArgs pe) { // compute rects Rectangle gaugeRect = new Rectangle( this.Width/6, 0, this.Width-(2*this.Width/6), this.Height-(this.Height/10) ); Rectangle bulbRect = new Rectangle(0, this.Height-(this.Height/5), this.Width-2, this.Height/5-2); Rectangle emptyRect = new Rectangle( gaugeRect.X, gaugeRect.Y, gaugeRect.Width, (gaugeRect.Height/100)*(100-percent)); Rectangle filledRect = new Rectangle( gaugeRect.X, emptyRect.Y+emptyRect.Height, gaugeRect.Width, gaugeRect.Height-emptyRect.Height ); // draw gauge pe.Graphics.FillEllipse( new SolidBrush( Color.Red ), bulbRect ); pe.Graphics.DrawRectangle( new Pen(new SolidBrush( Color.Red )), emptyRect ); pe.Graphics.FillRectangle( new SolidBrush( Color.Red ), filledRect ); // draw ticks for( int i = 1; i < 10; i ++ ) { pe.Graphics.FillEllipse( new SolidBrush( Color.Black ), gaugeRect.X, (gaugeRect.Height/100)*(10*i), gaugeRect.Width/3, 3 ); } base.OnPaint(pe); } protected override void OnSizeChanged(EventArgs e) { base.OnSizeChanged (e); Invalidate(); } public int Percentage { get { return percent; } set { if( value < 0 value > 100 ) return; percent = value; Invalidate(); } } } } CommentsThe previous two recipes relied on existing controls to perform any of the necessary logic required for rendering the control onto the Windows Form. In a majority of the controls created using those methods , you create custom code to alter the behavior rather than the underlying appearance of the control or controls that it relies on. When you create a custom control, however, the work of providing the code that renders the control onto a Windows Form is up to you. A custom control is derived from the System.Windows.Forms.Control class. This class provides several properties and methods to aid in the construction of your control. When you first begin implementation, your control is already able to perform actions, such as resizing or docking, and fire events, including mouse and keyboard events. If you've created controls using other technologies before, you'll immediately see gains not only in simplicity but also in the time saved from not having to add additional stock functionality to your control. When you first create your control, you are placed into a designer. However, it isn't the forms designer, as shown in the previous two recipes. Rather, this designer allows you to add any components that you need to aid in the functionality of your control, which can include timers, performance counters, or database objects. You can switch out of the designer and view the code for your control by selecting the hyperlink displayed in the designer or by right-clicking the filename of your control within Solution Explorer and selecting the View Code menu item. Rendering a control occurs within the OnPaint method. This method uses a single parameter named PaintEventArgs . One interesting aspect to point out is that the OnPaint method uses the same methodology as a delegate, but there is no associated code within your class that associates this delegate with the Paint event. This functionality is contained within the Control base class. In that class, delegates are associated with events, and those delegates are also made virtual, thereby allowing you to override them without having to create the necessary event-handling plumbing code. In fact, in the code listed earlier, you can also see that the OnSizeChanged method is overridden, and it is called whenever your control receives the SizeChanged event. You can capture a large portion of the events that your control receives within your class by overriding its associated delegate defined in the Control base class. The PaintEventArgs object contains a Graphics object that you can use to render your control. The Graphics class encapsulates a specific type of drawing surface, which is created using the newest version of the Graphics Device Interface known as GDI+. In the code for this recipe, you can see how the Graphics object is used in conjunction with the various properties of the control to render shapes using brushes and pens of a specified color, as shown in Figure 9.3. Chapter 10, "Programming Graphics with GDI+," provides a thorough examination of GDI+. Figure 9.3. The TemperatureGauge control uses the OnPaint method to render itself using a Graphics object. |
| < Day Day Up > |
EAN: 2147483647
Pages: 440