Using COM Components in .NET
 | |||||||||||
| Chapter 17 - COM Interoperability | |
| bySimon Robinsonet al. | |
| Wrox Press 2002 | |
Using COM Components in .NET
Most organizations might not be willing to throw out legacy COM components. Consequently, you can expect to reference legacy COM components from new .NET code, at least in your first .NET enterprise projects. Specifically, if youre building a new .NET application on top of an existing database, you will probably be using existing COM data access objects as your projects data access layer. While accessing data through the legacy components, your .NET components will enforce business rules and deliver data to an ASP.NET or Windows Forms user interface.
Binding to COM Components
Before a client can invoke a COM component objects methods and properties, it needs information about these methods and properties; there are two different techniques that client programs can use to determine this information.
Early binding allows clients to obtain compile-time type information from the components type library. This allows for stronger type checking during compile time. It is also much faster than the late binding approach that well see next . The COM interoperability techniques that well look at first rely on early binding.
On the other hand, late-bound clients bind to components at run time. They do not have rich type information available at compile time. Late-bound code typically refers to client objects through generic data types, such as object , and relies on the runtime to dynamically ascertain the method addresses.
COM interoperability uses wrapper classes and proxy components, conventions common in the programming world in general. A wrapper class surrounds a class that adheres to another architecture, providing a familiar interface to it for clients that would not recognize the wrappered classs native interface. Similarly, a client can use a proxy component to access a component that adheres to a different architecture or is geographically remote.
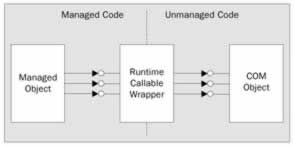
Runtime Callable Wrappers
A .NET application does not communicate directly with a COM component. Instead, it works through a managed wrapper of the component. This wrapper, known as a Runtime-Callable Wrapper (RCW), acts like a managed proxy to the unmanaged COM component. It is able to handle the calling of methods on the component, and pass back any return values in a form suitable for the CLR.
Once a metadata wrapper assembly is generated, either by the Type Library Importer ( TlbImp.exe ) or from within Visual Studio .NET, methods can be called on the COM component by calling corresponding methods in the managed metadata wrappers, giving the appearance that method calls are being made to a managed object.
Thus the target of any method calls to the COM component is not the component itself, but the RCW. The RCW also controls the lifetime of the COM component, which we shall discuss more in the Releasing COM Objects section.
The metadata wrapper generated from the type library contains wrapper classes that the C# client can reference and then use it to create the component and invoke its methods. An RCW is created on the fly whenever the component is created, and it acts like a managed proxy to the unmanaged COM component. The RCW handles the marshaling of managed types to COM-specific data types, and also unmarshals return types from COM back into managed data types.
First, we shall look at the two ways two to generate managed metadata wrappers:
-
Using the TlbImp.exe utility
-
From within Visual Studio .NET
Creating a Wrapper with TlbImp.exe
TlbImp.exe is invoked from the command-line, and converts the COM-specific type definitions in a COM type library into equivalent definitions for a .NET wrapper assembly. By default TlbImp.exe will name the resulting wrapper with the same name as the COM component DLL. You can provide TlbImp.exe with an out command-line argument so that the resulting wrapper assembly will have a different name from the COM DLL:
TlbImp is shorthand for Type Library Importer . When you execute this program against a COM DLL, it interrogates the COM DLLs type library and translates the information therein into a .NET format, converting COM standard data types into those recognized by .NET. Once youve run TlbImp.exe against a COM DLL, the output DLL can be referenced in the usual way like any other assembly by using the /r: compiler option.
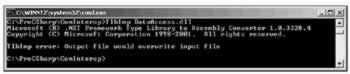
Dont forget to provide an out argument if you use TlbImp.exe to generate a wrapper from a DLL that is in the current directory! If you do not to provide one, the TlbImp.exe program will complain that it cannot overwrite the original file:
Creating a Wrapper from Visual Studio .NET
To generate a managed metadata wrapper from Visual Studio .NET, you need to use the References dialog, which is available from the Add Reference... option on the Project menu. The COM tab displays a list of the components that are registered as COM components on the local machine, and allows us to import COM components to use in our .NET project. The Browse button allows you to search the file system for the COM DLL that your .NET project needs.
When you locate your chosen DLL, selecting it adds it to the list of components on the COM tab of the form:
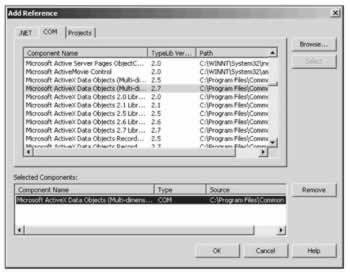
Once youve used the References dialog to locate a COM DLL and add it to the list of COM references, you can use that COM component in your .NET code. Visual Studio .NET generates a metadata wrapper assembly, putting the classes provided by that component into a namespace with the same name as the original COM component. You create a reference, instantiate, and invoke COM object wrappers with the same syntax with which you reference, instantiate, and invoke objects native to C#.
The Visual Studio .NET IDE will even use IntelliSense to help you remember the components class members . The screenshot below shows the IntelliSense dropdown that lists the classes in the DataAccess namespace. The original DataAccess DLL contained classes such as Customer , Order , OrderItem, and Product :
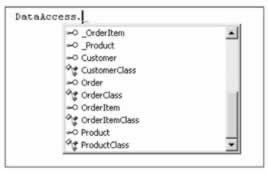
The screenshot shows something interesting in the original DLL, we had a class named Customer , but the screenshot shows that in the wrapper, we have a Customer interface, and a class called CustomerClass . To create an instance of the Customer class in the original DLL, we have to use the name CustomerClass .
-
This is because for each class actually imported into the wrapper assembly, two wrapper classes are generated. One is an interface associated with the same GUID as the original COM classs default interface, and with the same name as this COM class. The other class is a concrete class, and to use the COM component, we need to create instances of this class. The concrete class has the word Class appended to the original COM class name. The concrete class implements all the interfaces that are supported by the original COM class.
Using a C++ COM Component
For our example, we will use a simple C++ COM component, created in Visual C++ 6 with the ATL COM Wizard. We will not cover the creation of an ATL COM component here, and as most of the code is automatically generated by Visual C++ 6, we show only the code directly relevant to our example here.
For those familiar with the process of creating COM components in Visual Studio 6, this is perhaps a good opportunity to reflect on the progress Microsoft has made with the various automatic code generation facilities in Visual Studio .NET!
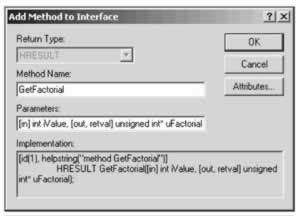
A new ATL COM AppWizard project is started from Visual C++ 6, with a project name of RCWTEST . A single class is added, Factorial , with a single method, GetFactorial() in the classs default interface IFactorial . The parameters for the method are shown in the screenshot below. Note we will be using an unsigned int to return the value of the factorial.
The code for the GetFactorial() method is below; this goes in the Factorial.cpp file.
STDMETHODIMP CFactorial::GetFactorial(int iValue, unsigned int* uFactorial) { unsigned int uSubTotal = iValue; for (int i = 1; i < iValue; i++) uSubTotal *= i; *uFactorial = uSubTotal; return S_OK; }
The GetFactorial() method simply takes an int , iValue , and returns an unsigned int uFactorial , which is the factorial value of iValue . We now build the project.
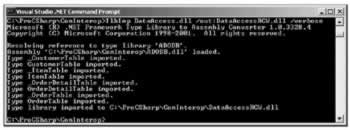
We use TlbImp.exe on the created type library, as seen in the screenshot below.
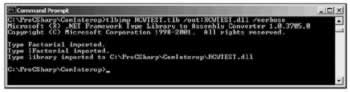
The above command generates a wrapper assembly called RCWTEST.dll from the components type library, RCWTEST.tlb . We use the VERBOSE option to specify that full output will be displayed.
Well have a look at how the COM-specific information in the RCWTEST component has been transformed into .NET information by viewing RCWTEST.dll from ildasm :
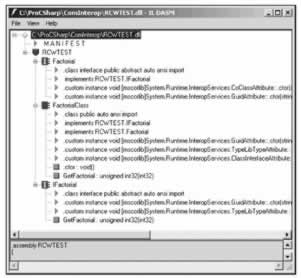
Looking at the screenshot, we can see a couple of things:
The type library importer has placed all generated types in the RCWTEST namespace. By default, the namespace name is based on the name of the wrapper assembly. However, you can generate a namespace of your choice by using the /namespace command-line option with TlbImp .
As with the IntelliSense screenshot earlier, we can see the two generated managed wrapper classes Factorial , and FactorialClass .
The type library importer converts the COM-specific parameter types used by the GetFactorial() method to the managed equivalents. GetFactorial() expects an int data type to be passed; this has been transformed into an int32 managed type. Youll also notice that the unsigned int uFactorial parameter in GetFactorial() has been transformed into the methods return value, an unsigned int32 managed type.
As we have discussed earlier, the wrapper automatically performs data type mapping as we cross from managed to unmanaged code. For example, certain VB-specific data types used in an unmanaged VB 6 COM component are mapped into the following C# types: an Integer becomes a short , a Long integer becomes a C# int , a Variant goes to an object , and a Double becomes a double . There is a more detailed table of data types conversions in the .NET Framework documentation.
We test the COM component from a straightforward C# Windows Application. We have a form, with two TextBoxes , textInput and textOutput , and a button. To make use of the COM component, we add a reference to the RCWTEST DLL from the COM tab of the References dialog, and a metadata wrapper assembly is generated. The code for the buttons click handler is simple:
private void button1_Click(object sender, System.EventArgs e) { int number = int.Parse(this.textInput.Text); RCWTEST.FactorialClass factorial = new RCWTEST.FactorialClass(); int result = factorial.GetFactorial(number); this.textOutput.Text = result.ToString(); }
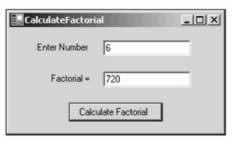
The screenshot below shows the output:
The important lines in the example concern the creation of the Factorial class, and the calling of the method to return the factorial of the input number:
RCWTESTLib.FactorialClass factorial = new RCWTESTLib.FactorialClass(); int result = factorial.GetFactorial(number);
Were simply creating an instance of the .NET wrapper, and allowing it to delegate its work to the real COM object behind the scenes.
Of course, this isnt an enterprise-level application, unless your enterprise involves calculating the factorial of small numbers , so lets look at another, more interesting scenario.
Filling a DataSet with a Recordset
Consider the scenario of a COM data access object in the business object layer of an n- tier data-centric application. The question is, how can we handle the ADO Recordset object in .NET? For example, can we fill a DataSet from this Recordset ?
The role of the particular component we will be looking at is simply to retrieve all products from the Products table in the Northwind database with a UnitPrice more than a value that we supply to the component. Of course, in an enterprise-level application, there would be error-handling, and stored procedures would be used for the bulk of the database access, and youd also be unlikely to query the Northwind database for your information.
We have the following snippet of a VB 6-based component, part of a Products class in a DataAccess DLL
Public Function Select_(ByVal Price As Integer) As ADODB.Recordset Dim ConnectionString As String ConnectionString = "Provider=SQLOLEDB.1;uid=sa;password=;" & _ "database=Northwind;Data Source=(local)" Dim strQuery As String strQuery = "SELECT * FROM Products WHERE UnitPrice > " & Price Set Select_ = ExecuteQuery_(ConnectionString, strQuery) End Function Public Function ExecuteQuery_(ByVal strConnection As String, _ ByVal SQLQuery As String) As ADODB.Recordset Dim objConnection As ADODB.Connection Dim objRecordset As ADODB.Recordset Set objConnection = New ADODB.Connection Call objConnection.Open(strConnection) Set objRecordset = New ADODB.Recordset objRecordset.CursorLocation = adUseClient objRecordset.Open SQLQuery, objConnection, adOpenStatic, _ adLockBatchOptimistic Set objRecordset.ActiveConnection = Nothing objConnection.Close Set ExecuteQuery_ = objRecordset End Function
Select_ returns a Recordset , consisting of all products with UnitPrice greater than our supplied Price .
To handle the Recordset in .NET, we will be using an overload of the Fill() method of the OleDbDataAdapter class; we saw this class in Chapter 9. The overload we will use accepts a DataSet , a Recordset or Record object, and a string for the name of a source table.
We create a Windows Form application, with a TextBox , a button, and a DataGrid control that we will bind our DataSet to, displaying all the products with UnitPrice greater than the value entered into the TextBox . First, we add a reference to the DataAccess.dll , which we saw the code for above. Note that this will also automatically add a reference to ADODB , since we referenced ADO 2.6 in the original DataAccess project.
The code for the buttons click handler consists of the following:
private void button1_Click(object sender, System.EventArgs e) { short number = short.Parse(this.textBox1.Text); DataSet ds = new DataSet("FromRecordset"); OleDbDataAdapter da = new OleDbDataAdapter();
We now create an instance of the Products class, and create an ADODB Recordset . We will use Recordset rather than RecordsetClass , and we will see why in a moment.
DataAccess.ProductsClass prod = new DataAccess.ProductsClass(); Recordset rs = new ADODB.Recordset();
Next, we use Select_ to populate our Recordset rs . If we have created rs as RecordsetClass , then the compiler would report that we are unable to implicitly convert Recordset to RecordsetClass .
rs = prod.Select_(number); Finally, we use the overload of the Fill() method we mentioned earlier to fill the DataSet , and then bind this to the DataGrid , and the data is displayed!
da.Fill(ds, rs, "Products"); dataGrid1.SetDataBinding(ds,"Products"); }
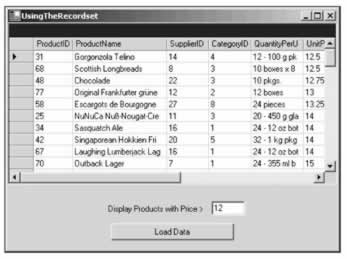
In the screenshot above, the rows are sorted by unit price with a simple click on the UnitPrice column it would have been much more difficult to achieve this with the Recordset itself.
Late Binding to COM Components
So far, we have looked at early binding, so now we will look at how we can late-bind to a COM component using reflection in C#.
We shall late-bind to our RCWTEST component here. We will use the same form as before, and add a reference to the System.Reflection namespace. The code that follows will replace the code in the buttons click handler.
When you late bind to a COM object in a C# program, you call the GetTypeFromProgID() static method of the Type class to instantiate an object representing the COM objects type. The Type class is a member of the System namespace, and in the code below, we configure a Type object for the RCWTEST component.
int number = int.Parse(this.textInput.Text); Type factorialType; factorialType = Type.GetTypeFromProgID("RCWTEST.Factorial");
Once you have a Type object encapsulating the COM objects type information, you use it to create an instance of the COM object itself. This is accomplished by passing the Type object to the CreateInstance() static method of the Activator class. CreateInstance() instantiates the COM object and returns a late-bound instance to it, which you can store in an object reference.
object objFactorial; objFactorial = Activator.CreateInstance(factorialType);
At this point, your C# code has a late-bound reference to a full-fledged instance of the COM class.
Unfortunately, you cant invoke methods directly on the object reference. Instead, to talk to the COM object, you have to rely on the InvokeMember() method of the Type object that you first created. When you call InvokeMember() , you pass it a reference to the COM object, along with the name of the COM method that you are invoking and an object array of any input arguments to that method.
For our factorial example, we only need the one input parameter.
object[] aryInputArgs = new object[] {number}; object objResult = factorialType.InvokeMember("GetFactorial", BindingFlags.InvokeMethod, null, objFactorial, aryInputArgs);
Finally, we cast the object containing our return value into a uint , and display the output in the textbox.
uint result = (uint)objResult; this.textOutput.Text = result.ToString();
Although C#s late binding facilities allow you to avoid the hassle of wrapper assemblies, you need to be aware of some of its associated drawbacks:
-
Late binding can be dangerous. When you use early binding, the compiler is able to consult the COM components type library to make sure that all of the methods that you call on the COM object actually exist. In late binding, however, a typo in an InvokeMember() call can generate a run-time error.
-
Late binding can be slow. Each time you use InvokeMember() on an object reference, the runtime has to look up the desired member in the COM classs function library before invoking it. This exacts an additional performance overhead on your program.
Releasing COM Objects
The lifetime of the RCW is controlled by the CLR, since the RCW is a managed creation. The COM component is freed from memory when the garbage collector calls the Finalize() method of the RCW. At this point, the RCW calls IUnknown::Release() on the COM component, and the COM component is released from memory. However, if you wish to explicitly remove the COM component from memory, for example if the component is holding on to valuable resources such as database connections, you can call the ReleaseComObject() static method of the Marshal class, in the System.Runtime.InteropServices namespace.
Marshal.ReleaseComObject(factorial); This would remove our factorial COM component from memory, by forcing the RCW to release any references to the component. In general, ReleaseComObject() decreases the reference count on the object.
Using ActiveX Controls in .NET
ActiveX controls support interfaces that interact with ActiveX containers that host these controls. Generally, ActiveX controls represent reusable graphical controls that can be hosted in ActiveX control containers. Its also possible to have windowless ActiveX controls.
Just as you can import standard COM components for use in .NET projects, you can import ActiveX controls, too. AxImp.exe is the utility program that allows you to do this.
AxImp.exe
To import an ActiveX component into .NET with AxImp.exe , you invoke AxImp.exe from the command line, and specify the name of the ActiveX ( *.ocx ) file that you wish to import.
For an example, in the screenshot below were importing the Windows Media Player ActiveX control ( msdxm.ocx ):

As you can see, the AxImp.exe program outputs two files. Heres why:
-
The first output file, MediaPlayer.dll , is the assembly proxy. It contains metadata type information that allows C# clients to create and invoke the methods and properties of the ActiveX control as if it were a managed component.
-
The second file, AxMediaPlayer.dll , is the Windows control. It allows you to use the graphical aspect of the imported ActiveX control as a Windows control in .NET Windows Forms projects, as the classes in AxMediaPlayer.dll present the ActiveX control as a managed Windows Form control.
To use the assembly proxy generated from an ActiveX component in Visual Studio by AxImp.exe , you just add a reference to the assembly proxy with Visual Studio .NETs References dialog, which we saw earlier in the chapter. We intend to use our Windows Media Player control on a Windows Form, so we will need to add references to both MediaPlayer.dll and AxMediaPlayer.dll .
Once youve referenced the proxy assembly (and the Windows control wrapper), youre ready to use the ActiveX component in your code.
Hosting an ActiveX Control on a Windows Form
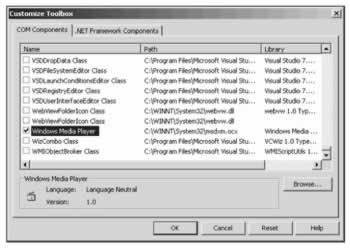
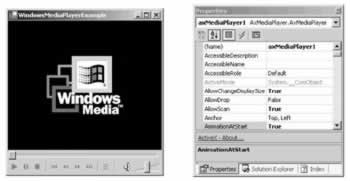
Its straightforward to host an ActiveX control on a Windows Form from within Visual Studio .NET. To do so, right-click on the Toolbox and select Customize Toolbox . From the COM Components tab, select the control you wish to import; we will be using the Windows Media Player control.
Once youve selected your control, you can drag it from the Toolbox onto your form, and youre ready to use the ActiveX component in your code. At this point the references are added to your project. We have two references added when we import our example control one is called MediaPlayer , the other is AxMediaPlayer . This is because classes in the AxMediaPlayer wrapper assembly use classes in the MediaPlayer wrapper assembly internally. Thus both assemblies are needed and added. stdole is also added, since this holds managed metadata type information for some standard OLE interfaces and data types, and is therefore required when importing ActiveX controls.
The instance of the control on the form is named axMediaPlayer1 . From the Properties dialog, you can access the properties of the ActiveX control as a standard control on the form, and right-clicking on the control itself and selecting Properties allows you to access the custom property page of the ActiveX control:
The imported ActiveX control can be coded against like any other Windows Form control. For example, if we add the following code to the forms constructor after the InitializeComponent() call:
this.axMediaPlayer1.FileName = "c:\ProCSharp\WroxTrailer.mpeg"; then our application will display a video clip.
EAN: 2147483647
Pages: 244