Reading and Writing to the Registry
 | |||||||||||
| Chapter 12 - File and Registry Operations | |
| bySimon Robinsonet al. | |
| Wrox Press 2002 | |
In all versions of Windows since Windows 95, the Registry has been the central repository for all configuration information relating to Windows setup, user preferences, and installed software and devices. Almost all commercial software these days uses the Registry to store information about itself, and COM components must place information about themselves in the Registry in order to be called by clients . The .NET Framework and its accompanying concept of zero-impact installation has slightly reduced the significance of the Registry for applications in the sense that assemblies are entirely self-contained, so no information about particular assemblies needs to be placed in the Registry - even for shared assemblies. In addition, the .NET Framework has brought the concept of isolated storage, by which applications can store information that is particular to each user in files, with the .NET Framework taking care of making sure that data is stored separately for each user registered on a machine. (Isolated storage is beyond the scope of this book, but if you are interested, you can find the relevant .NET base classes in the System.IO.IsolatedStorage namespace.)
The fact that applications can now be installed using the Windows Installer also frees developers from some of the direct manipulation of the Registry that used to be involved in installing applications. However, despite this, the possibility exists that if you distribute any complete application, your application will use the Registry to store information about its configuration. If you want your application to show up in the Add/Remove Programs dialog under the control panel, then this will involve appropriate registry entries being made. You may also need to use the Registry for backwards compatibility with legacy code.
As you'd expect from a library as comprehensive as the .NET library, it includes classes that give you access to the Registry. There are two classes concerned with the Registry, and both are in the Microsoft.Win32 namespace. The classes are Registry and RegistryKey . Before we examine these classes, we will briefly review the structure of the Registry itself.
The Registry
The Registry has a hierarchical structure much like that of the file system. The usual way to view or modify the contents of the Registry is with one of two utilities - regedit or regedt32 . Of these, regedit comes with all versions of Windows, since Windows 95 as standard. regedt32 comes with Windows NT and Windows 2000 - it is less user-friendly than regedit , but allows access to security information that regedit is unable to view. For our discussion here, we'll use regedit , which you can launch by typing in regedit at the Run dialog or command prompt.
When you first launch regedit up you'll see something like this:
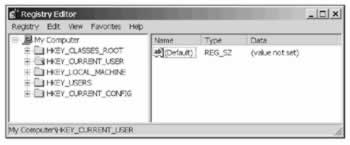
regedit has a similar treeview/listview style user interface to Windows Explorer, which matches the hierarchical structure of the Registry itself. As we'll soon see, however, there are some differences.
In a file system, the topmost level nodes can be thought of as being the partitions on your disks, C:\ , D:\ , and so on. In the Registry, the equivalent to a partition is the registry hive . It is not possible to change which hives are there - they are fixed, and there are seven of them, although only five are actually visible through regedit :
-
HKEY_CLASSES_ROOT (HKCR) contains details of types of files on the system ( .txt , .doc , and so on), and which applications are able to open files of each type. It also contains registration information for all COM components (this latter area is usually the largest single area of the Registry, since Windows these days comes with a huge number of COM components).
-
HKEY_CURRENT_USER (HKCU) contains details of user preferences for the user currently logged on to the machine.
-
HKEY_LOCAL_MACHINE (HKLM) is a huge hive that contains details of all software and hardware installed on the machine. It also includes the HKCR hive: HKCR is actually not really an independent hive in its own right, but is simply a convenient mapping onto the registry key HKLM/SOFTWARE/Classes .
-
HKEY_USERS (HKUSR) contains details of user preferences for all users. As you might guess, it also contains the HKCU hive, which is simply a mapping onto one of the keys in HKEY_USERS .
-
HKEY_CURRENT_CONFIG (HKCF) contains details of hardware on the machine.
The remaining two keys contain information that is of a temporary nature, and which changes frequently:
-
HKEY_DYN_DATA is a general container for any volatile data that needs to be stored somewhere in the Registry
-
HKEY_PERFORMANCE_DATA contains information concerning the performance of running applications
Within the hives is a tree structure of registry keys . Each key is in many ways analogous to a folder or file on the file system. However, there is one very important difference. The file system distinguishes between files (which are there to contain data), and folders (which are primarily there to contain other files or folders), but in the Registry there are only keys. A key may contain both data and other keys.
If a key contains data, then this will be present as a series of values. Each value will have an associated name , data type, and data. In addition, a key may have a default value, which is unnamed.
We can see this structure by using regedit to examine registry keys. The screenshot shows the contents of the key HKCU\Control Panel\Appearance , which contains the details of the chosen color scheme of the currently logged in user. regedit shows which key is being examined by displaying it with an open folder icon in the tree view:
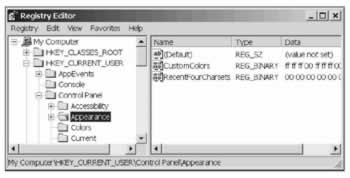
The HKCU\Control Panel\Appearance key has three named values set, although the default value does not contain any data. The column in the screenshot marked Type details the data type of each value. Registry entries may be formatted as one of three data types. The types are:
-
REG_SZ (which roughly corresponds to a .NET string instance - the matching is not exact because the registry data types are not .NET data types)
-
REG_DWORD (corresponds roughly to uint )
-
REG_BINARY (array of bytes)
An application that wishes to store data in the Registry will do so by creating a number of registry keys, usually under the key HKLM\Software\ < CompanyName >. Note that it is not necessary for these keys to contain any data. Sometimes the very fact of whether a key exists provides the data that an application needs.
The .NET Registry Classes
Access to the Registry is via two classes in the Microsoft.Win32 namespace, Registry and RegistryKey . A RegistryKey instance represents a registry key. This class implements methods to browse down into child keys, to create new keys or to read or modify the values in the key. In other words, to do everything you would normally wish to do with a registry key (except set security levels for the key). RegistryKey will be the class you use for almost all your work with the Registry. Registry , by contrast, is a class that you will never instantiate. Its role is simply to provide you with RegistryKey instances that represent the top-level keys - the different hives - in order to start you off navigating through the Registry. Registry provides these instances through static properties, and there are seven of them, called respectively ClassesRoot , CurrentConfig , CurrentUser , DynData , LocalMachine , PerformanceData , and Users . I bet you can't guess which of these properties corresponds to which hive!
So, for example, to obtain a RegistryKey instance that represents the HKLM key, you would write:
RegistryKey hklm = Registry.LocalMachine; The process of obtaining a reference to a RegistryKey object is known as opening the key.
Although you might expect that the methods exposed by RegistryKey would be similar to those implemented by DirectoryInfo , given that the Registry has a similar hierarchical structure to the file system, this actually isn't the case. Often, the way that you access the Registry is different from the way that you would use files and folders, and RegistryKey implements methods that reflect this.
The most obvious difference is in how you open a registry key at a given location in the Registry. The Registry class does not have any public constructor that you can use, nor does it have any methods that let you go directly to a key, given its name. Instead, you are expected to browse down to that key from the top of the relevant hive. If you want to instantiate a RegistryKey object, the only way is to start off with the appropriate static property of Registry , and work down from there. So, for example, if you want to read some data in the HKLM/Software/Microsoft key, you'd get a reference to it like this:
RegistryKey hklm = Registry.LocalMachine; RegistryKey hkSoftware = hklm.OpenSubKey("Software"); RegistryKey hkMicrosoft = hkSoftware.OpenSubKey("Microsoft");
A registry key accessed in this way will give you read-only access. If you want to be able to write to the key (that includes writing to its values or creating or deleting direct children of it), you need to use another override to OpenSubKey , which takes a second parameter, of type bool , that indicates whether you want read-write access to the key. So for example, if you want to be able to modify the Microsoft key (and assuming you are a systems administrator with permission to do this) you would write this:
RegistryKey hklm = Registry.LocalMachine; RegistryKey hkSoftware = hklm.OpenSubKey("Software"); RegistryKey hkMicrosoft = hkSoftware.OpenSubKey("Microsoft", true); Incidentally, since this key contains information used by Microsoft's applications, in most cases you probably shouldn't be modifying this particular key.
The OpenSubKey() method is the one you will call if you are expecting the key to already be present. If the key isn't there, it will return a null reference. If you wish to create a key, then you should use the CreateSubKey() method (which automatically gives you read-write access to the key through the reference returned):
RegistryKey hklm = Registry.LocalMachine; RegistryKey hkSoftware = hklm.OpenSubKey("Software"); RegistryKey hkMine = hkSoftware.CreateSubKey("MyOwnSoftware"); The way that CreateSubKey() works is quite interesting. It will create the key if it doesn't already exist, but if it does already exist, then it will quietly return a RegistryKey instance that represents the existing key. The reason for the method behaving in this manner is to do with how you will normally use the Registry. The Registry, on the whole, contains long- term data such as configuration information for Windows and for various applications. It's not very common, therefore, that you find yourself in a situation where you need to explicitly create a key.
What is much more common is that your application needs to make sure that some data is present in the Registry - in other words create the relevant keys if they don't already exist, but do nothing if they do. CreateSubKey() fills that need perfectly . Unlike the situation with FileInfo.Open() , for example, there is no chance with CreateSubKey() of accidentally removing any data. If deleting registry keys is your intention , then you'll need to explicitly call the RegistryKey.DeleteSubKey() method. This makes sense given the importance of the Registry to Windows. The last thing you want is to accidentally completely break Windows by deleting a couple of important keys while you're debugging your C# registry calls!
Once you've located the registry key you want to read or modify, you can use the SetValue() or GetValue() methods to set or get at the data in it. Both of these methods take a string giving the name of the value as a parameter, and SetValue() requires an additional object reference containing details of the value. Since the parameter is defined as an object reference, it can actually be a reference to any class you want. SetValue() will decide from the type of class actually supplied whether to set the value as a REG_SZ , REG_DWORD , or REG_BINARY value. For example:
RegistryKey hkMine = HkSoftware.CreateSubKey("MyOwnSoftware"); hkMine.SetValue("MyStringValue", "Hello World"); hkMine.SetValue("MyIntValue", 20); This code will set the key to have two values: MyStringValue will be of type REG_SZ , while MyIntValue will be of type REG_DWORD . These are the only two types we will consider here, and use in the example that we present later.
RegistryKey.GetValue() works in much the same way. It is defined to return an object reference, which means it is free to actually return a string reference if it detects the value is of type REG_SZ , and an int if that value is of type REG_DWORD :
string stringValue = (string)hkMine.GetValue("MyStringValue"); int intValue = (int)hkMine.GetValue("MyIntValue");
Finally, once you've finished reading or modifying the data, you should close the key:
hkMine.Close(); RegistryKey implements a large number of methods and properties. The tables give a selection of the most useful ones:
Properties
| Property Name | Description |
|---|---|
| Name | Name of the key (read-only) |
| SubKeyCount | The number of children of this key |
| ValueCount | How many values the key contains |
Methods
| Method Name | Purpose |
|---|---|
| Close() | Closes the key |
| CreateSubKey() | Creates a subkey of a given name (or opens it if it already exists) |
| DeleteSubKey() | Deletes a given subkey |
| DeleteSubKeyTree() | Recursively deletes a subkey and all its children |
| DeleteValue() | Removes a named value from a key |
| GetSubKeyNames() | Returns an array of strings containing the names of the subkeys |
| GetValue() | Returns a named value |
| GetValueNames() | Returns an array of strings containing the names of all the values of the key |
| OpenSubKey() | Returns a reference to a RegistryKey instance that represents a given subkey |
| SetValue() | Sets a named value |
Example: SelfPlacingWindow
We will illustrate the use of the registry classes with an application, which we will call the SelfPlacingWindow . This example is a simple C# Windows application, which actually has almost no features. The only thing you can do with it is click on a button, which brings up a standard Windows color dialog box (represented by the System.Windows.Forms.ColorDialog class), to let you choose a color, which will become the background color of the form.
Despite this lack of features, the self-placing window scores over just about every other application that we have developed in this book in one important and very user-friendly way. If you drag the window around the screen, change its size , or maximize or minimize it before you exit the application, it will remember the new position, as well as the background color, so that the next time it is launched it can automatically resume the way you chose last time. It remembers this information, because it writes it to the Registry whenever it shuts down. In this way, we get to demonstrate not only the .NET registry classes themselves, but also a very typical use for them, which you'll almost certainly want to replicate in any serious commercial Windows Forms application you write.
The location that SelfPlacingWindow stores its information in the Registry is a key, HKLM\Software\WroxPress\SelfPlacingWindow . HKLM is the usual place for application configuration information, but note that it is not user-specific . If you wanted to be more sophisticated in a real application, you'd probably want to replicate the information inside the HK_Users hive as well, so that each user can have their own profile.
It's also worth noting that, if you are implementing this in a real .NET application, you may want to consider using isolated storage instead of the Registry to store this information. On the other hand, since isolated storage is only available in .NET, you'll need to use the Registry if you need any interoperability with non-.NET apps.
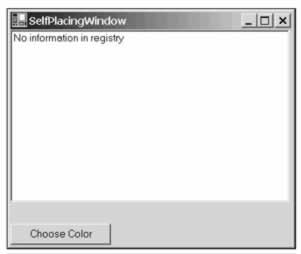
The very first time that you run the example, it will look for this key and not find it, obviously! Therefore it is forced to use a default size, color, and position that we set in the developer environment. The example also features a listbox in which it displays any information read in from the Registry. On its first run, it will look like this:
If we now modify the background color and resize the SelfPlacingWindow or move it around on the screen a bit before exiting, it will, just before it exits, create the HKLM\Software\WroxPress\SelfPlacingWindow key and write its new configuration information into it. We can examine the information using regedit :

We can see from this screenshot that SelfPlacingWindow has placed a number of values in the registry key.
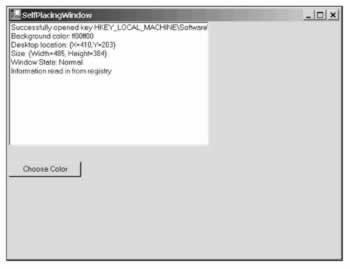
The values Red , Green , and Blue give the color components that make up the selected background color. If you're not familiar with color components, don't worry, as these will be explained later in Graphics with GDI+. For now, just take it that any color display on the system can be completely described by these three components, which are each represented by a number between 0 and 255 (or 0x00 and 0xff in hexadecimal). The values given here make up a bright green color. There are also four more REG_DWORD values, which represent the position and size of the window: X and Y are the coordinates of top left of the window on the desktop - that is to say the numbers of pixels across from the top left of the screen and the numbers of pixels down. Width and Height give the size of the window. WindowsState is the only value for which we have used a string data type ( REG_SZ ), and it can contain one of the strings Normal , Maximised , or Minimised , depending on the final state of the window when we exited the application.
If we now launch SelfPlacingWindow again it will read this registry key, and automatically position itself accordingly (I know it's a black and white book, but I can promise you that background color really is bright green!):
This time when we exit SelfPlacingWindow , it will overwrite the previous registry settings with whatever new values are relevant at the time that we exit it. To code up the example, we create the usual Windows Forms project in Visual Studio.NET, and add the listbox and button, using the developer environment's toolbox. We will change the names of these controls respectively to listBoxMessages and buttonChooseColor . We also need to ensure that we use the Microsoft.Win32 namespace:
using System; using System.Drawing; using System.Collections; using System.ComponentModel; using System.Windows.Forms; using System.Data; using Microsoft.Win32; We need to add one field ( chooseColorDialog ) to the main Form1 class, which will represent the color dialog box:
public class Form1 : System.Windows.Forms.Form { private System.Windows.Forms.ListBox listBoxMessages; private System.Windows.Forms.Button buttonChooseColor; private ColorDialog chooseColorDialog = new ColorDialog(); Quite a lot of action takes place in the Form1 constructor:
public Form1() { InitializeComponent(); buttonChooseColor.Click += new EventHandler(OnClickChooseColor); try { if (ReadSettings() == false) listBoxMessages.Items.Add("No information in registry"); else listBoxMessages.Items.Add("Information read in from registry"); StartPosition = FormStartPosition.Manual; } catch (Exception e) { listBoxMessages.Items.Add("A problem occurred reading in data from registry:"); listBoxMessages.Items.Add(e.Message); } } In this constructor, we start off by setting up the event handler for when the user clicks on the button. The handler is a method called OnClickChooseColor , which we will cover soon. Reading in the configuration information is done using another method that we will write called ReadSettings() . ReadSettings() returns true if it finds the information in the Registry, and false if it doesn't (which it should be since this is the first time we have run the application). We place this part of the constructor in a try block, just in case any exceptions are generated while reading in the registry values (this might happen if some user has come in and played around with the Registry using regedit ).
The StartPosition = FormStartPosition.Manual; statement tells the form to take its initial starting position from the DeskTopLocation property instead of using the Windows default location (the default behavior). Possible values are taken from the FormStartPosition enumeration.
SelfPlacingWindow is also one of the few applications in this book in which we have a serious use for adding code to the Dispose() method. Remember that Dispose() is called whenever the application terminates normally, so this is the ideal place from which to save the configuration information to the Registry. This is done using another method that we will write, SaveSettings() :
protected override void Dispose(bool disposing) { if(disposing) { if (components != null) { components.Dispose(); } } SaveSettings(); base.Dispose(disposing); } The SaveSettings() and ReadSettings() methods are the ones that contain the registry code we are interested in, but before we examine them we have one more piece of housekeeping: to handle the event of the user clicking that button. This involves displaying the color dialog and setting the background color to whatever color the user chose:
void OnClickChooseColor(object Sender, EventArgs e) { if(chooseColorDialog.ShowDialog() == DialogResult.OK) BackColor = chooseColorDialog.Color; }
Now let's look at how we save the settings:
void SaveSettings() { RegistryKey softwareKey = Registry.LocalMachine.OpenSubKey("Software", true); RegistryKey wroxKey = softwareKey.CreateSubKey("WroxPress"); RegistryKey selfPlacingWindowKey = wroxKey.CreateSubKey("SelfPlacingWindow"); selfPlacingWindowKey.SetValue("BackColor", (object)BackColor.ToKnownColor()); selfPlacingWindowKey.SetValue("Red", (object)(int)BackColor.R); selfPlacingWindowKey.SetValue("Green", (object)(int)BackColor.G); selfPlacingWindowKey.SetValue("Blue", (object)(int)BackColor.B); selfPlacingWindowKey.SetValue("Width", (object)Width); selfPlacingWindowKey.SetValue("Height", (object)Height); selfPlacingWindowKey.SetValue("X", (object)DesktopLocation.X); selfPlacingWindowKey.SetValue("Y", (object)DesktopLocation.Y); selfPlacingWindowKey.SetValue("WindowState", (object)WindowState.ToString()); }
There's quite a lot going on here. We start off by navigating through the Registry to get to the HKLM\Software\WroxPress\SelfPlacingWindow registry key using the technique we demonstrated earlier, starting with the Registry.LocalMachine static property that represents the HKLM hive.
Then we use the RegistryKey.OpenSubKey() method, rather than RegistryKey.CreateSubKey() to get to the HKLM/Software key. That's because we can be very confident this key already exists - if it doesn't then there's something very seriously wrong with our computer, as this key contains settings for a lot of system software! We also indicate that we need write access to this key. That's because if the WroxPress key doesn't already exist we will need to create it - which involves writing to the parent key.
The next key to navigate to is HKLM\Software\WroxPress - and here we are not certain whether the key already exists, so we use CreateSubKey() to automatically create it if it doesn't. Note that CreateSubKey() automatically gives us write access to the key in question. Once we have reached HKLM\Software\WroxPress\SelfPlacingWindow , it is simply a matter of calling the RegistryKey.SetValue() method a number of times to either create or set the appropriate values. There are, however, a couple of complications.
Firstly, you might notice that we are using a couple of classes that we've not encountered before. The DeskTopLocation property of the Form class indicates the position of the top left corner of the screen, and is of type Point . We'll cover the Point structure in Form.WindowState property - this contains an enumeration that gives the current state of the window - Minimized , Maximized , or Normal .
The other complication here is that we need to be a little careful about our casts: SetValue() takes two parameters - a string that gives the name of the key, and a System.Object instance, which contains the value. SetValue() has a choice of format for storing the value - it can store it as REG_SZ , REG_BINARY , or REG_DWORD - and it is actually pretty intelligent about making a sensible choice depending on the data type that has been given. Hence for the WindowState , we pass it a string , and SetValue() sensibly determines that this should be translated to REG_SZ . Similarly, for the various positions and dimensions we supply int s, which will be converted into REG_DWORD . However, the color components are more complicated as we want these to be stored as REG_DWORD too because they are numeric types. However, if SetValue() sees that the data is of type byte , it will store it as a string - as REG_SZ in the Registry. In order to prevent this, we cast the color components to int s.
We've also explicitly cast all the values to the type object . We don't really need to do this as the cast from any other data type to object is implicit, but we are doing so in order to make it clear what's going on and remind ourselves that SetValue() is defined to take just an object reference as its second parameter.
The ReadSettings() method is a little longer because for each value read in, we also need to interpret it, display the value in the listbox, and make the appropriate adjustments to the relevant property of the main form. ReadSettings() looks like this:
bool ReadSettings() { RegistryKey softwareKey = Registry.LocalMachine.OpenSubKey("Software"); RegistryKey wroxKey = softwareKey.OpenSubKey("WroxPress"); if (wroxKey == null) return false; RegistryKey selfPlacingWindowKey = wroxKey.OpenSubKey("SelfPlacingWindow"); if (selfPlacingWindowKey == null) return false; else listBoxMessages.Items.Add("Successfully opened key " + selfPlacingWindowKey.ToString()); int redComponent = (int)selfPlacingWindowKey.GetValue("Red"); int greenComponent = (int)selfPlacingWindowKey.GetValue("Green"); int blueComponent = (int)selfPlacingWindowKey.GetValue("Blue"); this.BackColor = Color.FromArgb(redComponent, greenComponent, blueComponent); listBoxMessages.Items.Add("Background color: " + BackColor.Name); int X = (int)selfPlacingWindowKey.GetValue("X"); int Y = (int)selfPlacingWindowKey.GetValue("Y"); this.DesktopLocation = new Point(X, Y); listBoxMessages.Items.Add("Desktop location: " + DesktopLocation.ToString()); this.Height = (int)selfPlacingWindowKey.GetValue("Height"); this.Width = (int)selfPlacingWindowKey.GetValue("Width"); listBoxMessages.Items.Add("Size: " + new Size(Width,Height).ToString()); string initialWindowState = (string)selfPlacingWindowKey.GetValue("WindowState"); listBoxMessages.Items.Add("Window State: " + initialWindowState); this.WindowState = (FormWindowState)FormWindowState.Parse (WindowState.GetType(), initialWindowState); return true; }
In ReadSettings() we first have to navigate to the HKLM/Software/WroxPress/SelfPlacingWindow registry key. In this case, however, we are hoping to find the key there so that we can read it. If it's not there, then it's probably the first time we have run the example. In this case, we just want to abort reading the keys, and we certainly don't want to create any keys. Now we use the RegistryKey.OpenSubKey() method all the way down. If at any stage OpenSubkey() returns a null reference then we know that the registry key isn't there and we can simply return the value false back to the calling code.
When it comes to actually reading the keys, we use the RegistryKey.GetValue() method, which is defined as returning an object reference - which means this method can actually return an instance of literally any class it chooses. Like SetValue() , it will return a class of object appropriate to the type of data it found in the key - so we can usually assume that the REG_SZ keys will give us a string and the other keys will give us an int . We also cast the return reference from SetValue() accordingly. If there is an exception, say someone has fiddled with the Registry and mangled the value types, then our cast will cause an exception to be thrown - which will be caught by the handler in the Form1 constructor.
The rest of this code uses one more data type that you might not be familiar with - again because we don't cover it until the graphics chapter - the Size structure. This is similar to a Point structure, but is used to represent sizes rather than coordinates. It has two member properties, Width and Height , and we use the Size structure here simply as a convenient way of packaging up the size of the form for displaying in the listbox.
EAN: 2147483647
Pages: 244