Using the DOM in .NET
 | |||||||||||
| Chapter 11 - Manipulating XML | |
| bySimon Robinsonet al. | |
| Wrox Press 2002 | |
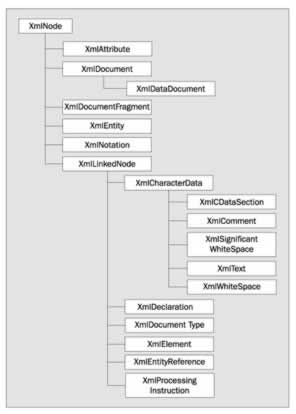
The Document Object Model (DOM) implementation in .NET supports the W3C DOM Level 1 and Core DOM Level 2 specifications. The DOM is implemented through the XmlNode class, which is an abstract class that represents a node of an XML document.
There is also an XmlNodeList class, which is an ordered list of nodes. This is a live list of nodes, and any changes to any node are immediately reflected in the list. XmlNodeList supports indexed access or iterative access. There is another abstract class, XmlCharacterData , that extends XmlLinkedNode , and provides text manipulation methods for other classes.
The XmlNode and XmlNodeList classes make up the core of the DOM implementation in the .NET Framework. Here is a list of some of the classes that are based on XmlNode :
| Class Name | Description |
|---|---|
| XmlLinkedNode | Returns the node immediately before or after the current node. Adds NextSibling and PreviousSibling propertiesto XmlNode . |
| XmlDocument | Represents the entire document. Implements the DOM Level 1 and Level 2 specifications. |
| XmlDocumentFragment | Represents a fragment of the document tree. |
| XmlAttribute | An attribute object of an XmlElement object. |
| XmlEntity | A parsed or unparsed entity node. |
| XmlNotation | Contains a notation declared in a DTD or schema. |
The following classes extend XmlCharacterDat a :
| Class Name | Description |
|---|---|
| XmlCDataSection | An object that represents a CData section of a document. |
| XmlComment | Represents an XML comment object. |
| XmlSignificantWhitespace | Represents a node with whitespace. Nodes created only if the PreserveWhiteSpace flag is true . |
| XmlWhitespace | Represents whitespace in element content. Nodes are created only if the PreserveWhiteSpace flag is true . |
| XmlText | The textual content of an element or attribute. |
Finally, the next collection of classes extend the XmlLinkedNode class:
| Class Name | Description |
|---|---|
| XmlDeclaration | Represents the declaration node (< ?xml version='1.0'... >) |
| XmlDocumentType | Data relating to the document type declaration |
| XmlElement | An XML element object |
| XmlEntityReferenceNode | Represents an entity reference node |
| XmlProcessingInstruction | Contains an XML processing instruction |
As you can see, .NET makes available a class to fit just about any XML type that you may encounter. Because of this, you end up with a very flexible and powerful toolset. We won't look at every class in detail, but we will use several examples to give you an idea of what you can accomplish. This is what the inheritance diagram looks like:
Using the XmlDocument Class
XmlDocument and its derived class XmlDataDocument (we look at this later in the chapter) are the classes that you will be using to represent the DOM in .NET. Unlike XmlReader and XmlWriter , XmlDocument gives you read and write capabilities as well as random access to the DOM tree. XmlDocument resembles the DOM implementation in MSXML. If you have programmed with MSXML then you will feel comfortable using XmlDocument .
Let's introduce an example that creates an XmlDocument object, loads a document from disk, and loads a listbox with data from the title elements. This is similar to one of the examples that we constructed in the XmlReader section. This difference here is that we will be selecting the nodes we want to work with instead of going through the entire document as the XmlReader- based example did.
Here is our code. Look at how simple it looks in comparison to the XmlReader example (the file can be found in the DOMSample1 folder of the download):
private void button1_Click(object sender, System.EventArgs e) { // doc is declared at the module level // change path to match your path structure doc.Load("..\..\..\books.xml"); // get only the nodes that we want XmlNodeList nodeLst=doc.GetElementsByTagName("title"); // iterate through the XmlNodeList foreach(XmlNode node in nodeLst) listBox1.Items.Add(node.InnerText); } Note that we also add the following declaration at the module level for the examples in this section:
private XmlDocument doc=new XmlDocument(); If this is all that we wanted to do, using the XmlReader would have been a much more efficient way to load the listbox, because we just go through the document once, and then we are finished with it. This is exactly the type of work that XmlReader was designed for. If, however, we wanted to revisit a node, then using XmlDocument is a better way. Let's extend the previous example by adding another event handler (this is DOMSample2 ):
private void listBox1_SelectedIndexChanged(object sender, System.EventArgs e) { //create XPath search string string srch="bookstore/book[title='" + listBox1.SelectedItem.ToString() + "']"; //look for the extra data XmlNode foundNode = doc.SelectSingleNode(srch); if(foundNode != null) MessageBox.Show(foundNode.InnerText); else MessageBox.Show("Not found"); }
In this example, we load the listbox with the titles from the books.xml document, as in the previous example. When we click on the listbox, it causes the SelectedIndexChanged() event handler to fire. In this case, we take the text of the selected item in the listbox (the book title) create an XPath statement and pass it to the SelectSingleNode() method of the doc object. This returns the book element that the title is part of ( foundNode ). Then we display the InnerText of the node in a message box. We can keep clicking on items in the listbox as many times as we want, since the document is loaded and stays loaded until we release it.
A quick comment regarding the SelectSingleNode() method. This is an XPath implementation in the XmlDocument class. There are the methods SelectSingleNode() and SelectNodes() . Both of these methods are defined in XmlNode , which XmlDocument in based on. SelectSingleNode() returns an XmlNode and SelectNodes() returns an XmlNodeList . However, the System.Xml.XPath namespace contains a richer XPath implementation, and we will be looking at that in a later section.
Inserting Nodes
Earlier we looked at an example using XmlTextWriter that created a new document. The limitation was that it would not insert a node into a current document. With the XmlDocument class we can do just that. Change the button1_Click() event handler from the last example to the following ( DOMSample3 in the download code):
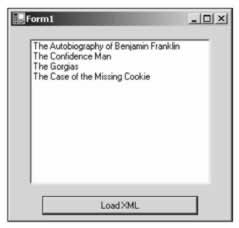
private void button1_Click(object sender, System.EventArgs e) { //change path to match your structure doc.Load("..\..\..\books.xml"); //create a new 'book' element XmlElement newBook=doc.CreateElement("book"); //set some attributes newBook.SetAttribute("genre","Mystery"); newBook.SetAttribute("publicationdate","2001"); newBook.SetAttribute("ISBN","123456789"); //create a new 'title' element XmlElement newTitle=doc.CreateElement("title"); newTitle.InnerText="The Case of the Missing Cookie"; newBook.AppendChild(newTitle); //create new author element XmlElement newAuthor=doc.CreateElement("author"); newBook.AppendChild(newAuthor); //create new name element XmlElement newName=doc.CreateElement("name"); newName.InnerText="C. Monster"; newAuthor.AppendChild(newName); //create new price element XmlElement newPrice=doc.CreateElement("price"); newPrice.InnerText="9.95"; newBook.AppendChild(newPrice); //add to the current document doc.DocumentElement.AppendChild(newBook); //write out the doc to disk XmlTextWriter tr=new XmlTextWriter("..\..\..\booksEdit.xml",null); tr.Formatting=Formatting.Indented; doc.WriteContentTo(tr); tr.Close(); //load listBox1 with all of the titles, including new one XmlNodeList nodeLst=doc.GetElementsByTagName("title"); foreach(XmlNode node in nodeLst) listBox1.Items.Add(node.InnerText); } After executing this code, you end up with the same functionality as the previous example, but there is one additional book in the listbox, The Case of the Missing Cookie (a soon-to-be classic). Clicking on the cookie caper title will show all of the same info as the other titles. Breaking the code down a little, we can see that this is actually a fairly simple process. The first thing that we do is create a new book element:
XmlElement newBook = doc.CreateElement("book"); CreateElement() has three overloads that allow you to specify:
-
The element name
-
The name and namespace URI
-
The prefix, localname , and namespace
Once the element is created we need to add attributes:
newBook.SetAttribute("genre","Mystery"); newBook.SetAttribute("publicationdate","2001"); newBook.SetAttribute("ISBN","123456789"); Now that we have the attributes created, we need to add the other elements of a book:
XmlElement newTitle = doc.CreateElement("title"); newTitle.InnerText = "The Case of the Missing Cookie"; newBook.AppendChild(newTitle); Once again we create a new XmlElement -based object ( newTitle ). Then we set the InnerText property to the title of our new classic, and append the element as a child to the book element. We repeat this for the rest of the elements in this book element. Note that we add the name element as a child to the author element. This will give us the proper nesting relationship as in the other book elements.
Finally, we append the newBook element to the doc.DocumentElement node. This is the same level as all of the other book elements. We have now updated an existing document with a new element.
The last thing to do is to write out the new XML document to disk. In this example we create a new XmlTextWriter , and pass it to the WriteContentTo() method. WriteContentTo() and WriteTo() both take an XmlTextWriter as a parameter. WriteContentTo() saves the current node and all of its children to the XmlTextWriter , whereas WriteTo() just saves the current node. Because doc is an XmlDocument -based object, it represents the entire document and so that is what is saved. We could also use the Save() method. It will always save the entire document. Save() has four overloads. You can specify a string with the file name and path, a Stream -based object, a TextWriter -based object, or an XmlWriter -based object.
We also call the Close() method on XmlTextWriter to flush the internal buffers and close the file.
This is what we get when we run this example. Notice the new entry at the bottom of the list:
If we wanted to create a document from scratch, we could use the XmlTextWriter , which we saw in action earlier in the chapter. We can also use XmlDocument . Why would you use one in preference to the other? If the data that you want streamed to XML is available and ready to write, then the XmlTextWriter class would be the best choice. However, if you need to build the XML document a little at a time, inserting nodes into various places, then creating the document with XmlDocument may be the better choice. We can accomplish this by changing the following line:
doc.Load("..\..\..\books.xml"); to (this code is in example DOMSample4 ):
//create the declaration section XmlDeclaration newDec = doc.CreateXmlDeclaration("1.0",null,null); doc.AppendChild(newDec); //create the new root element XmlElement newRoot = doc.CreateElement("newBookstore"); doc.AppendChild(newRoot);
First, we create a new XmlDeclaration . The parameters are the version (always 1.0 for now), the encoding, and the standalone flag. The encoding parameter should be set to a string that is part of the System.Text.Encoding class if null isn't used. null defaults to UTF-8. The standalone flag can be either yes , no, or null . If it is null then the attribute is not used and will not be included in the document.
The next element that is created will become the DocumentElement . In this case, we called it newBookstore so that you can see the difference. The rest of the code is the same as the previous example, and works in the same way. This is booksEdit.xml , which is generated from the code:
<?xml version="1.0"?> <newBookstore> <book genre="Mystery" publicationdate="2001" ISBN="123456789"> <title>The Case of the Missing Cookie</title> <author> <name>C. Monster</name> </author> <price>9.95</price> </book> </newBookstore>
We have not looked at every nook and cranny of the XmlDocument class, or of the other classes that help to create the DOM model in .NET. However, we have seen the power and flexibility that the DOM implementation in .NET offers. You will want to use the XmlDocument class when you want to have random access to the document, or the XmlReader based classes when you want a streaming type model instead. Remember that there is a cost for the flexibility of the XmlNode -based XmlDocument. Memory requirements are higher and the performance of reading the document is not as good as using XmlReader . So think carefully about which method is best for the situation.
EAN: 2147483647
Pages: 244
- Chapter III Two Models of Online Patronage: Why Do Consumers Shop on the Internet?
- Chapter XIV Product Catalog and Shopping Cart Effective Design
- Chapter XVI Turning Web Surfers into Loyal Customers: Cognitive Lock-In Through Interface Design and Web Site Usability
- Chapter XVII Internet Markets and E-Loyalty
- Chapter XVIII Web Systems Design, Litigation, and Online Consumer Behavior