A Workgroup Security Refresher
Before we start looking at the developer goodies , we first need to prepare a secure Northwind database, which will provide a perfect opportunity for a refresher course on workgroup security. We will first re-create our developer workgroup file and then secure a copy of the Northwind database to use later on in the chapter. In Chapter 8, I demonstrated how to make a developer workgroup file by using the conventional security commands. This time around, I will use the User -Level Security wizard, making the file as a by-product, which will demonstrate that you can produce an identical developer workgroup file by using both techniques. When we have finished running the wizard, I will review the correct object permissions that you should assign to your database users.
Before I demonstrate the wizard again, I should point out that you can find all the workgroup file and personal identifiers (PIDs) that we have been using in the book in Appendix A. If you feel like saving your own workgroup information, I have set up the tables in Appendix A so that you can enter your own workgroup information details, user and group names , and PIDs.
The Developer Workgroup File and Security Revisited
![]()
To reproduce a workgroup file and secure the database, I will walk you through the User-Level Security wizard.
-
Go to the Northwind samples directory and copy the Northwind.mdb file and all the HTML files ( *.HTM ) to a temporary folder. In my examples, I will use the C:\data\ folder .
-
Open the Northwind database in the temporary folder and choose Tools ˜ Security ˜ User-Level Security Wizard.
-
On the first page of the wizard, select Create a New Workgroup Information File, and then click Next.
-
Enter the same workgroup information (as shown in Figure 11-1) that we used in the developer workgroup file creation exercise from Chapter 8. Be careful here, because the field order in the wizard is not the same as that displayed when you create a new workgroup file by using the workgroup administrator. Because this is a demonstration, you should select the I Want to Create a Shortcut to Open My Secured Database option at the bottom of the wizard. Then click Next.
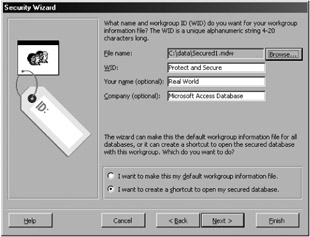
Figure 11-1: Entering the developer workgroup information into the wizard fields. -
Select all options on the third page of the wizard and click Next.
-
Select the Full Data Users permissions scheme on the fourth page of the wizard. Now enter "Real World Full Data" for the PID. At this stage, you could also select any other permission scheme that you are interested in experimenting with. Once you've selected the permission schemes, click Next.
-
On the fifth page, select the No, the Users Group Should Not Have Any Permissions option. This option will remove all permissions for the entire ubiquitous Users group, of which the anonymous Admin account is a member. Click Next.
-
On the sixth page, add two new users called "Developer" (with "RealWorldDeveloper" as the PID) and "Editor" (with "Real World Editor" as the PID). Remember to click the Add This User to the List button. Click Next.
-
On the seventh page, you will find, in the drop-down list, the two users that you set up plus a special user account that was set up automatically with the same name as your Windows user account. Add the developer account to the Admins group and the editor account to the Full Data Users group. Finally, remove the Windows user account from the Admins group.
-
On the eighth page, the final page, enter the name for the backup of the currently unsecured database, and then click Finish.
-
Check that the workgroup, users, and groups all have the correct PIDs by looking at the report produced by the wizard.
-
Open the database by using the shortcut file that the wizard placed on the Desktop, and log on with the Developer account.
Now you will have a developer workgroup file that is identical to the one that we created in Chapter 8, and the database will have set up the appropriate permission schemes for you. Remember not to distribute the same workgroup file to your users.
Now we will look at the permissions that the User-Level Security wizard established for the Editor account, as these will explain what we need to do for all the objects.
Workgroup Permissions that Protect Your Objects
Now that you have logged on to the database by using a Developer account, you should be ready to start checking the permissions. Of course, if you are unsure exactly which account you logged on as, open the Immediate window in the Visual Basic Editor and check the workgroup file by typing the following:
? Syscmd(13)
Once you have confirmed that the workgroup file is okay, choose Tools ˜ Security ˜ User and Group Permissions. To confirm that you are using the correct account, look for the account name at the bottom of the dialog. Now I will show you the minimum permissions that are necessary for Groups accounts to use your objects.
Table Permissions for Users
In a nutshell , what you have to do is clear the Modify Design and Administer permissions on all tables for all User and Group accounts that aren't specifically developers or administrators. If you need more information on table permissions, read Chapter 10.
Query Permissions for Users
First, you need to verify the permissions on your queries by selecting the Groups option on the Permissions tab on the User and Group Permissions dialog, and then select Query from the Object Type drop-down list. Now choose the group Full Data Users for all queries. Read Design should be the only design permission selected (as shown in Figure 11-2). The data permissions on the right-hand side will vary according to what permission scheme you selected in the User-Level Security wizard. Considering the work that developers sometimes put into queries, it is a pity that users can always see the query designs. I will discuss how to combat this capability later on in this chapter.
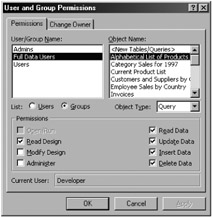
Figure 11-2: All users requireRead Design permission for queries.
In a nutshell, what you have to do is clear the Modify Design and Administer permissions on all queries for all User and Group accounts that aren't specifically developers or administrators.
Form, Report, and Macro Permissions for Users
Because the permissions that you want to allocate to your users are the same for forms, reports , and macros, let's look at form permissions. On the Permissions tab of the User and Group Permissions dialog, select the Groups option, select the Form object type, and then select any form. If you select the Full Data Users group (as shown in Figure 11-3), you will find that the form only has Open/Run permission.
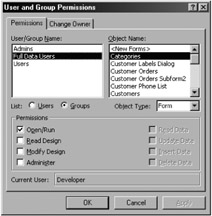
Figure 11-3: The Open/Run permission for forms.
Unless you actually want a user or group of users to be able to view or change the design of a form, report, or macro, Open/Run should be the only permission assigned.
In a nutshell, what you have to do for forms, reports, and macros is clear the Read Design, Modify Design, and Administer permission options for all User and Group accounts.
Module Permissions for Users
For modules in Access 97, clear all permissions for all User and Group accounts that aren't specifically developers or administrators. Unfortunately, Microsoft removed this security in Access 2000 and replaced it with VBA passwords (discussed later on in this chapter). Thankfully, you can simulate the Access 97 protection by using the DAO library, and you can find out all about that in Chapter 8.
Other Permissions Issues
Finally, here are some other permission issues that you need to consider while securing your database with workgroup security:
-
You should review the permissions for Users accounts. For example, to review permissions for forms, go to the Permissions tab on the User and Group Permissions dialog, select the Users option, select the Form object type, and then review the permission on all the users. If you ran the User-Level Security wizard, you should find that none of them has permissions on that or any other form or report.
-
You may want to give the Developer account permission for all objects. I prefer this option when I am the only developer on a database because it is easier to manage than using the Admins group.
-
Remember that ownership is critical, as owners can reset any permission, even if they are not members of the Admins group.
-
When you are looking at the object permissions for Groups, do not get the anonymous Admin user and the Admins (administrators) group mixed up.
Remember to test your actual user accounts when you have finished, and don't forget to test , test , test the anonymous Admin account. Now I will show you a neat way to avoid having linked tables in a database.
EAN: 2147483647
Pages: 176