Forms Authentication
|
Forms authentication (forms-based security) is the most flexible form of authentication. With forms-based security, you specify a login Web Form for your Web site, and the first time someone tries to access a secured page, he is redirected to the login form. This form makes the decision whether to grant access. There is no way for a user to bypass the login form—even if he tries to navigate to the exact address of a secure page, he will be redirected to the login Web Form. Code that you add to the page makes the decision whether to grant access. There is no way that an unauthenticated user can bypass the login page and get to the secured page—even if the user tries to navigate to the exact address of a secure page, he will be redirected to the login page. Typically the login form collects username and password information and executes code that validates the credentials, often by looking them up in a database. If the login credentials are valid, the login page opens again. ASP.NET handles most of the details for you automatically—you don’t need to open the authentication page explicitly. Figure 4-1 shows the process for a Web site that shows profile information for a user.
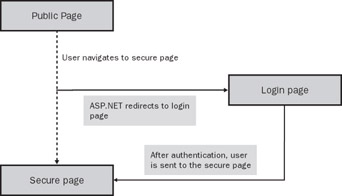
Figure 4-1: Forms authentication
The login page grants the user access by setting a value on the FormsAuthentication class. This sends back to the client a cookie that contains the authentication information in an encrypted format. The Web site can choose to persist the cookie on the machine, allowing automatic authentication on the next visit, or to not save the cookie, in which case it’s kept in memory and remains valid until the user’s session ends, either by timeout or by closing Internet Explorer.
Add a secure area to a Web application
In this exercise, you will change the EmployeeManagementWeb application to have a secure section.
-
In Microsoft Visual Basic .NET, open EmployeeManagementWeb.sln.
-
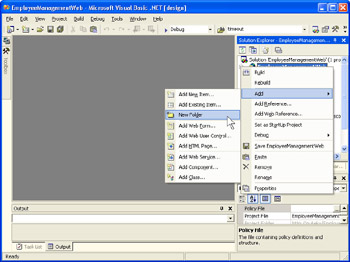
Create a new folder in the application by right-clicking the project file and choosing Add New Folder from the context menu, as shown here:
-
In Solution explorer, name the folder Secure.
-
One by one, drag the EditMyProfile.aspx, login.aspx, and MyProfile.aspx files and the Graphics folder from the root folder in the Solution explorer into the Secure folder you just created.
-
Open the page default.aspx. Because the Graphics folder and the MyProfile.aspx Web Form are now in the Secure folder, change the NavigateUrl property of the Hyperlink1 hyperlink control to Secure/MyProfile.aspx, and the imageUrl property of the Image1 image control to Secure/Graphics/ManyPeople.gif.
-
Open the Web.Config file, and find the element </system.web>. Insert the following text after this element and before the </configuration> element:
<location path="Secure">
 <system.web>
 <authorization>
 <deny users = "?"/>
 </authorization>
 </system.web>
</location>
This section sets up a new authorization configuration for all files in the Secure folder (denying access to unauthenticated users).
After you have finished, Solution Explorer will look like this:
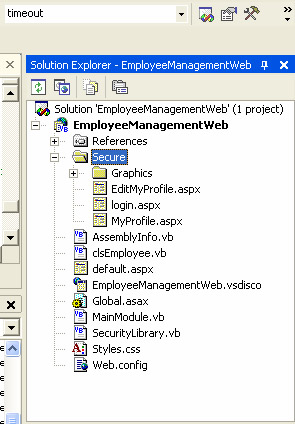
In this exercise, you created in the Web site a new area, which is governed by the settings in the Secure location part of the Web.Config file. If you didn’t add the new location section, the settings would inherit from the parent directory. In this case, we are denying access to anonymous users.
Authentication works through a client/server interaction between Internet Explorer on the client side and IIS (Internet Information Services) with ASP.NET on the server side. IIS and ASP.NET support a special user named Anonymous. The Anonymous user requires no login. Because Windows does require a login, when IIS is installed it adds a special user named IUSR_<machinename> for such anonymous requests. If your site allows anonymous access, ASP.NET will always use it, regardless of your other security settings. Anyone using your site will automatically be authenticated as anonymous unless you explicitly deny access to the Anonymous user. To trigger security for a certain area of your site, you have to do two things: configure the authentication type and also deny access to the Anonymous user. This is done by adding the tag <deny users = “?"/> in the authentication section of the Web.Config.
Create the login Web Form
In this exercise, you’ll configure ASP.NET to use a login page and create the login logic that checks the username password against the EmployeeManagement.mdb database and grants access to the user. You’ll also add code to the secure pages that allow people to log out.
-
In Visual Basic .NET, open the project EmployeeManagementWeb.
-
Open the Web.Config file, and change the authentication section from
<authentication mode="Windows" />
to
<authentication mode="Forms" >
 <forms name="EmployeeManagementWeb" loginUrl="Secure/Login.aspx"/>
</authentication> -
The forms element sets the login form to Login.aspx and specifies that the client-side cookie that will hold the authentication information will be called EmployeeManagementWeb. It’s good practice to give this cookie the name of your application.
-
Press F5 to run the application. Now when you navigate from the welcome page to MyProfile.aspx, the application automatically redirects you to Login.aspx instead, as shown here:
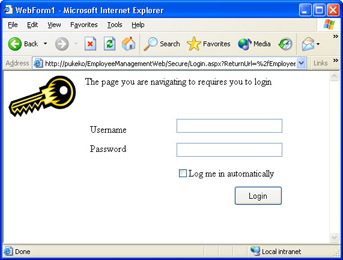
What you just did was set the authentication mode for the entire application to forms-based and set the login form to be login.aspx. As soon as you navigated to a page in the Secure area, ASP.NET redirected the browser automatically to the login page. The login page doesn’t do anything yet—currently there is no way to log in. You will add login logic now.
-
Open the page login.aspx, and double-click the Login button to open the btnLogin_Click event handler. Add the following code to the click event:
Private Sub btnLogin_Click(ByVal sender As System.Object, _
ByVal e As System.EventArgs) Handles btnLogin.Click
 ’WARNING: This line accepts user input without verifying
 ’it is valid. See chapter 7 for a better way to do this.
 Dim Employee As clsEmployee
 Employee=Employee.Create(Me.txtUsername.Text)
 ’Check the password
 If Employee.IsValidPassword(Me.txtPassword.Text) Then
 ’If it is valid then go to the originally requested
 ’page
 FormsAuthentication.RedirectFromLoginPage( _
 Me.txtUsername.Text, Me.chkPersistCookie.Checked)
 Else
 ’Otherwise, kick them out
 Me.lblBadLogin.Visible = True
 End If
End Sub -
Open the Web Form MyProfile.aspx, and double-click the Log Out button to open the click event handler. Add the following code to the event handler:
Private Sub btnLogOut_Click(ByVal sender As System.Object, _
ByVal e As System.EventArgs) Handles btnLogOut.Click
 ’Sign out, and re-open the same page
 ’This will force a redirect to the login page
 FormsAuthentication.SignOut()
 Response.Redirect("MyProfile.aspx")
End Sub -
Go to the Page_Load event, and change the line
Dim strUserName As String = "RKing"
to
Dim strUserName As String = _
HttpContext.Current.User.Identity.Name() -
Open the Web Form EditProfile.aspx, and double-click the Log Out button to open the click event handler. Add the following code to the event handler:
Private Sub btnLogOut_Click(ByVal sender As System.Object, _
ByVal e As System.EventArgs) Handles btnLogOut.Click
 ’Sign out, and redirect to the profile page
 ’This will force a redirect to the login page
 FormsAuthentication.SignOut()
 Response.Redirect("MyProfile.aspx")
End Sub -
Go to the Page_Load event, and change the line that reads
Dim strUserName As String = "RKing"
to
Dim strUserName As String = _
HttpContext.Current.User.Identity.Name() -
Go to the btnSave_Click event, and change the line
Dim strUserName As String = "RKing"
to
‘See chapter 2 for an explanation of identity objects
Dim strUserName As String = _
HttpContext.Current.User.Identity.Name() -
Press F5 to run the application. Try logging in with the username RKing and password RKing. Also try logging out and logging in again using username AFuller with a password of AFuller. Checking the Log Me In Automatically check box in the login screen will save a cookie on the client machine allowing the authentication to persist between sessions.
Note In this example of forms-based authentication, when the user submits her username and password, the information is sent unencrypted to the Web site. This means if anyone is monitoring network traffic, he will see the username and password. The most common method for protecting usernames and passwords is to use SSL (Secure Sockets Layer) encryption. See Chapter 5 for an exercise on how to add SSL encryption to the login.aspx Web Form.
|