Introduction to Add-Ins
|
Macros are excellent for those smaller isolated tasks, but if you have more advanced UI or input needs or you want to protect your source code, you're going to have to turn to writing add-ins. Although writing a macro is much easier, add-ins allow you to handle the following tasks, which you can't handle in macros:
-
Add your own tool windows and dialog boxes to the IDE.
-
Add your own command bars (that is, menus and toolbars) to the IDE.
-
Add custom property pages to the Options dialog box.
As you'll see in a moment, developing and debugging is much more difficult with add-ins than it is with macros, so I'd highly recommend trying to do all you can in macros instead of going through the hassle of add-ins.
Basically, add-ins are COM objects that plug into the IDE. If you were worried about losing all that COM knowledge you've learned over the last few years, don't be—you'll still need some of it in the add-in world. What's interesting is that since managed languages support COM, you can write your add-ins using Visual Basic .NET or C#. Although I like C++ as much as the next developer, I like the productivity enhancement of .NET even more, so in this chapter I'll concentrate on those issues related to writing add-ins in managed languages.
As usual, you should start your add-in journey by reading the documentation. Second, you need to visit http://msdn.microsoft.com/vstudio/downloads/ samples/automation.asp, which is the page that contains all the add-in and wizard samples Microsoft has released. You'll definitely want to spend a good deal of time reading the code for those samples as that's the best way to learn.
Many of the add-ins are written in multiple languages, so you shouldn't have any trouble with them. Some of the more advanced samples, such as RegExplore, are available only in C++. I have to point out that the C++ code in Microsoft's samples is a perfect example of poor coding. Much of the code is rife with magic macros that do error handling through gotos and that rely on assumed names. Sadly, the same bad code is generated from the Add-In wizard. If you do choose to use C++ for writing add-ins, please don't follow Microsoft's example!
One item you'll want to make sure to check out is Unsupported Tools. You can either download it or find the current version in the UnsupportedAddInTools directory in this book's sample code. The tools contain a program named Generate ICO Data for Extensibility (GenerateIcoData.exe) that's necessary to get the hex stream for an icon so that you can put a custom icon in the About box. I'll show you how to do this in the next section. An additional tool contained in Unsupported Tools is a nice add-in named the Extensibility Browser (ExtBrws.dll), which will show you all the late-bound properties for the DTE (Development Tools Environment) object, which is the root of everything in the Visual Studio .NET extensibility model. Since some of these properties are not very well documented, having ![]() ExtBrws.dll to show them to you is helpful. If you're a COM programmer from way back, you can also use OLE/COM Object Viewer to browse these properties as well.
ExtBrws.dll to show them to you is helpful. If you're a COM programmer from way back, you can also use OLE/COM Object Viewer to browse these properties as well.
Fixing the Add-In Wizard–Generated Code
When you first create a C# or Visual Basic .NET add-in using the Visual Studio .NET Add-In Wizard, which you can find in the Other Projects\Extensibility Projects directory of the New Project dialog box, the code can stand some fixing up. In this section, I want to discuss what you want to do immediately after generating a skeleton add-in so that you can streamline your development and not drive yourself crazy with problems from the stock code. Along the way, I'll point out some key facts about how add-ins work so that you'll have an idea about why I make certain suggestions.
The very first task you need to do after clicking the Finish button in the Add-In wizard is open the Registry Editor. The Add-In wizard creates some registry entries you need to export to a .REG file. The registry key starts at either HKEY_LOCAL_MACHINE or HKEY_CURRENT_USER depending on whether you wanted the add-in available to all users. The rest of the key is the same: \Software\Microsoft\VisualStudio\7.1\AddIns\<Add In Name>. You'll want to save all the keys and values that are under your add-in name, which for the rest of this discussion I'll call the add-in key.
If you look at the key created by the Add-In wizard, you'll notice that some of the value names make perfect sense, such as AboutBoxDetails, AboutBoxIcon, FriendlyName, and Description. A couple of other keys need more explanation because they're extremely important to debugging and developing your add-in. The first is the CommandPreload key, which indicates whether the add-in needs to be told to register any commands it might want. Many of the problems I've run into while debugging add-ins are related to the commands not getting registered correctly.
The documentation for the CommandPreload key appears to be wrong; it's not a Boolean field. When the CommandPreload key is 1, Visual Studio .NET loads the add-in to register its commands. When the CommandPreload value is 2, Visual Studio .NET assumes the add-in has already registered its commands. If you're having trouble with your commands executing, forcing CommandPreload to 1 and restarting the IDE can ensure you get the command registered.
The LoadBehavior value in your add-in key describes how your add-in is loaded. It's a bit field where 0 indicates your add-in is not loaded. A value of 1 indicates your add-in should be loaded when the IDE starts up. A value of 4 indicates your add-in should be loaded when doing command-line builds. In Visual Studio .NET 2002, there were problems because add-ins were always loaded during command-line builds even when you marked your add-in as not used with command-line builds. Fortunately, this bug was fixed for Visual Studio .NET 2003.
Two registry keys that are not in the default Add-In wizard–generated code, but which you'll be adding if you want to have your own command bar bitmaps or other Win32 resources, are SatelliteDllName and SatelliteDllPath. Although having your managed bitmaps and resources work in managed add-ins would be quite convenient, Visual Studio .NET speaks only COM, so you'll have to put your resources in Microsoft Win32 resource DLLs. As you can guess from its name, SatelliteDllName is only the filename of the DLL. The other value, SatelliteDllPath, indicates where the satellite DLL resides. The documentation for SatelliteDllPath indicates that the IDE will eventually look for the DLL in the path specified (prior searches will append locale-specific IDs to the directory path specified), but the IDE won't load it from that location, so you won't get any resources. For example, if you enter C:\FOO\ as your SatelliteDllPath and you're using American English as your locale, your satellite DLL must reside in C:\FOO\1033.
If you do have a satellite DLL specified, you can localize the values you specify in your add-in's registry key. If the string value you specify is an octothorpe (#) followed by a number, the IDE will look that value up in your satellite DLL's string table. Both the SuperSaver and SettingsMaster add-ins from this chapter demonstrate using satellite DLLs.
The odd, and final, registry value is AboutBoxIcon. It contains the bytes for the add-in icon you want displayed in the About box. As I mentioned earlier, the GenerateIcoData program that comes with the unsupported add-in tools generates the appropriate hexadecimal bytes necessary to plunk in the AboutBoxIcon REG_BINARY field.
If you look at the SuperSaver and SettingsMaster projects included with this book's sample files, you'll see that each has a <project name>.ADDIN.REG file that sets all the appropriate settings for each add-in. These REG files allow me to remove and quickly restore the appropriate registry settings without messing with installs. The one drawback is that you'll have to hard code the SatelliteDllPath value in it.
After getting the registry values for your add-in straightened out, you need to turn to getting the wizard-generated code corrected. Probably you'll want to first change the ProgId attribute associated with the generated Connect class. The wizard likes to add a ".Connect" to the add-in name, which is superfluous. Unfortunately, the Add-In wizard hard codes in the command name in numerous places, so if you remove the ".Connect" from the ProgId attribute, you'll need to change the name in the following places:
-
The add-in registry key
-
The command usage in the QueryStatus method (in
 CONNECT.CS/.VB)
 -
The command usage in the Exec method (in
CONNECT.CS/.VB)
I'd highly recommend that you put your command names in a constant and reference that constant from any place that needs the names. In my add-ins, I have a file named RESCONSTANTS.CS/.VB that contains all constants associated with any commands. That way I ensure there are no typo problems, and if I want to change the command name, doing so is trivial.
Probably the biggest problem with the wizard-generated code is that it eats exceptions when registering commands and adding items to the toolbars. When I first started with add-ins, I went nuts wondering why some of my commands weren't available. It came down to the fact that the command was not registered because the registration had thrown an exception, which skips the rest of the function. The generated code looks like the following snippet, and that's quite dangerous. You should make it part of your code reviews to ensure that if empty catch expressions are used, they are something you truly feel safe allowing.
try { Command command = commands.AddNamedCommand (...) ; CommandBar commandBar = (CommandBar)commandBars["Tools"] ; CommandBarControl commandBarControl = command.AddControl ( commandBar , 1 ) ; } catch(System.Exception /*e*/) { } All add-in command and toolbar creation occurs by default in the OnConnection method when the connection mode parameter contains ext_cm_UISetup. I always move my command and toolbar creation to a separate method outside of my OnConnection method. By the way, when you receive ext_cm_UISetup as the connection mode, your add-in is unloaded immediately after your OnConnection method returns. When the ext_cm_Startup or ext_cm_AfterStartup connection modes occur, your add-in is reloaded.
Before you register your commands and add any command bars, you'll want to remove any commands and toolbars you might have already added. That way you ensure that any commands you register and command bars you create for your add-in are created fresh. Removing added commands and toolbars will also allow you to safely change options for the commands or command bars and avoid any issues with exceptions that could occur if previous items of the same name exist.
To help with add-in development, I also always create a macro that will remove the commands and any command bars my add-ins create. That way I can also use the macro to get rid of the add-in traces. Before your remove commands macro can run, your add-in must be completely unloaded. That means you must uncheck the add-in from the Add-In Manager dialog box, shut down all running copies of the IDE, and delete the add-in registry key.
The command and toolbar creation methods all throw exceptions when anything is out of whack. You'll definitely want to make sure that you surround life with a try...catch block and that you report what failed inside the catch so that you'll know what's going on. You can look at both SuperSaver and SettingsMaster for examples of how to remove and install commands and command bars.
Handling Toolbar Button Issues
After getting the Add-In wizard–generated code straightened out, probably the next problem you'll run into is getting custom toolbar bitmaps to show up correctly. It's not that hard; it's just undocumented. It took me a while to get the magic incantations figured out, so hopefully this discussion will save you some time and frustration.
For custom toolbar bit maps to be loaded, they have to be placed in a Win32 satellite DLL; there's no way to use managed embedded bitmaps as toolbar bitmaps. When creating the command with Commands.AddNamedCommand, you'll pass false to the MSOButton parameter and the resource ID for the bitmap in your satellite DLL in the Bitmap parameter.
The biggest problem with custom toolbar bitmaps is the bitmaps themselves! The first problem is that only 16-color bitmaps are supported. If you're staring at your bitmap and it appears weird, you've got a high-resolution bitmap. The second problem is getting the mask right.
When I first looked at the sample add-ins custom bitmaps from the RegExplorer sample, green looked like the mask color. Getting the mask right is important as that's what allows the bitmap to look 3-D when the mouse cursor slides over the button. After creating my bitmap buttons, I used green as the mask. When I loaded my add-in, the mask sure didn't work, and all the places I wanted transparent were a bright, ugly green instead. After some poking around, I stumbled on the fact that it wasn't really green I was supposed to use as the mask but the RGB value 0, 254, 0. (Green is RGB 0, 255, 0).
However, even after changing my green in the palette to 0, 254, 0, the mask was still showing up as full green. I happened to be using an older painting program that was being "helpful" and "correcting" my palette to show green as 0, 255, 0 instead of the setting I needed. After I switched to using the Visual Studio .NET bitmap editor and reset one of the palette colors (I always reset the default pink to 0, 254, 0), life was good. Keep in mind that when you reopen the bitmap in the Visual Studio .NET bitmap editor, the editor will shift the green palette entry to 0, 254, 0 because that's the closest color to green. That means you'll need to change another entry to 0, 255, 0 if you want to use green in your bitmap.
After you get the mask color correct, you'll also want to update your code to ensure the toolbars look like the rest of the toolbars on the user's screen. By default, the toolbar buttons you add to a CommandBar object show up as buttons with text. To get the buttons to show up as the default buttons only, you'll have to manually loop through the CommandBarControl items in the CommandBar and set the style to MsoButtonStyle.msoButtonIcon. The following snippet from SuperSaver shows what you'll need to do.
foreach ( CommandBarControl ctl in SuperSaverCmdBar.Controls ) { if ( ctl is CommandBarButton ) { CommandBarButton btn = (CommandBarButton)ctl ; btn.Style = MsoButtonStyle.msoButtonIcon ; } }
Creating Tool Windows
Whereas nearly every add-in that adds a command will offer a bitmap toolbar, some add-ins will want to move past simple commands and show a user interface in Visual Studio .NET. Bringing up a managed dialog box from an add-in is as simple as doing it from a Windows Forms application. Showing a full window, called a tool window, takes a little more work.
There are two types of windows in the Visual Studio .NET IDE, documents and tool windows. Document windows are where you edit code. Any other window is a tool window. Examples of supplied tool windows are the Task List window, Solution Explorer, and the Toolbox window. Tool windows can be docked in views, or if you right-click in the tool window title bar and deselect the Dockable option, they can appear as full windows in the main editing area.
As all tool windows are COM objects, you can always create them in C++ and live with any pain that entails. Although there's no documentation on creating tool windows in managed code, one of the supplied samples, appropriately called ToolWindow, shows how to properly get everything hooked up.
The basic idea for creating a managed tool window is to have your managed add-in create an ActiveX component that in turn hosts the common language runtime (CLR). Once that's going, you can direct the ActiveX component to load and display the desired user control inside the ActiveX window. This ActiveX component is sometimes referred to as a host shim control because it simply pokes its way into the managed code operation so that you can get everything hooked up.
This host shim sounds like it might be pretty wild to write, but the good news is that Microsoft supplies a host shim control you can use with the ToolWindow sample. The bad news is that this host shim does nearly zero error checking, and, if anything fails, you're left scratching your head and wondering why things didn't work. The best news is that I went through the code and did some better error checking and added assertions so that you'll know what's going on when you use the host shim.
I renamed my host shim to VSNetToolHostShim and included it with a sample project named SimpleToolWindow, which is included with this book's sample files. SimpleToolWindow does nothing more than add a scratch edit window, a la WinDBG's scratch window, to the Visual Studio .NET IDE. Since creation of the host shim control is controlled by your managed add-in, any of your tool window projects can use VSNetToolHostShim directly.
The simplest way to explain how to get everything hooked up is to show you the OnConnection handler from SimpleToolWindow. The operation is to create the tool window with the VSNetToolWinShim control, which will return a reference to the VSNetToolHostShim control. Using the returned VSNetToolHostShim object, call the HostUserControl2 method so that your managed control gets loaded and the button for the tool window tab gets created. Listing 9-3 shows everything in action.
Listing 9-3: Using VSNetToolHostShim
public void OnConnection ( object application , ext_ConnectMode connectMode , object addInInst , ref System.Array custom ) { try { ApplicationObject = (_DTE)application; AddInInstance = (AddIn)addInInst; // Your tool window must have a unique GUID. String guid = "{E16579A4-5E96-4d84-8905-566988322B37}" ; // This'll contain the VSNetToolHostShim on output. Object RefObj = null ; // Create the main tool window by loading the host shim. TheToolWindow = ApplicationObject.Windows. CreateToolWindow ( AddInInstance , "VSNetToolHostShim.VSNetToolWinShim", "Scratch Pad Window" , guid , ref RefObj ); // Make the window visible. You must do this before calling // the HostUserControl method or things won't get hooked // up right. TheToolWindow.Visible = true ; // Get the shim. (This is a class level variable): // private VSNetToolHostShimLib.IVSNetToolWinShim ShimObj ; ShimObj = (VSNetToolHostShimLib.VSNetToolWinShimClass) RefObj ; // Get this assembly so I can pass the location to the shim. System.Reflection.Assembly CurrAsm = System.Reflection.Assembly.GetExecutingAssembly ( ) ; // Get the directory to this Add-In and append the name of // the resources DLL to the path so I can load the tab // button. StringBuilder StrSatDll = new StringBuilder ( ) ; String StrTemp = CurrAsm.Location.ToLower ( ) ; int iPos = StrTemp.IndexOf ( "simpletoolwindow.dll" ) ; StrSatDll.Append ( CurrAsm.Location.Substring ( 0 , iPos )); StrSatDll.Append ( "SimpleToolWindowResources.DLL" ) ; // Load the managed control into the ActiveX control and // have it load the bitmap. ShimObj.HostUserControl2 ( TheToolWindow , CurrAsm.Location , "SimpleToolWindow.ScratchPadControl" , StrSatDll.ToString ( ) , 1 ); } catch ( System.Exception eEx ) { MessageBox.Show ( eEx.Message + "\r\n" + eEx.StackTrace.ToString ( ) , "ExceptBion in OnConnection" ) ; } }
Creating Options Property Pages with Managed Code
Creating managed tool windows is relatively easy. Trying to create managed property pages that plug into the Options dialog box is a little weirder. It's important to get your pages into the Options dialog box because that's the common place users will look to modify your add-in settings, and it gives you a polished look. Figure 9-5 shows the SettingsMaster options property page.
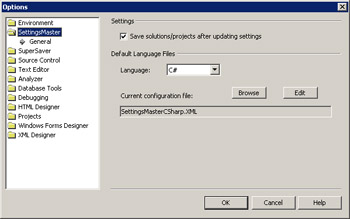
Figure 9-5: SettingsMaster Options property page
As you've probably guessed by now, an options property page is an ActiveX control that implements the IDTToolsOptionsPage interface. Visual Studio .NET finds out whether you have an options property page by looking in the add-in registry key. Under the main add-in key, it looks for an Options key. Under the Options key will be one or more keys that will be added as top-level nodes to the Options dialog box tree. By convention, you'll have one key and that's the name of the add-in. Under that key will be another set of keys that will form the subnodes underneath the top tree node. By convention, the first value will be General. Inside each final key will be a string value, Control, which contains the ProgID of the ActiveX control to create in order to show the property page.
It's probably easiest to show a complete key as an example. For the SettingsMaster property page in Figure 9-5, the registry keys are as follows:
HKEY_CURRENT_USER\ Software\ Microsoft\ VisualStudio\ 7.1\ AddIns\ SettingsMaster\ <-- Add-In key Options\ <-- Options key SettingsMaster\ <-- Root node in Options dialog General <-- Sub node under SettingsMaster Value item inside the General key Control REG_SZ SettingsMasterShim.SettingsMasterOption
The Options dialog box, not your add-in, controls creation and management of the property pages, which is a small problem when it comes to writing your individual property pages in managed code. The problem is that because the specific control started up is the ActiveX control specified in the Control string value. This means the ActiveX control created will have to have a priori knowledge of the managed control you want to show. I was really scratching my head over this one when the February 2002 issue of MSDN Magazine landed on my desk and Leo Notenboom had an excellent solution for the problem in an article.
Leo's trick was to write the C++ ActiveX shim control so that it did all the work. Because there's no possible way to write a generic ActiveX control for option property pages, as you can for tool windows, you're going to have to create a new control for each project. Fortunately, all you really need to do is lift Leo's code, change the GUID and name of the control in the control's .RGS files and, in the C++ code, change the GUID of the control to load. You'll want to read Leo's excellent article on add-ins for a complete description of how his code works.
I took Leo's code and added a few assertions and some more error handling to make it easier to find problems. If you borrow either SuperSaverOptionsShim or SettingsMasterShim from this book's sample files, search for the k_HOSTCLSID string in the main .CPP files and replace the GUID that is embedded in the string with the GUID of your particular option page. Of course, change the control's name and GUID in the .RGS files.
When I first got my option pages to show up, I thought life was good. When I moved my add-in to my laptop and looked at the option property page, I realized something was wrong because my option property page didn't look anything like the other property pages in the Options dialog box. I'd used a little known trick on my laptop to get dialog boxes and tool windows to show up better (as my laptop has a pretty insane screen resolution): I changed the Dialogs And Tool Windows font in the Environment folder, Fonts And Colors node. Since managed controls default to a fixed Microsoft Sans Serif 8.25-point font instead of asking their host for the correct font, I needed to do the work myself to find the host-specified font.
Look in the SuperSaver project and see the control named ![]() OptionPropPageBase.CS. It's a base class that looks up the current dialog box font and size and applies those settings to all the controls on the page. You would think getting the font and size would be a trivial matter, but late-binding properties such as these are mostly undocumented. That's why the unsupported Extensibility Browser I mentioned earlier in the chapter is something very worth using. Once I figured out the magic incantations, I was home free. Listing 9-4 shows the magic in the OptionPropPageBase.OnAfterCreated method that gets the appropriate font, creates it, and sets the dialog box and all controls.
OptionPropPageBase.CS. It's a base class that looks up the current dialog box font and size and applies those settings to all the controls on the page. You would think getting the font and size would be a trivial matter, but late-binding properties such as these are mostly undocumented. That's why the unsupported Extensibility Browser I mentioned earlier in the chapter is something very worth using. Once I figured out the magic incantations, I was home free. Listing 9-4 shows the magic in the OptionPropPageBase.OnAfterCreated method that gets the appropriate font, creates it, and sets the dialog box and all controls.
Listing 9-4: Getting and setting the fonts for an option property page
public virtual void OnAfterCreated ( DTE DTEObject ) { // To ensure this option property page looks right, I need to // set all the fonts to what the user chose as the Dialog and // Tool Windows font. I'll use the late-binding stuff to get // the values out of the DTE properties. Properties Props = DTEObject.get_Properties ( "FontsAndColors", "Dialogs and Tool Windows" ); String FntName = (String)Props.Item ( "FontFamily" ).Value ; Object ObjTemp = Props.Item ( "FontSize" ).Value ; Int32 FntSize = Convert.ToInt32 ( ObjTemp ) ; // Create the font. Font DlgFont = new Font ( FntName , FntSize , GraphicsUnit.Point ) ; // Set the font on the dialog. this.Font = DlgFont ; // Loop through all the controls on the dialog and set their // fonts as well. Some controls will pick the above up, but // not all so that's why I need to do this manually. foreach ( Control Ctl in this.Controls ) { Ctl.Font = DlgFont ; } } Of course, simply setting the font is only part of the final job. Although the label controls can be set to automatic sizing, most controls can't be, so you'll need to loop through and increase the sizes for any controls that don't automatically resize. You can look at my SuperSaverOptions.OnAfterCreated method to see how I handle resizing for a specific dialog box.
You might be wondering why I don't have any code hooked up to change the dialog box fonts on the fly after someone requests they change. The good news is that for dialog box fonts, they can be changed just by restarting the IDE. Interestingly, Visual Studio .NET lets you change all other fonts on the fly, except dialog box fonts.
My cool ![]() OptionPropPageBase.CS code will take care of some work for you, but it does expose a bug in Visual Studio .NET that makes the tool very difficult to use. If you derive your option control from OptionPropPageBase, the IDE will no longer open your option control in design mode and will simply treat it as a straight text file. What you'll need to do is temporarily set the base class to your option control to System.Windows.Forms.UserControl so that Visual Studio .NET can load the control into the design view, allowing you to edit it with the designer. I certainly hope Microsoft gets this fixed in a service pack or a future version.
OptionPropPageBase.CS code will take care of some work for you, but it does expose a bug in Visual Studio .NET that makes the tool very difficult to use. If you derive your option control from OptionPropPageBase, the IDE will no longer open your option control in design mode and will simply treat it as a straight text file. What you'll need to do is temporarily set the base class to your option control to System.Windows.Forms.UserControl so that Visual Studio .NET can load the control into the design view, allowing you to edit it with the designer. I certainly hope Microsoft gets this fixed in a service pack or a future version.
The GAC is a special place, and you shouldn't install anything in it unless absolutely necessary. Fortunately, the Visual Studio .NET IDE designers were thinking smart, and under the <VS.NET Installation Dir>\Common7\IDE directory are two directories for add-in or macro-only assemblies: PublicAssemblies and PrivateAssemblies. If you want to allow other add-ins or macros to call code in your assembly, place the assembly in the PublicAssemblies directory. If you want the assembly callable only by your add-in, put it in the PrivateAssemblies directory.
Debugging an add-in can be a huge pain because you have to remove the add-in's registry key, open the add-in project in the target IDE, and restore the add-in keys so that spawned instances of the IDE you want to debug will have everything set up. Though not too onerous a task, you can easily mess these steps up. Additionally, if you need to compile the add-in because you fixed a bug, and the add-in gets loaded by the IDE, your build will never work
Fortunately, there's an undocumented command-line switch, /rootsuffix, that comes to the rescue. What /rootsuffix does is tell Visual Studio .NET to append a suffix to the normal registry key and load all packages, add-ins, and settings from that registry key instead of from the default. It's almost like having two separate installs of Visual Studio .NET on your machine.
The first thing you need to do is start up REGEDIT.EXE and scoot to the key HKEY_LOCAL_MACHINE\SOFTWARE\Microsoft\VisualStudio\7.1. After selecting the key, select Export from the File menu and save the registry keys to a file. Once you've saved the file, open it in NOTEPAD.EXE and replace all instances of "HKEY_LOCAL_MACHINE\SOFTWARE\Microsoft\VisualStudio\ 7.1" with "HKEY_LOCAL_MACHINE\SOFTWARE\Microsoft\VisualStudio\ 7.1NoAddIns." Notice the "NoAddIns" added as the suffix to the registry key. After replacing all the keys, save the file. Back in REGEDIT.EXE, select Import from the File menu, and import the changed file into the registry. If you'd like to move your user settings over to the same export (minus any add-ins, of course!), change and import steps with HKEY_CURRENT_USER\Software\ Microsoft\VisualStudio\7.1.
To start Visual Studio .NET and have it use the key with the NoAddIns suffix, simply start Visual Studio.NET in the following way:
devenv /rootsuffix NoAddIns
This allows you to have a copy of Visual Studio .NET running in which you can play all you want with your add-in code without running into any problems.
|
EAN: 2147483647
Pages: 177
- Challenging the Unpredictable: Changeable Order Management Systems
- ERP System Acquisition: A Process Model and Results From an Austrian Survey
- Enterprise Application Integration: New Solutions for a Solved Problem or a Challenging Research Field?
- The Effects of an Enterprise Resource Planning System (ERP) Implementation on Job Characteristics – A Study using the Hackman and Oldham Job Characteristics Model
- Development of Interactive Web Sites to Enhance Police/Community Relations
- An Emerging Strategy for E-Business IT Governance
- Measuring and Managing E-Business Initiatives Through the Balanced Scorecard
- A View on Knowledge Management: Utilizing a Balanced Scorecard Methodology for Analyzing Knowledge Metrics
- Measuring ROI in E-Commerce Applications: Analysis to Action
- Governance in IT Outsourcing Partnerships