Agent Install Application
The easiest way to learn how to use the objects in the Event Service Configuration library is to look at a sample application that uses them. I created a Visual Basic program, named Agent Install, that allows you to select a folder on Exchange Server, see how many agents are installed in the folder, add or delete agents, and view the scripts of existing agents. (The Agent Install application is available on the companion CD in the Agent Install folder.) The main interface for the application is the tree view of Exchange folders, as shown in Figure 13-19. The interface is based on code from the Exchange Routing Wizard, a sample application included with Exchange Server 5.5 Service Pack 1 that uses Routing objects. (We will learn more about Routing objects in Chapter 14.) This wizard interface has been modified so that when you click on a folder, the application lists the number of agents contained in the folder as well as fills a list box with the names of all the agents. You can then add a new agent to the folder or delete one of the listed agents.
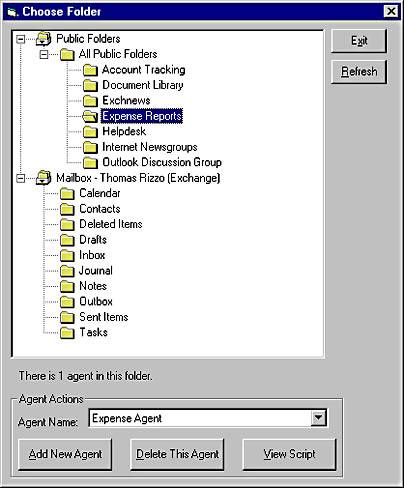
Figure 13-19. The main interface for the Agent Install application. The tree view allows you to pick a folder that you want to perform actions on.
If you select a folder that you own and click the Add New Agent button, a dialog box similar to Outlook's New Agent dialog box appears, as shown in Figure 13-20. The difference between the Agent Install New Agent dialog box and the one in Outlook is that the Agent Install version allows you to browse for the script you want to use in the agent. You can still select the events you want the agent to fire on as well as set the schedule for timer events.
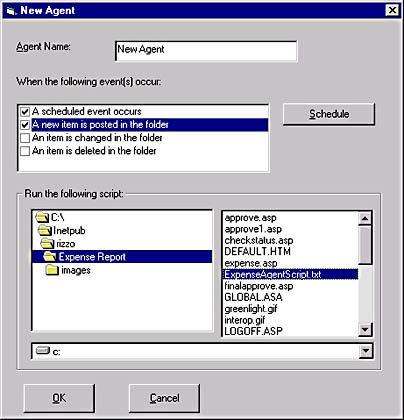
Figure 13-20. The Agent Install New Agent dialog box. This dialog box allows you to browse for the script you want to install.
When the user checks the A Scheduled Event Occurs check box, the Schedule button is enabled. The Scheduled Event dialog box, shown in Figure 13-21, mimics the Scheduled Event dialog box found in Outlook. From the Scheduled Event dialog box, you can change when the scheduled agent will run: hourly, daily, or weekly.
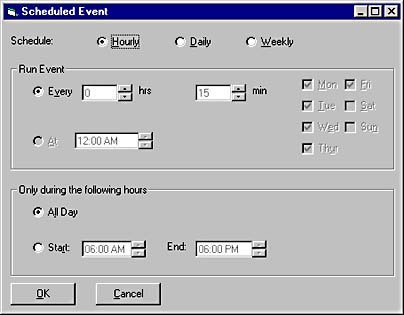
Figure 13-21. The Scheduled Event dialog box for the Agent Install program. This dialog box mimics the Scheduled Event dialog box in Outlook.
In the main interface, you can select to view the script for an agent by clicking the View Script button. This option launches Notepad on the local machine and displays the script. The Agent Install application doesn't allow you to modify the script, but the application could be modified to support this editing functionality.
Using the Exchange Event Service Configuration Library
The first task you need to accomplish when working with the Event Service Configuration library is to successfully create an instance of the Events object. To do this, you must call the CreateObject function and pass it the MSExchange.Events ProgID. The following line of code shows you how to do this:
Set oEvents = CreateObject("MSExchange.Events") |
After creating an instance of the Events object, you need to set the Session property for the Events object to a valid CDO session. Normally, you would log on to the CDO session before attempting to create an instance of the Events object. The following code from the Agent Install program shows you how to perform this step:
If CDOClass.LogonStatus = True then oEvents.Session = CDOClass.Session End if |
Once you set the Session property, you can begin to work with the other objects in the library. The following sections step you through the most common tasks you will perform with the library by using the code from the Agent Install application.
Accessing Existing Agents
As shown earlier in Figure 13-19, you can programmatically access the agents contained in a folder on your Exchange server. The Event Service Configuration library provides a number of objects, methods, and properties to help you do this. When attempting to access existing agents, you first set an object variable to the folder containing the bindings for the Event Service by using the BoundFolder property. You pass two arguments to the BoundFolder property: the CDO Folder object for the folder you are interested in and a Boolean value set to True. After setting this bound folder variable, you need to get the actual bindings in the folder by using the Bindings property. Your new bindings variable has a Count property, which is useful when accessing existing agents because it tells you how many agents exist in the folder. You can retrieve all the names of the agents by using a For…Each construct in Visual Basic. The following code from the Agent Install application shows how the label and combo box on the main interface are initialized. Note that the variable oFolder is already set to the CDO folder selected by the user.
Set oBoundFolder = oEvents.BoundFolder(oFolder, True) Set oBindings = oBoundFolder.Bindings If oBindings.Count = 1 Then lblAgentCount.Caption = "There is " & oBindings.Count & _ " agent in this folder." ElseIf oBindings.Count > 1 Then lblAgentCount.Caption = "There are " & oBindings.Count & _ " agents in this folder." Else '0 agents lblAgentCount.Caption = "There are " & oBindings.Count & _ " agents in this folder." End If comboAgents.Clear If oBindings.Count > 0 Then For Each oBinding In oBindings comboAgents.AddItem CStr(oBinding.Name) Next comboAgents.ListIndex = 0 End If |
Accessing the Scripts Contained in Agents
Once you have the agents (bindings) in a particular folder, you might want to access the script for those agents. Before showing you how to do this programmatically, however, I must first explain how the agents and their associated scripts are stored in the folder.
When you create a new agent in a folder and associate a script with that agent, the Event Service creates two hidden messages in the folder. The first has a message class IPC.Microsoft.ICS.EventBinding. As you would guess by its name, this message class contains the types of bindings you want the ICS interface to notify the agent of. The second hidden message has a message class of IPC.Microsoft.EventBinding. This hidden message class contains the script source in a special property (&H7102001E), so before you can even access the script for an agent, you must first retrieve the hidden message associated with the agent containing the script, and then you must pull out the value for this property from that message.
When you have a binding in a folder, you find out the unique ID of the script source message by using the EntryID property on the Binding object. The EntryID property lets you use the CDO GetMessage method to quickly retrieve the script source message in the folder.
The following code shows you how the Agent Install program retrieves the script for an agent by using the methods just described and then saves the script to a text file and opens it in Notepad. Note that the oBinding variable already refers to a valid agent in the folder.
If Not (oBinding Is Nothing) Then On Error GoTo Script_Err Set oMessage = oSession.Getmessage(oBinding.EntryID, Null) bstrEventScript = oMessage.Fields.item(PR_EVENT_SCRIPT) 'Write the script to a temporary file with a unique name tmpLocation = "c:\temp\" Randomize tmpFileName = "scr" & Int((99999 - 1 + 1) * Rnd + 1) & ".txt" tmpFullPath = tmpLocation & tmpFileName Open tmpFullPath For Output As #1 Print #1, bstrEventScript Close #1 'Notepad opens the temporary file retval = Shell("notepad.exe " & tmpFullPath, vbNormalFocus) End If |
Creating Agents Programmatically
Once you understand how to access agents, creating agents is a pretty straightforward process. The only challenge when creating agents is understanding what properties you need to set and what the values of these properties should be. To help you with the latter problem, the Agent Install application has a Visual Basic module called MSEventConstants that defines constants for all of the common values for the properties of your agents. Specifically, the module defines constants for the days of the week and the type of events the agent should fire on, and for what the event handler should be when the event is fired—either the scripting engine or the Exchange Routing Objects. The code for the MSEventConstants module is shown here:
Public Const MSMonday = 1 Public Const MSTuesday = 2 Public Const MSWednesday = 4 Public Const MSThursday = 8 Public Const MSFriday = 16 Public Const MSSaturday = 32 Public Const MSSunday = 64 Public Const PR_EVENT_SCRIPT = &H7102001E Public Const MSAllDayStart = 0 Public Const MSAllDayEnd = 0.9999 Public Const MSHourlyAgent = 1 Public Const MSDailyAgent = 2 Public Const MSWeeklyAgent = 3 Public Const MSScheduledEvent = 1 Public Const MSNewItemEvent = 2 Public Const MSChangedItemEvent = 4 Public Const MSDeletedItemEvent = 8 Public Const MSAgentActive = True Public Const MSAgentDisabled = False Public Const MSScriptHandlerID = _ "{69E54151-B371-11D0-BCD9-00AA00C1AB1C}" Public Const MSRoutingObjectsHandlerID = _ "{69E64151-B371-11D0-BCD9-00AA00C1AB1C}" |
Once you have these constants, all you need to do to create an agent programmatically is set the properties on a new binding in the desired folder. By setting an object variable as the return type for the Add method on the Binding object, the object model will return to you a new binding in the folder. From this object, you can set all the required properties, in this order:
- Name. The Name property takes a string that specifies the name of your agent.
- Active. The Active property takes a signed integer value which, if set to 0, specifies that the agent is disabled and will remain in the folder but will not fire on any events. Setting this property to -1 means the agent is enabled and will fire on its specified events. By default, the Agent Install program sets this property to -1 to make all new agents active.
- EventMask. The EventMask property takes an integer that specifies which events your agent should fire on, such as when a new item is added to the folder or when an item is deleted in the folder. If you want to fire on multiple events, such as when a new item is created or when an item is changed, you should add together the values of the constants MSNewItemEvent and MSChangedItemEvent, and place this new value in the EventMask property. You will see an example of this process in the code you'll look at a little later in this chapter.
- HandlerClassID. The HandlerClassID property takes a string that corresponds to the globally unique identifier (GUID) that the event handler calls when events fire on the binding. By default, the constants in the sample application include the script engine handler ID as well as the Routing Objects handler ID. If you create your own event handler, you will need to add your own GUID and specify it in this property.
- Schedule. The Schedule property is a Variant, and you must set an object reference to it. Once you have done this, you can modify the properties for the Schedule object. The main property you want to set is the Type property for the schedule. The Type property can take the constants MSHourlyAgent, MSDailyAgent, or MSWeeklyAgent. Your agent must be hourly, daily, or weekly—you cannot have an agent that is greater than one of these values.
The next property you want to set in the Schedule object depends on what you specified for the Type property. For example, if you specified that your agent should fire a timer event hourly, then you need to set only the Interval property (which specifies, in minutes, the interval of time between the firing of timer events) and the start and end times for these timer events to occur during the day. You use the StartTime and EndTime properties, respectively. If you specify that you want a daily agent, you need to specify only at what time each day you want the agent to fire. To specify this, you use the At property. Finally, if you specify a weekly agent, you need to set at what time you want your agent to fire during the day by using the At property, and you need to set which days of the week the timer event should fire on by using the Days property. To set the Days property, use the constants MSMonday through MSSunday, and add the values together to calculate the correct integer to place in this property.
After specifying these properties, you should call the SaveChanges method on your new Binding object to request that the object model create the corresponding hidden message for the script source. You can see the functionality we just examined implemented in the following code:
Private Sub SetAgentName() AgentName = txtAgentName.Text End Sub Private Sub SetAgentType() 'Scroll through the events to fire on and set type Dim tmp tmp = 0 If boolSchedule Then tmp = tmp + MSScheduledEvent End If If boolNewItem Then tmp = tmp + MSNewItemEvent End If If boolChangeItem Then tmp = tmp + MSChangedItemEvent End If If boolDeleteItem Then tmp = tmp + MSDeletedItemEvent End If AgentType = tmp End Sub 'Create the agent! SetAgentType SetAgentName Set oBinding = oBindings.Add oBinding.Name = AgentName oBinding.Active = MSAgentActive oBinding.EventMask = AgentType oBinding.HandlerClassID = MSScriptHandlerID 'Need to create a schedule, if set If boolSchedule Then Set oSchedule = oBinding.Schedule oSchedule.Type = AgentScheduleType Select Case AgentScheduleType Case MSHourlyAgent oSchedule.Interval = AgentInterval oSchedule.StartTime = Format(AgentStartTime, "hh:mm AM/PM") oSchedule.EndTime = Format(AgentEndTime, "hh:mm AM/PM") Case MSDailyAgent oSchedule.At = AgentAtTime Case MSWeeklyAgent oSchedule.Days = AgentDaysofWeek oSchedule.At = AgentAtTime End Select End If 'Save changes so message is created oBinding.SaveChanges |
After successfully saving the changes, you need to copy a script into the hidden message associated with the new agent. To do this, you must use the CDO GetMessage method and the EntryID property of your new Binding object. As you can see in the next snippet of code, the program tries to open the file selected by the user to read it, and then it tries to copy the file into the PR_EVENT_SCRIPT property in the hidden script source message. Notice, however, that a variable, tmpInProcess, is set to True (1) after the SaveChanges call on the Binding object. This is to notify the program that if the file cannot be correctly read—for example, when the file is a binary file—and an error occurs, the agent should be deleted from the folder because it is not a complete agent. In the error handler, you can see how the program calls the Delete method on the Bindings collection and passes in the object that corresponds to the half-completed Binding object.
If the script is read properly, you should call the CDO Update method on the script source message, the SaveChanges method on the Binding object, and the SaveChanges method on the BoundFolder object. If these calls succeed, you have programmatically created an agent that fires on events and has a script associated with it. If you do not call the SaveChanges method, your agent will not be saved if the Binding object goes out of scope. Calling SaveChanges is like calling the Update method in CDO—if you don't call Update after changing items, your changes will not be saved.
'Enter in script here 'Set tmpInProcess to 1 for bad files tmpInProcess = 1 Set oMessage = oSession.Getmessage(oBinding.EntryID, Null) tmpFileLocation = fileCurFile.Path & "\" & fileCurFile.FileName Open tmpFileLocation For Input As #1 bstrEventScript = Input$(LOF(1), #1) Close #1 oMessage.Fields(PR_EVENT_SCRIPT) = bstrEventScript oMessage.Update oBinding.SaveChanges oBoundFolder.SaveChanges MsgBox "Agent Successfully Created.", vbInformation + vbOKOnly, _ "Agent Created" frmFolders.RefreshAgentCount Unload Me Exit Sub cmdOK_Err: MsgBox "Error #" & Err.Number & vbLf & "Error Description: " & _ Err.Description, vbOKOnly, "Error in cmdOK" Close #1 If tmpInProcess = 1 Then 'Find the half-created agent and delete it oBindings.Delete oBinding oBoundFolder.SaveChanges End If Exit Sub End Sub |
Disabling and Deleting Agents
In the section titled "Creating Agents Programmatically," you had a glimpse of how to disable and delete agents. To disable an agent, all you need to do is set the Active property on the Binding object to 0 and then call the SaveChanges method. To delete an agent, find the Binding object that corresponds to the agent you want to delete, and then call the Delete method on the Bindings collection and pass the Binding object to Delete. Call the SaveChanges method to save the changes.
Agent Hosts
Although not used in the Agent Install application, you can enumerate the Exchange Server hosts capable of running agents. The Event Service Configuration library offers a Hosts collection, which provides you with a Count property for the number of available hosts and an Item property that will return a specific Host object. The following code fragment shows how you can print out the names of all the available hosts in your system:
Set oEvents = CreateObject("MSExchange.Events") oEvents.Session = oSession 'Assumes valid CDO Session Set oHosts = oEvents.Hosts Msgbox "Count: " & oHosts.Count For each oHost in oHosts Msgbox "Name: " & oHost.Name Next |
You can also figure out which host your agents will run on by using the HostName property on the BoundFolder object. Remember that all agents in a particular folder must run on the same host. You cannot have different agents in the same folder running on different hosts.
If you want to move agents running on one host to another host system, you must use the MoveBoundFolder method on the Events object. This method takes two arguments:
- A string that contains the host name you want to move the bindings in the folder to
- The BoundFolder object that contains the bindings you want to move to the new host
Be careful when using this method, because it will move all bindings for a folder to the new host you specify. They all must run on the same host!
EAN: 2147483647
Pages: 184