The Account Tracking COM Add-In
In the rest of this chapter, we will look at a COM add-in for the Account Tracking application. We will start by looking at how the COM add-in works and then delve into the code that implements the COM add-in. The Account Tracking COM add-in has various features, which include the following:
- The add-in includes a property page that allows users to set different options.
- On startup, the add-in checks whether an Account Tracking group and a shortcut exist. If not, the COM add-in can automatically create the group and shortcut.
- When creating the shortcut, the add-in can enable a folder home page for the Account Tracking folder.
- The add-in includes custom buttons on the command bar.
- The add-in notifies users via e-mail when new tasks or accounts are assigned to them.
- The add-in notifies users when changes to an account are made.
Compiling and Registering the COM Add-In
To set up the Account Tracking COM add-in, we first have to compile and register it. To compile it, you will need a machine with Outlook 2000 and Visual Basic 6.0 installed. Follow these steps to compile the add-in:
- Copy the Account Admin folder from the companion CD to your local hard drive, and clear the read-only flag for the files.
- Open AccountPP.vbp in Visual Basic 6.0.
- Make AccountPP.ocx. (This file is the ActiveX control property page. Compiling automatically registers it.)
- Open AccountAdminDLL.vbp in Visual Basic 6.0.
- Change the constant STRFOLDERHOMEPAGEPATH to the location of the FullContacts.htm file.
- Search for the second occurrence of oNS.Folders, and change the statement
- Make AccountAdminDLL.dll.
Set oFolder = oNS.Folders("Public Folders").Folders( _ "All Public Folders").Folders("Account Tracking") |
to the location of your Account Tracking folder.
NOTE
It might be necessary to specify the location of the AccountPP.ocx in the References dialog box. If AccountPP is displayed as MISSING in the References dialog box, uncheck it, click OK to close, reopen the References dialog box, and browse for the location of AccountPP.ocx.
- Double-click on AccountAdminDLL.reg to add the appropriate entries in the registry.
- Launch Outlook 2000.
- From the Tools menu, select Options. Click on the Other tab, click the Advanced Options button, and then click the COM Add-Ins button. In the COM Add-Ins dialog box, make sure that AccountAdmin is checked as an available add-in.
- Log off, and close Outlook.
- Restart Outlook.
Testing the COM Add-In
To test some of the COM add-in options, you have to turn them on. To turn the options on, you use the new Account Tracking tab, as shown in Figure 10-6. This property page is the AccountPP control we compiled in Visual Basic 6.0. (Later in the chapter, we will examine how it is constructed.) To display this property page, choose Options from the Tools menu in Outlook 2000, and then click on the Account Tracking tab. Make sure all options are checked, and click OK. (The Account Tracking tab is also available from the folder Properties dialog box, which can be accessed by right-clicking on the Account Tracking folder and choosing Properties.)
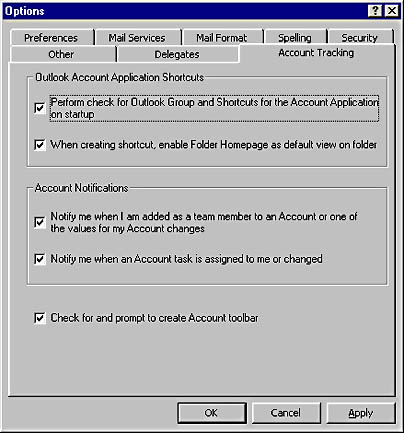
Figure 10-6. The new Account Tracking tab in the Options dialog box. This tab makes it easy for users to select which features of the Account Tracking COM add-in they want to use.
The Account Tracking settings selected by the user in either the Options or the Properties dialog boxes are automatically written to the registry so that the COM add-in can track the settings for each Outlook session. Figure 10-7 shows the registry with the user's settings for the COM add-in.
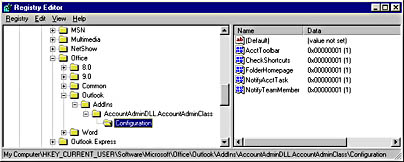
Figure 10-7. The registry settings for the Account Tracking COM add-in. The add-in automatically persists the user settings to this portion of the registry.
Now that the COM add-in is set up and the options are turned on, let's see how the add-in works. Select the Account Tracking folder in Outlook, and then choose New Account Info from the Actions menu. Fill out the information for a new account. Make sure you add yourself as a team member using your full name under the Account Team tab. Then click the Account Tasks tab, and add a new task.
NOTE
If you don't have the Outlook Visual Basic Scripting Support installed, a message indicating that scripting is not supported will be displayed when you try to display New Account Info. You can install the Outlook Visual Basic Scripting Support by re-running Setup for Outlook 2000.
If you left yourself as the task owner, once you add a new task, the COM add-in should send two e-mail messages to your Inbox. The first e-mail indicates that a new account has been created with you as a team member. The second e-mail indicates that a task was assigned to you. Figure 10-8 shows an example of the second e-mail.
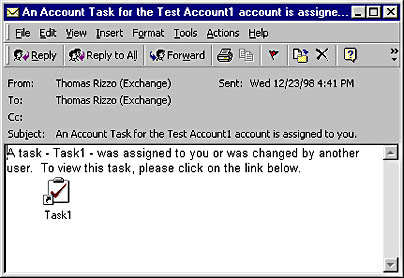
Figure 10-8. An e-mail notification stating that a task either has been assigned to the current user or has changed in the event the current user is also the owner of the task.
The COM add-in can notify a user when the user is added to the account team or, if the user is already a member of the account team, when the account information changes in the application. The information change notification can be triggered by changing the revenue of the account, the team members on the account, or the address of the account. Figure 10-9 shows the e-mail that is sent to the user when his account changes.
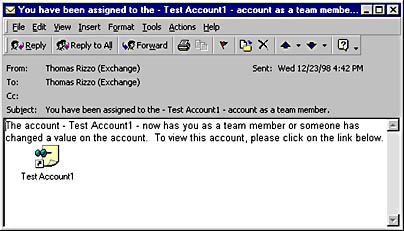
Figure 10-9. An e-mail notification stating that account information has changed. This notification will be triggered only when the current user is a member of that account team.
The Account Tracking COM add-in also includes the ability to automatically search for an Account Tracking Outlook group and shortcut. This option was activated on the Account Tracking tab of the Options dialog box. When the user starts Outlook and an Account Tracking group or shortcut does not exist, the user is prompted, as shown in Figure 10-10, about whether he wants to create a group or shortcut for the Account Tracking application. If the user chooses Yes, a new Account Tracking group and an Account Tracking shortcut are created on the Outlook Bar. If the Account Tracking Group dialog box is not displayed, try restarting Microsoft Windows and opening Outlook.
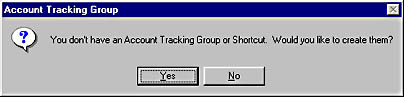
Figure 10-10. A message box asking if an Account Tracking Group and Shortcut should be created.
If when creating the shortcut, the check box named When Creating Shortcut Enable Folder Homepage As Default View On Folder is checked on the Account Tracking tab, the folder home page will be set as the default view for the folder. For the Account Tracking application, the folder home page is FullContacts.htm, which was specified earlier in the AccountAdminDLL project.
The COM add-in includes a new command bar and command buttons designed specifically for the Account Tracking application. After restarting Outlook, the COM add-in should display a message box asking if you want to create and display these new buttons, as shown in Figure 10-11. If the message box is not displayed, try clicking the newly created Account Tracking shortcut in the Account Tracking group.

Figure 10-11. A message box asking if the Account Tracking application should create new command buttons.
The buttons make it easier for users to quickly create new accounts, contacts, or tasks. Figure 10-12 shows you the new command bar in Outlook 2000. If these buttons are not displayed, right-click on the command bar and select Account Tracking from the context menu.
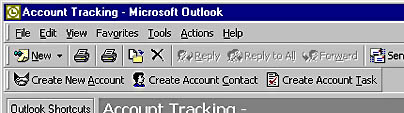
Figure 10-12. A command bar created programmatically by the COM add-in.
Implementing the COM Add-In
Let's review assumptions I made about implementation of the Account Tracking COM add-in. To make the code easier to digest, I assumed that users would always load the COM add-in at startup. For this reason, as you will see, the OnConnection event for the COM add-in is left pretty bare. Since loading at startup calls both the OnConnection and the OnStartupComplete events, most of the code is written in the OnStartupComplete event for simplicity. If you want to implement the ability to disconnect and reconnect the Account Tracking COM add-in, you will need to move some of the code out of the OnStartupComplete event into a subroutine, and then call that subroutine from both events. You will also need to revise the code to properly initialize some of the Outlook object variables.
The COM add-in options are stored in the registry. The registry path to these options is included in a code module with the COM add-in. Therefore, to change the registry location for the COM add-in options, you simply change this path.
Searching for the Account Tracking Group and Shortcut
The first section of the code we'll examine searches for the Account Tracking group and shortcut on the Outlook Bar. As mentioned earlier, this code occurs only when the add-in is loaded and connected upon startup in Outlook 2000. The main portion of this code is implemented in the OnStartupComplete event for the COM add-in. Remember that you must place Implements IDTExtensibility2 in your project before you can create code for this event. The following code is from the general declarations and the OnStartupComplete event procedure:
Implements IDTExtensibility2 Dim WithEvents oApplication As Outlook.Application Dim WithEvents oNS As Outlook.NameSpace Dim WithEvents oItems As Outlook.Items Dim oFolder As Outlook.MAPIFolder Dim WithEvents oExplorer As Outlook.Explorer Dim oCommandBar As Office.CommandBar Dim WithEvents oCreateAccountBHandler As Office.CommandBarButton Dim WithEvents oCreateAcctContactBHandler As Office.CommandBarButton Dim WithEvents oCreateAcctTaskBHandler As Office.CommandBarButton Dim oAcctItem As Outlook.PostItem Dim oFolders As Outlook.Folders Dim prefLookForShortcuts As Integer Dim prefMakeFolderHomepage As Integer Dim prefNotifyWhenNewMember As Integer Dim prefNotifyWhenNewTask As Integer Dim prefEnableAcctToolbar As Integer Dim oNewPage As Object Const STRFOLDERHOMEPAGEPATH = _ "file://C:\Webview\fullcontacts.htm" Private Sub IDTExtensibility2_OnStartupComplete(custom() As Variant) On Error Resume Next Set oNS = oApplication.GetNamespace("MAPI") 'Replace with your folder location. 'This is for offline users since they must put the folder 'in their Favorites folder. Set oFolder = oNS.Folders("Public Folders"). _ Folders("Favorites").Folders("Account Tracking") If oFolder Is Nothing Then 'You may prefer to put in an EntryID here Set oFolder = oNS.Folders("Public Folders").Folders( _ "All Public Folders").Folders("Account Tracking") End If If oFolder Is Nothing Then Set oFolders = oNS.Folders("Public Folders").Folders( _ "All Public Folders").Folders 'The following code can be used if you want to search 'the entire public folder hierarchy for the folder. 'For performance reasons, this code is commented out. ' If Not (oFolders Is Nothing) Then ' Set otmpFolder = oFolders.GetFirst ' Do While Not (otmpFolder Is Nothing) ' ListFolders otmpFolder ' If otmpFolder Is Nothing Then ' Set otmpFolder = oFolders.GetNext ' Else ' Exit Do ' End If ' Loop ' End If ' If you do use this code, you need to uncomment the ' ListFolders subroutine as well as add a check here ' to see if oFolder is nothing after finishing MsgBox "You have the Account Tracking COM add-in loaded" & _ " but you have no Account Tracking folder. " & _ "You may wish to unload the COM add-in.", _ vbOKOnly + vbInformation, "Account Tracking COM add-in" Exit Sub End If Set oItems = oFolder.Items Set oExplorer = oApplication.ActiveExplorer 'See if the user wants us to check for shortcuts If prefLookForShortcuts = 1 Then 'The following code checks to see if the user has 'an Outlook shortcut and group for the Account Tracking 'application Dim oPane As OutlookBarPane Dim oOLBarStorage As OutlookBarStorage Dim oOLBarGroups As OutlookBarGroups Dim oOLBarGroup As OutlookBarGroup Dim oOLBarShortcuts As OutlookBarShortcuts Dim oOLBarShortcut As OutlookBarShortcut 'Used if shortcut found with no group Dim otmpOLAccountBarGroupIndex As Integer Dim otmpOLBarGroup As OutlookBarGroup Dim otmpOLShortcuts As OutlookBarShortcuts Dim BarCounter As Integer Dim ShortcutCounter As Integer Set oPane = oExplorer.Panes("OutlookBar") Set oOLBarStorage = oPane.Contents Set oOLBarGroups = oOLBarStorage.Groups boolFoundAcctGroup = 0 boolFoundAcctShortcut = 0 BarCounter = 1 For Each oOLBarGroup In oOLBarGroups 'For debugging purposes 'MsgBox "Group: " & oOLBarGroup.Name If oOLBarGroup.Name = "Account Tracking" Then boolFoundAcctGroup = BarCounter End If Set oOLBarShortcuts = oOLBarGroup.Shortcuts ShortcutCounter = 1 For Each oOLBarShortcut In oOLBarShortcuts 'For debugging purposes 'MsgBox oOLBarShortcut.Name Err.Clear If IsObject(oOLBarShortcut.Target) Then 'Check to see if this is the file target by 'checking error If oOLBarShortcut.Target.Name = _ "Account Tracking" Then If Err.Number = -2147319765 Then 'File Target ElseIf Err.Number = 0 Then 'For Debugging purposes 'MsgBox _ "Account Tracking Folder: " & _ oOLBarShortcut.Target.Name boolFoundAcctShortcut = _ ShortcutCounter otmpOLAccountBarGroupIndex = _ BarCounter End If End If Else 'The target is a URL string End If ShortcutCounter = ShortcutCounter + 1 Next BarCounter = BarCounter + 1 Next 'For debugging purposes 'MsgBox boolFoundAcctShortcut & boolFoundAcctGroup. 'Check to see whether shortcut exists without group. If (boolFoundAcctShortcut <> 0) And _ (boolFoundAcctGroup = 0) Then 'Check to see whether they want to remove the 'shortcut and move it to a new group Response = MsgBox("You have an Account " & _ "Tracking shortcut without an Account " & _ "Tracking group. Would you like to create a " & _ "new Account Tracking group and move the " & _ "Account Tracking shortcut there?", & _ vbYesNo + vbQuestion, "Account Tracking") If Response = vbYes Then 'Delete the old Account Tracking shortcut. 'Get the Outlook Bar for the shortcut. Set otmpOLBarGroup = _ oOLBarGroups.Item(otmpOLAccountBarGroupIndex) Set otmpOLShortcuts = otmpOLBarGroup.Shortcuts otmpOLShortcuts.Remove boolFoundAcctShortcut Dim otmp2OLBarGroup As OutlookBarGroup Dim otmp2OLShortcuts As OutlookBarShortcuts 'Create a new Account Tracking group Set otmp2OLBarGroup = oOLBarGroups.Add( _ "Account Tracking", oOLBarGroups.Count + 1) 'For debugging purposes 'MsgBox "Group: " & otmp2OLBarGroup.Name Set otmp2OLShortcuts = otmp2OLBarGroup.Shortcuts otmp2OLShortcuts.Add oFolder, "Account Tracking" 'Check to see whether they want us to create a 'Web view If prefMakeFolderHomepage = 1 Then 'Create the Web view oFolder.WebViewAllowNavigation = True oFolder.WebViewOn = True oFolder.WebViewURL = STRFOLDERHOMEPAGEPATH End If End If 'Check to see whether group exists with no shortcut ElseIf (boolFoundAcctShortcut = 0) And _ (boolFoundAcctGroup <> 0) Then 'See if user wants to add shortcut to group Response = MsgBox("There is an Account " & _ "Tracking Group without a shortcut to the " & _ "Account Tracking folder. Do you want " & _ "to add a shortcut to the Account Tracking " & _ "folder in this group?", _ vbYesNo + vbQuestion, "Account Tracking") If Response = vbYes Then Dim otmpOLGroup As OutlookBarGroup Set otmpOLGroup = _ oOLBarGroups.Item(boolFoundAcctGroup) 'For debugging purposes 'MsgBox otmpOLGroup.Name Set otmpOLShortcuts = otmpOLGroup.Shortcuts otmpOLShortcuts.Add oFolder, "Account Tracking" 'Check to see whether user wants us to create a 'Web view If prefMakeFolderHomepage = 1 Then 'Create the Web view oFolder.WebViewAllowNavigation = True oFolder.WebViewOn = True oFolder.WebViewURL = STRFOLDERHOMEPAGEPATH End If End If 'Check to see whether there is neither ElseIf (boolFoundAcctGroup = 0) And _ (boolFoundAcctShortcut = 0) Then Response = MsgBox("You don't have an Account " & _ "Tracking Group or Shortcut. Would you like to " & _ "create them?", vbYesNo + vbQuestion, _ "Account Tracking Group") If Response = vbYes Then Set otmpOLGroup = oOLBarGroups.Add( _ "Account Tracking", oOLBarGroups.Count + 1) 'For debugging purposes 'MsgBox otmpOLGroup.Name Set otmpOLShortcuts = otmpOLGroup.Shortcuts otmpOLShortcuts.Add oFolder, "Account Tracking" 'Check to see whether user wants us to create a 'Web view If prefMakeFolderHomepage = 1 Then 'Create the Web view oFolder.WebViewAllowNavigation = True oFolder.WebViewOn = True oFolder.WebViewURL = STRFOLDERHOMEPAGEPATH End If End If 'There is one other scenario with an Account Tracking 'shortcut and an Account Tracking group. 'In this scenario, do nothing. End If End If End Sub Sub ListFolders(objFolder) ' On Error Resume Next ' If Not (objFolder Is Nothing) Then ' 'Check to see whether Account Tracking folder ' If objFolder.Name = "Account Tracking" Then ' Set oFolder = objFolder ' Exit Sub ' Else ' 'Check for child folders ' Set objFolders = objFolder.Folders ' Set objFolder = objFolders.GetFirst ' Do While Not (objFolder Is Nothing) ' ListFolders objFolder ' Set objFolder = objFolders.GetNext ' Loop ' End If ' End If End Sub |
The first task the code performs is to set some of the variables in the application to their correct values. The commented parts in the code show how you can search for the Account Tracking public folder in the public folder hierarchy. Obviously, if the public folder hierarchy is large, completing the search could take a long time, and you might decide not to implement the code. Instead, you could replace the code in the event with code that retrieves the Account Tracking folder by EntryID, which allows you to eliminate any hard-coded paths to the folder.
The code then checks to see whether the user wants to look for the Account Tracking group and shortcut. This configuration information is pulled from the registry, as will be explained later in this section. If the user wants to search for the group and the shortcut, the code uses some of the new objects and collections in the Outlook 2000 object model.
The code grabs the OutlookBar pane from the current Explorer. Then the code retrieves the OutlookBarStorage object for the contents of that pane, and it retrieves the OutlookBarGroups in the storage object. From there, the code uses a For…Each loop to find the Account Tracking group.
NOTE
You could replace the For…Each loop code with a simpler version that uses the Item method on the OutlookBarGroups collection. By using the Item method, you can retrieve the group by name. But to show you how to use this collection, I used the For…Each loop.
In the For…Each loop, the code retrieves each shortcut in the group by using the OutlookBarShortcuts collection. The code then loops through each shortcut to determine whether the target for that shortcut is the Account Tracking folder by using the Account Tracking name. You could also compare the EntryIDs of the target with the original folder we set earlier in the code. It's really your choice how you want to implement this.
You can see some error handling code in the IDTExtensibility2_OnStartupComplete procedure. We have to make sure we do not error-out on file system targets. This error-handling code skips file system targets.
Counters in the code let the application know the index of the Account Tracking group as well as the index of the Account Tracking shortcut within that group, if the shortcut exists. The code uses these counters to check a number of scenarios, such as whether both the group and the shortcut exist. This checking scenario occurs when both counters are 0. The code also checks to see whether the shortcut exists but no group does. If the shortcut does exist, the code can create a new group, remove the existing shortcut, and place the shortcut in the new group. The code counts where the shortcut exists in a certain group to simplify removing the shortcut using its index. If the group exists without a shortcut, the code can create a shortcut in the group and associate the shortcut with the folder.
The code also checks the option settings to see whether it should make the default view on the folder the folder home page. If the check box that enables the folder home page on the Account Tracking tab of the Options dialog box is checked, the code uses the WebViewAllowNavigation, WebViewOn, and WebViewURL properties to set up the folder home page. WebViewAllowNavigation returns or sets the navigation mode for the folder if the user is viewing a folder home page. When this property is set to True, Outlook allows users to navigate using the Forward and Back buttons of the Microsoft Web Control. When this property is set to False, Outlook displays the folder home page in Native mode, which makes the Forward and Back buttons unavailable. By setting this property to True, the folder home page provides more functionality to the user, although it runs a bit slower.
The WebViewOn property returns or sets the folder home page state. If you set this property to True, as is done in the preceding code, Outlook displays the folder home page as the default view for the folder.
The WebViewURL property returns or sets the string that identifies the URL for the folder home page. Any valid URL can be used in this property, such as a file or an http URL. The application sets this property to a constant string, which is set in the declarations section of the program.
Using Events to Notify Users of Changes
The next section of the code we will take a look at tracks when users add or change account or task items in the folder. The application does not track deleted items since Outlook does not pass the deleted item in its ItemRemove event, making it difficult to figure out what was removed from the folder.
To track additions and changes to items, the code declares a variable oItems as an Outlook.Items collection by using the WithEvents keyword. The WithEvents keyword allows you to select the events you want to handle in the Visual Basic environment for the collection. The code for this application implements the ItemAdd and the ItemChange events for the Items collection. Let's first review the ItemAdd event, which is shown here:
Private Sub oItems_ItemAdd(ByVal Item As Object) Dim oUser As Variant Dim oMail As Outlook.MailItem Dim oAttach As Outlook.Attachment Dim oItem As Outlook.TaskItem Dim oAccountItem As Outlook.PostItem Dim oUserProps As Outlook.UserProperties oUser = oNS.CurrentUser.Name 'Check to see what type of item was just created If Item.Class = olTask Then 'Check to see whether user wants notification If prefNotifyWhenNewTask = 1 Then 'Transform into TaskItem Set oItem = Item 'Check to see whether the current user is the owner If oItem.Owner = oUser Then 'Send to the user a message with a link to the item Set oMail = oApplication.CreateItem(olMailItem) With oMail .To = oUser .Subject = "New Account Task for the " & _ Item.ConversationTopic & _ " account is assigned to you." .Body = "A new task - " & Item.Subject & _ " - was assigned to you. " & _ "To view this task, please click" _ & " on the link below." End With Set oAttach = oMail.Attachments.Add(Item, _ olEmbeddeditem) oMail.Recipients.ResolveAll oMail.Send End If End If ElseIf Item.MessageClass = "IPM.Post.Account info" Then 'Check to see whether user wants notification If prefNotifyWhenNewMember = 1 Then Set oAccountItem = Item boolAccountMember = 0 Set oUserProps = oAccountItem.UserProperties If oUserProps.Find("txtAccountConsultant") = oUser Then boolAccountMember = 1 ElseIf oUserProps.Find("txtAccountExecutive") = _ oUser Then boolAccountMember = 1 ElseIf oUserProps.Find("txtAccountSalesRep") = _ oUser Then boolAccountMember = 1 ElseIf oUserProps.Find("txtAccountSE") = oUser Then boolAccountMember = 1 ElseIf oUserProps.Find("txtAccountSupportEngineer") = _ oUser Then boolAccountMember = 1 End If If boolAccountMember = 1 Then 'Send to the user a message with a link to the item Set oMail = oApplication.CreateItem(olMailItem) With oMail .To = oUser .Subject = "A New Account - " & _ Item.ConversationTopic & _ " - has been created with you as a " & _ "team member." .Body = "A new account - " & Item.Subject & _ " - was created with you as a team member." _ & " To view this account, please click" _ & " on the link below." End With Set oAttach = oMail.Attachments.Add(Item, _ olEmbeddeditem) oMail.Recipients.ResolveAll oMail.Send End If End If End If End Sub |
The oItems_ItemAdd event procedure first retrieves the name of the current user. Then the code checks the class of the item that was added to the collection in the folder. If the item is a task, the code coerces the item into an Outlook TaskItem object before it attempts to call the methods and properties on that object type. If the current user is the owner of the new task, the application creates an e-mail message with the new task attached as a shortcut, and then sends the e-mail to the user. The user receives the notification e-mail in the Inbox.
The code used to notify users of a new account in the folder is similar to the task code, but instead of checking the owner property, the account code checks the item's custom properties that correspond to the names of the team members for the account. If the user is found in one of these properties, the code sends an e-mail to the user indicating that she has a new account for which she is a team member.
The only aspect of this subroutine and the next subroutine that you might want to change is the user who sends the item. In the current implementation, the user sends the update. You can change this functionality so that the public folder is the sender of the message by giving your users Send On Behalf Of permissions in your Exchange Administrator program for the folder. Then either expose the folder in the address list so that it can be added into the From field, or place the address of the folder in the From field. If you don't want the e-mail to come from the folder, you can create a mailbox and assign it Send On Behalf Of permissions in the Exchange Administrator program.
To notify the user that she has been assigned an existing task or that a task for which she is the owner has changed, the code uses the ItemChange event for the Items collection. This event is also used to notify the user when she is added to an account team after the account is created, or when an account for which she is a team member has been changed. The following code implements the ItemChange event:
Private Sub oItems_ItemChange(ByVal Item As Object) Dim oUser As Variant Dim oMail As Outlook.MailItem Dim oAttach As Outlook.Attachment Dim oTaskItem As Outlook.TaskItem Dim oAccountItem As Outlook.PostItem Dim oUserProps As Outlook.UserProperties 'Since the event doesn't show us how the item changed, 'we need to notify the user of the change but not what 'specifically changed on the item oUser = oNS.CurrentUser.Name 'Check to see what type of item was just created If Item.Class = olTask Then 'Check to see whether the user wants to be notified If prefNotifyWhenNewTask = 1 Then 'Transform into TaskItem Set oTaskItem = Item 'Check to see whether the current user is the owner If oTaskItem.Owner = oUser Then 'Send to the user a message with a link to the item Set oMail = oApplication.CreateItem(olMailItem) With oMail .To = oUser .Subject = "An Account Task for the " & _ Item.ConversationTopic & _ " account is assigned to you." .Body = "A task - " & Item.Subject & _ " - was assigned to you or was changed " & _ "by another user. " _ & "To view this task, please click" _ & " on the link below." End With Set oAttach = oMail.Attachments.Add(Item, _ olEmbeddeditem) oMail.Recipients.ResolveAll oMail.Send End If End If ElseIf Item.MessageClass = "IPM.Post.Account info" Then Set oAccountItem = Item boolAccountMember = 0 Set oUserProps = oAccountItem.UserProperties If oUserProps.Find("txtAccountConsultant") = oUser Then boolAccountMember = 1 ElseIf oUserProps.Find("txtAccountExecutive") = oUser Then boolAccountMember = 1 ElseIf oUserProps.Find("txtAccountSalesRep") = oUser Then boolAccountMember = 1 ElseIf oUserProps.Find("txtAccountSE") = oUser Then boolAccountMember = 1 ElseIf oUserProps.Find("txtAccountSupportEngineer") = _ oUser Then boolAccountMember = 1 End If If boolAccountMember = 1 Then 'Send to the user a message with a link to the item Set oMail = oApplication.CreateItem(olMailItem) With oMail .To = oUser .Subject = "You have been assigned to the - " & _ Item.ConversationTopic & _ " - account as a team member." .Body = "The account - " & Item.Subject & _ " now has you as a team member or someone " & _ "has changed a value " _ & "on the account. To view this account, " _ & "please click on the link below." End With Set oAttach = _ oMail.Attachments.Add(Item, olEmbeddeditem) oMail.Recipients.ResolveAll oMail.Send End If End If End Sub |
The code that handles the ItemChange event is very similar to the code for ItemAdd, so I won't cover it in detail. The only difference between the two event handlers is the text of the message that they send to the user. Since Outlook does not pass the property that was changed on the item as a parameter to ItemChange, the code can't know whether the user was assigned to an item or which property was changed. For this reason, the message text notifies the user only that a change to the item has occurred.
Adding and Handling Custom Command Bars and Buttons
The next section of code we'll take a look at adds a custom command bar and command buttons to the Outlook toolbar, and provides event handlers for the buttons when users click them. The code for this functionality is shown here:
Private Sub oExplorer_BeforeFolderSwitch( _ ByVal NewFolder As Object, Cancel As Boolean) 'Add CommandBar buttons to the Outlook User Interface for easy 'creation Dim oTempFolder As Outlook.MAPIFolder Dim oCommandBars As Office.CommandBars Dim oCommandBar2 As Office.CommandBar Dim oControls As Office.CommandBarControls Dim oControl As Office.CommandBarButton Dim otmpCommandBar As Office.CommandBar 'Make sure they want to do this If prefEnableAcctToolbar = 1 Then 'First check to see whether the folder is the 'Account Tracking folder If Not (NewFolder Is Nothing) Then Set oTempFolder = NewFolder boolFoundCommandBar = 0 'You might want to put in the EntryID here rather than 'the name If oTempFolder.Name = "Account Tracking" Then 'Check to see whether command bar already exists Set oCommandBars = _ oApplication.ActiveExplorer.CommandBars For Each oCommandBar In oCommandBars If oCommandBar.Name = "Account Tracking" Then boolFoundCommandBar = 1 Set otmpCommandBar = oCommandBar Exit For End If Next If boolFoundCommandBar = 0 Then 'Need to create the command bar 'Maybe add text box for searching for account 'or contacts Response = MsgBox("The Account Tracking " & _ "application can create a toolbar with " _ & "the most commonly used commands. Do " & _ you want to have the application create" _ & " the toolbar and display it?", _ vbYesNo + vbQuestion, "Account Tracking") If Response = vbYes Then 'Create the command bar Set oCommandBar = oCommandBars.Add( _ "Account Tracking", Temporary:=False) Set oControls = oCommandBar.Controls 'Create the buttons, and set the 'event handler objects to the 'buttons. 'Create the first button. Set oControl = oControls.Add( _ Type:=msoControlButton, ID:=1, _ Temporary:=False) oControl.Caption = "Create New &Account" oControl.FaceId = 609 oControl.Style = msoButtonIconAndCaption Set oCreateAccountBHandler = oControl 'Create the second button 'Context menu Set oControl = oControls.Add( _ Type:=msoControlButton, ID:=1, _ Temporary:=False) oControl.Caption = "Create Account &Contact" oControl.FaceId = 607 oControl.Style = msoButtonIconAndCaption Set oCreateAcctContactBHandler = oControl 'Create the third button 'Context menu Set oControl = oControls.Add( _ Type:=msoControlButton, ID:=1, _ Temporary:=False) oControl.Caption = "Create Account &Task" oControl.FaceId = 329 oControl.Style = msoButtonIconAndCaption Set oCreateAcctTaskBHandler = oControl 'Make the command bar visible oCommandBar.Visible = True oCommandBar.Position = msoBarTop End If Else 'Account Tracking command bar already exists. 'See if they want to do this. If prefEnableAcctToolbar = 1 Then 'Check to see if visible; if not, make 'visible Dim oCBControls As Office.CommandBarControls Dim oCBButton As Office.CommandBarButton If otmpCommandBar.Enabled = False Then otmpCommandBar.Enabled = True End If If otmpCommandBar.Visible = False Then otmpCommandBar.Visible = True End If End If End If Else 'It's not the Account Tracking folder. 'Look for the toolbar and disable it. On Error Resume Next Set oCommandBars = oApplication.ActiveExplorer. _ CommandBars Set oCommandBar = oCommandBars("Account Tracking") oCommandBar.Enabled = False End If Else 'It's a file system folder! 'Disable toolbar. On Error Resume Next Set oCommandBars = _ oApplication.ActiveExplorer.CommandBars Set oCommandBar = oCommandBars("Account Tracking") oCommandBar.Enabled = False End If End If Set oTempFolder = Nothing Set oCommandBars = Nothing Set oCommandBar = Nothing Set oControls = Nothing Set oControl = Nothing End Sub |
The application includes the Outlook Explorer object's BeforeFolderSwitch event, as shown in the preceding code. The oExplorer_BeforeFolderSwitch event procedure is passed, as a MAPIFolder, the folder that the user is trying to switch to. The code checks the folder's name to see if it is the Account Tracking folder. You could also perform this comparison by using the EntryID of the folder.
If the folder is the Account Tracking folder, the code searches the CommandBars collection of the Explorer object to see whether an Account Tracking command bar exists. If the code finds the Account Tracking command bar, it simply makes the command bar visible.
If the code doesn't find the Account Tracking command bar, it creates the command bar if the user selected to do this as a preference. The code adds a new CommandBar object to the CommandBars collection by passing the name of the command bar as well as the Temporary parameter. The Temporary parameter indicates that Outlook should persist the command bar between Outlook sessions. Then the code starts creating the buttons on the command bar.
To create the buttons, the code uses the Controls collection on the CommandBar object. The code then adds three button controls to the collection. The control type is identified with the msoControlButton constant. (You can create other types of controls on your command bars besides buttons, such as drop-downs, combo boxes, and popups.) The code also passes an ID of 1 for all the controls; this value indicates that the control is a custom control and not built in. The code passes the Temporary parameter and sets it to False so that Outlook persists the buttons between sessions. Depending on the type of control you specify, the Add method will return an appropriate object, such as a CommandBarButton, a CommandBarComboBox, or a CommandBarPopup object.
After the code receives the CommandBarButton object from the Add method on the Controls collection, it starts setting properties on the CommandBarButton object. The first property it sets is the Caption property, which is a string containing the caption text for the control. Notice how you can place an ampersand before one of the letters in the control caption to provide a shortcut key to the control. This caption property is the default screen tip for the control.
The second property the code sets is FaceId, which specifies how the button face should look. Office 2000 has a number of built-in faces that you can use. If you want to use a custom face on your buttons, you must specify a 0 for this property and copy your custom face to the clipboard. Then you can use the PasteFace method on the CommandBarButton object to paste the face from the clipboard onto your control.
The final property the code sets is the Style property. This property can have many different values, such as the msoButtonIconAndCaption constant, which displays the button face as well as the caption text. Or you could choose msoButtonCaption to display only the caption. To enhance usability of the buttons, the code displays both the icon and the caption in them. For a list of all the style values, refer to the Office 2000 help file.
After the new CommandBarButtons are created and set, they are assigned to other variables such as oCreateAccountBHandler. If you take a look at the declarations section of the code earlier in the chapter, you'll notice that oCreateAccountBHandler is declared as an Office.CommandBarButton using the WithEvents keyword. The WithEvents keyword specifies that oCreateAccountBHandler is used to respond to events for a CommandBarButton. The following code shows the event handlers for the three buttons on the Account Tracking command bar:
Private Sub oCreateAccountBHandler_Click(ByVal Ctrl As _ Office.CommandBarButton, CancelDefault As Boolean) Dim oAccount As Outlook.PostItem Set oAccount = oFolder.Items.Add("IPM.Post.Account info") oAccount.Display End Sub Private Sub oCreateAcctContactBHandler_Click(ByVal Ctrl As _ Office.CommandBarButton, CancelDefault As Boolean) Dim oSelection As Outlook.Selection On Error Resume Next boolFoundAccountItem = 0 Set oSelection = oExplorer.Selection For Each oItem In oSelection If oItem.MessageClass = "IPM.Post.Account info" Then boolFoundAccountItem = boolFoundAccountItem + 1 'Set the item found to a global variable just in case 'it is the only one found Set oAcctItem = oItem End If Next If boolFoundAccountItem = 0 Then MsgBox "You have no account selected. Please select " & _ "an account and try again.", _ vbOKOnly + vbExclamation, "Create Contact" Exit Sub ElseIf boolFoundAccountItem > 1 Then MsgBox "You have more than one account selected. " & _ "Please select only one account and try again.", _ vbOKOnly + vbExclamation, "Create Contact" Exit Sub ElseIf boolFoundAccountItem = 1 Then Set AccountContactForm = oAcctItem.Actions( _ "Create New Account Contact").Execute AccountContactForm.Display (True) End If End Sub Private Sub oCreateAcctTaskBHandler_Click( _ ByVal Ctrl As Office.CommandBarButton, CancelDefault As Boolean) On Error Resume Next boolFoundAccountItem = 0 Set oSelection = oExplorer.Selection For Each oItem In oSelection If oItem.MessageClass = "IPM.Post.Account info" Then boolFoundAccountItem = boolFoundAccountItem + 1 'Set the item found to a global variable just in case 'it is the only one found Set oAcctItem = oItem End If Next If boolFoundAccountItem = 0 Then MsgBox "You have no account selected. Please select " & _ "an account and try again.", _ vbOKOnly + vbExclamation, "Create Contact" Exit Sub ElseIf boolFoundAccountItem > 1 Then MsgBox "You have more than one account selected. " & _ "Please select only one account and try again.", _ vbOKOnly + vbExclamation, "Create Contact" Exit Sub ElseIf boolFoundAccountItem = 1 Then Set AccountTaskForm = oAcctItem.Actions( _ "Create New Account Task").Execute AccountTaskForm.Display (True) End If End Sub Private Function CheckSelection(strMessageClass) As Integer On Error Resume Next boolFoundAccountItem = 0 Set oSelection = oExplorer.Selection For Each oItem In oSelection If oItem.MessageClass = strMessageClass Then boolFoundAccountItem = boolFoundAccountItem + 1 'Set the item found to a global variable just in case 'it is the only one found Set oAcctItem = oItem End If Next CheckSelection = boolFoundAccountItem End Function |
Notice that we use the standard Outlook object model to implement all three event handlers. The oCreateAccountBHandler_Click event handler is the simplest of the three since it only adds a new account form to the folder and displays this form to the user.
The other two event handlers, oCreateAcctContactBHandler_Click and oCreateAcctTaskBHandler_Click, also use some of the features in the Outlook 2000 object model. Before a user can create either an account contact or a task, the user must first select an account. The code for these handlers uses the new Selection collection on the Explorer object to determine what the user has selected in the user interface.
The oCreateAcctContactBHandler_Click and oCreateAcctTaskBHandler_Click event handlers both loop through the collection of selected items to see whether any are account items. Users can select multiple items in the user interface, so the code remembers how many account items it sees in the Selection collection. Both handlers set the last account item they see to a global variable just in case this account item is the only one in the selection. Because the add-in cannot guess for which account the user wants to create a new contact or task, the subroutines display error messages when the user has more than one account selected in the user interface. If no accounts are selected, the application displays an error message telling the user to select an account. If only one account is selected, the application calls the custom actions on the account form to create either a new account contact or a new task.
Adding Custom Property Pages and Storing User Settings
The final section of code implements the property pages that allow users to pick their custom settings for the application. We will also quickly look at how the registry is used to store these settings for the user. While we examine this code, you will see some interesting objects implemented in Outlook 2000, such as the PropertyPage object, the PropertyPageSite object, and the PropertyPages collection object.
Custom property pages allow you to integrate your applications more tightly into the Outlook application. They also make it easier for your users to configure your application, because your customizations are part of the standard Outlook configuration pages. The following code implements the property page extension code in the COM add-in. Then we will look at the code for the ActiveX control, which creates the actual property page that appears.
Private Sub SetDefaultProps() oNewPage.prefLookForShortcuts = prefLookForShortcuts oNewPage.prefEnableAcctToolbar = prefEnableAcctToolbar oNewPage.prefMakeFolderHomepage = prefMakeFolderHomepage oNewPage.prefNotifyWhenNewMember = prefNotifyWhenNewMember oNewPage.prefNotifyWhenNewTask = prefNotifyWhenNewTask End Sub Private Sub oNS_OptionsPagesAdd(ByVal Pages As _ Outlook.PropertyPages, ByVal Folder As Outlook.MAPIFolder) If Folder.Name = "Account Tracking" Then 'Add the Options page to the folder Set oNewPage = CreateObject("AccountPP.UCAdminPage") SetDefaultProps oNewPage.oAdminDLL = Me Pages.Add oNewPage End If End Sub Private Sub oApplication_OptionsPagesAdd(ByVal Pages As _ Outlook.PropertyPages) Set oNewPage = CreateObject("AccountPP.UCAdminPage") SetDefaultProps oNewPage.oAdminDLL = Me Pages.Add oNewPage End Sub Public Sub SetRegistryValues(prefShortcuts, prefAcctToolbar, _ prefFolderHomepage, prefNotifyMember, prefNotifyTask) 'This subroutine is called by the Property page to have the 'Options page persist its values boolSuccess = SetAppRegValue("CheckShortcuts", REG_DWORD, _ prefShortcuts) boolSuccess = SetAppRegValue("AcctToolbar", REG_DWORD, _ prefAcctToolbar) boolSuccess = SetAppRegValue("FolderHomepage", REG_DWORD, _ prefFolderHomepage) boolSuccess = SetAppRegValue("NotifyTeamMember", REG_DWORD, _ prefNotifyMember) boolSuccess = SetAppRegValue("NotifyAcctTask", REG_DWORD, _ prefNotifyTask) End Sub |
In this code, two subroutines handle the OptionsPagesAdd event. The first subroutine uses the NameSpace object. The OptionsPagesAdd event fires for the NameSpace object when the user clicks on a folder in the namespace you are monitoring and then selects Properties. The NameSpace OptionsPagesAdd event procedure is passed two parameters: Pages, which is a collection of Outlook PropertyPages; and Folder, which is the folder the user is trying to retrieve properties for.
The second subroutine uses the Outlook Application object. The OptionsPagesAdd event fires the Application object when a user selects Options from the Tools menu to configure the overall application settings for Outlook. Both OptionsPagesAdd event handlers call the same code because there is only one way to customize the Account Tracking application. However, for your add-ins, you could have two different property pages for these two different events, depending on your needs.
The first step both event handlers perform is creating an object. This object is an ActiveX control, which is the actual property page that the subroutine will add to the PropertyPages collection. We'll look at the code for the control later in this chapter.
The next step the event handler performs is to set the default properties for the new property page object we created. This is accomplished by setting some of the variables on the control to the values that are currently stored in the add-in. All of these values are originally retrieved from the registry.
After all properties are set for the controls on the form, the code passes a reference of the add-in to the new property page. You might be wondering why it does this. The main reason is to allow the ActiveX control property page call back into the add-in when a user makes a change and applies it. If the ActiveX control does not call back into the add-in, the add-in will not know that something has changed and, therefore, will not behave as expected.
The final step in the code is to add the new page to the PropertyPages collection. This is done using the Add method of the collection. You can call this method in two ways. The first way, which is exemplified in the code, passes an object to the method so that the object is displayed as a property page. The second way passes in the ProgID of the control as a string, which enables Outlook to create the control. If you use the second way, you can also pass an optional string that is the caption for the property page. We'll see how to set the caption when we pass an ActiveX control later on.
Now that we know how to add our pages to the PropertyPages collection, we need to look at what the actual page should implement. The following code implements the ActiveX control, which is the property page extension. Figure 10-13 shows the interface for the control in Visual Basic 6.0 design mode.
Implements Outlook.PropertyPage Private oSite As Outlook.PropertyPageSite Dim m_prefLookForShortcuts As Integer Dim m_prefMakeFolderHomepage As Integer Dim m_prefNotifyWhenNewMember As Integer Dim m_prefNotifyWhenNewTask As Integer Dim m_prefEnableAcctToolbar As Integer Dim m_fDirty As Boolean Dim m_AdminDLL As Object Private boolInitializing As Boolean Private Sub SetDirty() If Not oSite Is Nothing Then m_fDirty = True oSite.OnStatusChange End If End Sub Public Sub RefreshControls() checkNotifyAccount.Value = m_prefNotifyWhenNewMember checkNotifyTask.Value = m_prefNotifyWhenNewTask checkPerformCheck.Value = m_prefLookForShortcuts CheckToolbar.Value = m_prefEnableAcctToolbar CheckWebShortcut.Value = m_prefMakeFolderHomepage End Sub Private Sub checkNotifyAccount_Click() If boolInitializing = False Then SetDirty m_prefNotifyWhenNewMember = checkNotifyAccount.Value End If End Sub Private Sub checkPerformCheck_Click() If boolInitializing = False Then SetDirty m_prefLookForShortcuts = checkPerformCheck.Value End If End Sub Private Sub checkNotifyTask_Click() If boolInitializing = False Then SetDirty m_prefNotifyWhenNewTask = checkNotifyTask.Value End If End Sub Private Sub CheckToolbar_Click() If boolInitializing = False Then SetDirty m_prefEnableAcctToolbar = CheckToolbar.Value End If End Sub Private Sub CheckWebShortcut_Click() If boolInitializing = False Then SetDirty m_prefMakeFolderHomepage = CheckWebShortcut.Value End If End Sub Private Sub PropertyPage_Apply() On Error GoTo PropertyPageApply_Err m_fDirty = False If Not m_AdminDLL Is Nothing Then m_AdminDLL.SetRegistryValues m_prefLookForShortcuts, _ m_prefEnableAcctToolbar, m_prefMakeFolderHomepage, _ m_prefNotifyWhenNewMember, m_prefNotifyWhenNewTask 'Refresh the add-in DLL settings m_AdminDLL.CheckRegistryValues End If Exit Sub PropertyPageApply_Err: MsgBox "Error in PropertyPage_Apply. Err# " & Err.Number _ & " and Err Description: " & Err.Description End Sub Private Property Get PropertyPage_Dirty() As Boolean PropertyPage_Dirty = m_fDirty End Property Private Sub PropertyPage_GetPageInfo(HelpFile As String, _ HelpContext As Long) HelpFile = "nothing.hlp" HelpContext = 102 End Sub Private Sub UserControl_EnterFocus() boolInitializing = False End Sub Private Sub UserControl_Initialize() m_fDirty = False boolInitializing = True End Sub Private Sub UserControl_InitProperties() On Error Resume Next Set oSite = Parent RefreshControls End Sub Public Property Get prefLookForShortcuts() As Variant prefLookForShortcuts = m_prefLookForShortcuts End Property Public Property Let prefLookForShortcuts(ByVal vNewValue As Variant) m_prefLookForShortcuts = vNewValue End Property Public Property Get prefMakeFolderHomepage() As Variant prefMakeFolderHomepage = m_prefMakeFolderHomepage End Property Public Property Let prefMakeFolderHomepage( _ ByVal vNewValue As Variant) m_prefMakeFolderHomepage = vNewValue End Property Public Property Get prefNotifyWhenNewMember() As Variant prefNotifyWhenNewMember = m_prefNotifyWhenNewMember End Property Public Property Let prefNotifyWhenNewMember( _ ByVal vNewValue As Variant) m_prefNotifyWhenNewMember = vNewValue End Property Public Property Get prefNotifyWhenNewTask() As Variant prefNotifyWhenNewTask = m_prefNotifyWhenNewTask End Property Public Property Let prefNotifyWhenNewTask( _ ByVal vNewValue As Variant) m_prefNotifyWhenNewTask = vNewValue End Property Public Property Get prefEnableAcctToolbar() As Variant prefEnableAcctToolbar = m_prefEnableAcctToolbar End Property Public Property Let prefEnableAcctToolbar( _ ByVal vNewValue As Variant) m_prefEnableAcctToolbar = vNewValue End Property Public Property Get Caption() As Variant Caption = "Account Tracking" End Property Public Property Get oAdminDLL() As Variant End Property Public Property Let oAdminDLL(ByVal vNewValue As Variant) Set m_AdminDLL = vNewValue End Property |
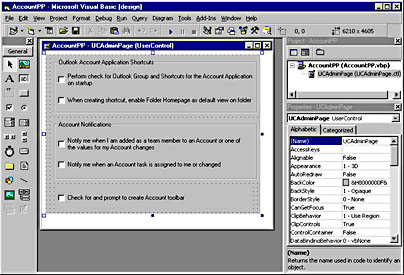
Figure 10-13. The ActiveX control that implements the property page extension in Visual Basic 6.0 design mode.
As you can see from the preceding code listing, not much code is implemented in the extension. Property page extensions are actually pretty easy to write. There are just a few important elements you need to implement.
The first of these elements, which is at the top of the code, implements the PropertyPage interface. To implement this interface, add a reference to the Outlook 2000 object model and then type Implements Outlook.PropertyPage in your declarations section. Once you do that, you will be able to select the different methods and properties you need to implement for your property page. You need to implement only two methods, GetPageInfo and Apply, and one property, Dirty.
The GetPageInfo method is called by Outlook to retrieve for your users help information about the property page. In this method, you can set two parameters: HelpFile and HelpContext. HelpFile is a string that points to your help file. (In the code, I point to a nonexistent help file.) The HelpContext parameter is a Long data type that specifies the context ID of the help topic associated with your property page.
The Apply method and the Dirty property work together with another method on the Outlook PropertyPageSite object, which we haven't discussed yet. The PropertyPageSite object, which in my code you can see declared in the declarations section, points to the container for your property page object. In this case, the container that holds your object is Outlook.
Once you declare a variable to be a PropertyPageSite, you need to initialize it. The best place to do this is in the intrinsic InitProperties event procedure of your ActiveX control. As you can see in the code, oSite, which is the PropertyPageSite variable, is set to the intrinsic Parent property of the ActiveX control. The Parent property, in this case, returns an Outlook PropertyPageSite object.
Now that we know how to retrieve the PropertyPageSite, we can continue looking at the Apply method and the Dirty property. When users make changes to your page, the code must be able tell Outlook that the page has become dirty and the Apply button should become active. To do this, you can keep some private variable that tracks whether the user has changed an option—in essence, a dirty flag. When the user does change an option, you set this flag to True and then call the OnStatusChange method of the PropertyPageSite object.
The OnStatusChange method, in turn, forces Outlook to try to retrieve the Dirty property for your property page. You can see this implemented in the Property Get PropertyPage_Dirty procedure. The code sets the PropertyPage_Dirty variable to the value of the private dirty flag, which should be True, and returns that value to Outlook. Once Outlook receives a True value, it enables the Apply button.
So what happens when the user clicks this newly enabled Apply button? Well, your PropertyPage_Apply subroutine is called. In this subroutine, you should take whatever steps are necessary to apply the changes and also set your private dirty flag back to False. You can see in the code for my property page that I set the dirty flag to False, and then I attempt to save the values the user selected back to the registry.
You might be wondering what the m_AdminDLL object in this subroutine is. It is the reference to the add-in, which we passed to the property page when we created it. Since the registry functions are already implemented in the add-in, the property page just calls back to the add-in. The CheckRegistryValues call forces the add-in to refresh its internal values with the new values the user has selected.
The Apply method is also called when there is a dirty setting in your property page and the user clicks OK in the Properties or Options dialog box. The Apply method is not called when the user clicks Cancel.
The only other element that you must implement in your property page is its caption. To set the caption, you must add a property to your application. You can do this by selecting the Add Procedure option from Tools menu and then selecting the settings for creating a new public property, as shown in Figure 10-14.
Once you've added the Caption property procedure, select the Procedure Attributes option from the Tools menu, and select the property you just created from the drop-down list. Click the Advanced button, and select the Caption procedure ID in the Procedure ID dialog box, as shown in Figure 10-15. By doing this, you are associating your property with the identifier for the caption property on a control. Outlook will query this property ID for the caption for your property page. Then just implement the code to set this property to the value you want for your caption. An example of the Caption property procedure was shown in the previous code.
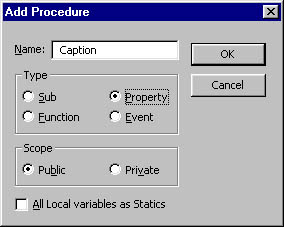
Figure 10-14. Creating a new property for the caption of your property page.
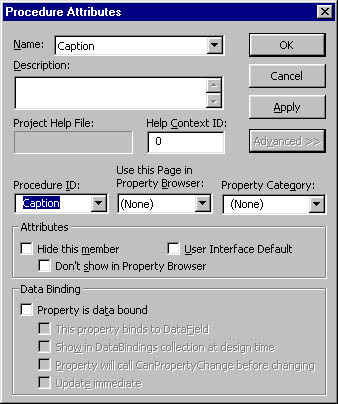
Figure 10-15. Setting the Caption Procedure ID for your property.
EAN: 2147483647
Pages: 184