Reusing Outlook Web Access
While OWA provides an extensibility model in the form of the URL string, one of the key requirements for customizing OWA is the ability to replace the default forms that it displays for items contained in Exchange Server. Imagine that you created an ASP application that stored information in Exchange Server. Now suppose that, when using OWA to access your application's content, your users got the default OWA forms instead of getting your application's forms. This wouldn't make for a great user experience. That's why Exchange Server supports Web Storage System forms and a Web Storage System forms registry.
Creating a Web Storage System Form
Since Web Storage System forms can be ASP forms or simply HTML forms, there is no custom tool you need to learn to create them. Instead, you can create your forms by using common HTML development tools, such as Microsoft FrontPage or Microsoft Visual InterDev.
When creating Web Storage System forms, you have two choices for rendering. First, you can simply use an ASP file and generate all the code and HTML yourself without getting any help from the Exchange Server. Second, you can use HTML forms and the Web Storage System Forms Renderer. This option does not require you to write any code.
Using ASP Forms
The Training application uses the first approach of creating a Web Storage System form because of the flexibility that ASP provides. When a user chooses OWA as her interface to the Events Calendar page and opens an item from the calendar, Exchange Server checks the Web Storage System forms registry and sees that an ASP page is registered for the calendar. Instead of displaying the default calendar form, Exchange Server hands over execution of the application to the ASP application and passes it some parameters within the URL. As part of the URL, Exchange Server passes the dataurl parameter. The dataurl parameter is the full path to the item that the user requested from Exchange Server. By using the value in this dataurl parameter, you can open the item via ADO and perform the necessary operations for your application. The following code is taken from eventwsform.asp, which is the ASP file called in the Training application:
'Figure out display from a querystring variable set rec = Server.CreateObject("ADODB.Record") strFullURL = request.querystring("dataurl") set oConnection = Server.CreateObject("ADODB.Connection") oConnection.ConnectionString = strFullURL oConnection.Provider = "ExOledb.Datasource" oConnection.Open rec.Open strFullURL,oConnection Response.Write "<B>Course Details:</B><BR><BR>" 'Open the connection set iAppt = Server.CreateObject("CDO.Appointment") i=1 Dim strhref 'Load the appointment into CDO 'Response.Write strhref strhref = rec.Fields("DAV:href") iAppt.DataSource.Open strhref,oConnection,1 . . . . |
Using HTML Forms
Creating an HTML form that supports data binding is easy with Exchange Server 2000 and Web Storage System forms. By using some special HTML markup, you can turn ordinary HTML elements into data-bound elements. The markup that you'll need to implement consists of two attributes to set. First, you must set the name attribute of the HTML element as the schema name that you want to bind to the element. An example of this is urn:schemas:httpmail:subject. The second attribute that you need to set on the HTML element is named class. You always set this attribute to a value of field to tell the Web Storage System Form Renderer that this is a data-bound field. The following HTML sets a text box to suddenly be data bound to a Web Storage System field named myprop:
My Prop: <input type="text" name="urn:schemas:myschema:myprop" class="field"> |
You also receive the dataurl parameter as you would in an ASP Web Storage System form. Using dataurl, you can set the action of your form to post the data back to the URL from which the data is retrieved. The following code permits a user submitting a form to have that form post back to Exchange Server and then redirect the Web page to the application's default page:
<form class="form" method="post" actionspec="%dataurl%?Cmd=saveitem&redir=%dataurl%/../"> |
That's it. As you can see, creating a Web Storage System data-bound HTML form is pretty simple.
Registering a Web Storage System Form
Now that you've created a Web Storage System form, you need to tell Exchange Server what to do with it. For example, you might want your form to replace another form. Or, you might want your form to process commands sent to a specific server. In order to tell Exchange Server how to use your form, you must add a form registration to your application. A form registration is just another item in the Exchange Server database; however, it contains some special properties, which we'll examine momentarily. Normally, you'll want to save your form registrations in the schema folder for your applications in the same place you store your custom content classes and properties.
The following code shows you how to register a form using ADO. This particular registration will display the custom form whenever a user browses to the folder over http, either by typing a URL in Internet Explorer or by browsing through the folders of OWA and selecting a folder.
Set oRec = CreateObject("ADODB.Record") oRec.Open "default.reg", oCon, 3, 0 oRec.Fields("DAV:contentclass") = _ "urn:schemas-microsoft-com:office:forms#registration" oRec.Fields("urn:schemas-microsoft-com:office:forms#contentclass") = _ "urn:content-classes:folder" oRec.Fields("urn:schemas-microsoft-com:office:forms#request")="GET" oRec.Fields("urn:schemas-microsoft-com:office:forms#cmd") = "*" oRec.Fields("urn:schemas-microsoft-com:office:forms#formurl") = _ "default.htm" oRec.Fields("urn:schemas-microsoft-com:office:forms#executeurl") = _ "/exchweb/bin/exwform.dll" oRec.Fields_ ("urn:schemas-microsoft-com:office:forms#executeparameters") = "" oRec.Fields("urn:schemas-microsoft-com:office:forms#contentstate") = "*" oRec.Fields("urn:schemas-microsoft-com:office:forms#platform") = "WINNT" oRec.Fields("urn:schemas-microsoft-com:office:forms#browser") = "*" oRec.Fields("urn:schemas-microsoft-com:office:forms#majorver") = "*" oRec.Fields("urn:schemas-microsoft-com:office:forms#minorver") = "*" oRec.Fields("urn:schemas-microsoft-com:office:forms#version") = "" oRec.Fields("urn:schemas-microsoft-com:office:forms#messagestate") = "*" oRec.Fields("urn:schemas-microsoft-com:office:forms#language") = "*" oRec.Fields.Update oRec.Close |
The code simply creates a new item in Exchange Server. It sets the content class of the item as urn:schemas-microsoft-com:office:forms#registration , which tells Exchange Server that the item is a form registration. Then the code sets some properties that tell Exchange Server which commands and requests the form should handle, what languages the form should be used for, and which type the form is. You can have multiple form registrations in a single folder that target similar types of requests but display different forms based on the criteria you set, such as browser, language, or content state. Table 19-4 describes each of these properties in more detail. Be aware that, when appropriate, properties can support wildcards that allow all values.
Table 19-4. Form registration properties.
| Property Name | Description |
|---|---|
| urn:schemas-microsoft-com:office:forms#browser | Indicates the type of browser. This property is useful if you want different forms for different browsers. For example, you can detect a cell phone microbrowser making a request and return an appropriate version of the form for that type of browser. |
| urn:schemas-microsoft-com:office:forms#cmd | This corresponds to a URL query string Cmd parameter, such as Myurl/?cmd=contents. You can also set this property to custom commands that you implement and register. For example, you could have a parameter named NewEvent, which you register for when the url contains Myurl/?cmd=NewEvent. |
| urn:schemas-microsoft-com:office:forms#contentclass | The content class the form is registered for. You can specify a built-in content class or a custom one. |
| urn:schemas:microsoft-com:office:forms#contentstate | This checks the form against the urn:schemas:microsoft-com:office:forms#contentstate property. You can set this property to any value you want. For example, you could set contentstate to approved, and have a form display the item differently depending on whether the contentstate property is approved or not approved. |
| urn:schemas-microsoft-com:office:forms#executeparameters | Parameters to pass to the form rendering engine. |
| urn:schemas-microsoft-com:office:forms#executeurl | The URL from which to execute the form. If you're using the built-in renderer, this URL will be /exchweb/bin/exwform.dll. However, if you're using ASP, you'll want to use the URL of your ASP page as this value. |
| urn:schemas-microsoft-com:office:forms#formurl | The URL to the form that should be used to render the data. |
| urn:schemas-microsoft-com:office:forms#language | Allows you to specify the language of the browser client for which the form should be rendered. This property can be any language code that is valid for http headers. |
| urn:schemas-microsoft-com:office:forms#majorver | The browser major version. |
| urn:schemas-microsoft-com:office:forms#messagestate | The message state. An example of this value can be read or submitted. |
| urn:schemas-microsoft-com:office:forms#minorver | The browser minor version. |
| urn:schemas-microsoft-com:office:forms#platform | Indicates the platform of the browser, such as WINNT or UNIX. |
| urn:schemas-microsoft-com:office:forms#request | Specifies whether the form is the default for a GET or POST request. |
Since I showed you an example of registering a form by using the built-in forms renderer, I thought I should show you an example of a registration that uses an ASP page. This code is taken from the setup program for the Training application. Notice how the formurl and executeurl parameters differ from when we registered to use the built-in forms renderer.
'Create the registration in the schema folder Set oRec = CreateObject("ADODB.Record") oRec.Open strPath & "schema/webstoreform.reg", oConnection, 3, 0 oRec.Fields("DAV:contentclass") = _ "urn:schemas-microsoft-com:office:forms#registration" oRec.Fields("urn:schemas-microsoft-com:office:forms#contentclass") = _ "urn:content-classes:appointment" oRec.Fields("urn:schemas-microsoft-com:office:forms#request") = "GET" oRec.Fields("urn:schemas-microsoft-com:office:forms#cmd") = "*" 'Put full URL to Web Store forms oRec.Fields("urn:schemas-microsoft-com:office:forms#formurl") = _ strHTTPURL & "/eventwsform.asp" oRec.Fields("urn:schemas-microsoft-com:office:forms#executeurl") = _ strHTTPURL & "/eventwsform.asp" oRec.Fields _ ("urn:schemas-microsoft-com:office:forms#executeparameters") = "" oRec.Fields("urn:schemas-microsoft-com:office:forms#contentstate") = "*" oRec.Fields("urn:schemas-microsoft-com:office:forms#platform") = "WINNT" oRec.Fields("urn:schemas-microsoft-com:office:forms#browser") = "*" oRec.Fields("urn:schemas-microsoft-com:office:forms#majorver") = "*" oRec.Fields("urn:schemas-microsoft-com:office:forms#minorver") = "*" oRec.Fields("urn:schemas-microsoft-com:office:forms#version") = "" oRec.Fields("urn:schemas-microsoft-com:office:forms#messagestate") = _ "*" oRec.Fields("urn:schemas-microsoft-com:office:forms#language") = "*" oRec.Fields.Update oRec.Close |
Another way you can register a new form for a folder is by using the DAV:defaultdocument property. This property takes a string that specifies the Web page to open when the user browses to the folder by using OWA. Instead of displaying the contents of the folder when this property is set, OWA displays the custom form. You can easily set this property by using ADO or WebDAV.
FrontPage 2000 Support
Although you can create and register your forms manually, you can also take advantage of the support Exchange Server 2000 provides for FrontPage 2000. You can create and run FrontPage Web pages inside Exchange Server 2000 folders. Since Exchange 2000 has some FrontPage tools that don't require you to do any development (they're pretty much point and click), I won't cover them at length. However, I will show you what the tools look like so that you can understand their capabilities.
First, let's examine the Schema Picker, shown in Figure 19-1. You can drop any HTML element on your Web page into FrontPage and use the schema picker to data bind the element to Exchange Server. If you only name your element and don't use the schema picker, the FrontPage add-ins will generate the schema on the fly when you publish your form.
You can also use the tools in FrontPage to set the properties for your form. In the Choose Content Class dialog box, shown in Figure 19-2, you can change the content class that your application's custom schema uses. If you don't use any custom schema but instead use one from built-in properties, you can simply select an existing content class as your default.
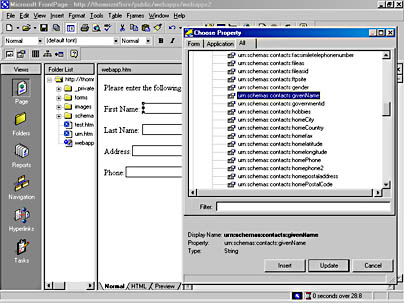
Figure 19-1. Selecting the property to data bind to an element from the Schema Picker.
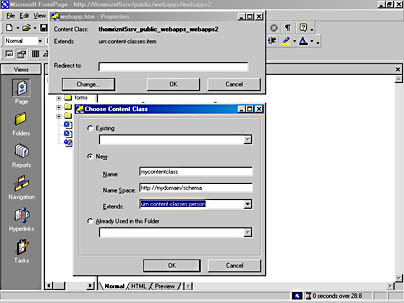
Figure 19-2. The Form Properties dialog box in FrontPage.
Another tool offered in FrontPage is the View Design-Time Control (DTC), shown in Figure 19-3. This DTC makes it easy for you to reuse the OWA view capabilities in your application without having to write code. The View DTC also gives you all the features of the OWA View control, such as sorting and grouping.
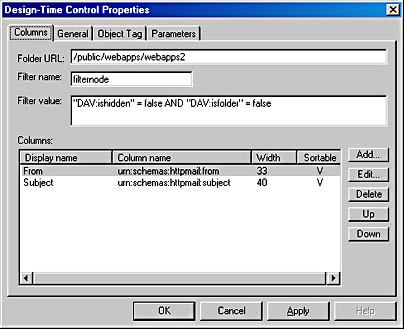
Figure 19-3. The View DTC in FrontPage.
After you specify your options for the DTC, it generates some HTML and an XML data island on your Web page. An XML data island describes the view that you want to use with the OWA View control. The values in the XML data island determine which columns and formats will be displayed on your page. You also can generate your own HTML and XML to perform the functionality of the DTC in your applications. The HTML and XML generated by the DTC is shown here:
<SPAN id="View1" class="view" style="width:544;height:296" URL="/public/webapps/webapps2" storeType="1" RowsPerPage="5" viewDescriptor="View1_XML" viewClass="/exchweb/views/standardview.xsl" linkspec="%DataUrl%" > <XML id="View1_XML"> <view xmlns:v="http://schemas.microsoft.com/schemas/view" xmlns:d="urn:uuid:c2f41010-65b3-11d1-a29f-00aa00c14882"> <baseroot>/exchweb/img/</baseroot> <name>Normal</name> <column><heading>Subject</heading> <prop d:dt="string">urn:schemas:httpmail:subject</prop> <width>40</width> <sortable>1</sortable> <bitmap>0</bitmap><multivalued>0</multivalued> <style></style> </column> <filter id="filternode"> "DAV:ishidden" = false AND "DAV:isfolder" = false </filter> <groupby> <order> <heading>From</heading> <prop d:dt="string">urn:schemas:httpmail:from</prop> <sort>ASC</sort> <style></style> </order> </groupby> <headerstyle>background-color:#c0c0c0</headerstyle> <rowstyle>background-color:#c0c0c0</rowstyle> </view> </XML> </SPAN> |
FrontPage also provides the Folder Tree DTC, shown in Figure 19-4. Think of this DTC as the Web equivalent of the Outlook folder picker. Using the Folder Tree DTC, you can select the root folder that the folder picker will start at in your hierarchy.
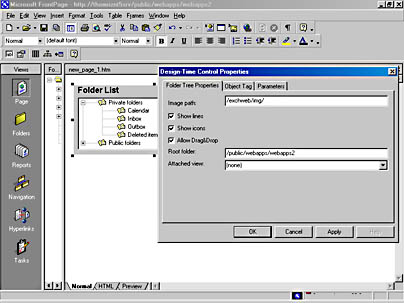
Figure 19-4. The Folder Tree DTC in FrontPage.
FrontPage provides one more DTC, the Outlook Web Access DTC, which is shown in Figure 19-5. This DTC lets you set some properties, and then it provides a link to Outlook Web Access using the correct URL parameters. Again, you can achieve the same result yourself, but the DTC makes it easier.
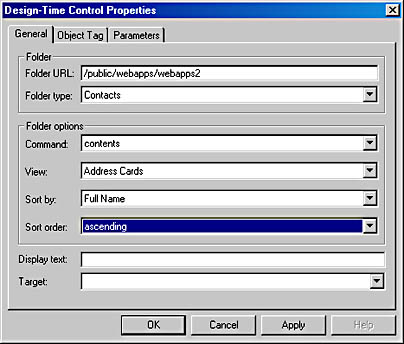
Figure 19-5. The Outlook Web Access DTC in FrontPage.
EAN: 2147483647
Pages: 184