The Training Application
The best way to understand the development capabilities of Exchange Server 2000 is to see an application that takes advantage of the product's new capabilities. That's why I designed the Training application. This application is pretty complex; it contains ASP, XSL, server events, and workflow components. This sample application manages an internal training program site. It also provides a Web interface via which students and instructors can register for, critique, and discuss training courses and materials. I've created a setup program for this application, which will make it easier for you to get this application started and will show you how to perform some administrative functions for Exchange Server 2000. The setup program will also show you how to perform COM+, IIS, and Active Directory administrative tasks.
Before examining the code and technologies used throughout the Training application, let's discuss exactly what this application does. That way, when we cover each of the application's implementation sections, you'll understand what each implementation actually does within the context of the rest of the application.
Setting Up the Training Application
When you launch the setup for the Training application, the first thing you'll see is the Microsoft Visual Basic setup program I've created. Figure 18-4 shows the user interface for the setup program.
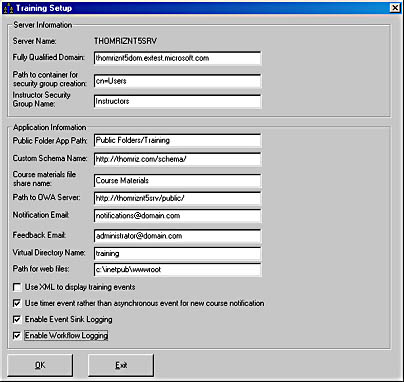
Figure 18-4. The user interface for the setup program. It requires you to fill in information about where you want the Training application to be placed.
The setup program takes the information you provide in your setup interface and sets up the Training application, so you don't have to perform any extra steps. The setup program performs the following steps:
- Establishes an ADO Connection to the Exchange Server so that the Connection object can be used throughout the setup and certain parts of the setup can be transacted and rolled back.
- Creates the Exchange Server folders.
- Creates the custom schema, including custom content classes and properties.
- Creates messages in the Emails folder, which contains the HTML templates for the notification e-mails sent by the application.
- Prompts you for the categories you wish to create for your training events and then stores those categories in the Configuration folder.
- Creates a security group in Active Directory that will contain the users who are instructors for the application.
- Creates the IIS virtual directory and copies the Web files to it.
- Creates a Windows 2000 file share for the course materials.
- Copies and registers the event dynamic link libraries (DLL).
- Registers the event DLL files as a COM+ application.
- Creates the event registrations for the application that will handle new course notification, survey notification, and survey result compilation.
- Imports, registers, and enables the workflow process definition.
- Creates the event registrations for the workflow process.
Although the setup program is quite extensive in what it provides, I won't detail here the non-Exchange Server or noncritical application deployment steps, such as creating virtual directories in IIS using ADSI. To learn more about such steps, look at the source code for the setup program, which you'll find on the companion CD. We'll look closely at the code behind the setup program throughout this chapter.
NOTE
You will need to run the setup program of the Training application directly on your Exchange server. You will also need to be an administrator of both the Windows 2000 and Exchange Server systems.
Using the Training Application
Once you're done running the setup program, you can start using the Training application. The application uses a series of Public Folders that store all the application's information. Figure 18-5 shows the folder hierarchy of the Training application. As you can see, the different types of folders in the application range from standard message folders to contact folders and calendar folders.
The classes are contained in the Schedule folder, while student and instructor information are contained in their respective contact folders. The interface of the application is the default training page, which is different for instructors and for students. The instructor home page is shown in Figure 18-6.
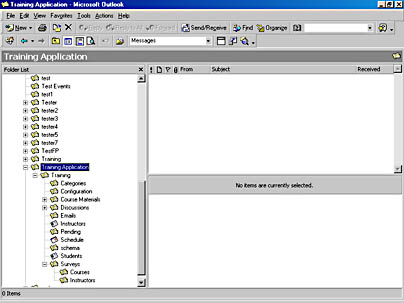
Figure 18-5. The folder hierarchy for the Training application as it appears in Microsoft Outlook.

Figure 18-6. The Training application home page for the sample application as viewed by an instructor.
From the home page, you can retrieve the schedule of classes; view information about instructors; change your notification preferences; or if you are an instructor, create a new course. The application determines whether you are an instructor by using Windows 2000 Security Groups. The application searches the security group you specify in the setup program and checks to see whether the user accessing the application is a member of that security group. If the user is a member of that security group, the instructor-specific content appears on the Web page. Figure 18-7 shows the Active Directory Users And Computers snap-in with the Instructors security group open.
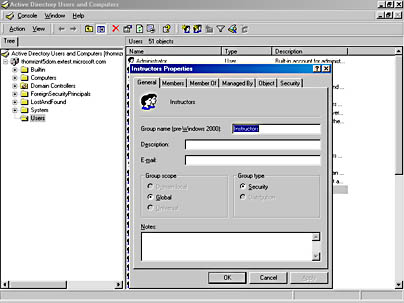
Figure 18-7. The Instructors security group controls access to instructor-specific functions.
One thing to note is that the Training application creates its folders in the Public Folder hierarchy. I coded the application this way so that you could see the folders in Outlook. However, if I was to really deploy this application, I would not create the folders in the Public Folder hierarchy because it's Web-based. Instead, I would create a new top-level hierarchy, not visible by Outlook, to contain my application. There are a number of reasons to create separate top-level hierarchies for your applications, including the ability to conduct deep searches of the folders using ADO, and not providing access to the application from Outlook.
Creating a Course
The application allows you to create courses and register students for them. When an instructor creates a course, the application asks the instructor whether she wants to create a file share for course materials or a discussion group for the course. This functionality demonstrates how you can utilize the IFS components of the Web Storage System through the file share capabilities and also illustrates the reusability of OWA. Figure 18-8 shows a course listing that contains links to both the course materials and a discussion group for a particular course.
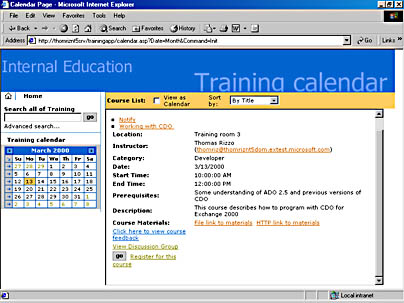
Figure 18-8. A course listing that shows how you can utilize both IFS and OWA extensibility in your Exchange Server 2000 application.
After an instructor creates a course, an asynchronous or timer event (depending on which you specified in the setup program), fires in the Schedule folder. This event checks to see whether any students have asked to be notified when new training is available in the specific course category. As the application administrator, you must specify these categories—for example, Developer, End User, and IT. If the application locates students who need to be notified about the training, it sends the students an HTML-formatted message, as shown in Figure 18-9.
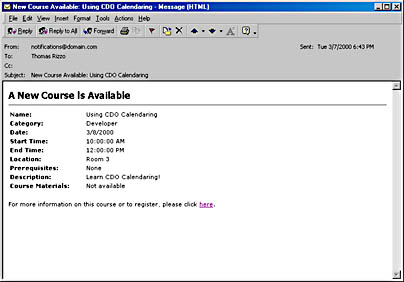
Figure 18-9. An HTML-formatted message sent to students who want to be notified about new training events.
The notification preferences of each student are stored on their respective contact record in the Students folder. Students can change their preferences for notification through the application's Web interface, as shown in Figure 18-10.
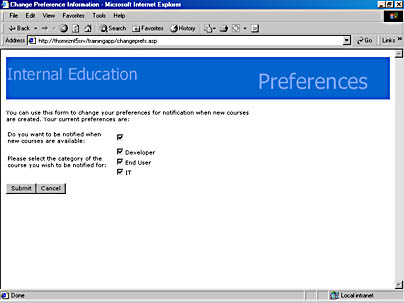
Figure 18-10. The Web page for changing student notifications.
Registering for a Course
You might be wondering how a student goes about registering for a class. The application provides two ways for students to browse through the available courses in the Schedule folder. First, a student can specify date ranges from a Date Picker and view the courses in a simple list. The student can then re-sort the list by title, date, or category. The page containing this simple list is shown in Figure 18-11.
NOTE
There are two ways you can generate this simple list page. One way is to use ADO inside ASP pages. The other technique involves using the XMLHTTP component of Internet Explorer 5 and requesting XML data from the Exchange server. The Training application then renders that XML data locally, thereby eliminating a round-trip to the server if the user wants to re-sort the list of classes.
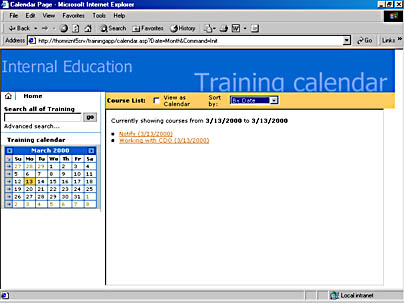
Figure 18-11. The page showing a simple list of courses for a specific date range.
The second way the Training application allows students to browse through the available courses is by leveraging the extensibility of OWA. By passing OWA-specific parameters (which you'll learn about later in this chapter), you can make OWA display information. Figure 18-12 shows how the Training application employs the rich calendar views of OWA to display the schedule of courses.
When a user double-clicks on one of the calendar items in the view, the application displays a custom Web Storage System form instead of displaying the standard OWA appointment form. The ability to replace OWA forms with your own is a powerful one. Figure 18-13 shows the Web Storage System form displayed when a user clicks on a training event in the calendar.
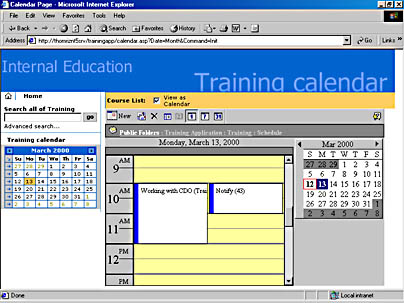
Figure 18-12. Using OWA and the calendar view to display a list of available courses.
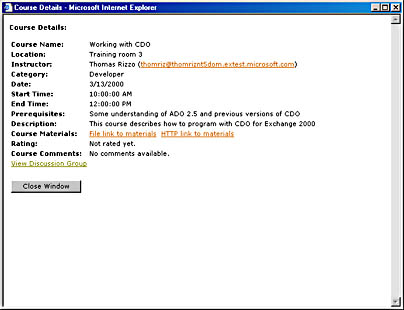
Figure 18-13. The Web Storage System form that is displayed when a user clicks on an item in the Training application's calendar.
Searching for a Course
The Training application also offers students and instructors two ways to quickly find course information: via quick search, and via advanced search. Both types of search eventually follow the same code path, but the advanced search provides the user with a more powerful interface for specifying search options. Figure 18-14 shows the Advanced Search page of the Training application. The search capabilities can take advantage of the built-in content indexing of Exchange Server 2000, if you enable content indexing. We'll learn about content indexing and how to leverage it in Chapter 19.
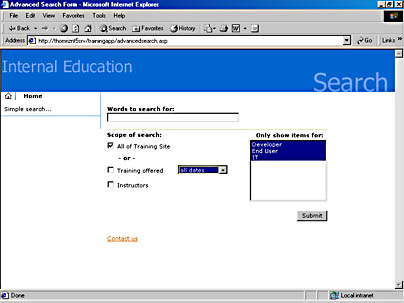
Figure 18-14. The Advanced Search page for the Training application.
Using a Workflow Process for obtaining approvals
The Training application utilizes the built-in workflow engine and the graphical Workflow Designer of Exchange Server 2000. If an instructor specifies that a course requires approval, the application starts a workflow process when a student attempts to register for the course. The application next sends an e-mail to the student's manager. The manager can then approve the student to take the course. If the manager rejects the request or doesn't approve it in time, the student can't take the course.
Figure 18-15 shows the workflow process in the Workflow Designer for Exchange Server 2000. Figure 18-16 shows the e-mail that the manager receives when an approval is required for a student to take a course.
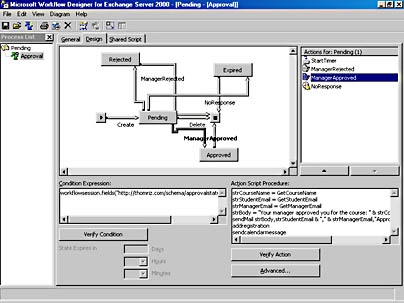
Figure 18-15. The workflow process shown in the Workflow Designer for Exchange Server 2000.
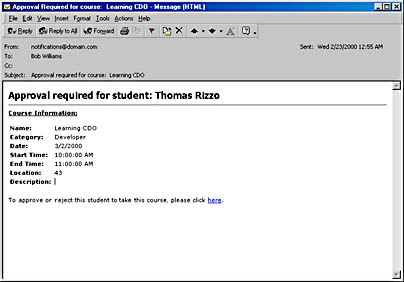
Figure 18-16. The e-mail sent to the manager who needs to approve a student who wants to take a course.
Providing a Survey
The Training application also provides a survey component. A timer-based event fires on the Exchange server every night to implement the course survey component. This event checks to see whether any courses have been completed on that day. If a course has been completed, the timer agent e-mails a notice to the students who were registered for the course, as shown in Figure 18-17. The students can then click on a link in the e-mail message and fill out a survey to rate both the course and the instructor. The application checks to make sure that students don't fill out multiple surveys for either the course or the instructor. Figure 18-18 shows a survey form for a course.
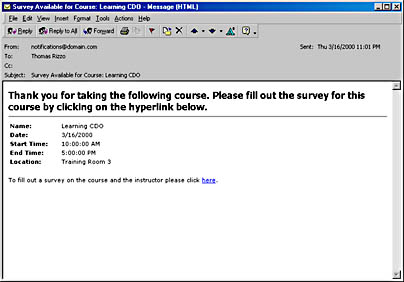
Figure 18-17. The e-mail notice that a survey is available for a course.
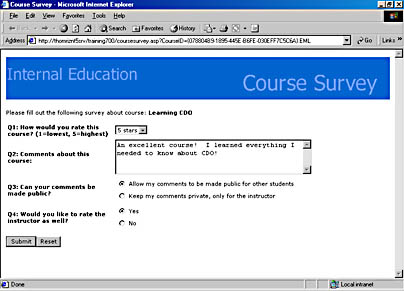
Figure 18-18. A survey for a course that the student can fill out.
Once the student fills out the survey, the survey is saved into one of the Surveys folders, depending on whether the survey is a course or instructor survey and on whether another agent fires. This agent collates all surveys received for the course and the instructor and determines an overall rating for each. The agent also takes any comments the users have and adds them to the course or the instructor rating. Figure 18-19 shows how the final results look after the agent completes its processing. Other students can then view ratings and comments about either the instructor or the course.
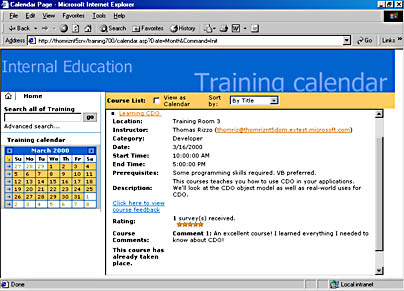
Figure 18-19. Ratings and comments are shown in the main views for both the instructor and the course. Here, we see the ratings for a course.
Now that you've had a quick overview of some of the features of the Training application, let's take a look at how the Training application was actually built. We'll look at the technologies used in our programming and at some code snippets from both the setup program and the application itself.
EAN: 2147483647
Pages: 184