The Outlook View Control
After Outlook 2000 becomes available, an add-on product named the Outlook View control will also be available. The Outlook View control is an ActiveX wrapper around the Outlook views, such as the Table, Calendar, Card, and Timeline views. You can use this ActiveX control either inside a web application, such as an ASP application, or inside your folder home page. This control prevents you from having to rewrite significant portions of code to mimic Outlook functionality. Figure 10-3 shows the second folder home page example (FullContacts.htm) hosting the View control.
The environment you place the View control in determines the control's functionality. For example, when you place the View control in a folder home page, the control provides full access to the Outlook object model as well as automatic merging of menu commands with the Outlook container, as shown in Figure 10-4. In contrast, in a stand-alone web page scenario, the control does not allow access to any user data nor does it give you the entire Outlook object model. This restriction prevents the control from downloading all the Outlook data when a user accesses the web page. In either scenario, the View control does require Outlook to be installed on the machine. The control does not install Outlook for you.
The View control allows you to programmatically change control properties so that you can place more than one control on a single page in your application. For example, you might want to show a side-by-side view of two calendars, or maybe a contacts list and all tasks associated with the currently selected contact. When multiple View controls are on a single page, merging their menus is based on the control with the focus.
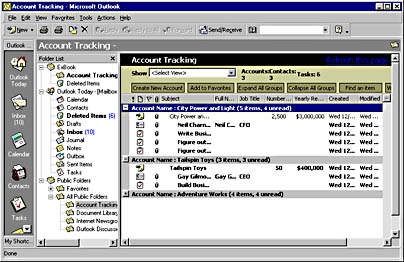
Figure 10-3 A folder home page (FullContacts.htm) hosting the Outlook View control.
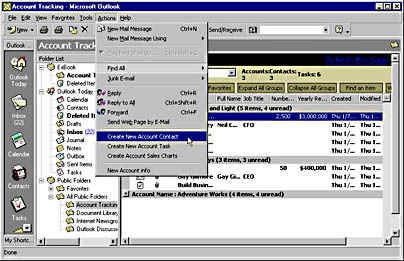
Figure 10-4 When hosted in a folder home page, the View control automatically merges menu commands with its Outlook container. Notice that the custom actions appear in the Actions menu for an Account Tracking form selected in the control.
Setting Up the Second Folder Home Page
Using a machine that has Outlook 2000 with the Visual Basic Scripting Support and Collaboration Data Objects components installed, follow the next set of steps to set up the second folder home page, which uses the Outlook View control:
- Make sure you have the Outlook View control installed. You can check this by searching your hard drive for the file Outlctlx.dll. This control should also have an entry in the Registry under the following key:
HKEY_CLASSES_ROOT\OVCtl.OVCtl |
NOTE
The Outlook View control is scheduled to ship after Outlook 2000. Microsoft will make the control available for downloading from the Outlook and Microsoft Exchange Server web sites after Outlook 2000 ships. A beta version of the control is available on the companion CD in the View Control Beta folder. To use the beta version of the control, you must register it using the Regsvr32 utility. Since the Outlook View control on the companion CD is a beta version, it may not behave as expected and should be used only for testing purposes.
- In Outlook, right-click on the Account Tracking folder and choose Properties.
- In the Address text box of the Home Page tab, specify the location of the FullContacts.htm file—for example, file://C:\Webview\FullContacts.htm—and click OK. (FullContacts.htm is available on the companion CD.)
- Click the Account Tracking folder to display the folder home page.
The following section outlines how to add the View control to a web page and how to program it.
Using the Outlook View Control
Adding a View control to your folder home page or web page is actually quite easy. All you need to do is add the Object tag to your page and give the control an ID that you will use in your program. For the Account Tracking folder home page, the Object tag at the top of the next page was inserted into the HTML page.
<object ID="oViewControl" WIDTH=100% HEIGHT=84% style="border-bottom:1px silver solid" CLASSID="CLSID:0006F063-0000-0000-C000-000000000046"> <param NAME="Namespace" VALUE="MAPI"> <param NAME="Folder" VALUE=""> <param NAME="View" VALUE="Accounts"> </object> |
This tag creates the View control object. Also notice the Param tags—you can use these tags to pass parameters to the control. In this example, I pass in MAPI for the Namespace parameter. I also pass in the folder. I pass a blank value for the folder so that the control defaults to the default folder the user is currently looking at. Finally, I pass in, as a string, the default view I want in the control. The Accounts view is the default view for the Account Tracking folder.
After you insert the control, you can add code in the folder home page to grab the Outlook Application object using the technique we saw earlier, Window.External.OutlookApplication. Because I know this script must be running in the Account Folder (as this is the folder home page for that folder), I set a variable to the current folder so that I can use that variable later in the script.
After the folder variable is set, my code needs to accomplish one more task. Recall that the View control is going to bring up the default folder that the user is viewing. This folder, however, might not be the Account Tracking folder. To ensure that the control displays the Account Tracking folder, the code finds the full path to the Account Tracking folder and passes this path as one of the control's properties, Folder. For example, if the Account Tracking folder was a top-level folder in the Favorites folders, the path would be \\Public Folders\Favorites\Account Tracking\. The code then fills in the total number of accounts, contacts, and tasks in the folder. The code for this process is shown here:
<SCRIPT ID=clientEventHandlersVBS LANGUAGE=vbscript> '****************************************************** 'In-line code ' 'These lines of code are run when the browser reaches 'them while parsing the document. They set up the global 'variables that are needed throughout the application. '****************************************************** Set oApplication = window.external.OutlookApplication Set oNS = oApplication.GetNamespace("MAPI") Set oCurrentFolder = oApplication.activeExplorer.currentfolder Set oAccountFolder = oCurrentFolder 'AvailWidth = document.body.clientWidth '****************************************************** 'Function StrFullPath() ' 'This function creates and returns the full path to the 'folder '****************************************************** function StrFullPath() If oCurrentFolder Is Nothing Then strFolderName = "" End If Set olCollabFolder = oCurrentFolder strFolderName = "" Set olRoot = oCurrentFolder While (olRoot <> "Mapi") strFolderName = oCurrentFolder.Name & "\" & strFolderName Set olRoot = oCurrentFolder.Parent If olRoot <> "Mapi" Then Set oCurrentFolder = oCurrentFolder.Parent End If Wend strFullPath = "\\" & strFolderName end function '****************************************************** 'Sub FillTotals() ' 'This subroutine gets the count for the different types 'of items in a folder, such as accounts, contacts, and 'tasks. It also fills in the HTML page with this 'information. '****************************************************** Sub FillTotals() RestrictString = "" RestrictString = "[Message Class] = ""IPM.Post.Account info""" Set oAccounts = oAccountFolder.Items.Restrict(RestrictString) oAcctCount = oAccounts.Count AccountTotal.innerHTML = "<STRONG>" & oAcctCount & "</STRONG>" RestrictString = "" RestrictString = _ "[Message Class] = ""IPM.Contact.Account contact""" Set oContacts = oAccountFolder.Items.Restrict(RestrictString) oContactCount = oContacts.Count ContactTotal.innerHTML = "<STRONG>" & oContactCount & "</STRONG>" RestrictString = "" RestrictString = "[Message Class] = ""IPM.Task""" Set oTasks = oAccountFolder.Items.Restrict(RestrictString) oTasksCount = oTasks.Count TaskTotal.innerHTML = "<STRONG>" & oTasksCount & "</STRONG>" End Sub Fullpath = StrFullPath() oViewControl.Folder = FullPath '****************************************************** 'Sub Window_onLoad() ' 'This subroutine is called when the HTML page is loaded '****************************************************** sub Window_onLoad() oViewControl.Folder = Fullpath 'oViewControl.width = AvailWidth txtFolder.innerHTml = oAccountFolder.Name FillTotals() end sub |
Now that some of the information for the HTML page is filled in, we need to add some buttons to the page to allow the user to call our subroutines, which automate the View control. I've left out the HTML code that actually creates the buttons (you can look at this code in the FullContacts.htm file on the companion CD), but we will take a look at the automation code that drives the View control from these buttons.
There are actually six buttons and a drop-down list from which the user can change the View control. The drop-down list enables the user to change the view of the control to one of the other views in the Outlook folder. Figure 10-5 shows another view of the Account Tracking folder home page.
The View control has no methods to create new views, so the views must already exist in the folder. To change the view by using code, set the View property on the control as the name of the desired new view. Since a fully functional Outlook application is running in the control, users can right-click on view columns to bring up the Field Chooser or customize the view directly in the page. The following code implements changing the views of the control:
'****************************************************** 'Sub WhatView_onChange ' 'This subroutine changes the view of the Outlook control 'depending on what the user picked in the drop-down list '****************************************************** sub WhatView_onChange oViewControl.view = WhatView.value window.focus end sub |
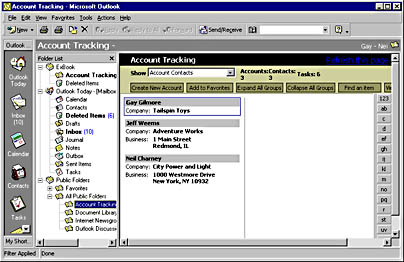
Figure 10-5 The folder home page for the Account Tracking application, which contains the Outlook View control. This time the view is showing account contacts.
Implementing the functionality for the buttons is actually pretty straightforward as well. From the buttons, the user can create new accounts, expand groups, collapse groups, add a folder to a favorites list, find an item in a folder, and view the address book. Most of these actions are already contained in the View control as methods. For example, to view the address book, all the code has to do is call the AddressBook method on the View control. Same thing for adding the folder to the favorites—all the code has to do is call the AddtoFavorites method on the View control. Here's the code for the buttons:
'****************************************************** 'Sub CreateAccount ' 'This subroutine creates a new account info form and 'displays it for the user to fill in '****************************************************** Sub CreateAccount() set oAccount = oAccountFolder.Items.Add("IPM.Post.Account info") oAccount.Display() End Sub '****************************************************** 'Sub Actions_onClick(Action) ' 'This subroutine executes the correct action depending 'on what the user picked in the web page, such as 'finding an item, creating a new account, etc. '****************************************************** Sub Actions_onClick(Action) Select Case Action case "AddressBook" oViewControl.AddressBook() case "AddtoFavorites" oViewControl.AddtoFavorites() case "ExpandAllGroups" oViewControl.ExpandAllGroups() case "CollapseAllGroups" oViewControl.CollapseAllGroups() case "AdvancedFind" set oExplorer = oApplication.ActiveExplorer set oCommandBar = _ oExplorer.CommandBars.Item("Menu Bar") set oMenu = oCommandBar.Controls("Tools") set oAF = oMenu.Controls("Advanced Find...") oAF.Execute case "CreateAccount" CreateAccount() End Select End Sub |
You can also take advantage of other methods and properties in your applications that use the View control. To see a complete list of them, just add a reference to the Outlook View control either in the VBA that ships with Outlook 2000 or in Visual Basic, and use the object browser. Most of the methods and properties are self-explanatory, such as the ReplyInFolder and ReplyAll methods. Here are a few of the more interesting properties and methods for the View control that we haven't discussed yet and that you can use in your code:
- FlagItem method. This method brings up the dialog box that flags an item with a reminder. It will not work unless the user has selected a valid item in the View control, such as a PostItem.
- Categories method. The method brings up the Categories dialog box in which the user can select item categories. This is the same dialog box that appears when the categories button is clicked in an Outlook form.
- CustomizeView method. This method brings up the dialog box that lets a user select fields, sortings, the filter, the automatic formatting, and the grouping for the view. This is the same dialog box that is displayed by selecting the View\Current View\Customize Current View menu option.
- ShowFields method. This method brings up the Show Fields dialog box. Using this method, the user can quickly select the desired fields that the View control will display for the current view.
- SynchFolder method. This method attempts to synchronize the current folder in the background. (I use the word attempts because your program might call this method only to find that the connection to the Exchange Server is not available.) Consider creating a button on your HTML form so that users can easily activate folder synchronization.
- Restriction property. This is a powerful property because it allows you to filter the items you want to display in your view. It takes the same string format as the Restrict method on the Items collection. For example, if you want to restrict the view so that only Task items appear, you would pass to the Restriction property the following string: [Message Class] = "IPM.Task". You can also pass your restriction as a parameter by using the following syntax when creating your View control:
<param NAME=Restrict VALUE="[Message Class] = 'IPM.Task'"> |
By using the Restriction property, you can place two View controls on a single page and have one view control show a restricted set of items based on what the users pick in the other View control.
EAN: 2147483647
Pages: 101