| The Graph Editor is a window that shows a graphic representation of your animation. It has points that represent the time and position in which a keyframe was set, and curves between the keyframes, which show the acceleration (Figure 12.29). Figure 12.29. Use the Graph Editor to fine-tune your animation once you get the basic timing down. 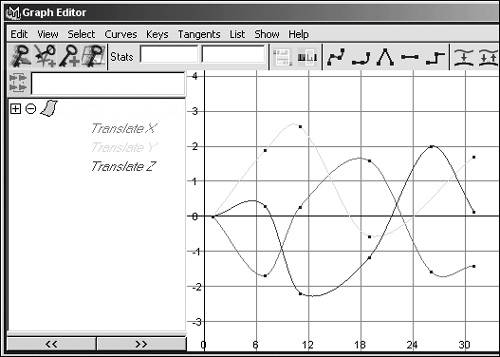
By changing the distance between keyframes, you can change an object's speed. However, you must adjust the curve that represents its motion between keyframes to change its acceleration. You can use the tangent types in the Graph Editor to quickly change the shapes of the curves (Figure 12.30). By default, the keyframes you set will be spline tangents. You can also manually adjust the shapes of the tangents. The Graph Editor is helpful for editing, copying, and looping animation. Figure 12.30. From left to right, these tangent types are spline, linear, and flat. 
Tangent types There are six tangent types, all of which you can set by selecting a keyframe or an animation curve and choosing from the Tangent menu in the Graph Editor. You can also change which tangent type is automatically assigned to keyframes before they are set, in the Keys section of the Preferences window. Spline Keyframes with spline tangents have smooth curves between and through them (Figure 12.31). When animating a fish through water, you might use a spline tangent. Figure 12.31. These keyframes are set to the spline tangent type. Note that while the values at frames 1 and 12 are the same, there is still a curve between those points because the keyframes are not set flat. This causes drifting, which can be problematic if you want an object to stay still. 
Linear This tangent type simply draws a straight line from one keyframe to the next. It creates jerky movement with sudden changes, which might be good for some-thing mechanical (Figure 12.32). Figure 12.32. These keyframes are set to the linear tangent type. 
Clamped This is the default tangent type. Keyframes with clamped tangents act just like spline tangents with one very useful exception: If two keyframes are set at the same value at different points in time, it acts like a linear tangent. It prevents the problem that sometimes occurs with spline tangents, which is that an object you want to be still will drift slightly (Figure 12.33). Figure 12.33. These keyframes are set to the clamped tangent type. This tangent type is similar to the spline tangent except that the drifting problem between frames 1 and 12 has been removed. 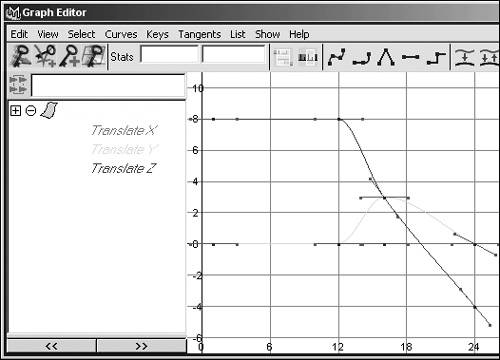
Stepped This tangent type ensures that a value remains the same until it gets to the next keyframe, when it jumps to that position. It makes the curve look like a stephence, the name (Figure 12.34). One use for this tangent is for producing camera cuts. If you want a camera to hold in one position and then cut to another position, keyframe using a stepped tangent. Figure 12.34. These keyframes are set to the stepped tangent type. 
Flat The tangent itself becomes horizontal when using this tangent type. Flat tangents typically create "slow-in slow-out"which means that the animation gradually accelerates between keyframes, goes quickly in the middle of the curve, and then gradually decelerates as it moves to the next keyframe (Figure 12.35). Figure 12.35. These keyframes are set to the flat tangent type. 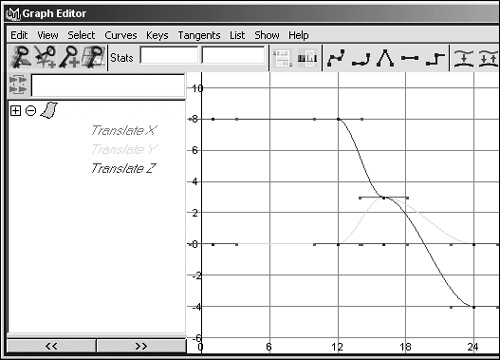
Fixed The tangent doesn't change when you edit the keyframe.
Creating a bouncing-ball animation is a good way to learn some of the functions of the Graph Editor. To use the Graph Editor to change tangent types: 1. | From the Create menu, select NURBS Primitives > Sphere.
| 2. | Move the sphere up 10 grid units.
An easy way to do this is to type 10 in the field next to Translate Y in the Channel Box.
| 3. | Make sure you're at frame 1 in the time-line and that Auto Keyframe is turned on.
The key icon  should appear red and pressed down. should appear red and pressed down.
| 4. | Press  to keyframe only the translate attributes. to keyframe only the translate attributes.
| 5. | Go to frame 15 and translate the sphere down to 1 along the Y axis.
The ball will be keyframed once it is moved, because Auto Keyframe is on.
| 6. | Go to frame 30 and translate the sphere back up to 10 along the Y axis.
Rewind and play back the animation. The ball's bounce is not convincing.
| 7. | From the Window menu, select Animation Editors > Graph Editor.
The Graph Editor window opens. The curve for the sphere's animation should appear as long as the sphere is still selected.
| 8. | Marquee-select the two keyframes at the top of the graph (Figure 12.36).
Figure 12.36. The keyframes at the top of the curve are being selected. The ball is at its highest between these points, and it needs to slow down on the way in and out of thema perfect use for the flat tangent type. 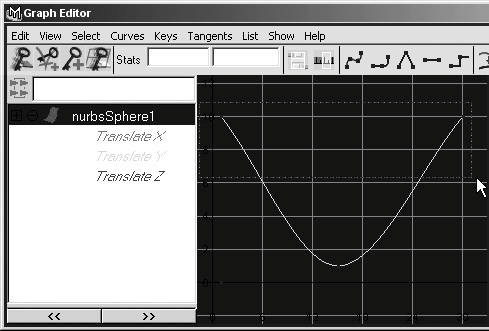
| 9. | Click the Flat Tangents button  in the Graph Editor window. in the Graph Editor window.
| 10. | Select the keyframe at the bottom of the curve (Figure 12.37).
Figure 12.37. This keyframe is at the point when the ball hits the ground. As it is now, the ball doesn't seem to bounce; it just kisses the ground. 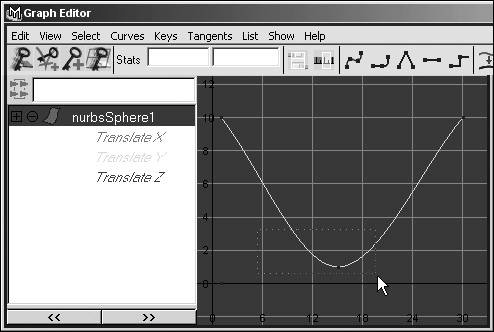
Since you're trying to click on such a small point, it helps if you marquee-select, even when you're only selecting one keyframe.
| 11. | Click the Break Tangents button  . .
This allows you to move the tangents on either side individually.
| 12. | Select the tangent on the left of the keyframe; then  -select the tangent on the right. -select the tangent on the right.
| 13. | Click the Move Nearest Picked Key Tool button, which is at the top-left corner of the Graph Editor  . .
| 14. | With the middle mouse button, drag the tangents and move them up one at a time to form a V shape (Figure 12.38).
Figure 12.38. Now that the tangents have been adjusted, the ball will appear to really bounce. 
Play back the animation. It should now look more like a real bouncing ball.
|
Perhaps you want your ball to bounce again. One easy way to accomplish this is to copy and paste keyframes in the timeline. To copy and paste in the timeline: 1. | Animate the bouncing ball as described in the previous task.
| 2. | Make sure that the playback end time is set to at least 60.
You can do this by typing 60 in the Playback End Time field.
| 3. | Hold down and drag in the timeline from 1 to at least 31 (Figure 12.39).
Figure 12.39. You can -click and drag the keyframes you want to copy from. If you stop at frame 30 in your selection, the selection will not include the keyframe at 30, so you must go one frame beyond it. 
| 4. | Right-click the timeline; select Copy from the pop-up menu (Figure 12.40).
Figure 12.40. Copy the keyframes from the convenient pop-up menu. 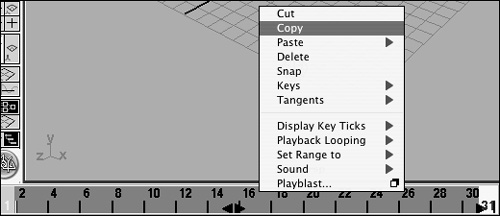
| 5. | Click frame 30.
The frame you are on when you paste sets the time when the range of keyframes you paste will begin.
| 6. | From the Edit menu, select Keys and then select the option box next to Paste.
The Paste Keys Options dialog box opens.
| 7. | In the Paste Method section, click Merge (Figure 12.41) to paste the keyframe at the current frame without moving any adjacent keyframes.
Figure 12.41. In the Paste Keys Options dialog box, click Merge to place the keyframe at the current frame without offsetting any adjacent frames. 
| 8. | Click Apply.
A new keyframe marker appears on the timeline.
| 9. | Rewind and play the animation.
The ball now bounces twice.
|
Sometimes you want an animation to repeat several times. You can use the Graph Editor to perform multiple paste operations at once. To copy and paste in the Graph Editor: 1. | Animate a bouncing ball.
| 2. | Make sure that the timeline goes to at least 120.
You can do this by typing 120 in the Playback End Time field.
| 3. | From the Window menu, select Animation Editors > Graph Editor.
The curve for the sphere's animation should appear. If it does not, select the sphere.
| 4. | From the Edit menu in the Graph Editor, select Copy.
| 5. | Hold down  and drag in the Graph Editor window until the red line, which is the time indicator, is at the end of the curve (Figure 12.42). and drag in the Graph Editor window until the red line, which is the time indicator, is at the end of the curve (Figure 12.42).
Figure 12.42. Be sure that the current time is at the point where you want to begin the paste operation. Otherwise, when you paste, the keyframes will end up wherever the current time indicator happens to be and overwrite the frames that were there. 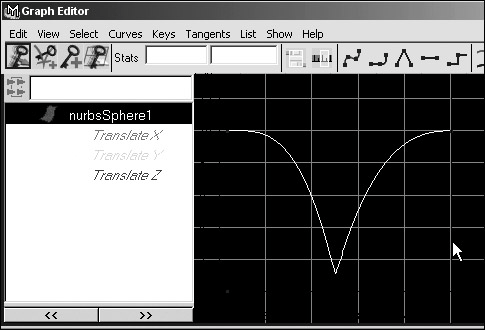
| 6. | From the Edit menu in the Graph Editor, select the box next to Paste.
The Paste Keys Options window opens.
| 7. | In the Copies field, type 3 (Figure 12.43).
Figure 12.43. Using the Paste Keys options, you can conveniently make several copies at once. 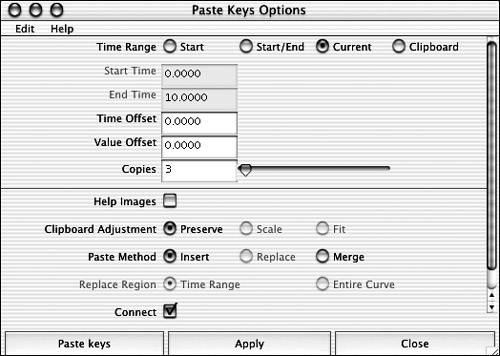
| 8. | While the mouse is in the Graph Editor, press  . .
The entire animation curve now fits within the window. There are now three additional bounces (Figure 12.44).
Figure 12.44. This is the result of the paste operation. The ball bounces four times instead of just once. 
| 9. | Rewind and play the animation.
The ball bounces four times.
If you want to speed up or slow down your animation, you can scale the time in the Graph Editor. A longer time for the same distance means slower movement, and vice versa.
|
You can also scale values. Perhaps all of your bounces are too high, or none of your arm swings extends far enough. Scaling a value is just as easy as scaling an object's size. To scale in the Graph Editor: 1. | Create a bouncing ball with four bounces, as in the previous task.
| 2. | From the Window menu, select Animation Editors > Graph Editor.
| 3. | From the column on the left, select Translate Y.
This isolates the Y translate curve.
| 4. | Marquee-select the whole curve.
| 5. | Press  to switch to scale mode. to switch to scale mode.
| 6. | Move the mouse over the first keyframe on the left side of the curve (Figure 12.45).
Figure 12.45. It is important to have the mouse at the correct position when you start to scale keyframes in the Graph Editor. Wherever you begin to scale is where the pivot point of the scale will be. 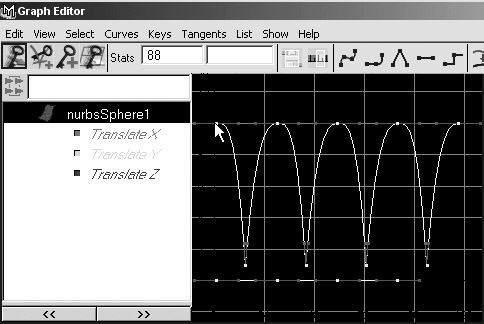
The mouse's location when you begin to scale serves as the scale's pivot point.
| 7. | With the middle mouse button, drag to the left.
| 8. | Move the mouse over one of the low points of the bounces (Figure 12.46).
Figure 12.46. Here the time has been scaled down so that the ball bounces faster. The mouse has been carefully placed at the bottom of the bounce, so that position will be the pivot point of the scale. 
| 9. | With the middle mouse button, drag down.
The bounces get shorter (Figure 12.47).
Figure 12.47. Now the value has been scaled downthat is, the bounces don't go as high as they did. Because the pivot point was at the bottom of the curve, the position at which it bounces hasn't changedwhich means that the ball will still appear to be bouncing on the ground, not above or below it. 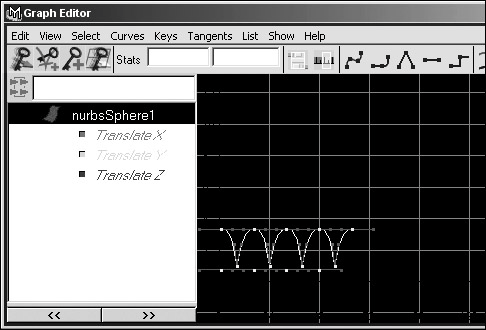
|
 Tip Tip
|