| The first step in using VersaMail to access email wirelessly on your Treo is to create an email account. Although I use the word "create," in reality you're just setting up VersaMail to access an existing email account. In other words, an email account doesn't truly exist on your Treo; you're using your Treo to access an email account hosted by an email server somewhere. Semantics aside, from the perspective of VersaMail, you have to "create" an account so that VersaMail knows how to access it. For the purposes of this chapter, "creating an account" refers to the process of informing VersaMail about an email account. Note VersaMail is set up by default to leave messages on the server for POP accounts. See the "Tweak Advanced VersaMail Settings" section later in this chapter to find out how to change this setting.
Note Although they don't necessarily solve the POP synchronization problems of VersaMail, you might consider some third-party email applications if you're itching to try something different. SnapperMail, the most popular VersaMail replacement, is available online at http://www.snappermail.com/wireless/email/. Another promising third-party Treo email client is ChatterMail, which you can find out about at http://www.chatteremail.com/.
You have two options for creating an email account for use in VersaMail: Create the account on your desktop/notebook computer, and then synchronize it with VersaMail. Create the account directly in VersaMail on your device.
The approach you use primarily has to do with whether you already have an email account set up on your desktop computer. There's also the issue of what kind of desktop computer you are usingthe first approach is an option only on Windows computers. If you have a Windows computer and you'd like to go with the first option, you have some added flexibility because the VersaMail Account Setup Wizard on your PC is usually capable of finding existing email accounts set up on your computer and transferring them automatically to VersaMail. Then the account creation boils down to simply synchronizing the account with your device. If you're creating a new email account, as opposed to finding and setting up an existing account, you need to gather a few pieces of information about your account: Your email address, username, and password Note In keeping with VersaMail's tenuous connection to Microsoft Outlook, I have to report that I struggled when trying to get VersaMail to detect existing email accounts I had set up in Outlook. Again, it appears that the whole VersaMail-Outlook relationship is better suited to Exchange-based email accounts rather than POP and IMAP accounts.
The email protocol used for incoming mail, such as POP or IMAP The name of the incoming mail server The name of the outgoing mail server (SMTP is assumed as the protocol) Any security features for the account, such as Secure Sockets Layer (SSL), Authenticated Post Office Protocol (APOP), or Extended Simple Mail Transfer Protocol (ESMTP)
With this information in hand, you're ready to get down to the business of telling VersaMail about your email account. Create the Account from Your Desktop Computer Palm provides a desktop application for Windows called VersaMail Setup that makes it possible to set up VersaMail email accounts on your PC. Follow these steps to use the VersaMail Setup application to create a new account: 1. | Launch the VersaMail Setup application on your PC. The first step of the Account Setup Wizard appears, as shown in Figure 8.1.
Figure 8.1. The first step in setting up a new email account in VersaMail involves selecting your device username and choosing a setup option. 
| 2. | First, select the username you use to synchronize your device with your desktop computer. After that, you're ready to choose a setup option. The first option, creating a new VersaMail account, is what you use to create a new email account. However, before going with that option, check to make sure an account isn't already set up by clicking the second option (for editing an existing account) and taking a look at the drop-down list. If you see an account in addition to VersaMail, you already have an account on your device, and you can select and edit it instead of creating a new account. Otherwise, go with the first option to create a new account, and then click the Next button.
| 3. | Figure 8.2 shows the next step in the wizard, which prompts you about the new email account. Keep in mind that the email account in question is new only to VersaMailit must already exist outside VersaMail. If you're lucky, VersaMail finds an existing account on your PC, and you can select An Email Account Detected on This PC to use the existing account settings. This option keeps you from having to enter the email account settings manually. Unfortunately, this process doesn't always work reliably, so you might have to select the A Mail Service from This List option, which isn't quite as automatic. If you don't see your mail service in the list, scroll to the bottom and select Other. Then click the Next button to continue with the email setup process.
Figure 8.2. You can choose an account that VersaMail Setup finds on your PC, or you can create one from a list of mail services. 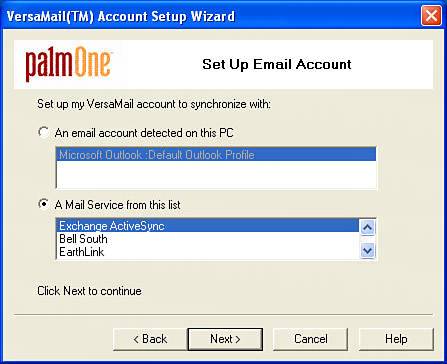
Note Editing an existing email account is virtually identical to creating a new account, except that the account details are already entered for you. So the remaining steps generally apply in either case. | 4. | If you found your mail service in step 3, you need to just follow the service-specific setup from here on. Rather than go through the details of each service, I want to show how to set up an email account through the Other option, which applies to any POP or IMAP email account. So if you selected Other in step 3, the next choice you have to make is simply between IMAP and POP. After making this choice, click the Next button to continue.
Note If you selected Exchange ActiveSync as your email service, you need to make sure you get the appropriate email settings from your network administrator to enter in the VersaMail Setup application. | 5. | Figure 8.3 shows the next setup step, Enter Account Settings, which gets into the details of your account settings. Specify the name you'd like to use for the email account, which is simply a descriptive name of your choosing. Then enter your username, password, and email address, which you should already have for the account. After entering these account settings, click the Next button to continue.
Figure 8.3. Entering the first page of email account settings is a critical part of the email account creation process. 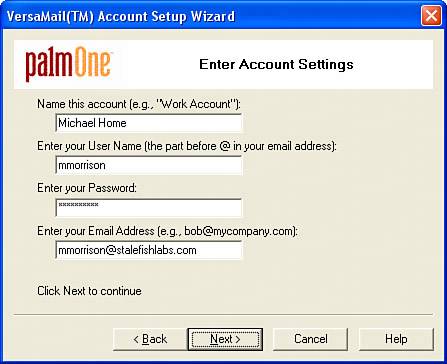
| 6. | Figure 8.4 shows another page of account settings that prompts you to enter the mail servers for the account. The mail servers are the most important information on this page. After entering the incoming and outgoing mail servers, you have the option of enabling server authentication, which depends entirely on your specific email account. If your account requires additional settings, such as SSL security for outgoing email, you need to click the Advanced Settings button to access and enter advanced email settings.
Figure 8.4. The second page of account settings primarily prompts you for the mail servers. 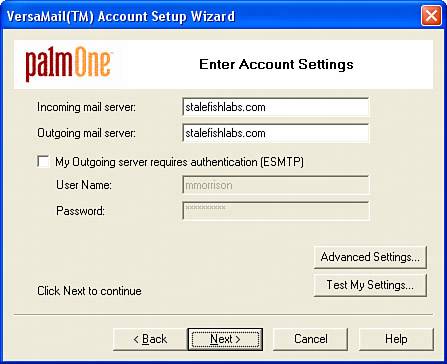
| 7. | It's important to test your new email account to make sure the settings are correct. To do so, just click the Test My Settings button in the page shown in Figure 8.4. A dialog box similar to the one in Figure 8.5 should open and confirm a test of the account. If you get an error while testing the account, step back through the wizard and double-check the settings. If you're satisfied with the email test, click the Next button to continue.
Figure 8.5. Testing the new email account is a good way to ensure that you've entered the account settings correctly. 
| 8. | You're almost finished. The next to last step in the email setup process is to declare that you're finished or elect to create another account. If you opt to create another account, just follow these steps again for the new account. Otherwise, select the I'm Finished option, and click the Next button.
| 9. | The last page in the setup wizard reminds you that a HotSync is necessary for the new account information to get transferred to your device. The actual transfer of account information is technically part of the synchronization process. Click the Finish button to close the wizard, and then press the HotSync button on the Multi-connector cable to perform a HotSync and transfer the account to your device.
|
The email account is now created and ready to use in VersaMail. In fact, you might find it has already connected and pulled down email messages. Just to clarify from the earlier discussion on synchronization, if you're using an Exchange or IMAP email account, the Inbox on your Treo will match the Inbox on your PC. However, if you're using a POP account, "synchronizing" the account simply involves retrieving messages from the POP mail server. Regardless of synchronization issues, you now have the capability of accessing email wirelessly from your Treo, which is incredibly cool. Create the Account on Your Treo You don't have to use your desktop computer to establish an email account with VersaMail; you can create a new account directly on your Treo. The steps are very similar to those for creating a new account with the VersaMail Account Setup Wizard, except you enter the information directly on your device. Follow these steps to create a new email account directly in the VersaMail application on your Treo 650: 1. | Press the Option key followed by the Messaging button to launch the VersaMail application. You can also navigate to VersaMail on the main application screen and launch it if you've changed the Option + Messaging application button combination. The VersaMail application opens, and if no accounts have been set up in VersaMail, the account setup process should automatically start. If not, press the Menu button, navigate over to the Accounts menu, and scroll down and select the Account Setup command. The Account Setup screen appears, as shown in Figure 8.6.
Figure 8.6. The Account Setup screen displays the accounts currently set up in VersaMail. 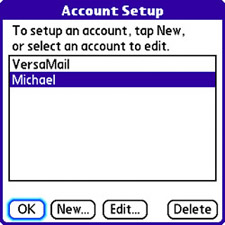
| 2. | Tap the New button to begin creating a new email account, or tap Edit to edit an existing account. Another Account Setup screen for entering an account name and mail service appears (see Figure 8.7).
Figure 8.7. The initial step in the account setup process prompts you to enter an account name and select a mail service. 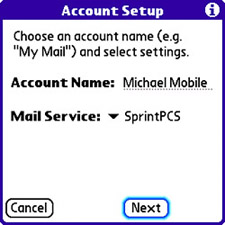
| 3. | First enter the account name, which is just a descriptive name, and then select the mail service, just as you saw earlier in the desktop email account creation process. If you select Other, you're also prompted to specify the protocol, which can be POP, IMAP, or Exchange ActiveSync. Tap the Next button to continue setting up the account.
| 4. | The next few screens in the account creation follow the same general information-gathering approach as the desktop email setup. You specify the username, password, email address, and mail servers. You then have the option of tweaking advanced email settings, such as the port number for the mail servers, and specifying whether SSL is required for security. When you're finished entering account information, tap the Done button to finish creating the new account.
|
When you're finished creating the new account, it immediately attempts to synchronize or otherwise connect to a mail server and retrieve any available messages. |