Adjust the Brightness and Screen Settings


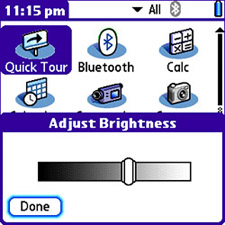
Another handy way to prolong the life of your Treo battery is to reduce the screen brightness. Of course, this option isn't always practical. Being able to use your device is certainly more important than trying to preserve its battery. However, if you're in a dimly lit place and can get away with a dimmer setting for the screen, by all means turn down the brightness and save some battery charge. To quickly adjust the screen brightness up or down, follow these steps:

1.

Press the Option key followed by the P key. The Adjust Brightness screen appears, as shown in Figure 3.10.

Figure 3.10. The Adjust Brightness screen displays a slider control for increasing and decreasing the screen brightness.


2.

To adjust the screen brightness, just press the Left and Right buttons on the five-way navigator.

Tip

If you want to quickly dim the screen brightness and you don't need to choose an exact setting, try pressing the Option key followed by the Right Shift key. The screen dims to a preset brightness level. To restore the screen to the previous brightness level, just press the same key combination again.

3.

Tap the Done button to accept the changes to the screen brightness.

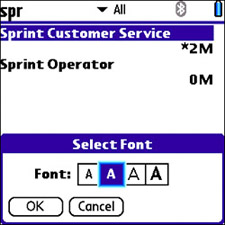
The brightness level is not the only customization you can make to the Treo screen. Another important tweak you might want to consider is the default font size, which is changed on an application-by-application basis. More specifically, you can specify the font size for the Calendar, Contacts, Memos, Messaging, and Tasks applications. However, I have to admit that I use the phrase "font size" rather loosely. In reality, you get to choose between only two different sizes and whether you want the font displayed in a regular or bold typeface for each size. This results in a total of four font options for each application. As an example, follow these steps to change the font size for the Contacts applications:

1.

Press the Application button to open the main application screen.

2.

Press the C key to jump near the Contacts application, and then navigate with the five-way navigator to select the Contacts application.

3.

Press the Center button to launch the Contacts application.

4.

Press the Menu button and scroll over twice to the Options menu. The first menu item, Font, should already be selected, so press the Center button to issue the menu command and open the Select Font screen, shown in Figure 3.11.

Figure 3.11. In the Select Font screen, you can change an application font to one of four different sizes and weights.


5.

Press the Up button to highlight the currently selected font/weight. To select a different font/weight, press the Left or Right button until you reach the desired setting.

6.

Tap the OK button to confirm the font change for the application.

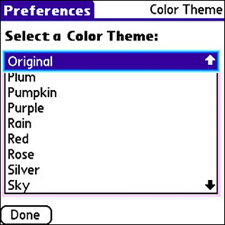
Don't forget that font changes apply only to the application in which you made the change. To alter the font setting for other applications, you need to open each individual application and repeat the previous steps.

The last screen customization worth looking into is more decorative than practical, yet it's still something you'll want to consider changing. I'm referring to the color theme for your Treo, which is much like the desktop themes that are popular on desktop and notebook computers. The Treo is a much simpler device than a full-size computer, however, and therefore the color theme setting for your device is simple. In fact, Treo themes are responsible only for establishing the colors used on your device, nothing more.

Tip

While I'm on the subject of the Treo screen, it's worth pointing out that you might need to recalibrate the touchscreen at some point. You'll know if this is necessary because the stylus taps won't seem to accurately reflect where you touch the screen. The "Up and Running with Your Treo" section in Chapter 1, "Meet Your Treo," addressed touchscreen calibration when setting up your device initially, but you can initiate a touchscreen recalibration by tapping Touchscreen in the main Preferences screen.


You select a theme by name with no regard for any other details, such as fonts or wallpaper. To change the color theme for your device, follow these steps:

1.

Press the Application button to open the main application screen.

2.

Press the P key to jump near the Prefs application, and then navigate with the five-way navigator to select the Prefs application.

3.

Press the Center button to launch the Prefs application. The Preferences screen appears with several options for tweaking device settings.

4.

Navigate to Color Theme on the Preferences screen under the Personal heading, and press the Center button to open the color theme preferences. The Color Theme Preferences screen consists of a long list containing theme names (see Figure 3.12).

Figure 3.12. You can to select a different color theme for your Treo from a large list of predefined themes in the Color Theme Preferences screen.


5.

To select a new color theme, press the Up button followed by the Center button to activate the theme list, and then press the Up and Down buttons to move between themes. You can also just tap each theme with the stylus. The cool thing about the color theme list is that you see the change immediately when you select a theme in the list.

Tip

If you forget the initial theme setting and would like to restore the default color theme, just choose Original as the theme.

6.

Tap the Done button to confirm the color theme change for your device.

Note

What I said about wallpaper applying only to the phone isn't entirely true. You can also set a background image for the Agenda view of the Calendar application. You learn how to set this background image in Chapter 6, "Getting Productive with the Calendar, Tasks, and Memos."


In case you're wondering, it is indeed possible to change the wallpaper for your device. However, wallpaper is unique on Treo devices because it applies only to the Phone application.


    TREO essentials
    Treo Essentials
    ISBN: 0789733285
    EAN: 2147483647
    Year: 2005
    Pages: 189

    flylib.com © 2008-2017.
    If you may any questions please contact us: flylib@qtcs.net