(Re)using the .NET Framework
In the previous sections (under the "Dicing the .NET Framework" heading), I emphasized that the .NET Framework was designed to encourage reuse. The objects that make up the class library are all available for your exploitation. In this section, that is exactly what you will do.
In the sample code that follows , I demonstrate how to both use and reuse the .NET Framework objects. In my demonstration, I use Microsoft's predefined delegates, classes, and structures. Each code sample introduces the creation of a class.
| Cross-Reference | Chapter 9 covers classes in more detail. |
COBOL .NET Example
As you will notice in Listing 7-4, I have created a console application and named the project FrameworkExampleCobol . For your convenience, the sample code from the .cob module is provided in Listing 7-4.
| |
000010* 000020 CLASS-ID. MYFIRSTCLASS. 000030 ENVIRONMENT DIVISION. 000040 CONFIGURATION SECTION. 000050 REPOSITORY. 000060* 000070* Reference a .NET Framework Class 000080* These classes are from the 000081* System.Text.RegularExpressions Namespace 000090* 000100 CLASS Regex AS "System.Text.RegularExpressions.Regex" 000110 CLASS Match AS "System.Text.RegularExpressions.Match" 000120* 000130* Reference a .NET Framework Delegate 000140* The Delegate is from the 000141* System.Text.RegularExpressions Namespace 000150* 000160 DELEGATE MatchEvaluator AS 000170 "System.Text.RegularExpressions.MatchEvaluator" 000180* 000190* Reference a .NET Framework Class 000200* This Class is from the System Namespace 000210* 000220 CLASS SYS-STRING AS "System.String" 000230 000240 STATIC. 000250 PROCEDURE DIVISION. 000260 METHOD-ID. MAIN. 000270 DATA DIVISION. 000280 WORKING-STORAGE SECTION. 000290 01 OBJ OBJECT REFERENCE MYFIRSTCLASS. 000300 PROCEDURE DIVISION. 000310 INVOKE MYFIRSTCLASS "NEW" RETURNING OBJ. 000320 END METHOD MAIN. 000330 END STATIC. 000340 000350 OBJECT. 000360 DATA DIVISION. 000370 WORKING-STORAGE SECTION. 000380 PROCEDURE DIVISION. 000390* 000400 METHOD-ID. NEW. 000410 DATA DIVISION. 000420 WORKING-STORAGE SECTION. 000430 PROCEDURE DIVISION. 000440 INVOKE SELF "MYFIRSTMETHOD". 000450 END METHOD NEW. 000460* 000470 METHOD-ID. MYFIRSTMETHOD. 000480 DATA DIVISION. 000490 WORKING-STORAGE SECTION. 000500* 000510* Establish appropriate References to the .NET Framework objects 000520* 000530 01 MY-DELEGATE OBJECT REFERENCE MatchEvaluator. 000540 01 INPUT_STRING OBJECT REFERENCE SYS-STRING. 000550 01 OUTPUT_STRING OBJECT REFERENCE SYS-STRING. 000560 01 STRING_PATTERN OBJECT REFERENCE SYS-STRING. 000570 01 DISPLAY_LINE PIC X(100). 000580 01 NULL-X PIC X(1). 000590 000600 LINKAGE SECTION. 000610 PROCEDURE DIVISION. 000620* 000630* Assigning the Delegate via the Class Constructor 000640* 000650 INVOKE MatchEvaluator "NEW" 000660 USING BY VALUE SELF "EvaluatorMethod" 000670 RETURNING MY-DELEGATE. 000680* 000690 SET INPUT_STRING TO "I think programming on the .NET platform is 0." 000700 SET STRING_PATTERN TO "\d" 000710* 000720* Using a .NET Framework Class and doing an INLINE Invoke 000730* 000740 SET OUTPUT_STRING TO REGEX::"Replace" 000750 (INPUT_STRING, STRING_PATTERN, MY-DELEGATE) 000760 SET DISPLAY_LINE TO OUTPUT_STRING 000770 000780 DISPLAY DISPLAY_LINE 000790 DISPLAY "Enter X and Press Enter to Exit.". 000800 ACCEPT NULL-X. 000810 000820 END METHOD MYFIRSTMETHOD. 000830* 000840* Using the Public Shared Function that is 000850* fired each time the Regex.Replace method finds a match 000860* 000870 METHOD-ID. MatchEvaluatorMethod as "EvaluatorMethod". 000880 DATA DIVISION. 000890 WORKING-STORAGE SECTION. 000900 LINKAGE SECTION. 000910 01 MY-MATCH OBJECT REFERENCE Match. 000920 01 MyReturnString OBJECT REFERENCE SYS-STRING. 000930 PROCEDURE DIVISION USING BY VALUE MY-MATCH 000940 RETURNING MyReturnString. 000950* 000960* Optionally, you could make the return value 000970* conditional depending on the MATCH value. 000980* 000990 SET MyReturnString TO "Easy" 001000 END METHOD MatchEvaluatorMethod. 001010 001020 END OBJECT. 001030 END CLASS MYFIRSTCLASS.
| |
| Note | The PROGRAM-ID has been changed to MAIN. You will need to modify the Entry Name on the property pages for this project to reflect the value of "MYFIRSTCLASS,MAIN". |
In the COBOL .NET sample in Listing 7-4, the System.Text.RegularExpressions and System namespaces were used. Additionally, a Microsoft-provided delegate was used (the MatchEvaluator ). Please take some time to review the code. The comments included in the sample code describe what the code is accomplishing. Listing 7-1, of course, represents just a sample of what is possible when you leverage the existing .NET Framework objects. Incidentally, the .NET Framework Regex class (the main class for regular expressions) used in this sample code is capable of much more.
| |
When possible, consider looking into the topic of regular expressions . That is right, there is a toolset (namespace) within the .NET Framework called RegularExpressions . This toolset includes a very powerful, very flexible syntax that allows the creation of conditional matching and replacing logic that will really surprise you. What you might spend ten to fifteen lines of code doing in VB .NET, C#, or COBOL .NET, you could likely do with just one line of regular expressions. A word of caution: The syntax for regular expressions can appear to be quite cryptic until you spend some time deciphering it (see the "Books" subsection of the "To Learn More" section at the end of this chapter for a helpful resource). One good application for this type of flexible matching logic is in the area of screen scraping (scraping HTML Web pages). Validation logic is yet another area where regular expressions really shine . You can use this recommended addition to your retraining effort from any .NET language.
| |
To wrap up the discussion of the COBOL .NET sample code in Listing 7-4, I thought it would be interesting to execute the Class Viewer .NET Framework tool to display your own class: MyFirstClass . Because you have compiled your project, the executable (similar to the legacy mainframe COBOL load modules) will be located in the bin subfolder. By the way, your bin subfolder will be located within the folder location that you chose to save your .NET project in. The code in Listing 7-5 is from the Class Viewer display of the MyFirstClass class. (The following option was used: WINCV /r:FrameworkExampleCobol.exe .)
| |
public class MYFIRSTCLASS : object // Constructors public MYFIRSTCLASS(); // Methods public virtual bool Equals(object obj); public virtual string EvaluatorMethod(System.Text.RegularExpressions.Match MY-MATCH); public virtual int GetHashCode(); public Type GetType(); public static void MAIN(); public virtual void MYFIRSTMETHOD(); public virtual string ToString(); // end of MYFIRSTCLASS
| |
In Listing 7-5, notice the "extra" methods that appear on your class. Recall that you did not "need" to create these yourself. As discussed earlier in the section "Classes," all classes ”even the ones that you create ”indirectly or directly inherit from System.Object. These "extra" methods being in your class is the result of this inheritance.
VB .NET Example
For the VB .NET sample code, I have created a console application and named the project FrameworkExampleVB. Listing 7-6 presents the sample code from the Module1.vb module.
| |
' IMPORT a .NET Framework Namespace. ' By importing the Namespace, you can then refer ' to objects from the Namespace without typing the full ' name of the namespace - provides a shortcut. Imports System.Text.RegularExpressions Module Module1 Sub Main() 'Call the Sub Procedure MyFirstClass.MyfirstSubProcedure() End Sub End Module 'Create our own Class Class MyFirstClass Public Shared Sub MyfirstSubProcedure() 'Declare variables by reusing the String Class 'The SYSTEM Class is from the SYSTEM namespace 'Including name of the namespace is optional 'I could have just had "STRING" instead of "SYSTEM.STRING" Dim MyStringPattern As System.String = "\d" Dim MyfirstOutputString As System.String Dim MyfirstInputString As String _ = "I think programming on the .NET platform is 0." 'Using the .NET Framework class REGEX and its Replace method. 'Our Declared String variable will "receive" the returned result 'Notice that the AddressOf Operator is used 'The AddressOf Operator is used to reference the Shared Function. MyfirstOutputString = _ Regex.Replace(MyfirstInputString, MyStringPattern, _ AddressOf Evaluator) Console.WriteLine(MyfirstOutputString) Console.WriteLine("Press Enter to Exit") Console.ReadLine() End Sub ' Using the Public Shared Function that is ' fired each time the Regex.Replace method finds a match Public Shared Function Evaluator(ByVal passedString As Match) As String 'Optionally, you could make the return value 'conditional depending on the MATCH value. Return "Easy" End Function End Class | |
Please take a moment to read the comments included in Listing 7-6. Although this sample code is simple, it is a good example of how to leverage an existing .NET Framework delegate.
There are many other delegates (e.g., the popular System.EventHandler delegate). The sample code provided in this chapter provides examples of how to leverage these .NET Framework objects. Additionally, the interfaces, classes, enumerations, and structures are all available and waiting for you to exploit them.
| Tip | In Listing 7-6, there is a reason why it is optional to use the System namespace name when declaring the String data types. Even though the Import statement was not included in the code, the System namespace is actually imported by default. View the property pages to see the other namespaces that are imported by default. Compare this with the Import statement that was added for the System.Text. RegularExpressions namespace. From the property pages, you can add or remove namespaces for Import. Importing from the property pages will spread the "effect" across the entire project. Using the Import statement in code affects just the module that contains the Import statement. |
The Visual Basic class MyFirstClass is available for you to examine in the Class Viewer. The code in Listing 7-7 shows the output from the Class Viewer tool when viewing FrameworkExampleVB.exe. The command line used to view this specific assembly is WINCV /r: FrameworkExampleVB.exe .
| |
class FrameworkExampleVB.MyFirstClass : object // Constructors public MyFirstClass(); // Methods public virtual bool Equals(object obj); public static string Evaluator(System.Text.RegularExpressions.Match passedString); public virtual int GetHashCode(); public Type GetType(); public static void MyfirstSubProcedure(); public virtual string ToString(); // end of FrameworkExampleVB.MyFirstClass
| |
As with the COBOL .NET sample in Listing 7-4, notice that there are members in the MyFirstClass class that you did not explicitly code. Again, this provides you with a glimpse into the role of the .NET Framework's object-oriented design.
Referencing the .NET Framework Assemblies
In the previous VB .NET sample, FrameworkExampleVB, I mentioned that the Import statement was available for namespace typing shortcuts. This feature (in VB .NET) can be implemented explicitly in code or in the property pages.
Now that you understand all of that, I need to point out that the importing of .NET Framework namespaces should not be confused with the referencing of the assemblies (that contain the namespaces).
You may recall that I discussed the referencing of assemblies earlier in this chapter, when I needed to make the assemblies "visible" to the Object Browser. Well, this same "visibility" needs to exist for the application itself (remember the mainframe analogy of using STEPLIB and JOBLIB DD JCL statements to reference mainframe compiled load modules).
In COBOL .NET, you are accomplishing this "assembly reference" when you add the name(s) of the .NET Framework namespace(s) in the REPOSITORY paragraph.
In VB .NET, the "assembly reference" is accomplished by adding the name(s) of the .NET Framework namespace(s) in the Reference node in the Solution Explorer window. Figure 7-13 shows the assembly references that are automatically added for the VB .NET Console Application template.
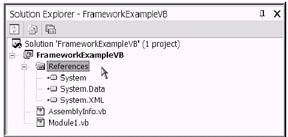
Figure 7-13: The VS .NET IDE Solution Explorer window with the Reference node expanded to show the referenced assemblies
I realize that it may be a little confusing that you would use the namespace names to reference particular assemblies. In this context, the two names (assembly and namespace) are practically synonymous without the "dll" suffix. This is made even more confusing when you realize that several namespaces could potentially be stored all in the same assembly. For example, both the System and System.Text.RegularExpressions namespaces are stored in the System.dll assembly. Aren't you glad that you had a chance (here) to clear that all up?
VS .NET Feature: IntelliSense
While you've edited various lines of code, you've certainly noticed the IntelliSense feature by now. Basically, IntelliSense is a productivity feature. As you start to type, the VS .NET IDE attempts to assist you by displaying a "type ahead" list (see Figure 7-14).
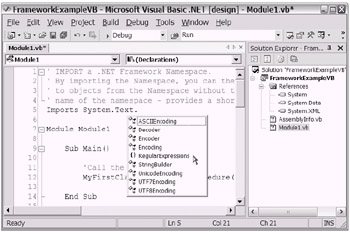
Figure 7-14: The VS .NET IntelliSense feature
For example, say that you intend to type in System.Text.RegularExpressions . After you type in the period to signal the end of the second namespace level (i.e., System.Text. ), you will notice that a list will appear. You can use your up and down arrow keys to navigate the list and select RegularExpressions from the list. Pressing Enter (or the Tab key) will enter the list item selection into your code as if you had typed it yourself.
Property Pages and the Project File
For each sample application I've presented in Chapter 6 and in this chapter, there have been occasions when I've referenced updating the project property pages. In those instances, I mentioned using the VS .NET IDE to perform these updates. Although I still recommend that you take advantage of the VS .NET IDE for these types of updates, you may find it interesting to know that you have a choice. You can also browse and/or update the project files directly.
In the case of each sample application (VB .NET and COBOL .NET), a project file is created and stored in the application folder. The project file for COBOL .NET (in this case) is named FrameworkExampleCobol.cobp. The VB .NET file, on the other hand, is named FrameworkExampleVB.vbproj.
If you use Notepad as your editor and open the FrameworkExampleCobol.cobp file (using a right-click, Open With approach), you will see the contents of the project file. Listing 7-8 presents a snippet of the file. Note the C# structure.237
| |
"General" { "ProjectIdGuid" = "{864B8329-105D-4818-BCB6-41CA912020D7}" "NestedProjectID" = "{930598EC-661E-4688-8812-014B15FBAC44}" "EntryName" = "MYFIRSTCLASS,MAIN" "OutputType" = "Exe" "AssemblyName" = "FrameworkExampleCobol" "Version" = "" "Company" = "" "Copyright" = "" "ProductName" = "" "Trademark" = "" "Description" = "" "Title" = "" "DelaySign" = "False" "KeyFile" = "" "KeyName" = "" } "Configurations" { "Debug.NET" { "OutputPath" = "bin\Debug\" "GenerateListFile" = "False" "AdditionalOptions" = "" "ReferencePaths" = "" "CopyBookPaths" = "" } "Release.NET" { "OutputPath" = "bin\Release\" "GenerateListFile" = "False" "AdditionalOptions" = "" "ReferencePaths" = "" "CopyBookPaths" = "" } } | |
Optionally, you can browse and edit the VB .NET project file. Listing 7-9 shows the code as displayed in the Notepad editor. Note the XML structure.
| |
<VisualStudioProject> <VisualBasic ProjectType = "Local" ProductVersion = "7.0.9466" SchemaVersion = "1.0" ProjectGuid = "{ABD5521A-28AA-4676-905E-0D8F0418D5CF}" > <Build> <Settings ApplicationIcon = "" AssemblyKeyContainerName = "" AssemblyName = "FrameworkExampleVB" AssemblyOriginatorKeyFile = "" AssemblyOriginatorKeyMode = "None" DefaultClientScript = "JScript" DefaultHTMLPageLayout = "Grid" DefaultTargetSchema = "IE50" DelaySign = "false" OutputType = "Exe" OptionCompare = "Binary" OptionExplicit = "On" OptionStrict = "Off" RootNamespace = "FrameworkExampleVB" StartupObject = "FrameworkExampleVB.Module1" > <Config Name = "Debug" BaseAddress = "285212672" ConfigurationOverrideFile = "" DefineConstants = "" DefineDebug = "true" DefineTrace = "true" DebugSymbols = "true" IncrementalBuild = "true" Optimize = "false" OutputPath = "bin\" RegisterForComInterop = "false" RemoveIntegerChecks = "false" TreatWarningsAsErrors = "false" WarningLevel = "1" /> <Config Name = "Release" BaseAddress = "285212672" ConfigurationOverrideFile = "" DefineConstants = "" DefineDebug = "false" DefineTrace = "true" DebugSymbols = "false" IncrementalBuild = "false" Optimize = "true" OutputPath = "bin\" RegisterForComInterop = "false" RemoveIntegerChecks = "false" TreatWarningsAsErrors = "false" WarningLevel = "1" /> </Settings> <References> <Reference Name = "System" AssemblyName = "System" /> <Reference Name = "System.Data" AssemblyName = "System.Data" /> <Reference Name = "System.XML" AssemblyName = "System.Xml" /> </References> <Imports> <Import Namespace = "Microsoft.VisualBasic" /> <Import Namespace = "System" /> <Import Namespace = "System.Collections" /> <Import Namespace = "System.Data" /> <Import Namespace = "System.Diagnostics" /> </Imports> </Build> <Files> <<Include> <File RelPath = "AssemblyInfo.vb" SubType = "Code" BuildAction = "Compile" /> <File RelPath = "Module1.vb" SubType = "Code" BuildAction = "Compile" /> </Include> </Files> </VisualBasic> </VisualStudioProject> | |
Although I am encouraging you to explore the files that are created in your local application folder, I ask that you do so with caution. Generally , you will be better off using the VS .NET IDE for your project properties editing. However, I believe that the more you understand what is going on behind the scenes, the more efficiently you will be able to leverage the .NET Framework.
| Note | At this time, I am only noting the observation that the structure of the project file contents is different: The COBOL. .NET project uses a C# structure, and VB .NET project uses an XML structure. However, it is fair to say that the XML structure is generally more common for .NET file content. |
So, you have taken a good look at the contents of the project file. Perhaps you are debating whether to continue using the VS .NET IDE to update your project files. Well, before you make up your mind, here are a couple of alternative ways to access the property pages ( still from within the VS .NET IDE). You may prefer either of these two methods over going to the Solution Explorer, right-clicking the project file, and selecting Properties.
-
The first alternative is via the Standard toolbar. From your open VS .NET IDE, select the project file in the Solution Explorer window. Next, on the Standard toolbar, simply select Project Properties.
-
The second alternative is via the Properties window. From your open VS .NET IDE, select the project file in the Solution Explorer window. Then, display the Properties window by pressing F4 (or on the Standard toolbar, select View Properties). The last step is to click the Property Pages icon, as shown in Figure 7-15.
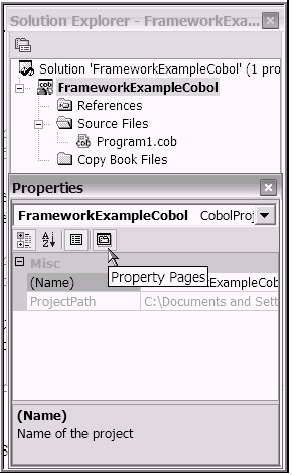
Figure 7-15: Clicking the Property Pages icon in the Properties window
EAN: 2147483647
Pages: 204