Introducing Your Serviced Component to COM
Introducing Your Serviced Component to COM+
You have a few choices available from which to choose when you want to introduce your serviced component to COM+. Your choice will depend on either your given set of circumstances or simply your personal preference.
Your basic choices are as follows : [6]
-
Using dynamic registration
-
Using manual registration with the command-line tool Regsvcs.exe
-
Using manual registration with the command-line tool Regasm.exe and the Component Services console
In my own experience, I have tried all three approaches and found that each worked. Each technique offers its own advantages that you should know about as part of your retraining effort.
Registering Dynamically
You have the option to use dynamic registration as a way to get a serviced com ponent into COM+. To use this option, you would have prepared your class library as you did with your MyFirstClassLibraryVB sample project (i.e., you would have added assembly- and class-level attributes, and inherited from the System.EnterpriseServices.ServicedComponent class).
Then, you need to add a reference to a client application to point to the .dll file output from the build of your class library. You need to add appropriate code to instantiate an object and make use of your class library/serviced component.
| Note | The use of dynamic registration requires that your client application is able to run with administrative-level security privileges. |
Next , simply run the client application. The first time you pass through the code that instantiates an object from your class library/serviced component, a COM+ application will dynamically be registered.
| Tip | After I used the dynamic registration approach, it became obvious to me that RegistrationHelper executes the System.EnterpriseServices.RegistrationHelperTx transaction as your new COM+ application is being "added" to the COM+ catalog. This was made apparent after I created a client application to use my new COM+ application and viewed the Running Processes folder in the Component Services console display. To know that your COM+ and Windows registry updates are occurring within the safe confines of a transaction is rather comforting. Certainly , this is a thumbs up for the dynamic registration approach. [7] |
As shown in Figure 19-11, the Component Services console displays a new COM+ application that has been dynamically registered and installed for your MyFirstClassLibraryVB sample serviced component.
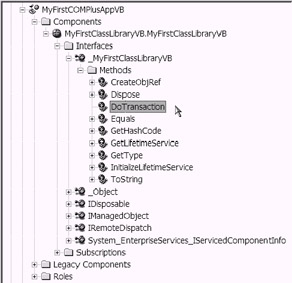
Figure 19-11: A new COM+ application for the MyFirstClassLibraryVB sample serviced component. For demonstration purposes, I have expanded a few of the nodes for the COM+ application.
You will notice that the name "MyFirstCOMPlusAppVB" was the result of using the assembly-level attribute ApplicationNameAttribute in the MyFirstClassLibraryVB sample serviced component. As you can see in Figure 19-11, the public methods /functions (including the DoTransaction function) are exposed. This is the result of applying the assembly-level ClassInterfaceAttribute attribute (using the ClassInterfaceType.AutoDual argument value) in the VB .NET sample application.
| Tip | The ClassInterfaceAttribute attribute comes from the System.Runtime.InteropServices namespace. You can apply this attribute at the assembly or class level. |
Feel free to explore the property pages of the sample application and component. The majority of the properties shown on the property pages will relate to the attributes shown earlier in the earlier section "Other System.EnterpriseServices Attributes." That's right, you can actually modify the properties directly using the property pages. Some people prefer this approach to configuration.
The next thing you should do is delete the MyFirstCOMPlusAppVB COM+ application in preparation for the next demonstration.
| Caution | Be careful! You do not want to delete the wrong COM+ application. To delete the sample COM+ application while you use the Component Services console, simply select the sample COM+ application and press the Delete key. |
Now let's take a look at the other choices for installing/registering your serviced component into COM+.
Using Regsvcs.exe
Assume that you just completed the build of your serviced component (that con tains the strong name key file and so forth). The next step, if you were using this COM+ Register option, would be to execute the Regsvcs.exe command-line tool using the .dll file that was output as you completed the build of your serviced component.
| Tip | Use the Visual Studio .NET Command Prompt window to enter the Regsvcs.exe command. Additionally, be sure that your strong name key file (.snk) is located in your \bin folder along with your assembly (.dll) file. This is a requirement for executing the Regsvcs.exe command-line tool. |
Using the regsvcs /? switch option, a display is easily generated to show the full list of command syntax options (see Figure 19-12).
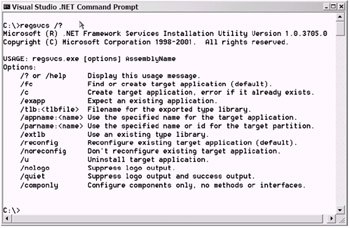
Figure 19-12: Using the regsvcs /? command syntax option to display the full list of options
Using the appropriate regsvcs command-line syntax, you accomplish the following:
-
The assembly (.dll) is loaded and registered in the Windows registry.
-
A type library (.tlb) is created for your assembly (.dll).
-
The COM+ catalog is updated to include a new COM+ application based on the type library being imported.
-
Any attributes included with serviced component are used to apply the initial configuration settings to the new COM+ application.
I chose to run the regsvcs command with minimal (default) options as shown in Listing 19-5.
| |
C:\>regsvcs C:\Chpt19Applications\MyFirstClassLibraryVB\bin\MyFirstClassLibraryVB.dll Microsoft (R) .NET Framework Services Installation Utility Version 1.0.3705.0 Copyright (C) Microsoft Corporation 1998-2001. All rights reserved. Installed Assembly: Assembly: C:\Chpt19Applications\MyFirstClassLibraryVB\bin\MyFirstClassLibraryVB.dll Application: MyFirstCOMPlusAppVB TypeLib: C:\chpt19applications\myfirstclasslibraryvb\bin\MyFirstClassLibraryVB.tlb C:\>
| |
As you can see from the output display in Listing 19-5, the assembly has been installed. Additionally, a type library (.tlb) file was created and imported for me. After executing this command, I used the Component Services console tool and verified that the COM+ application had been created using the name MyFirstCOMPlusAppVB.
Out of curiosity , I looked inside my local application's \bin folder and verified that a new .tlb file was in fact there. Not bad! Of course, I could not stop there and just close my folder. I wanted to see what was inside the .tlb file. As it turns out, there is a tool included on your .NET installation disk called the OLE/COM Object Viewer.
| Note | Depending on your .NET installation options, you may already be able to use the OLE/COM Object Viewer from within the VS .NET IDE (see the Tools menu). |
I followed these steps to manually install the OLE/COM Object Viewer:
-
I browsed my original .NET installation disks (<CD
Drive>VSENARD1\Program Files\Microsoft Visual Studio
.NET\Common7\Tools on the .NET installation disks). -
I located two files: Oleview.exe and Iviewers.dll.
-
I copied the two files (Oleview.exe and Iviewers.dll) to the location C:\Program Files\Microsoft Visual Studio .NET\Common7\Tools.
-
I navigated to the VS .NET Tools menu and chose OLE/COM Object Viewer.
After I completed these steps, I launched the OLE/COM Object Viewer tool and navigated to the location of my .tlb file. Mission accomplished! The content of my \bin\MyFirstClassLibraryVB.tlb file is shown in Listing 19-6.
| |
// Generated .IDL file (by the OLE/COM Object Viewer) // // typelib filename: MyFirstClassLibraryVB.tlb [ uuid(9BE69B56-EF21-4FA9-B664-7EC0B7BAC85E), version(1.0), custom(90883F05-3D28-11D2-8F17-00A0C9A6186D, MyFirstClassLibraryVB, Version=1.0.1023.16377, Culture=neutral, PublicKeyToken=c78f6c8808f9dff8) ] library MyFirstClassLibraryVB { // TLib : // TLib : Common Language Runtime Library : {BED7F4EA-1A96-11D2-8F08-00A0C9A6186D} importlib("mscorlib.tlb"); // TLib : : {4FB2D46F-EFC8-4643-BCD0-6E5BFA6A174C} importlib("System.EnterpriseServices.tlb"); // TLib : OLE Automation : {00020430-0000-0000-C000-000000000046} importlib("stdole2.tlb"); // TLib : Common Language Runtime Execution Engine 1.0 Library : {5477469E-83B1-11D2-8B49-00A0C9B7C9C4} importlib("mscoree.tlb"); // Forward declare all types defined in this typelib interface _MyFirstClassLibraryVB; [ uuid(7B2F68EF-7868-3993-8AB4-BAD7A1A654C6), version(1.0), custom(0F21F359-AB84-41E8-9A78-36D110E6D2F9, MyFirstClassLibraryVB.MyFirstClassLibraryVB) ] coclass MyFirstClassLibraryVB { [default] interface _MyFirstClassLibraryVB; interface _Object; interface IRemoteDispatch; interface IDisposable; interface IManagedObject; interface System_EnterpriseServices_IServicedComponentInfo; }; [ odl, uuid(9A6DAB02-62E1-3F0E-BC2E-EE3686D107D0), hidden, dual, nonextensible, oleautomation,custom(0F21F359-AB84-41E8-9A78-36D110E6D2F9, MyFirstClassLibraryVB.MyFirstClassLibraryVB) ] interface _MyFirstClassLibraryVB : IDispatch { [id(00000000), propget, custom(54FC8F55-38DE-4703-9C4E-250351302B1C, 1)] HRESULT ToString([out, retval] BSTR* pRetVal); [id(0x60020001)] HRESULT Equals( [in] VARIANT obj, [out, retval] VARIANT_BOOL* pRetVal); [id(0x60020002)] HRESULT GetHashCode([out, retval] long* pRetVal); [id(0x60020003)] HRESULT GetType([out, retval] _Type** pRetVal); [id(0x60020004)] HRESULT GetLifetimeService([out, retval] VARIANT* pRetVal); [id(0x60020005)] HRESULT InitializeLifetimeService([out, retval] VARIANT* pRetVal); [id(0x60020006)] HRESULT CreateObjRef( [in] _Type* requestedType, [out, retval] _ObjRef** pRetVal); [id(0x60020007)] HRESULT Dispose(); [id(0x60020008)] HRESULT DoTransaction([out, retval] BSTR* pRetVal); }; }; | |
Please take a moment to review the .tlb file in Listing 19-6. Viewing the content of your .tlb file will help provide you with a more complete perspective of exactly what a type library file is. As you can see, the information in this file resembles the assembly metadata that you saw when you used reflection and when you used the ILDASM.exe tool. The type library file is just another way that your assembly metadata is being captured and displayed.
Next, you'll examine your last option for registering your serviced component into COM+. Please delete the sample MyFirstCOMPlusAppVB COM+ application and delete your .tlb file from the \bin folder in preparation for the next demonstration.
Using Regasm.exe
This option also involves the use of a command-line tool: the Regasm.exe tool. Additionally, after you execute the Regasm.exe tool, you will use the Component Services console to install and configure the sample COM+ application. As you will see, this approach requires more effort. However, it is my favorite.
| Tip | Use the Visual Studio .NET Command Prompt to enter the Regasm.exe command. |
As I mentioned earlier, each COM+ registration approach worked. Yes, this Regasm.exe approach involves more manual effort. It also offers its own advan tages, such as more control and awareness of what is going on. For example, the Regasm.exe command has a command-line option that I really like: the ability to create and save a registry (.reg) file. The registry file could prove useful in a deployment situation.
| Tip | In VB .NET there is an option on the VS .NET project property pages (in the Configuration Properties Build section) that exposes a Register for COM Interop check box. Selecting this option and then building the solution will create a type library and accomplish the Windows registry task. In practice, I found this to be a viable alternative to Regasm.exe, particularly during development. |
I suppose the bottom line might be that the various COM+ options are just that: options. I suggest that you try each one and decide which one best fits your needs. Incidentally, after I used this Regasm.exe approach and activated the COM+ application with my sample client application, I noticed that the resulting display shown in the Running Processes folder in the Component Services console display was more informative.
The Regasm.exe command offers a regasm /? option. Execute it to quickly review the syntax options available to you. Figure 19-13 shows the resulting display.
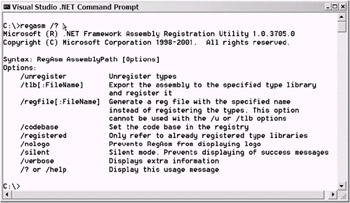
Figure 19-13: Using the regasm /? command syntax option to display the full list of options
Using the /regfile:<filename.reg> Option
Before I get into the actual installation of your COM+ applications, I'll take a quick peek at the .reg file for the VB .NET sample application. I use the / regfile command-line switch. As shown in Figure 19-14, the generation of a registry script was successful.
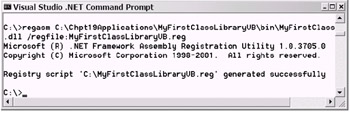
Figure 19-14: Using the regasm command and the /regfile command-line switch to generate a registry script. The file will be saved at C: \MyFirstClassLibraryVB.reg.
Navigating to the saved location, I right-click the .reg file and choose Edit.
| Caution | If you double-click a .reg file, you can potentially update your Windows registry. Be really careful with .reg files. |
Viewing the .reg file with the Notepad utility (as shown in Figure 19-15) I am easily able to see exactly what will be "merged" into my Windows registry.
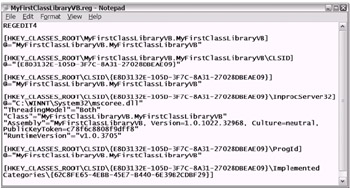
Figure 19-15: Viewing the C: \MyFirstClassLibraryVB.reg file with Notepad
You might say, "All right, who cares about what is in the .reg file?" The fact is, you should care. Any time that any thing is updating your Windows registry, you should care. Let's take a closer look at this .reg file now.
First, you will notice a few lines showing that the class identifier (CLSID) is being set using a globally unique identifier (GUID). Then, about in the middle of the .reg file display (as shown earlier in Figure 19-15), you will see the lines in Listing 19-7.
| |
. . . [HKEY_CLASSES_ROOT\CLSID\{E8D3132E-105D-3F7C-8A31-27028DBEAE09}\InprocServer32] @="C:\WINNT\System32\mscoree.dll" "ThreadingModel"="Both" "Class"="MyFirstClassLibraryVB.MyFirstClassLibraryVB" "Assembly"="MyFirstClassLibraryVB, Version=1.0.1022.32968, Culture=neutral, PublicKeyToken=c78f6c8808f9dff8" "RuntimeVersion"="v1.0.3705" . . . | |
Several things are worth noting here:
-
The "version" information has been "read" from your assembly metadata. Recall the topics of assembly-level custom attributes, reflection, and metadata.
-
ThreadingModel is set to Both . This means that the unmanaged COM+ client will control the apartment model. This is important to be aware of. The apartment model could possibly be either a single-threaded apartment (STA) or a multithreaded apartment (MTA).
-
The InprocServer32 program is set as C:\WINNT\System32\mscoree.dll. This COM unmanaged DLL controls the COM callable wrapper (CCW) for COM Interop to occur.
Of these important points, this last one may be the most interesting. Interop erability is actually a .NET feature. There is language interoperability that allows one .NET language to "talk" to another .NET language. There is the runtime callable wrapper (RCW) side of COM Interoperability (COM Interop) that allows an unmanaged object to "talk" to the "managed" world. Then, there is the CCW side of COM Interop that allows a managed component to "talk" to the unmanaged world.
In other words, when you take your .NET serviced component and "register" it into the COM+ catalog, you are potentially participating using the .NET feature of COM Interop. Why is this? COM+ is a runtime environment itself. That is, it is an unmanaged runtime environment. The COM+ product existed before .NET existed. Basically, COM+ is a robust, incredibly useful legacy application.
There are a few things I should make clear:
-
The other COM+ registration techniques (dynamic and Regsvcs.exe) also expose you to the potential of using COM Interop. On the other hand, the use of Regasm.exe and viewing the .reg file simply provided a convenient opportunity to point it out to you.
-
COM Interop is not evil or bad. It is just something that you should plan and design for. Anytime you make use of any type of interoperability, you should make sure that your application design supports it.
-
There is a small performance hit with COM Interop. On a case-by-case basis, you will need to weigh this small performance hit against the potential value brought by using specific COM+ services.
-
When you choose the activation type for your COM+ application, be aware that the choice Library equates to being in-process. The choice Server equates to being out-of-process. It is the out-of-process model that makes use of COM Interop. Recall that you used the ActivationOption.Library argument value setting for the assembly-level ApplicationActivation- Attribute attribute in your VB .NET sample application.
The use of COM Interop is a large topic in and of itself, and it's beyond the scope of this book. I suggest that you take advantage of the references provided at the end of this chapter in the "To Learn More" section for further exploration. For now, you'll proceed to register your serviced components into COM+ using Regasm.exe and the Component Services console.
Exporting the Type Library
I executed the Regasm.exe file for both the COBOL .NET MyFirstClassLibrary- Cobol and VB .NET MyFirstClassLibraryVB sample applications. Listing 19-8 shows the command-line syntax used and resulting output display.
| Tip | Again, use the Visual Studio .NET Command Prompt window to enter the regasm command. |
| |
C:\>regasm /tlb:C:\Chpt19Applications\MyFirstClassLibraryVB\bin\MyFirstClassLibr aryVB.tlb C:\Chpt19Applications\MyFirstClassLibraryVB\bin\MyFirstClassLibraryVB. dll Microsoft (R) .NET Framework Assembly Registration Utility 1.0.3705.0 Copyright (C) Microsoft Corporation 1998-2001. All rights reserved. Types registered successfully Assembly exported to 'C:\Chpt19Applications\MyFirstClassLibraryVB\bin\MyFirstCla ssLibraryVB.tlb', and the type library was registered successfully C:\>regasm /tlb:C:\Chpt19Applications\MyFirstClassLibraryCOBOL\bin\debug\MyFirst ClassLibraryCOBOL.tlb C:\Chpt19Applications\MyFirstClassLibraryCOBOL\bin\debug\M yFirstClassLibraryCOBOL.dll Microsoft (R) .NET Framework Assembly Registration Utility 1.0.3705.0 Copyright (C) Microsoft Corporation 1998-2001. All rights reserved. Types registered successfully Assembly exported to 'C:\Chpt19Applications\MyFirstClassLibraryCOBOL\bin\debug\M yFirstClassLibraryCOBOL.tlb', and the type library was registered successfully C:\>
| |
As you can see from the output display, the .tlb files were created in the respective \bin subfolders . On this occasion, the Windows registry updates have been performed. If you were to browse the Windows registry (using the Regedit.exe command-line tool), you would see entries similar to what you viewed in the .reg file.
The next step is to take the newly created type library files for each sample application and manually register them into COM+.
Installing the COM+ Application
After you navigate to the familiar Component Services console window, you will need to right-click the COM+ Applications node. As shown in Figure 19-16, you will select New Application. This will begin a series of steps/prompts to add a new COM+ application.
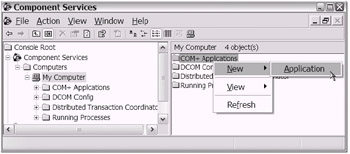
Figure 19-16: Using the Component Services console to manually add a new COM+ application
Follow this series of steps to add a COM+ application:
-
Figure 19-17 shows the first prompt for the COM+ Application Install Wizard. Click Next.

Figure 19-17: Beginning the COM+ application installation -
Choose the "Create an empty application" option from the Install or Create a New Application window (see Figure 19-18). You will add the components in during a later step. Click Next.
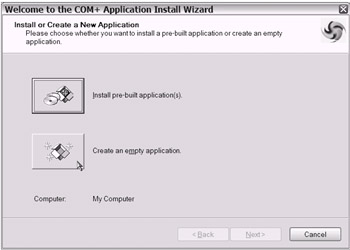
Figure 19-18: Choosing to create an empty COM+ application -
Enter a name for the new application and choose "Library application" (see Figure 19-19) in the Create Empty Application window. Recall that the choice of Library will result in using your serviced component in an in- process model, thus avoiding any COM Interop concerns. Click Next.
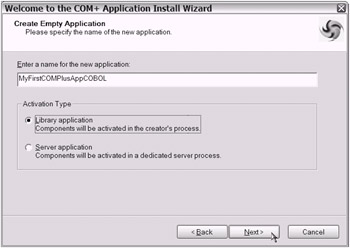
Figure 19-19: Choosing the "Library application" option -
This is the last prompt (see Figure 19-20). Congratulations! Click Finish.
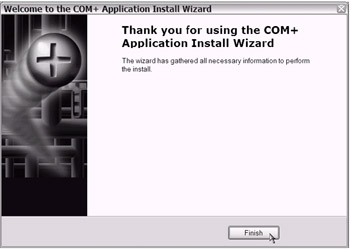
Figure 19-20: The last prompt in the COM+ Application Install Wizard. You can potentially see other prompts depending on the choices you made in earlier wizard prompts.
Now, please repeat the previous four steps for each sample application. In the end, you should have two COM+ applications. As shown in Figure 19-21, one COM+ application is named MyFirstCOMPlusAppCOBOL and the second one is named MyFirstCOMPlusAppVB.
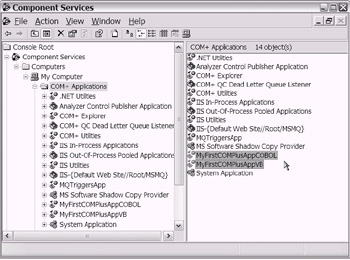
Figure 19-21: Two new COM+ applications, one for each sample application
You are almost done. The next series of steps involves adding the components into each COM+ application.
Installing the Components
Let's proceed. In these next series of steps, you will use another COM+ wizard. To launch this effort, right-click the Components folder of each sample COM+ appli cation (see Figure 19-22).
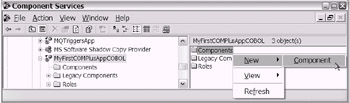
Figure 19-22: Launching the COM+ Component Install Wizard
The following series of steps takes you through the Component Install Wizard:
-
Figure 19-23 shows the first prompt for the Component Install Wizard. Click Next.

Figure 19-23: The Welcome screen for the Component Install Wizard -
Select the "Install new components" option from the Import or Install a Component window (see Figure 19-24). Click Next.
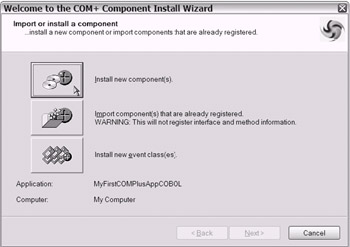
Figure 19-24: Choosing the "Install new components" option -
In the Select Files window, navigate to the \bin folder for the appropriate sample application and select the type library (.tlb) file. After you select the .tlb file, click Open.
-
As shown in Figure 19-25, your type library and class library information is displayed. Click Next and then click Finish.
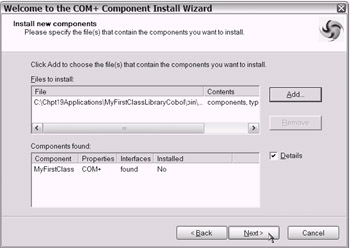
Figure 19-25: The type library and serviced component (modified class library) information is exposed in the COM+ Component Install Wizard.
Congratulations! You have successfully added a component into the COM+ application. Now, please repeat the previous four steps for each sample appli cation. (See Figure 19-26.)
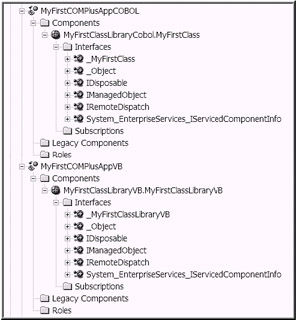
Figure 19-26: The components have been installed into the two COM+ applications.
That completes the installation of the COM+ application and serviced com ponent. In the following section, I introduce the use of the Properties page for further COM+ configuration. Following that, you will walk through the process of building a client application that will use these two COM+ applications.
| Tip | I have seen it mentioned in some of Microsoft's product documentation to use the folder location C:\Program Files\ComPlus Applications for installed serviced components. In practice, this would mean deploying your application folder (containing the \bin subfolder and its contents) to this location. Give this some thought. I am considering it as a possible best practice. I imagine that you will want to settle on the folder location prior to performing any of the Windows and COM+ catalog registration steps. |
Additional COM+ Application Configuration
You may have noticed that your COBOL .NET sample serviced component is missing a few attributes, both at the class level and the assembly level. For example, I added the TransactionAttribute attribute on the VB .NET sample ser viced component with a value of TransactionOption.Required. However, on the COBOL .NET sample serviced component, I intentionally omitted this class-level attribute.
I did this to show that you modify the properties of an installed COM+ appli cation using the Component Services console. Additionally, you can modify the properties of an installed serviced component. As shown in Figure 19-27, if you select and then right-click your component, you can choose Properties from the context menu.
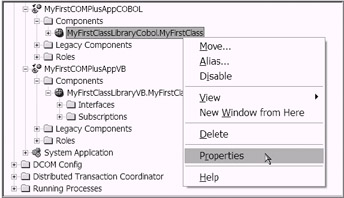
Figure 19-27: Accessing the component-level Properties page
On the Properties page, you will notice that there are several tabs available (see Figure 19-28). You can use the General tab to modify the Description value.
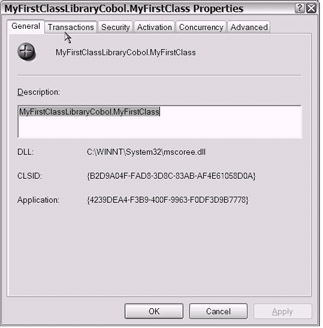
Figure 19-28: The Properties page's General tab
For this demonstration, select the Transactions tab. Under the Transaction support label, change the level of support from Not Supported to Required (see Figure 19-29). Before you leave the Properties page, click Apply. Then click OK.
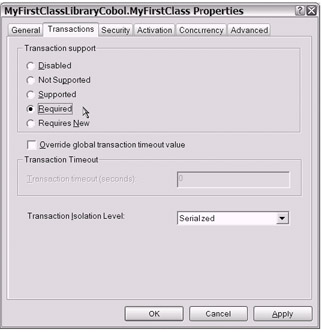
Figure 19-29: Using the Properties page's Transactions tab to change the transaction support level
As you can see on the Transactions tab, other properties are available to further customize your transaction. Give careful consideration to the Transaction Timeout and Transaction Isolation Level settings. The default settings are gen erally acceptable. Be that as it may, you can certainly customize these property settings to fit your particular needs. You have now been introduced to the Prop erties page and how to use it for some of your configuration needs.
Now you'll take a look at a simple client application that will use each sample serviced component.
[6] I stumbled across the RegistrationHelper.InsallAssembly class method in the System.EnterpriseServices namespace. After I read its documented description, it appears to me that you can use this class method to basically create your own version of the Regsvcs.exe command-line tool. Please note that time constraints have not allowed me to try this myself . However, ultra - curious types who may be out there might consider trying it. When time allows, I am sure I will experiment with it as well.
[7] According to Microsoft's documentation, Regsvcs.exe also uses the System.EnterpriseServices.RegistrationHelperTx transaction. It was not made apparent during my own testing. Perhaps your research will yield more conclusive results. If so, I would like to hear about it.
EAN: 2147483647
Pages: 204