Configuring for Code Access Security
While I was writing the first half of this book, I debated about the inclusion of a security- related chapter. Was this because I thought the subject too small, too insignificant to write about? Quite the contrary, the subject is massive. It is so large that I generally felt that doing anything less than an entire book on the topic would be a disservice to you, the reader.
Then, it happened . As I was preparing the sample code for Chapter 16 (for the section "Potential Exception Messages"), I ran into "Access denied" errors. You might recall the discussion in that earlier chapter. In order to complete the simple Crystal Reports demonstration, I resorted to a quick-and-dirty solution to get around the "Access denied " issues. This incident planted the seed.
| Note | I did eventually set my Machine.config file back to its more appropriate default setting. Although your approach and needs may vary, I found that locating the Crystal Reports output files to a folder that had the appropriate permissions worked well, thus allowing the Windows operating system's native configurations to provide the appropriate access. So, just for the record, your Machine.config file should have the following attribute/value setting in the <processModel></processModel> child element: userName="machine". Using the value of SYSTEM in Chapter 16 was just a temporary workaround. |
With that experience, I decided to bite the bullet . . . well, at least part of the bullet. Yes, I decided I would include a discussion about security. However, I decided to limit the security discussion to just code access security. Then, as I have done with other detail- and feature-rich topics, I provide adequate refer ences for your continued research, learning, and extended retraining needs in the "To Learn More" section at the end of the chapter.
| Cross-Reference | Several resources exist that focus solely on .NET security. Be sure to refer to the provided references in the "To Learn More" section at the end of this chapter. |
Therefore, for clarification , in this section you will learn about the configu ration concerns surrounding code access security. The remaining portions of the broader security topic that you may want to learn about (according to your needs, of course) are as follows :
-
Cryptography, encryption, and hash algorithms
-
Authentication (Passport, Active Directory, and so forth)
-
Role access and authorization
-
Windows impersonation
-
WS-Security (GXA and security for XML Web services)
-
Windows access control list (ACL)
-
Secure Sockets Layer (SSL) for IIS
-
Channel security for .NET Remoting
-
The following security-related .NET Framework namespaces: System.Security.Cryptography , System.Security.Cryptography. X509Certificates , System.Security.Cryptography.Xml , and System.Security.Principal
The preceding list of security topics is rather lengthy, right? Stop for a moment and think about the breadth of security topics found on the mainframe. As I recall, there is the entire topic of the System Authorization Facility (SAF). Then, either IBM's Resource Access Control Facility (RACF) or Computer Associates' Access Control Facility product (now known as CA-ACF2) would come into the picture. This left you with the opportunity to master the ins and outs of user profiles and assuring proper access to DASD, TSO, CICS, and other resources.
In other words, being able to function in the mainframe security arena was not a piece of cake. Likewise, functioning in the Windows security arena, even with .NET, is not a piece of cake. Truly being functional in the security arena ”the full arena ”requires continued effort. Nevertheless, the code access security infor mation I discuss in this chapter will prove to be immediately useful and serve as a foundation for other security topics.
In the next section you will dive into the topic of code access security and its configuration concerns.
Code Access Security Introduction
The topic of code access security is somewhat new for the Windows development world. Previous to .NET, the amount of security applied to an application focused mainly on the question of "who" was attempting to execute a specific program. With .NET, the interrogation that a specific program is subjected to gets down to a much more granular level. Yes, the question of "who" is still important. However, you can now get much deeper with the managed CLR environment.
With code access security, questions such as "Where did the program orig inate?" "Who created the program?" and "What is the program trying to do?" are being asked. The level of control available that is exposed through code access security gets as low-level as your needs dictate .
To further discuss code access security and the configuration concerns surrounding it, I present the following subtopics:
-
Evidence
-
Policy hierarchy
-
Permissions
-
Configuration concerns
Throughout the code access security discussion, the following security-related .NET Framework namespaces will be used:
-
System.Security
-
System.Security.Permissions
-
System.Security.Policy
In the following sections when I discuss each portion of code access security, you will have the opportunity to use an assembly as an example. I created a new sample application, CodeAccessSecurityExampleVB, just for this purpose. As you will notice, this sample application borrows the file I/O logic from the sample application demonstrated in Chapter 10 in the section "Accessing Text Files in .NET the New Way."
| |
You should take the following information into consideration when you work with the CodeAccessSecurityExampleVB sample application:
-
You will use the VS .NET Locals window to view runtime values.
-
You will use reflection to examine assembly metadata.
-
The "enabled" attribute for the <trace></trace> child element in the Web.config XML configuration file has been set to true.
-
You will use the Trace.Write class/method to capture additional runtime values.
-
To retrieve runtime values written with Trace.Write class/method, I will refer to the generated "trace" file located at http://localhost/CodeAccessSecurityExampleVB/trace.axd .
| |
Evidence
The first part of code access security introduces pieces of information referred to as evidence. That is, for example, evidence about the assembly (.dll). There are seven types of evidence:
-
Site
-
Url
-
Zone
-
ApplicationDirectory
-
StrongName
-
Publisher
-
Hash
You will notice that the first four types of evidence speak to the question of "where" the assembly was loaded or executed from. The StrongName and Pub lisher types of evidence both speak to the question of "who" created the assembly. The last type of evidence, Hash, is in reference to the assembly contents (recall the earlier discussion about AssemblyHash in the section "Understanding System.Configuration.Assemblies").
Let's take a quick look at the evidence provided by the CodeAccessSecurityExampleVB assembly. To accomplish this, you will use the System.Reflection.Assembly namespace as follows:
Private Sub Page_Load(ByVal sender As System.Object, _ ByVal e As System.EventArgs) Handles MyBase.Load 'The following logic added for Code Access Security demonstration 'Use Reflection to retrieve Current Assembly Dim ExecutingAssembly As System.Reflection.Assembly ExecutingAssembly = ExecutingAssembly.GetExecutingAssembly() . . . End Sub
Then, by using a debug breakpoint, pause the execution of the assembly to review the contents during runtime. As shown in Figure 18-10, the VS .NET Locals window enables you to display the assembly. Three items appear in the assemblies evidence array: Zone, Url, and Hash.
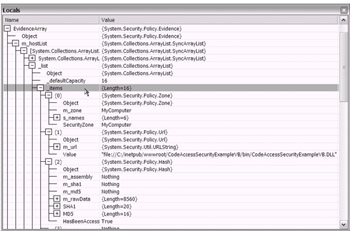
Figure 18-10: The VS .NET Locals window showing runtime information
The Url evidence value is shown (see Figure 18-10) as being file based. The encryption algorithms SHA1 and MD5 are shown as part of the Hash evidence. The Zone evidence shows as MyComputer, which is reasonable given that you are exe cuting the code from localhost. The other possible values for Zone evidence are shown in Figure 18-11.
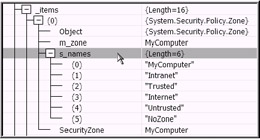
Figure 18-11: The other Zone evidence values from which the MyComputer value was assigned. The display is taken from the VS .NET Locals window during runtime.
You might ask why it is that I do not show the other four types of evidence. Consider the following explanations :
-
Site: I am reporting on the assembly as if it is a file. Notice that the Url evidence shows the physical location of the assembly. In order to have Site evidence, you would need to modify the demonstration slightly to recognize an actual IIS Web site, in this case localhost.
-
ApplicationDirectory: This evidence value is not available by querying the assembly. At any rate, in this case the value would be similar to the Url evidence value.
-
StrongName: You first need to use the Sn.exe command-line tool to have StrongName evidence.
-
Publisher: Your assembly needs to be signed with an X.509 certificate in order to have Publisher evidence. A handful of useful command-line utilities are related to the use of certificates. In fact, there is even one that you can use to create "practice" certificates. Now, that is really cool! Be sure to look into the following free tools that are bundled with the .NET Framework toolset: Makecert.exe, Cert2spc.exe, Signcode.exe, and Chktrust.exe.
Just for fun (after all, learning is fun, right?), let's explore the System.Security.Policy namespace. After you discover the existence of the System.Security.Policy.Evidence class, all that's left to do is add a few additional lines of code to your previous assembly reflection logic. As shown in Listing 18-13, you can access the code access security evidence information programmatically.
| |
. . . 'Use Reflection to retrieve Current Assembly Dim ExecutingAssembly As System.Reflection.Assembly ExecutingAssembly = ExecutingAssembly.GetExecutingAssembly() 'Retrieve Evidence Array Dim EvidenceArray As System.Security.Policy.Evidence _ = ExecutingAssembly.Evidence Dim i As IEnumerator = EvidenceArray.GetHostEnumerator While i.MoveNext Dim evidence As Object = i.Current 'Display Types of Evidence members Trace.Write("Evidence: " & evidence.GetType.ToString()) 'Exclude Hash from "text" based Write, otherwise, display Evidence If Trim(evidence.GetType.ToString()) <> "System.Security.Policy.Hash" Then Trace.Write("Evidence: " & evidence.ToString()) End If End While . . . | |
Notice that the code in Listing 18-13 makes use of the Trace.Write class/ method. After you enable the trace feature, [9] you can use the browser to navigate to the Trace.axd file. As shown in Figure 18-12, the evidence information has been written to the trace file. It's even in XML format already. Not bad!
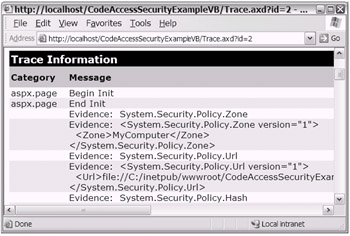
Figure 18-12: The Trace.axd file showing the evidence information that was written using the Trace.Write class/method
All right, now you should be somewhat comfortable with the idea of evidence. You'll continue drilling down further into code access security. After all, there's a purpose for assembly modules having (or not having) evidence.
Policy Hierarchy
All of the concern about evidence is for the purpose of knowing what input is going to be presented to any of four policy-level types. The four policy types are User, Machine, Enterprise, and AppDomain. In other words, the System.Security.PolicyLevelType enumeration has exactly four members (as just introduced to you). These four System.Security.PolicyLevelType enumeration members are collectively referred to as the policy hierarchy.
The User, Machine, and Enterprise PolicyLevelTypes are loaded from XML-based configuration files. You may recall that in the section "Configuration with XML-Based Files" there was a Note that mentioned the existence of a few other XML configuration files.
Consider Figures 18-13 and 18-14. The location and names of the specific config files are shown in each image. Additionally, the config file-to-PolicyLevelType mapping is noted with each image.

Figure 18-13: The User PolicyLevelType is loaded from a Security.config file. The exact location (path) varies depending on the user and version of the .NET Framework/CLR. In this case, the path is noted as C: \Documents and Settings\Administrator\Application Data\Microsoft\CLR Security Config\v1.0.3705.
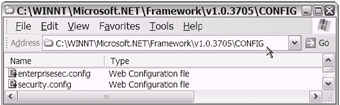
Figure 18-14: The Machine PolicyLevelType is loaded from a Security.config file. The Enterprise PolicyLevelType is loaded from the Enterprisesec.config file. The location is shown in the figure. The exact path varies depending of the version of the .NET Framework/CLR. In this case, the path is noted as C: \WINNT\Microsoft.NET\Framework\v1.0.3705\CONFIG.
You can use either the .NET Framework Configuration tool or the Code Access Security Policy tool when you want to edit the XML config files associated with the User, Machine, and Enterprise PolicyLevelTypes. Optionally, you can edit the XML in Notepad or VS .NET (this is not recommended). You can access the configu ration tools as follows:
-
.NET Framework Configuration tool: Mscorcfg.msc is a MMC snap-in. You can access it by clicking the Start button and selecting Programs Administrative Tools Microsoft .NET Framework Configuration.
-
Code Access Security Policy tool: Access Caspol .exe, a command-line tool, by first navigating to the Visual Studio.NET Command Prompt and then entering the command caspol followed by the desired options.
Now you'll examine some programming code to further review these code access security objects. Please take note of the Label and StoreLocation property of each PolicyLevel. Use the following code snippet to iterate through the PolicyHierarchy class:
. . . Dim ii As IEnumerator = System.Security.SecurityManager.PolicyHierarchy While ii.MoveNext Dim level As Object = ii.Current Trace.Write("Policy Level : " & level.label) Trace.Write("Policy StoreLocation : " & level.StoreLocation) End While . . . After you execute the preceding code, again navigate to the Trace.axd file to retrieve the trace output. This .NET trace feature is rather nice. When you think about the effort that would have been needed on the mainframe to display and write out debugging/tracing information to a separate file, it is easy to appreciate this new VS .NET feature. As shown in the following code, the output lines were written out using the Trace.Write class/method (I modified the output slightly with regard to spacing and indentation to improve the page display):
Policy Level : Enterprise Policy StoreLocation: C:\WINNT\Microsoft.NET\Framework\v1.0.3705\config\enterprisesec.config Policy Level : Machine Policy StoreLocation: C:\WINNT\Microsoft.NET\Framework\v1.0.3705\config\security.config Policy Level : User Policy StoreLocation : C:\WINNT\Microsoft.NET\Framework\v1.0.3705\config\defaultusersecurity.config
Not bad, not bad at all. The security-related objects are certainly accessible. This is one of many things I find amazing about all of this. Right there on your desktop, at work [10] or at home, you're able to get to this type of information. This level of training is easily made available. Compare that with trying to squeeze a mainframe into your living room. Even if you were able to do so, can you imagine how much it would cost for RACF or ACF2 products and training? Let's continue.
I almost forgot about the fourth PolicyLevelType, AppDomain . This PolicyLevelType is handled quite differently. Tucked nicely into the System namespace is the AppDomain class. [11] By using the AppDomain class, you can execute its CreateDomain and SetAppDomainPolicy methods (after you instantiate a new Policy Level object with the System.Security.Policy.PolicyLevel.CreateAppDomainLevel method) to establish application-domain security policy.
The AppDomain policy brings exciting opportunities to restrict security policy that may have been granted by any of the higher level User, Machine, or Enterprise policy levels.
Are you ready to drill down a bit further? Good.
In the code snippet shown earlier, you took at look at the Label and StoreLocation property policy levels stored in the PolicyHierarchy class. As it turns out, each policy level contains a few other properties ”in fact, they are very important properties. You can use the following property objects to examine each policy level further:
-
System.Security.Policy.PolicyLevel.NamedPermissionSets
-
System.Security.Policy.PolicyLevel.RootCodeGroup
In the following sections, you will take a closer look these important policy level properties.
| Note | There is one other important policy level property: System.Security.Policy.PolicyLevel.FullTrustAssemblies . Discussion of this other policy level property is beyond the scope of this book. |
System.Security.Policy.PolicyLevel.NamedPermissionSets
I start this section with a code snippet. I follow Listing 18-14 with a brief discussion, after you have had a chance to examine the code and its resulting output.
| |
. . . Dim iii As IEnumerator = System.Security.SecurityManager.PolicyHierarchy() While iii.MoveNext() Dim level As System.Security.Policy.PolicyLevel = _ CType(iii.Current, System.Security.Policy.PolicyLevel) Trace.Write("Policy Level: " & level.Label) Dim iiii As IEnumerator = level.NamedPermissionSets.GetEnumerator() While iiii.MoveNext() Dim NamedPermissionSet As System.Security.NamedPermissionSet = _ CType(iiii.Current, System.Security.NamedPermissionSet) Trace.Write(" Permission set: " & NamedPermissionSet.Name) End While End While . . . | |
After you run the code in Listing 18-14, you can view the appropriate output using the Trace.axd file (as shown in Figure 18-15).
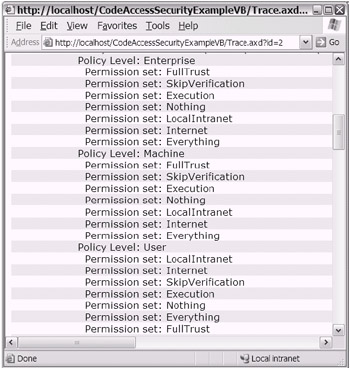
Figure 18-15: The Trace.axd file showing the available NamedPermissionSets per policy level
Specific NamedPermissionSets (i.e., FullTrust, SkipVerification, Execution, Nothing, LocalIntranet, Internet, and Everything) are granted by the respective policy levels (User, Machine, Enterprise, and AppDomain) after any available evidence is presented. Depending on any "intersections" of granted NamedPermissionSets, a resulting permission is actually granted. In other words, if each policy level provides a SkipVerification NamedPermissionSets after the evi dence is reviewed, then the SkipVerification NamedPermissionSet is considered to have met the intersection requirement.
To drill down even further, you will use the .NET Framework Configuration tool . As previously mentioned, this tool is an MMC snap-in (using Mscorcfg.msc). You can access this tool by clicking the Start button and selecting Programs Administrative Tools Microsoft .NET Framework Configuration.
As shown in Figure 18-16, you can use the .NET Framework Configuration tool to drill down just about as far as your needs and interest can take you.
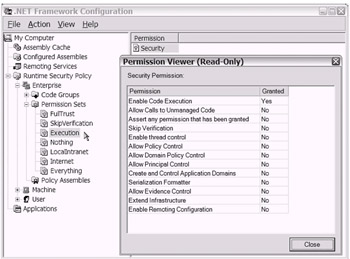
Figure 18-16: Using the .NET Framework Configuration tool to view the contents of the Execution permission set (within the Enterprise policy level). You can enable the Permission Viewer by double-clicking the Permission value in the right pane.
To give you a more complete idea as to what types of permissions are contained inside a NamedPermissionSet, take a look at the display shown in Figure 18-17. As you can see, an extremely granular level of control is exposed using either the .NET Framework Configuration tool or programming code. Isn't code access security intriguing?
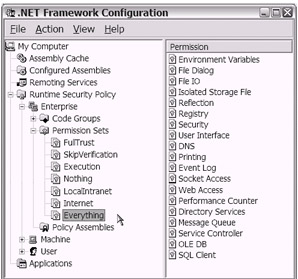
Figure 18-17: Using the .NET Framework Configuration tool to view the contents of the Everything permission set (within the Enterprise policy level)
Now, what does each policy level use when reviewing the evidence to determine which NamedPermissionSets to grant? That takes you to the other important policy level property: RootCodeGroup .
System.Security.Policy.PolicyLevel.RootCodeGroup
As I did in the previous section, I start this section with a code listing (see Listing 18-15) and output display. Are you ready? Great! Here you go.
| |
. . . Dim iiiii As IEnumerator = System.Security.SecurityManager.PolicyHierarchy() While iiiii.MoveNext() Dim level As System.Security.Policy.PolicyLevel = _ CType(iiiii.Current, System.Security.Policy.PolicyLevel) Trace.Write("Policy Level: " & level.Label) Dim CodeGroup As System.Security.Policy.CodeGroup = level.RootCodeGroup Trace.Write(" Root CodeGroup MembershipCondition: " & _ CodeGroup.MembershipCondition.ToString()) End While . . . | |
After you execute the code in Listing 18-15, a display of output similar to the following is retrieved:
Policy Level: Enterprise Root CodeGroup MembershipCondition: All code Policy Level: Machine Root CodeGroup MembershipCondition: All code Policy Level: User Root CodeGroup MembershipCondition: All code
Not terribly exciting, huh? I was tempted to modify the code to drill down into each RootCodeGroup to review any children code groups. However, I figured you might want to do that as part of a practice exercise. Instead, you will use the .NET Framework Configuration tool again. Using this tool, you will be able to continue your inquiry into the policy level code group property.
You can use the .NET Framework Configuration tool to view and/or modify runtime security attributes. Additionally, using this tool, you can easily add custom code groups. As shown in Figure 18-18, the Enterprise and User policy levels do not have any default child code groups. On the other hand, as shown, the Machine policy level has several default child code groups.
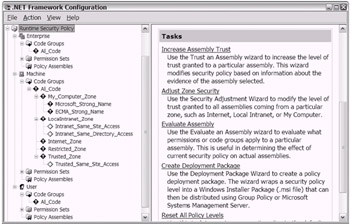
Figure 18-18: Using the .NET Framework Configuration tool to view the Enterprise policy level code group information
Now you'll explore one of the existing code groups. For demonstration pur poses, you'll take a closer look at the Microsoft_Strong_Name child code group. It exists in the Machine policy level. As shown in Figure 18-19, the right pane of the .NET Framework Configuration tool window exposes an Edit Code Group Prop erties option. (Alternately, you can right-click a specific code group in the left pane and choose Properties.)
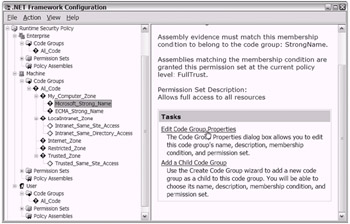
Figure 18-19: Preparing to view the properties of the Microsoft_Strong_Name child Code group in the Machine policy level
After you open the Properties window for a code group, you will notice three tabs: General, Membership Condition, and Permission Set. As shown in Figure 18-20, the General tab contains basic identifying information and two important property settings near the bottom of the page.
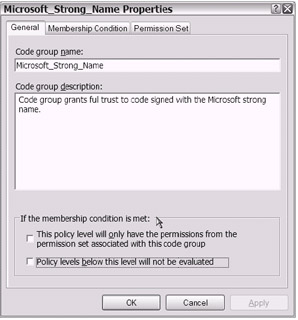
Figure 18-20: The General tab on the code group Properties window
The next tab, Membership Condition, really helps provide you with a better understanding of the code group and its relationship to evidence. Take a quick look at Figure 18-21. You will notice that the current Membership Condition setting for the Microsoft_Strong_Name child code group is Strong Name .
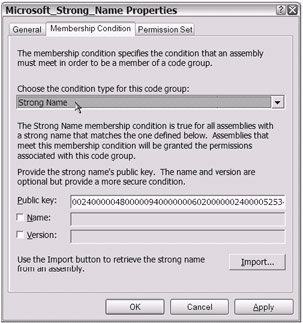
Figure 18-21: The current Membership Condition setting for the Microsoft_Strong_Name child code group
If you click the drop-down arrow where Strong Name is currently displayed, you see the other possible Membership Condition settings (see Figure 18-22). If I did not know better, I would swear that the list of Membership Condition choices looked like the same list of possible evidence types. In all seriousness, they are one and the same.
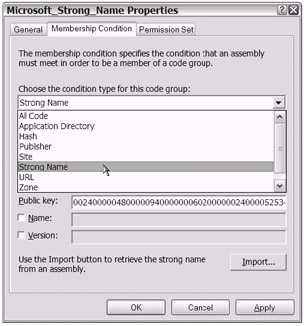
Figure 18-22: The list of Membership Condition choices for a code group
One more tab to go. Take a look at the Permission Set tab. As shown in Figure 18-23, the default Permission Set setting is FullTrust for this particular code group.
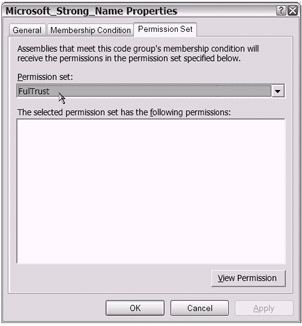
Figure 18-23: The default Permission Set setting for the Microsoft_Strong_Name child code group
As you would expect, you can click the drop-down arrow to view the expected range of Permission Set choices (see Figure 18-24).
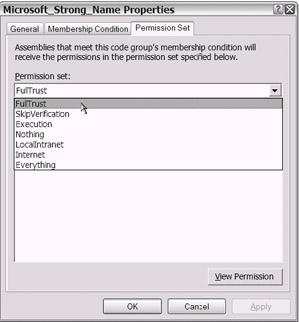
Figure 18-24: The Permission Set choices as shown in the code group Properties page
| Tip | It would be wise to click Cancel to exit the code group Properties page. This way, any changes you made inadvertently will not be saved. |
Now do you have a better idea of how these pieces tie together? You have evi dence, policy levels, permission sets, and code groups all working in concert with each other. Assembly evidence is presented to the policy hierarchy. The code groups that are in each policy level perform a test based on the membership con ditions. Permission sets are selected from each code group that had its memberships conditions met. The group of permissions granted from all of the code groups and from all of the policy levels is then resolved and matched.
The Great Resolve (Well, Sort Of)
I could not resist the temptation to run my evidence through the available System.Security.SecurityManager.ResolvePolicy method to see how many and which permission sets I would end up with after going through the policy hier archy, code groups, and so forth. Listing 18-16 shows the additional code that I added to the code access security sample application.
| |
. . . Dim PermissionAgg As System.Security.PermissionSet = _ System.Security.SecurityManager.ResolvePolicy(EvidenceArray) Trace.Write("Permission Aggregate : " & PermissionAgg.ToString) . . . | |
After running the code in Listing 18-16, I captured the trace output. As you can see in Listing 18-17, I have two permission sets granted: UrlIdentityPermission and ZoneIdentityPermission .
| |
Permission Aggregate : <PermissionSet class="System.Security.PermissionSet" version="1" Unrestricted="true"> <IPermission class="System.Security.Permissions.UrlIdentityPermission, mscorlib, Version=1.0.3300.0, Culture=neutral, PublicKeyToken=b77a5c561934e089" version="1"Url="file://C:/inetpub/wwwroot/CodeAccessSecurityExampleVB/bin/ CodeAccessSecurityExampleVB.DLL"/ /> <IPermission class="System.Security.Permissions.ZoneIdentityPermission, mscorlib, Version=1.0.3300.0, Culture=neutral, PublicKeyToken=b77a5c561934e089" version="1" Zone="MyComputer"/> </PermissionSet>
| |
As you can see, the permission sets, as determined from the evidence that was presented, were rather limited. Simply, there were just two "identity"-type permis sions. Certainly, it was not much. Nevertheless, that is what the policy Resolve determined based on the associated evidence of the sample code assembly.
That concludes my high-level presentation of code access security. However, you are not done with code access security per se. In the next section you will take a brief look at the "programmatic" configuration options available to you.
Programmatic Configuration Options for Code Access Security
In the previous section you went through several code access security steps. If you had wanted to influence the outcome, you could have added/changed/removed any of the evidence information. Additionally, as previously discussed, you could manipulate the policy levels or any of the policy level properties using either the command-line tools introduced to you or the .NET Framework Configuration tool.
| Tip | There is a toolset available called the .NET Framework Wizards. When possible, consider looking into the features offered by this toolset. Generally, it provides a shortcut to some of the options available in the .NET Framework Configuration tool. To access this other .NET tool, simply click the Start button and select Programs Administrative Tools Microsoft .NET Framework Wizards. |
As it turns out, yet another option is available to you. In this section you will focus mainly on using programming code to change the default results that you may experience with code access security.
| Note | To help stage the following demonstration, I made an adjustment to the normal ACL setting using a native configuration for the Windows operating system. The ACL setting was made to "share" the targeted folder to allow file I/O. |
Listing 18-18 demonstrates a general code-based approach to configuring code access security. This type of programmatic code access security development is referred to as imperative . The declarative approach involves the use of attributes.
| |
. . . 'Demo code for Denying permissions '**************************** Dim sPath As String = Server.MapPath("myTextFile.txt") Dim fsPermission1 As FileIOPermission = _ New FileIOPermission(FileIOPermissionAccess.AllAccess, sPath) fsPermission1.Deny() . . . | |
Please review the code in Listing 18-18. You will notice that there is an explicit request for the FileIOPermission to be set to Denied . Additionally, notice the use of the Try/Catch logic for exception handling. The following trace message captured in the Trace.axd file indicating that the attempted access was denied was produced to show the success of the imperative code approach:
An Error Msg: Request for the permission of type System.Security.Permissions.FileIOPermission, mscorlib, Version=1.0.3300.0, Culture=neutral, PublicKeyToken=b77a5c561934e089 failed.
This underscores an important point. Using a programmatic approach (imperative or declarative), you can "take away" privileges/permissions that you may have had. In the case of the sample application, the targeted folder was given access using a normal Windows operating system native configuration. Yet, you were able to "deny" the permissions during runtime using the code access security constructs.
As your needs and interest lead you, feel free to experiment with the other pro- grammatic methods and techniques such as demand and assert. Keep in mind that you can code similar logic for other permission sets as well.
You will find that there is much more to learn. Lots more fun waiting to be had. The references included at the end of this chapter in the "To Learn More" section should prove helpful as you continue this exploration. Although brief, this intro duction should get you started in the right direction.
Configuring CAS with an XML Child Element
One option for configuring your environment to grant your assemblies permis sions other than what their evidence would have resolved to is to use the <trust> XML element. You can use the <trust> XML child element in either the Web.config or Machine.config file . Your ASP.NET applications will feel the impact of this type of code access security configuration. As shown in the following code snippet, the syntax is rather simple:
. . . <system.web> . . . <trust level="Full High Low None" originUrl="url" /> . . . </system.web> . . .
When set appropriately, the <trust> XML element will enable a "mapping" to occur to the appropriate security "trust" configuration file. Though a <trust> setting of Full will not map to a file at all, the other values are set according the < securityPolicy > attribute settings. In other words, these mappings are config urable via the <securityPolicy> XML child element. You will find the <securityPolicy> element in the Machine.config file. It is recognizable as such in the following code snippet:
<securityPolicy> <trustLevel name="Full" policyFile="internal"/> <trustLevel name="High" policyFile="web_hightrust.config"/> <trustLevel name="Low" policyFile="web_lowtrust.config"/> <trustLevel name="None" policyFile="web_notrust.config"/> </securityPolicy>
These <trust> configuration files are located in the following relative path:
C:\WINNT\Microsoft.NET\Framework\v1.0.3705\CONFIG.
As you have seen in this brief discussion, the XML configuration file approach even has applicability to the topic of configuring code access security.
[9] Use the Web.config XML configuration file. Set the "enabled" attribute to true for the <trace> child element.
[10] This is assuming that your place of employment has not locked down or restricted some of these capabilities. Either way, if you consider the practical nature of acquiring your own personal computer, nothing will hold you back.
[11] Of course, we will not ask why Microsoft did not put this class into one of the Security namespaces.
EAN: 2147483647
Pages: 204