Flylib.com

Books Software


Configuring Mac OS X

 < Day Day Up > 

Configuring Mac OS X

After you've bought and paid for your .Mac account, you could go to www.mac.com, log in, and begin using some features—such as Mail—right away. However, to get the most out of your .Mac account, you'll want to configure your Mac's operating system to work with it by setting up your .Mac preferences. After all, one of the chief benefits of having a .Mac account is its tight integration with Mac OS X and using it to sync data between the two. If you entered your .Mac account information when installing Mac OS X, your operating system is already configured to work with your .Mac account. If, however, you ever need to change your .Mac login information (say, you change your .Mac account), you'll need to follow a similar procedure.

To set up Mac OS X to work with a .Mac account

1.

From the Apple menu, choose System Preferences ( Figure 1.1 ).

Figure 1.1. To set up Mac OS X to access your .Mac account, you'll need to first open your System Preferences by choosing System Preferences from the Apple menu.


System Preferences window opens.

2.

Do one of the following:

  • In the Internet & Network section, click the .Mac icon to select it ( Figure 1.2 ).

    Figure 1.2. The .Mac preferences are nestled in the Internet & Network section of the System Preferences window. Simply click the .Mac globe, and the .Mac preferences pane will load.


  • From the View menu, choose .Mac.

    The .Mac pane opens to the login pane.

3.

Click the Account tab to select it.

4.

In the .Mac Member Name field, enter your .Mac member name .

5.

In the Password field, enter your password ( Figure 1.3 ).

Figure 1.3. The main pane of the .Mac preferences lists your .Mac member name and password, and it reminds you of how long you have until your account expires . This page offers more options in Mac OS X 10.4 than it did in earlier versions, including the new Sync area, in which you can choose what information gets synchronized, and the Advanced area, which shows which computers are registered to be synchronized.
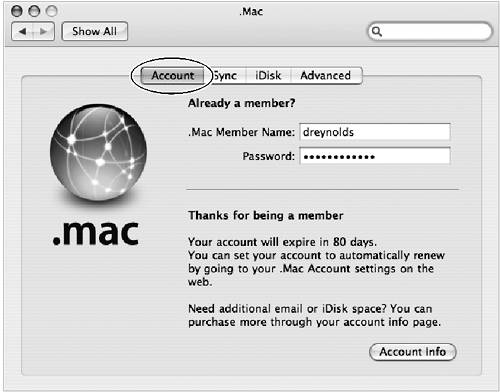

6.

From the System Preferences menu, choose Quit System Preferences (Command-Q) ( Figure 1.4 ).

Figure 1.4. Choosing Quit System Preferences from the System Preferences menu will (as you may have guessed) cause the System Preferences application to quit. What you may not have guessed is that any changes you make to the .Mac pane are saved automatically when you quit.


Mac OS X is now set up to access your .Mac account.

Tips

  • You can choose whatever you like for your password, as long as it's 6 to 14 characters long. Make sure it's something you can remember that isn't easy to guess.

  • If you don't yet have a .Mac account, click the Sign Up button in the lower right portion of the .Mac preferences pane. This takes you to the .Mac homepage, where you can become a .Mac member by purchasing an annual .Mac subscription.


 < Day Day Up > 
 < Day Day Up > 

Changing Account Settings

Your .Mac account has a wide range of settings that you can only change online. If you want to make changes to your personal information, credit card information, password, e-mail settings—or if you want to purchase additional iDisk space—you need to first log in to your .Mac account settings using a Web browser.

To log in to your .Mac account

1.

Type www.mac.com in your Web browser.

The .Mac Web page opens ( Figure 1.5 ).

Figure 1.5. Welcome to .Mac! When you first load the .Mac homepage in a Web browser, you'll be greeted by a page that looks like this. Keep in mind that Web pages can change on a dime, so the page you're looking at on your computer may appear different from the one shown here.


2.

In the lower left corner of the .Mac page, click Account to select it ( Figure 1.6 ).

Figure 1.6. In the lower left section of the .Mac homepage you'll see the Account link. Click it to load the login page of your .Mac account settings.


Your .Mac login page opens.

3.

In the Member Name field, type your member name ( Figure 1.7 ).

Figure 1.7. To log in to .Mac, you need to enter your .Mac member name and password, and then click the Enter button.


4.

In the Password field, type your password.

Your .Mac Account Settings page opens, and you can now make changes to your account ( Figure 1.8 ).

Figure 1.8. This is your main .Mac Account Settings page. Here you can manage your e-mail accounts, buy more storage, and change your personal information, credit card information, and a plethora of other settings.


Tip

  • If you've forgotten your .Mac password, you can click the " Forgot your password?" link on the login page to retrieve it. Simply follow the onscreen instructions.


To change your personal information

1.

Log in to your .Mac account settings.

The Account Settings page opens.

2.

On the Account Settings page, click the Personal Info button as shown in Figure 1.8.

Your Personal Info page opens ( Figure 1.9 ).

Figure 1.9. Your .Mac Personal Info page lets you change your name, assign an alternate e-mail address, set your preferred language, and request a subscription to the .Mac newsletter. The newsletter is a valuable read, well worth subscribing to.


3.

On the Personal Info page, do any of the following:

  • In the First Name field, change your first name.

  • In the Last Name field, change your last name.

  • In the Alternate Email Address field, change or edit your alternate e-mail address (where you can be contacted regarding .Mac, in case your .Mac address isn't available for some reason).

  • In the Preferred Language pop-up menu, select your preferred language in which to view .Mac (currently the only two options are either English or Japanese).

  • In the News and Info section, click the check box to change your opt-in e-mail setting (when checked, this tells Apple that you wouldn't mind being sent the .Mac newsletter and other .Mac communications).

4.

In the lower right corner of the Personal Info page, click the Submit button.

Apple applies the changes you made to your .Mac account's personal information settings.

Subscribing to the .Mac Newsletter

Although it's a good idea to be careful with your e-mail address—after all, one slip-up and you'll be getting more spam than you do now—subscribing to the .Mac newsletter is a pretty good idea.

This newsletter contains special information and offers for .Mac members that can help you take full advantage of your .Mac account. And don't worry about being bombarded by too much e-mail—the frequency of these communiqus wouldn't bury anyone .


Changing credit card information

.Mac is built around an annual subscription, and therefore it keeps your credit card information on file (just in case you want to sign up for the optional automatic renewal). Of course, as soon as you get that new card with 0 percent interest until 2006 on all balance transfers and new purchases, you'll probably want to change the credit card information stored in your .Mac account.

To change your credit card information

1.

Log in to your .Mac account settings.

The Account Settings page opens.

2.

On the Account Settings page, click the Credit Card Info button as shown in Figure 1.8.

The Credit Card Info page opens ( Figure 1.10 ).

Figure 1.10. Your .Mac Credit Card Info page lets you adjust settings that include your credit card type and number, your name and billing address, and auto-renewal of your account.


3.

On the Credit Card Info page, do any of the following:

  • Change your credit card number and billing information.

  • Check the Auto-Renew box to set your .Mac membership to automatically renew.

  • If the Auto-Renew check box is already selected and you don't want your .Mac membership to automatically renew, click the check box to deselect it.

4.

Click Submit.

Apple applies the changes you made to your .Mac account's credit card settings.

{% if main.adsdop %}{% include 'adsenceinline.tpl' %}{% endif %}

Tip

  • If you do select the Auto-Renew check box, you'll get an e-mail about 30 days before your account is set to automatically renew, notifying you of the impending action.


Changing password settings

When logged in to your .Mac account settings, you can also change your .Mac password and your .Mac password verification, including your birthday, password question, and password answer.

To change your password settings

1.

Log in to your .Mac Account Settings.

The Account Settings page opens.

2.

On the Account Settings page, click the Password Settings button as shown in Figure 1.8.

Your Password Settings page opens ( Figure 1.11 ).

Figure 1.11. Your .Mac Password Settings page lets you change your password (although you can't view it—all you see is bullets). You can also use it to set password-verification information—namely, your birthday and a password question and answer.


3.

On the Password Settings page, do any of the following:

  • In the Password field, type a new password.

  • From the Date of Birth pop-up menus , change your birth date.

  • In the Password Question field, type in a new password question.

  • In the Password Answer field, type in a new answer to your password question.

4.

Click Submit.

Apple applies the changes you made to your .Mac account's password settings.

About the Other Settings

The Account Settings page also covers settings that relate to your .Mac e-mail account and your iDisk. These settings let you do the following:

  • Change e-mail account settings. (For more information, see Chapter 2, "Sending Mail.")

  • Manage and buy more e-mail accounts. (For more information, see Chapter 2, "Sending Mail.")

  • Check iDisk usage via a Web browser. (For more information, see Chapter 3, "Using iDisk.")

  • Buy more online storage. (For more information, see Chapter 3, "Using iDisk.")


 < Day Day Up >