| Flash has a wide range of preference settings that let you control everything from the number of Undos you can perform to the way objects are selected. In this lesson, you'll check to make sure that most of your preferences are set to Flash's defaults and learn what many of the preferences actually do. -
Choose Edit > Preferences (Flash > Preferences in Mac OS X) to display the Preferences window. Click the General tab, set the Undo Levels to 50, and make sure the other preferences are set as shown in the figure below. 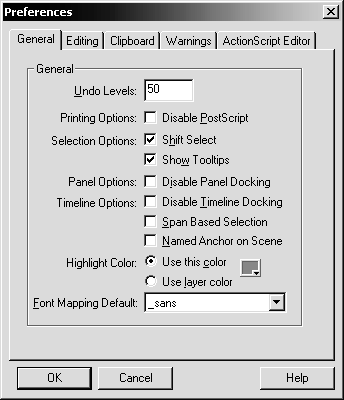 Undo Levels controls the number of steps that Flash remembers. If you need to make corrections to your work, Flash will be able to revert by the number of steps set in the Undo Levels field. With the setting at 50 steps, you should be able to undo almost any mistake. But you should also be aware that each step is saved in memory. With a high Undo Levels setting, your computer might start slowing after you complete several tasks . If you notice your computer slowing and it starts causing problems, return to the Preferences window and lower the Undo Levels setting. The options checked in the General tab of the Preferences window are Shift Select and Show Tooltips. Selecting Shift Select lets you add to a selection by holding down the Shift key when you click additional objects. Clicking an additional object without holding down Shift simply selects that object. If Shift Select is off, objects are added to a selection as you click themyou don't have to hold down Shift. (If this doesn't make sense to you, don't worry about it; we'll cover it later in the book. Right now, you only need to make sure that your preferences are set correctly.) Show Tooltips is a quick help system, handy for novices. When Show Tooltips is checked, a Tooltip or label, appears whenever you pause the pointer over a control. The options that are not checked in the General tab of the Preferences window are Disable PostScript (Windows only), Disable Panel Docking (Windows only), Disable Timeline Docking, Span Based Selection, and Named Anchor on Scene. On a Windows computer, you can select the Disable PostScript option if you have trouble printing to a PostScript printer, but you'll find that it slows down printing. When the Disable Panel Docking option is selected on a Windows computer, panels will not attach, or dock, to each other. You'll learn more about panels and docking later in this lesson. Selecting the Disable Timeline Docking option keeps the timeline from attaching to the application window after it has been separated into its own window. The Span Based Selection option determines whether you're able to use span-based or frame-based selection in the timelineyou'll learn more about what that means in Lesson 4. You can select the Named Anchor on Scene option to have Flash add a named anchor to the first frame of each scene, which will allow you to use the Forward and Back buttons in the browser to move from scene to scene. TIP You may find that opening a Flash file created on another computer can sometimes result in a Missing Font Warning. This warning indicates that a font in the file you opened is not installed on your computer. You can choose to use the default substitute, or you can indicate a specific font to replace the missing font. -
Click the Editing tab, and select the Show Pen Preview option. Make sure that the rest of the Pen Tool and Vertical Text options are deselected, and that all of the Drawing Settings are set to Normal. 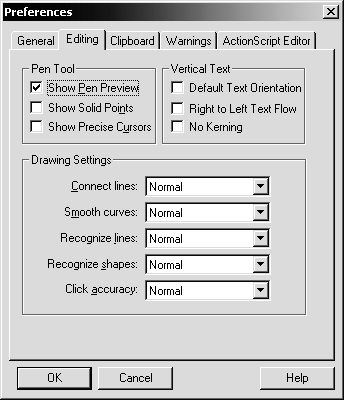 Since you haven't started working with the drawing tools yet, some of the settings under the Editing tab may not look familiar. After you start working with the drawing tools, you might find it useful to return to the Preferences window to modify these settings. The options in the Pen Tool category modify the way the pen tool, one of the drawing tools found in the toolbox, works. When the Show Pen Preview option is checked, Flash shows the line segment before it's drawn with the pen tool. The Show Solid Points option, which is not checked by default, specifies the way the points of lines are displayed when using the pen or subselection tool. If this option is checked, selected points will appear hollow, while unselected points will appear solid. The opposite is true if this option is not checked. When the Show Precise Cursors option is selected, the pen tool appears as a crosshair instead of as the default pen tool icon. All of the Vertical Text options are deselected by default, which is just fine for the project we're creating. You might want to use them in the future, so it's good to know what they do. Selecting the Default Text Orientation option will make vertical text the default orientation for any text added to the movie. This is particularly useful if you're working with Asian-language fonts. The Right to Left Text Flow option, when checked, will force text to flow from right to left, instead of the default left to right. Again, you might want this option if you're working with some Asian-language fonts. Finally, selecting the No Kerning option will turn off kerning for all vertical text in the movie. This option might be useful for improving the spacing for some fonts. The Drawing Settings specify the tolerances for some of the drawing behaviors in Flash. These settings are relativethey depend on the resolution of your computer screen and your current magnification level. So when you zoom in and out as you draw, the drawing behaviors become more or less tolerant. The Connect lines setting determines how close a line being drawn can come to an existing line before its end point automatically connects to the closest point on the preexisting line. The options for this setting are Must be close, Normal, and Can be distant . The Smooth curves setting can be set to Off, Rough, Normal, or Smooth and specifies the amount of smoothing applied to a curved line drawn with the pencil tool. The Recognize lines setting specifies how close to a straight line a segment drawn with the pencil tool must be before it's actually considered a straight line. When Flash recognizes a segment as a straight line, it will make that segment perfectly straight. The Recognize shapes option is similar, except it's used to specify how close to a circle, oval, rectangle, square, 90-degree arc, or 180-degree arc a shape must be before it's recognized and redrawn as one of those geometric shapes. Both the Recognize lines and Recognize shapes settings can be set to Off, Strict, Normal, or Tolerant. Finally, the Click accuracy setting determines how close the pointer has to be to a shape to recognize that shape. As you'll see when you start working with the drawing tools in the next lesson, moving the pointer near a shape causes the cursor to change, depending on the shape and the currently selected drawing tool. The Click accuracy option, which can be set to Strict, Normal, or Tolerant, specifies how close to a shape the pointer must be before the cursor changes appearance. -
Click the Warnings tab and make sure that all of the options are selected. 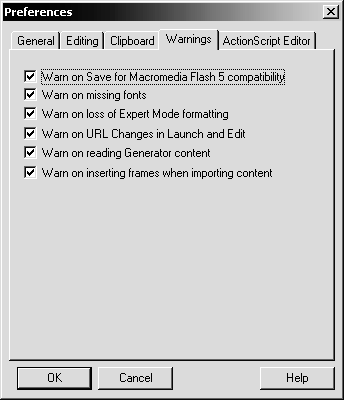 You're just getting started, so it's probably best to let Flash warn you whenever something happens that could potentially mess things up. All of the options under the Warnings tab are checked by default, but as you become more comfortable with Flash, you probably won't need as many warnings. For example, if you have Warn on missing fonts selected, Flash will warn you every time you open a Flash movie that contains a font that is not installed on your computer. If you often work with files that contain fonts not installed on your computer, and you no longer want to see this setting, open the Preferences window and deselect that option. -
Click OK to close the Preferences window. When you click OK, any changes you made in the Preferences window take effect. Now that you've taken a look at your preferences, it's time to explore the Flash environment a little more.  |