Designing Access Control for Files and Folders
|
| < Day Day Up > |
|
Just as with Active Directory objects, there are different types of permissions that apply to files and folders. In this section, you will learn how to control access to files and folders locally or by using NTFS permissions, and then you will learn how to work shared folders into your overall design.
There are standard and special permissions for all securable objects that exist in the Windows network system. The standard permissions are those that are most frequently assigned, while special permissions provide for more granular control over resources. For example the NTFS Read permission includes the following special permissions: List Folder/Read Data, Read Attributes, Read Extended Attributes, and Read Permissions.
The standard permissions that are provided for NTFS are as follows:
-
Full Control
-
Modify
-
Read & Execute
-
List Folder Contents
-
Read
-
Write
In earlier versions of Windows, the default file permissions were inadequate because they gave all users Full Control. As a result of the new focus at Microsoft on security, specifically Microsoft is now implementing secure defaults whenever possible; for example, the Users group, by default, receives only the Read permissions. If you’ve worked with the earlier versions of Windows, you will need to remember that in Windows Server 2003, when creating a file structure, you do not need to remove the Everyone group from the ACL. However, by default the Administrators group and the special SYSTEM group will inherit Full Control from the volume root. The Users group will inherit Read & Execute, List Folder Contents, and Read permissions from the volume root. If these permissions are not the ones that you require, you’ll need to remove the default ACEs from the DACL.
Windows Server 2003 organizes the files into directories that are represented in Windows Explorer as folders. NTFS file permissions, or NTFS permissions for short, are always checked when an attempt is made to access a resource on the file system. NTFS permissions will be cumulated whether the principal is requesting the file locally (logged in directly at the server) or remotely from their workstation. There is another level of access control that only applies when the resource is being accessed remotely: Share permissions. When designing the access control for files and folders, you will need to remember that Share permissions determine the maximum access that is allowed into the file system remotely. The NTFS permissions that are assigned to the requesting principal are combined with the Share permissions and the most restrictive permission passes through. For example, Server5 is sharing a folder named myShare and has explicitly granted the Domain Users group Read permission to the share. The Domain Users group is also explicitly granted the Full Control NTFS permission. If the user is accessing a file using the share (Server5\myShare), members of the Domain Users group will only have Read permission because it is the most restrictive permission when comparing the NTFS to the Share permissions.
When a folder is shared, the Read permission is granted to the Everyone special group as the default permission. You will want to remove this and only grant permissions to the required principals. As you grant specific users or groups rights to the share, their default permission is Read.
You can create hidden shares, which will not be displayed in Windows Explorer if a client navigates to the server using its UNC path. Hidden shares do not add any layer of security, nor should you assume that they are not visible to a potential attacker. You can create a hidden share simply by appending a dollar sign ($) to the name of the share when you create it as you would any other share such as Accounting$. Windows Server 2003 will automatically share folders that are required for certain administrative tasks. By default, these administrative shares assign Full Control permission to the Administrators group and you cannot modify the permissions of administrative shares.
Table 5.3 shows the administrative shares and describes what they are typically used for.
| Share Name | Local Folder | Description |
|---|---|---|
| C$, D$, E$, … | C, D, E, … | The root of each partition with a drive letter assigned to it is automatically shared. Through this root share, an administrator will have remote access to the entire partition tree. |
| Admin$ | Systemroot (e.g., C:\Windows) | This is the operating system root. Administrators can use this hidden share to access the Windows installation without knowing the drive or path that Windows was installed to. |
| Print$ | Systemroot\System32\Spool\Drivers | When a printer is shared on the server, this share is created to store the operating system drivers required to print to the printer. The Everyone group has Read permission and the Administrators, Server Operators, and Print Operators all have the Full Control permission. If no printer is shared on a server, this share will not exist. |
| IPC$ | This folder is used when administering the server remotely. |
You can view all of the folders that are shared, including the administrative hidden shares, by typing net share at the command prompt, as seen in Figure 5.1.
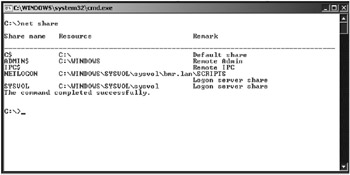
Figure 5.1: The net share command
You can also use the Computer Management MMC, shown in Figure 5.2, to view the shares.
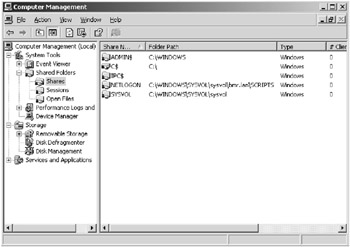
Figure 5.2: Viewing shared folders in Computer Management
| Note | You can remove certain administrative shares; however, the next time the Server service is started, they will be re-created. |
You should combine Share and NTFS permissions to control the access to your organization’s data. Make sure that you remember that all objects on an NTFS volume have an owner and that owner always has the permission to change the permissions on the object. This can be exploited to undermine the security policies configured by the IT staff. For example, a user in the Human Resources group creates a spreadsheet on the HR server that allows only Human Resources employees to access the data. The user who created the spreadsheet has the Full Control permission to it as its owner, and that user can grant another user the Full Control permission, even if the other user is not a member of the Human Resources group. To counter this, you should grant Change Permissions to the Human Resources group on the shared folder on the HR server. The user can still create new files on the server but cannot grant Full Control permissions to any other user unless they are logged on locally to the HR server.
In the following Design Scenario, you will evaluate a scenario and make the appropriate decisions to control access to the files and folders within the specified organization.
Design Scenario: Designing an Access Control Strategy for Files and Folders
You are the network administrator for a small architecture firm named Brady Corp. Brady Corp. has an office in Miami and another in Boston. The Brady Corp. network is made up of a single Active Directory domain named Bradycorp.com. There are two domain controllers in each office.
A Global security group named MiaResidentialArchitects contains the members of the architecture department in the Miami office and a Global security group named BosResidentialArchitects contains the members of the architecture department in the Boston office. All of the servers are running Windows Server 2003, Enterprise Edition. All of the workstations are running Windows XP Professional and have the most recent service packs applied. All of the architectural data is located on a server named ArchBrady in a folder named ArchData, which is located in Miami.
The company’s security policy specifies the following requirements:
-
Access to the ArchData folder must be restricted to only members of the MiaResidentialArchitects and the BosResidentialArchitects.
-
The members of these groups need to be able to add and modify the files in the folder, but they should not be able to take ownership or change the permissions of other members’ files in the ArchData folder.
-
Question: You need to design an access control strategy for the ArchData folder and the files and folders that are contained within it. What should you do to secure the folder according to the business requirements? Answer: You should assign the MiaResidentialArchitects and the BosResidentialArchitects groups the Allow-Modify permission. In addition, you will need to remove the Administrators, SYSTEM, and Users group from the DACL.
Designing a File Encryption Strategy
Now that you’ve learned to restrict access to file and folder resources, you will take a look at securing resources that are out of the realm of your control. Laptops that must leave the environment must have their data secured from theft and other risks and you must work with the Encrypting File System (EFS) features of Windows.
EFS enables you to encrypt files on an NTFS volume automatically, and by default, no additional administration is required. EFS is based on the Cryptography Application Programming Interface (CyptoAPI), which is built into the Windows Server 2003 operating system.
The EFS encrypts only the files that are on disk; files that are transmitted over the network are decrypted before they are sent. In order to encrypt data in transit, you should use IPSec or SSL.
EFS-protected files are encrypted at the file-system level, and the files are only accessible with the appropriate private key and certificate. Even if an attacker reinstalls the operating system, the file will be unreadable without the decryption key.
| Tip | Encryption and compression are mutually exclusive. |
In order to encrypt a file or folder, you simply right-click the object and select Properties from the context menu and select the Encrypt contents to secure data option. When the Properties window is displayed, click Advanced to display the Advanced Attributes dialog box, shown in Figure 5.3.
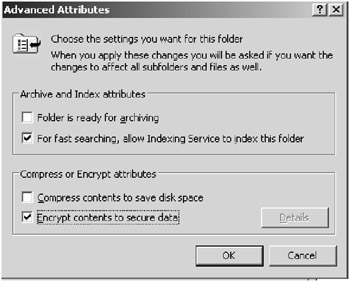
Figure 5.3: The Advanced Attributes dialog box
Implementing the Encrypting File System
The EFS is a very powerful technique in securing your data, but if misused, it can lead to legitimate users being prevented from accessing their data. You should have a policy in place for encrypting files to prevent encryption from inadvertently causing a loss of data. For example, an administrator encrypts all of the files in a folder and later deletes the administrative account.
For maximum security, you should encrypt folders before creating sensitive files in them. This assures that the files are never written to the disk as plaintext. When folders, rather than individual files, are encrypted, files that are created within them are also encrypted, even those created by an application or service.
You should also create a policy for the recovery of encrypted files. The policy should include the guidelines and steps for file recovery as well the standard operating procedure for the storage and use of the private recovery key. An administrator may leave the floppy disk that contains the data recovery agent’s private key, which could then be used to decrypt any encrypted file. The policy should outline the appropriate methods for working with the recovery key.
In addition to creating procedures for the encryption and decryption of the files requiring this level of security, it is always recommended that users be trained on EFS and understand what it can and can’t do. Proper education will minimize the use of the recovery agent as well as the likelihood that a user will encrypt a file with no means of recovering it or believe that when the file is copied to another location, such as a floppy disk, it will remain encrypted and secure.
To recover an encrypted file, any recovery agent on the domain can simply remove the encryption attribute or open the file. You should take great care in securing the private key of the recovery agent.
Designing Access Control for the Windows Registry
The Windows Registry contains sensitive information about the entire system, its applications, and its users. If an attacker can gain access to the Registry, they would be able to cause severe damage to the computer. It is for this reason that you should maintain a high level of security on the Windows Registry.
The Windows Registry is highly secure by default, with the Administrators group having Full Control permission to just about all keys in the Registry. Users have full access to the keys that pertain to their accounts (HKEY_CURRENT_USER) and read-only rights to the keys related to the system and its software; they have no access to information stored for other users. Users who are assigned the appropriate permissions for a key can make changes to the permissions that are similar to the permissions within the file system.
The Windows Registry, like the resources you’ve seen up to this point, has its access permissions stored in DACLs and SACLs. To modify the permissions on Registry keys, you can use the Registry Editor, shown in Figure 5.4.
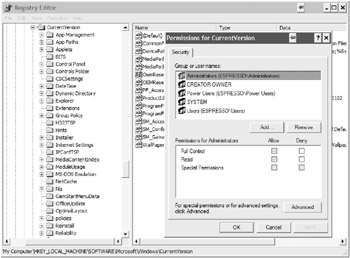
Figure 5.4: The Registry Editor
You should make sure that, whether the data is an Active Directory object, part of the file system, or in the Windows Registry, accounts are given only the minimum permissions required to complete their tasks. Never give more permissions than those that are explicitly required.
Analyzing the Auditing Requirements for Data
When you implement network security in your organization, you do so typically by attempting to prevent attacks. A proper security design will mitigate many of the common attacks. However, with persistence, an attacker will eventually be able to penetrate your security infrastructure. The quicker that you can detect the penetration, the quicker you can respond to it. To minimize the damage inflicted at the hands of an intruder, you must detect it early.
One of the most important techniques for early detection is auditing your network and systems so that you can react promptly when an anomaly is noticed. In this section, you will learn the value of auditing and of having an auditing policy in place. You will then learn how to design an auditing policy for your organization.
Network auditing is the process of recording specific events on a network. Auditing the events that occur on systems and the applications that they run will provide you with the information that you would need in order to compare the behavior of a user to that of an attacker.
In order for the audit information to be useful, you will need to have a baseline of what a user, computer, or application is supposed to be doing. Having the baseline allows you to better discover an intruder. For example, we have running on a server an ASP.NET web application that should only be accessing a Microsoft SQL Server database and its own application directory. With auditing enabled, we can detect when the application attempts to access another directory or server on our network. The attempt to access the other directory may be due to an attacker compromising the application. In short, knowing what your systems should be doing is important to detecting an intruder.
Now that you have learned just how important auditing is, in the following sections, you’ll learn how to create an audit policy as well as a process for an audit review.
Real World Scenario: Preventing Internal Attacks through Auditing
A medium-sized investment firm uses Microsoft Exchange Server. All of the network administrators are members of the Domain Admins group for the domain. One of the administrators is able to open and read all of the other users’ mail, which causes users to occasionally report that mail that they have not read is shown as having been already read in Outlook. The administrators may brush this off when the users complain because it may appear as a minor inconvenience. However, if auditing is enabled (the auditing of Microsoft Exchange opening another user’s mailbox is enabled by default) and monitored, this issue could have been stopped before sensitive information was leaked, because someone would have seen the entries showing an administrator opening other users’ mail.
Designing an Audit Policy
As you may have guessed, there is more to an audit policy than flipping a switch and turning it on. You’ll need to properly plan your strategy for the best results. You’ll need to complete the following steps in order to plan your audit policy:
Determine which events to audit. Having an audit log that contains thousands of events per hour will make it difficult at best, and impossible at worst, to sift through the unimportant audit event entries to locate something substantive. To keep the information in the audit log meaningful, you will want to work with both the business and technical teams in your organization because they will have specific insight as to the normal operations that their respective applications and users perform.
Select the appropriate auditing tools. Select the most appropriate tool for the job. This can be applied to many different situations and is extremely important when it comes to auditing the events that occur in your organization. Depending on what needs to be audited, you will need to use different tools to gather the data, and you may even require a separate tool to view the audit log. The various tools are listed in Table 5.5 later in this section.
| Resource to Audit | Application or Resource Containing Audit Data |
|---|---|
| Operating system | Event Viewer, Microsoft Operations Manager, custom scripts |
| Web applications | IIS logs, URLScan |
| Network perimeters | Router log, firewall log, packet filtering log, intrusion detection system log, network monitor |
| Application specific | Application-specific logs, intrusion detection log, antivirus log, Microsoft Operations Manager |
Design a method for reviewing event logs. You’ll need to work with the different teams to assign the responsibility of monitoring the logs. Obviously, the reviewer of the business application logs should have an understanding of the business application and how it works. For example, a typical IT staffer won't understand whether or not the general ledger should be accessed by a specific user of an accounting application.
Design a course of action to examine the suspicious events. You should also define a process by which to investigate the events that appear to be out of the norm. The process should be in the form of a written policy that includes items such as who should be notified.
Create a retention policy for audit logs. In many cases, there is a history or pattern that led to the attacker being discovered. This history can be evaluated for future prevention or as evidence to provide to authorities. To access the historical data, you’ll want to have a policy defined for the archival of the security logs. This policy could be consulted when you need to view an audit log from last year, for example.
There are some best practices when it comes to auditing that you will want to adhere to, both for performance and to keep the size of the audit log to a minimum. To facilitate this, it is recommended that you create audit statements that will define the general type of event that needs to be tracked, the details that need to be recorded, and what system or resource that will be audited. Table 5.4 is an example of an audit statement.
| Audit Statement Component | Example |
|---|---|
| Event Type | Track logon attempts to authenticate to the network. |
| Event Details | Record failed logon attempts, time of occurrence, remote system attempting to log on. |
| Audit Resource | Only record for members of the IT_Administrators group on domain controllers |
There are a number of tools that you can use for auditing; their usefulness will depend on the resource that is being audited. Table 5.5 contains a partial list of the common resources that require auditing and some of the tools that can be used to produce an audit log.
Once the audit log has been generated there should be a procedure designed for its review. In the next section, you will learn the steps that you should complete in order to design the audit review procedure for your organization.
Designing a Process for Audit Review
When evaluating the audit data, you should define the following:
The principal who is responsible for analyzing the events You need to make sure that those charged with managing and analyzing the audit logs are accountable and do their job. They should be able to recognize the difference between normal operating events and suspicious activity as recorded in the log. You should also look into custom applications or scripts to better search through the logs looking for events that have already been defined by your organization as suspicious.
Audit review schedule You’ll need to create a schedule for audit log analysis. There must be more than one person assigned to this task, and it is a good idea to verify this by planting suspicious data in the log in order to verify that your process for discovering suspicious events is functional and is being followed. There should be a maximum interval of time that is permitted to pass between log reviews, and you’ll want to make sure that this interval is short enough to prevent significant damage to your infrastructure should an attacker have access to your system for this duration.
Suspicious event notification procedures You should explicitly define how those who analyze the logs are to report the information to the security response team or manager for further investigation. There should be a defined escalation policy if the notification is not accepted within a specified time period.
Evidence preservation procedure As explained in earlier chapters, you will want to be able to provide as much data to law enforcement as possible to aid in the conviction of the offense. You will need to make sure that the audit logs are gathered and used appropriately to aid the investigation and possibly the ensuing trial.
In the “Designing an Audit Policy” Design Scenario, you will evaluate a scenario and design the appropriate audit policy to facilitate early detection.
Design Scenario: Designing an Audit Policy
You are the network administrator for a contractor that does business with the government. It is specified in the government contract that you must not only secure access to the data located in the GovData folder, but you must also maintain a record each time an attempt is made to read or write to/from the contents of an existing file, even if the attempt is unsuccessful. You need to design a monitoring strategy for the GovData folder. You also need to track when someone attempts to change the permissions on a file or folder in the GovData directory.
-
Question: What should you do? Answer: You should audit success and failures for reading, writing, and appending data on the GovData folder. You will also track the success and failures for Change Permissions and Take Owner ship. The auditing policies will be for all users.
|
| < Day Day Up > |
|
EAN: 2147483647
Pages: 168
- Integration Strategies and Tactics for Information Technology Governance
- Linking the IT Balanced Scorecard to the Business Objectives at a Major Canadian Financial Group
- Measuring ROI in E-Commerce Applications: Analysis to Action
- Governing Information Technology Through COBIT
- The Evolution of IT Governance at NB Power