Applying Behaviors that Control Sound
One of the features of Flash 8 is the Behaviors panel, introduced in Flash MX 2004. This panel enables you to quickly add interactive functionality to elements of your Flash movie. There are five behaviors in the Sound category of the Behaviors panel. In this section, you learn how each of these behaviors works.
| Note | Behaviors are essentially prewritten ActionScript code blocks that appear on event handlers, such as keyframes, Button instances, and Movie Clip instances. Just as Dreamweaver behaviors add JavaScript code to HTML documents, Flash behaviors add ActionScript code to your Flash documents. |
You can see all of the Sound behaviors by clicking the Add Behavior (+) button in the top-left corner of the Behaviors panel, and choosing the Sound menu item (see Figure 15-7).
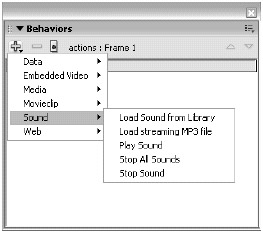
Figure 15-7: The Sound behaviors in the Behaviors panel
Load Sound from Library Behavior
This behavior locates a sound item in the Flash movie's library and establishes a reference to that sound, so that the sound can be played later. This behavior can also be used to play the sound.
| Caution | You must use this behavior before you can use the Play Sound behavior we discuss later in this section. |
In practice, you will use this behavior to set up references to any sounds that you wish to use the Play Sound behavior. For example, if you have three sounds in your Library and you want to prepare all three for later use in your Flash movie, you would add three Load Sound from Library behaviors to the first frame of a layer in your Flash document. In the following steps, you learn how to add this behavior to a Flash document.
| On the CD-ROM | In the following exercise, you can use the atmospheres_1.wav or atmospheres_1.aif sound file from the ch15 folder of this book's CD-ROM. |
-
Create a new Flash document by choosing File ð New.
-
In the New Document dialog box, select Flash Document and click OK.
-
Import a sound file into the Flash document. Choose File ð Import to Library and browse to a sound file on your local computer.
You can import one of the sound files from the book's CD-ROM. For this example, we refer to the atmospheres_1.wav file.
-
Once the sound is imported into the document's library, open the Library panel (Ctrl+L or z+L).
You need to create a linkage identifier for the newly imported sound in order for the Load Sound from Library behavior to locate the sound in the library.
-
Select the sound file in the panel, and right-click (or Control+click on the Mac) the sound file.
-
Choose the Linkage option in the contextual menu.
-
In the Linkage Properties dialog box, select the Export for ActionScript check box.
The sound filename automatically populates the Identifier field. You can leave the name as is, or rename the identifier term. For this example, use the term "song," as shown in Figure 15-8. Click OK to close the dialog box.
Now, you are ready to access the linked sound in a behavior.
-
In the Timeline window, rename Layer 1 behaviors.
-
Select frame 1 of this layer, and open the Behaviors panel (Shift+F3).
-
In the top-left corner of this panel, click the Add Behavior (+) button, and choose Sound ð Load Sound from Library.
A dialog box opens, in which you can enter the parameters for the behavior.
-
In the Linkage ID field, type the identifier you specified in Step 7.
In the sample, we used the term "song." In the Identifier field, type a unique instance name for this sound. For this example, use sndSong. Refer to Figure 15-9. The Play this sound when loaded check box is checked by default. As such, the atmospheres_1.wav sound will play as soon as frame 1 is loaded. When you are finished, click OK to close the dialog box.
-
Save your Flash document (File ð Save) as loadsound_behavior.fla.
-
Choose Control ð Test Movie (Ctrl+Enter or z+Enter).
As soon as the Flash movie starts, you will hear the atmospheres_1.wav sound begin to play.
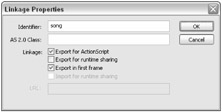
Figure 15-8: The Linkage Properties dialog box
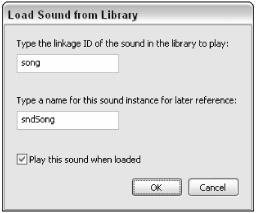
Figure 15-9: The Load Sound from Library parameters
| Note | The audio options for Audio event in the Flash tab of the Publish Settings dialog box (File ð Publish Settings) are automatically compressing the sound file to MP3 audio at 16 Kbps. |
| On the CD-ROM | You can find the completed file, loadsound_behavior.fla, in the ch15 folder of this book's CD-ROM. |
Load Streaming MP3 File Behavior
This behavior, as the name implies, loads an MP3 file at run time directly from the Flash Player environment. Instead of attaching a sound from the movie's library, this behavior can access an external MP3 file residing on a publicly accessible Web server. Note that "streaming" here means that the MP3 file will begin playback as soon as enough of the file has buffered into the Flash Player.
| Note | Technically, this type of loading is called a progressive download — it's not true streaming like audio or video from a Macromedia Flash Communication Server application. |
In the following exercise, you learn how to use this behavior to play an MP3 file from a remote Web server.
-
Create a new Flash document by choosing File ð New.
-
In the New Document dialog box, select Flash Document and click OK.
-
Rename Layer 1 to behaviors.
-
Select this layer's first frame, and open the Behaviors panel (Shift+F3).
-
In the top-left corner of this panel, click the Add Behavior (+) button, and choose Sound ð Load streaming MP3 file.
When this behavior's dialog box opens, there are two options: Sound Location and Identifier.
-
In the top field, type the URL to an MP3 file that has been copied to a publicly accessible folder on your Web server.
You can use the following URL to test this example:
-
http://www.flashsupport.com/mp3/atmospheres_1_short.mp3
-
-
In the Identifier field, type sndBg.
This identifier allows you to target the sound with another behavior or in your own ActionScript code.
-
Click OK to close the dialog box.
See Figure 15-10 for more details.
-
Save your Flash document as loadmp3_behavior.fla.
-
Test your movie by choosing Control ð Test Movie (Ctrl+Enter or z+Enter).
As soon as the movie loads, the MP3 begins to stream into the Flash Player. When enough of the sound has buffered, the MP3 file automatically plays.
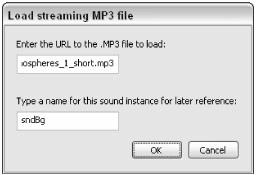
Figure 15-10: The Load streaming MP3 file behavior parameters
| Note | You need to have a connection to the Internet in order for this example to work. If you would like to test this example with a local MP3 file, make a copy of the MP3 file directly to the same location as your Flash document. Then, change the URL in the behavior's parameters to atmospheres_1_short.mp3, omitting the http://www.flashsupport.com/mp3/ portion. |
| On the CD-ROM | You can find the completed file, loadmp3_behavior.fla, in the ch15 folder of this book's CD-ROM. |
As indicated by the previous note, you can specify relative URLs (or file locations) in the Sound Location field for this behavior's parameters. For example, if you save your Flash movie file (.swf) in the same location or folder as your MP3 file, you can simply specify the MP3 filename in the Sound Location field. You can also use relative path notation. For example, /myfile.mp3 would load the myfile.mp3 file located one directory above (that is, the parent folder) the Flash movie's location.
| Note | With the Load streaming MP3 file behavior, the sound does not loop. If you want to replay the sound, you need to use the Play Sound behavior or target the sound with further ActionScript code. |
Play Sound
The Play Sound behavior plays a sound that has been set up with the Load Sound from Library or Load streaming MP3 file behavior. Remember that the Load streaming MP3 file behavior automatically begins playback of the MP3 file, and the Load Sound from Library behavior has an optional parameter that automatically begins playback as well. You can use the Play Sound behavior to
-
Play a sound that was only set up by the Load Sound from Library behavior, where the Play this sound when loaded checkbox was not selected.
-
Replay a sound that finished playing or was stopped by the Stop Sound behavior (discussed later in this section).
In the following steps, you learn how to add a Play Sound movie to a Button instance.
| On the CD-ROM | Use the loadsound_behavior.fla file you created earlier in this section. You can find this file in the ch15 folder of the book's CD-ROM as well. |
-
Open the loadsound_behavior.fla document.
-
Select frame 1 of the behaviors layer in the Timeline window, and open the Behaviors panel. Double-click the Load Sound from Library behavior in the Action column of the panel. In the Load Sound from Library dialog box, clear the Play this sound when loaded check box. You do not want the sound to automatically play when the sound loads because you will assign a Play Sound behavior to a button in a later step. Click OK to accept the new setting.
-
Create a new layer named buttons , and place this layer below the existing behaviors layer.
-
Save your Flash document as playsound_behavior.fla.
It's always good practice to resave an older document with a new name whenever you are changing the scope of your document.
-
Open the Buttons library by choosing Windows ð Common Libraries ð Buttons.
-
In this Library, navigate to the Circle Buttons folder, and drag an instance of the Play symbol to the Stage.
Make sure you have selected the first frame of the buttons layer before you drag the symbol.
-
Select the new Play instance on the Stage, and open the Behaviors panel (Shift+F3).
-
In the top-left corner of this panel, click the Add Behavior (+) button, and choose Sound ð Play Sound.
-
In the Play Sound dialog box, type sndSong in the Identifier field.
Remember that the sound loaded in the loadsound_behavior.fla file had this same identifier. See Figure 15-11.
-
Save your Flash document, and test the movie (Control ð Test Movie).
When you click the Play button, you hear the sndSong instance play.
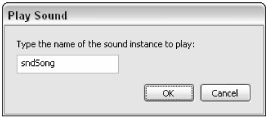
Figure 15-11: The Play Sound behavior parameters
| On the CD-ROM | You can find the completed file, playsound_behavior.fla, in the ch15 folder of this book's CD-ROM. |
The Play Sound behavior is the first Sound behavior discussed in this section that has different events from which you can choose in the Behaviors panel, as shown in Figure 15-12.
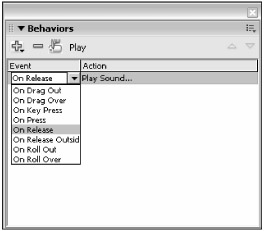
Figure 15-12: The event options available for behaviors attached to buttons
If you prefer the Play Sound behavior to activate with a different mouse event, you can choose another option in the Event combo box.
Stop All Sounds
This behavior inserts the stopAllSounds() function into the code of the selected event handler (that is, a keyframe, a Button instance, or a Movie Clip instance). As we discussed earlier in this chapter, the stopAllSounds() function halts the playback of any and all playing sounds.
In the next exercise, you'll learn how to stop the playback of multiple sounds with the Stop All Sounds behavior.
| On the CD-ROM | Use the loadmp3_behavior.fla document as a starting point for this exercise. You can find this document in the ch15 folder of this book's CD-ROM. This exercise also requires the robert_video.flv file located in the same folder of the CD-ROM. Make a copy of this file to your local hard drive. |
-
Open the loadmp3_behavior.fla document, and create a new layer named video.
-
Place this layer below the existing behaviors layer.
-
Save your Flash document as stopallsounds_behavior.fla.
The video file that you import in the next step has a frame rate of 24 fps. As such, you need to change the frame rate of this Flash document to match.
-
Click anywhere on the Stage of your document, and press the Esc key to deselect any selected objects.
-
In the Property inspector, change the frame rate from 12 fps to 24 fps.
Remember that this document already plays the streaming MP3 file located on the flashsupport.com Web server. Now, you will add a video to the Flash movie, to act as a second sound source.
-
Select the first frame of the video layer, and import the robert_video.flv video file by choosing File ð Import ð Import to Stage (Ctrl+R or z+R).
On the first stage of the import process, titled Select Video, accept the defaults and click the Next button. In the Deployment stage, select the radio button labeled Embed video in SWF and play in timeline and click the Next button. In the Embedding phase, accept the defaults and click the Next button. On the Finish Video Import phase, click the Finish button. After the video file has been imported, the video layer frames will expand to include all of the frames in the robert_video.flv clip.
Note On the Macintosh, the Next button in the Video Import wizard is labeled as Continue.
-
Create a new layer, and rename it buttons.
-
Place this layer at the bottom of the layer stack.
-
On frame 1 of the buttons layer, drag an instance of the Stop button from the Circle Buttons folder of the Buttons Library (Window ð Common Libraries ð Buttons) to the Stage.
-
Place the instance below the video object.
-
Select the new Stop instance, and open the Behaviors panel.
-
Click the Add Behavior (+) button in the panel, and choose Sounds ð Stop All Sounds.
When you choose this behavior, you see a dialog box describing this behavior (see Figure 15-13).
-
Click OK.
-
Save your Flash document, and test the movie (Control ð Test Movie).
As the movie plays, you hear the streaming MP3 file and the video's audio track play. If you click the Stop button, all of the sounds stop playing.

Figure 15-13: The Stop All Sounds behavior dialog box
| On the CD-ROM | You can find the completed file, stopallsounds_behavior.fla, in the ch15 folder of this book's CD-ROM. |
You may have noticed that if you allow the movie to continue to play, the movie eventually loops back to the first frame and repeats. You can add a stop() action to the last frame of the timeline to prevent the Flash movie from looping.
| Cross-Reference | You learn how to apply basic actions to Flash timelines in Chapter 18, "Understanding Actions and Event Handlers." |
| Tip | To decrease publishing (or testing) time, change the Audio stream compression option to Speech in the Flash tab of the Publish Settings dialog box (File ð Publish Settings). The Speech codec is particularly suited to the audio track of the sample video clip, but it does add more weight, in bytes, to the final .swf file. |
EAN: 2147483647
Pages: 395
- The Second Wave ERP Market: An Australian Viewpoint
- The Effects of an Enterprise Resource Planning System (ERP) Implementation on Job Characteristics – A Study using the Hackman and Oldham Job Characteristics Model
- Healthcare Information: From Administrative to Practice Databases
- A Hybrid Clustering Technique to Improve Patient Data Quality
- Development of Interactive Web Sites to Enhance Police/Community Relations