Animator s Keys and Inbetweening
Animator's Keys and Inbetweening
In Chapter 11, "Timeline Animation," you learned about two Flash animation methods: frame- by-frame and tweening. This section focuses on traditional cartoonist frame-by-frame techniques, together with traditional cartoonist's keys and inbetween methods, to accomplish frame-by-frame animation. Despite the similarity of terminology, this topic heading does not refer to a menu item in Flash. Instead, it should be noted that animation programs such as Flash have derived some program terminology (and methods) from the vintage world of hand-drawn cel animation. Vintage animators used the methods of keys and inbetweening to determine the action a character will take in a given shot. It's akin to sketching, but with motion in mind. In this sense, keys are the high points, or ultimate positions, in a given sequence of motion. Thus, in vintage animation:
-
Keys are the pivotal drawings or highlights that determine how the motion will play out.
-
Inbetweens are the fill-in drawings that smooth out the motion.
In Flash, the usual workflow is to set keyframes for a symbol and then to tween the intervening frames, which harnesses the power of the computer to fill the inbetweens. Although this is fine for many things, it is inadequate for many others. For example, a walk sequence is too subtle and complex to be created simply by shape or motion tweening the same figure — each key pose in the walk requires a unique drawing. So, let's take a look at the traditional use of keys and inbetweens for generating a simple walk sequence that starts and ends according to a natural pace, yet will also generate a walk loop.
Walk Cycles (Or Walk Loops)
Humans are incredibly difficult to animate convincingly. Why? Because computers are too rigid — too stiff. Human movement is delightfully sloppy — and we are keenly aware of this quality of human movement, both on a conscious and a subconscious level. (Another term for this is body language.) Experienced animators create walk cycles with life not by using perfectly repeating patterns, but rather by using the dynamic quality of hand-drawn lines to add just the right amount of variation to basic movements.
The most difficult aspect of creating a walk cycle is giving the final walk distinctive qualities that support the role that the character plays. This again is something that only gets easier with practice. There is no substitute for drawing skill and time spent studying human movement, but to get started it can be helpful to study a basic walk pattern.
| On the CD-ROM | We've included the three walk cycle examples we show in this section on the CD-ROM for you to open and analyze. The frame-by-frame pattern of the different walks can be a good starting point for designing your own walk cycle. You will find the files in the Walks folder inside the ch14 folder of the CD-ROM. |
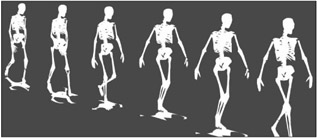
Many 3D programs have prebuilt walk cycles that you can modify. We begin with a basic walk made in Poser (a popular 3D character animation program from e-Frontier) and output it as an image sequence that can be traced in Flash. As you can see in Figure 14-7, this walk cycle was composed of ten different poses, but the final result is fairly generic.

Figure 14-7: A traced sequence from a basic walk cycle that was created in Poser
Notice that the main pivot points of the figure create a balanced pattern that can be used as a basis for many other kinds of figures. Also notice that as the figure moves through the cycle, there is a slight up and down movement that creates a gentle wave pattern along the line of the shoulder. This wave motion is what will keep your figure from looking too mechanical. It is important to remember that the final pose in the cycle is not identical to the first pose in the cycle — this is crucial for creating a smooth loop. Although it might seem logical to create a full cycle of two strides and then loop them, you will get a stutter in the walk if the first and last frames are the same. Whatever pose you begin the cycle with should be the next logical "step" after the final pose in your cycle, so that the pattern will loop seamlessly.
Although the figures are shown here with the poses spaced horizontally, you will actually draw your poses on individual frames (best done on a Movie Clip timeline), but align the drawings on top of each other so that the figure "walks in place" as if on a treadmill. Once you have established your walk cycle, you add the horizontal movement by tweening the walk cycle Movie Clip. As shown in Figure 14-8, by using a Motion tween to scale the walk cycle Movie Clip and move it from one corner of the Stage to another, you can create the illusion that the figure is walking toward the viewer.

Figure 14-8: A series of angled poses in a walk cycle work well to create the illusion that the figure is walking toward the viewer if the final Movie Clip is scaled as it is Motion tweened from the far corner to the near corner of the Stage.
The speed of the Motion tween has to match the speed of the walk cycle. If the tween is too slow (too little distance or too many frames), the figure will seem to be walking in place. If the tween is too fast (too much distance or too few frames), the figure will seem to be sliding over the ground. Play with the ratio of your Motion tween, and if the figure needs to walk faster or slower, then make adjustments to the walk cycle itself rather than just "pushing" or "dragging" the figure with your Motion tween. Also keep in mind that a figure should seem to walk more quickly as it gets closer to the viewer. In the skeleton walk example, the Motion tween is eased- in so that as the figure gets closer (larger), the walk appears to cover more ground.
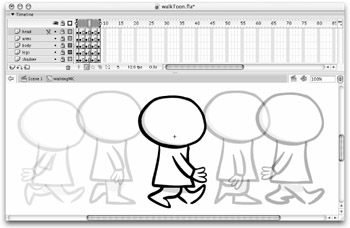
Achieving realistic human walk cycles can take hours of work and require very complex walk cycles (often 30 or more poses). Fortunately, many cartoons actually have more personality if they use a simplified or stylized walk cycle that suits the way they are drawn. Figure 14-9 shows a walk cycle that only required three drawings to create a serious but childlike stride for an outlined character.

Figure 14-9: A stylized walk cycle created by flipping and reusing the same three drawings for both legs of an outlined character
Notice that the legs, arms, torso, and head of the character are all animated on separate layers. This allows you to reuse the same drawings for both sides of the body — by simply offsetting the pattern so that the legs swing in opposition to each other, with the leg on the far side layered underneath the leg on the near side. This economy of effort is helpful not only because it is faster, but also because it makes it easier to maintain the symmetry of your character if you are trying to keep the motion simple and stylized.
Repeaters
If you open the source file (walkToon.fla), you will notice some spans of nonkeyed frames (repeaters) in the Movie Clip timeline for the cartoon walk. We used these to economize drawing time and to slow the walk of the character. If a speedier walk was called for, we would simply shorten these spans to eliminate repeater frames. A good basic rule about repeaters is to add no more than one repeater frame between keys; adding more causes the smoothness of motion to fall apart. If the motion must proceed more slowly, then you have to draw more inbetweens.
Fortunately, with Flash Onion skinning (the capability to see before and after the current time in a dimmed graphic), which we discuss in Chapter 11, "Timeline Animation," the addition of a few more inbetweens is not an enormous task. In fact, Onion skinning is indispensable for doing inbetweens, and even for setting keys. One pitfall of Onion skinning is the tendency to trace what you're seeing. It takes practice to ignore the onion lines and use them only as a guide. You need to remember that the objective is to draw frames that have slight, but meaningful, differences between them. Although it can mean a lot more drawing, it's well worth it. Because you'll use your walk (and running) cycles over and over during the course of your cartoon, do them well.
| Tip | One real timesaver in creating a walk cycle is to isolate the head and animate it separately via layers or grouping. This trick helps to prevent undesirable quivering facial movements that often result from imperfectly traced copies. Similarly, an accessory such as a hat or briefcase can be isolated on a separate layer. Finally, if the character will be talking while walking, make a copy of the symbol and eliminate the mouth. Later, you'll add the mouth back as a separate animation. We describe lip-syncing techniques later in this chapter. |
Types of Walks
So far, we've covered the mechanics of a walk cycle. But for animators, the great thing about walking — in all its forms — is what it can communicate about the character. We read this body language constantly every day without really thinking about it. We often make judgments about people's moods, missions, and characters based on the way that they carry themselves. Picture the young man, head held high, briskly striding with direction and purpose: He is in control of the situation and will accomplish the task set before him. But if we throw in a little wristwatch checking and awkward arm movements, then that same walk becomes a stressful "I'm late." Or, witness the poor soul — back hunched, arms dangling at his sides. He moves along, dragging his feet as if they each weigh a thousand pounds. That tells the sad story of a person down on his luck. Finally, what about a random pace, feet slipping from side to side, sometimes crisscrossing, other times colliding, while the body moves in a stop-and-start fashion as if it was just going along for the ride? Is that someone who couldn't figure out when to leave the bar? Of course, these are extreme examples. Walks are actually very subtle and there are limitless variations on the basic forms. But if you begin to observe and analyze these details as they occur in everyday life, you'll be able to instill a higher order in your animations. Simply take time to look. It's all there waiting for you to use in your next animation. Then remember that because it's a cartoon, exaggerate!
EAN: 2147483647
Pages: 395