Motion Guides and Movie Clip Masks
As you have seen in the examples so far, you can Shape tween primitive shapes (and Drawing Objects) or Motion tween symbol instances (and Drawing Objects) directly on the Main Timeline in Mask layers to create animated masks. But what if you want to add more control to the movement of a mask? Unfortunately, one of the limitations of Mask layers is that they can't be nested below Motion guide layers to become guided elements. However, by using a Movie Clip symbol instance as the content of your Mask layer, you have the option of adding a Motion guide to the Movie Clip timeline to control the movement of the element that defines your mask.
To create a mask that contains an element controlled by a Motion guide, follow these steps:
-
Set up an art layer and a Mask layer on the Main Timeline as in previous examples. Because the animation of your mask exists on a Movie Clip timeline, you need only one frame on each layer.
-
Unlock the Mask layer and, on the first keyframe of the Main Timeline, insert a new symbol (Ctrl+F8 or z+F8). In the Symbol Properties dialog box, specify Movie Clip behavior and name the symbol (circleAnim in this example), as shown in Figure 13-19.
-
After you click OK in the Symbol Properties dialog box, Flash automatically opens the symbol timeline in the Document window.
-
Add a Motion guide layer that contains the path for the animation and a guided layer that contains a Motion tween of the symbol that you want to define the final mask, as shown in Figure 13-20.
-
When you return to the Main Timeline, you will see only the first frame of the animation that you just created in the Movie Clip (as shown in Figure 13-21). You can select the Movie Clip instance on the Mask layer to alter its position on the Stage.
-
If you want to see how the whole Motion guide aligns with the content on the masked layer, double-click the Movie Clip symbol instance on the Mask layer to enter Edit-in-place mode (see Figure 13-22). You will now be able to scrub the Movie Clip timeline and see how the animation lines up with (the dimmed out) content on the Main Timeline. You can make adjustments as needed to the Motion guide layer or to the tweened symbol that will define the mask.
-
After you have all the elements aligned and edited, lock both the Mask layer and the masked layer and test the movie (Ctrl+Enter or z+Return) to see how the guided animation in the Movie Clip on the Mask layer reveals the content on the masked layer. Figure 13-23 shows one frame of the Motion tween in the example as it displays in the final .swf.
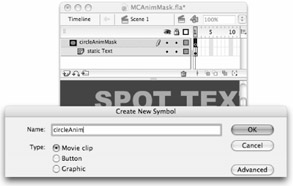
Figure 13-19: Insert a Movie Clip symbol that will contain the Motion guide to control the animated mask content.
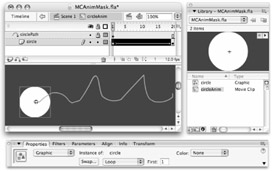
Figure 13-20: A Motion guide and a Motion tween layer added to the Movie Clip timeline
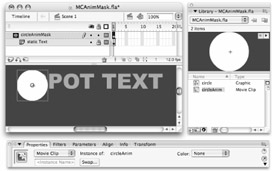
Figure 13-21: The first frame of the Movie Clip animation visible on the Mask layer in the Main Timeline
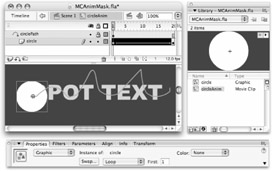
Figure 13-22: Use Edit-in-place mode to align the Motion guide on the Movie Clip timeline with the content on the masked layer of the Main Timeline.
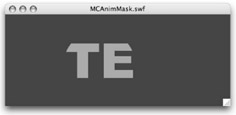
Figure 13-23: The final .swf previewed in the test movie environment
| On the CD-ROM | To see how the finished animated Movie Clip mask example looks, open MCAnimMask.swf from the mask folder in the ch13 folder on this book's CD-ROM. |
Of course, you can also animate content on masked layers separately from the content on Mask layers. But the endless possibilities for layering masks and masked content starts to get confusing when the additional variable of animation is thrown in. To make the best use of these features, take the extra time to carefully consider the most efficient way to achieve the final effect that you want. First consider what you would like to see on the Stage, and then plan any animation of visible elements. The next step should be adding a mask if needed, and finally adding animation to the mask itself. Try to create your effects with the fewest possible animated elements — you will waste less production time and end up with a more optimized file.
| Tip | When working on multiple nested layers, it can be visually confusing to work on animation while all layers are displayed. Use the Eye toggle to hide or show specific layers in the Timeline so that you can concentrate on only the elements that you are currently editing. Also, to avoid changing the wrong items, lock all layers that you are not currently modifying. |
Keeping some basic principles in mind as you are working with multiple masks and animated elements will help you to follow the logic of masking in Flash:
-
The mask always goes above the item that is revealed by it.
-
Filled items on Mask layers function as windows that reveal content on the masked layers nested beneath them.
-
The content on Mask layers is only visible in the authoring environment if the Mask layer is unlocked. For the applied mask to preview properly in the authoring environment, both the Mask layer and the masked layer(s) must be locked.
-
Mask layers will only apply to layers that are nested below them as masked layers. Normal layers or Guide layers that may be lower in the layer stack (but not nested with the Mask layer) won't be affected by the mask.
-
Multiple layers can be nested below a single Mask layer, but masks cannot be applied to other Mask layers, and each Mask layer can contain only one masking item (with the exception of multiple primitive shapes or Drawing Objects).
-
Content on Mask layers is not visible in the final movie (.swf).
EAN: 2147483647
Pages: 395