| Creating a basic setup to maintain multiple Mac OS X computers with Radmind is a fairly straightforward process. In this exercise, you will set up a base load and an overload for a desktop Mac OS X client. You will: Install the Radmind software on your Radmind server and client Make a base load on a client Mac OS X computer and upload it to the server Make an overload on the client and upload it to the Radmind server Add additional clients to the system
Tip Radmind Assistant lets you see which UNIX commands are being issued by the GUI, as well as other command-line information. While the Radmind Assistant is running, type Command-L to open a drawer showing the UNIX command that corresponds to the current action.
Installing and Configuring the Radmind Server You can use Mac OS X or Mac OS X Server (or any UNIX system) for your Radmind server; it doesn't matter. 1. | On the Macintosh that will be your Radmind server, open a Web browser and go to www.radmind.org. Find and download the latest version of Radmind Assistant.
| 2. | Drag the Radmind Assistant application to /Applications/Utilities, and double-click it to start the Radmind Assistant.
 | 3. | A dialog appears notifying you that you must install the Radmind Tools. Click OK to install the Radmind Tools
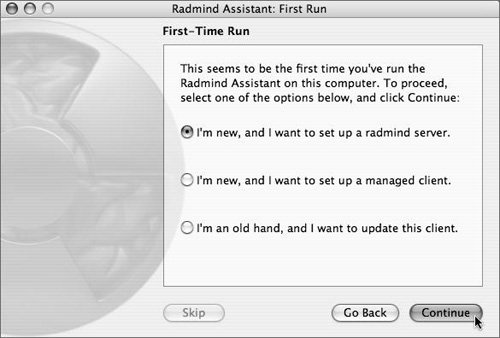
| 4. | In the "Radmind Assistant: First Run" window, make sure the radio button for "I'm new, and I want to set up a radmind server" is selected, then click Continue.
 | | | 5. | Make sure the radio button "Start the radmind server with Rendezvous on" is selected and click Continue. You will be asked to provide an administrator password.
The assistant displays a window showing how it is configured. Notice that the Radmind server service runs on port 6662make sure this port is not blocked by your firewall.
| 6. | Click Finish. You are asked to provide an administrator password to start the Radmind Server Manager application.
|
Installing and Configuring a Radmind Client You will now need to set up a Mac OS X client computer with a base loadthat is, install the operating system along with the files that will be common to all of your Radmind-managed client computers. 1. | On the Macintosh that will be your Radmind client, perform a clean install of Mac OS X, erasing the contents of the hard drive.
| 2. | Configure the computer with the startup assistant.
| 3. | Open a web browser and go to www.radmind.org. Find and download the latest version of Radmind Assistant.
| 4. | Drag the Radmind Assistant application to /Applications/Utilities, and double-click it to start the application.
| 5. | A dialog will appear to notify you that you must install the Radmind Tools. Click OK to install the Radmind Tools
| 6. | In the Radmind Assistant: First Run window, select "I'm new, and I want to set up a managed client", and click Continue.
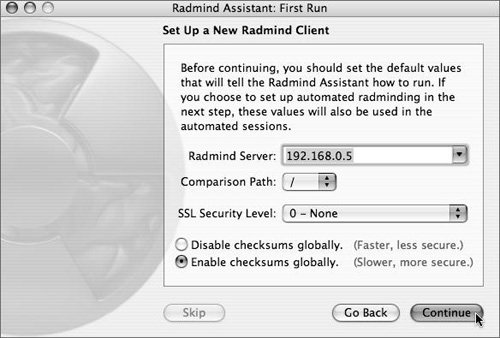
| | | 7. | The Radmind Assistant: First RunSet Up a New Radmind Client window appears. In the Radmind Server field, enter the fully qualified domain name or the IP address of your Radmind server. Leave the Comparison Path set to /, leave the SSL Security Level set to 0 - None, and select "Disable checksums globally" button. Click Continue and enter your administrative password when prompted.
 | 8. | At this point, you are given the option of Configuring Radmind Automation. If you want to add this functionality, you can always add it later as an overload. For now, click Continue
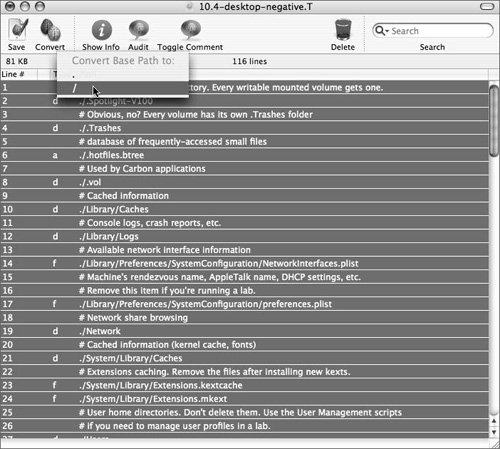
| 9. | Select 10.4-desktop-negative from the transcripts listed, click Edit Negative and provide your administrative password when prompted. This opens the negative transcript in the Radmind Transcript Editor
| | | 10. | Because you will be using / for your base path (as specified in step 7), click Edit > Select all to select every item in the negative transcript. In the Transcript Editor toolbar, click Convert and choose /.
 | 11. | In the toolbar, click the Save button and quit the Transcript Editor.
| 12. | In Radmind Assistant, click Continue.
| 13. | Because you configured the Radmind server to use Rendezvous/Bonjour, a dialog may appear, Radmind Server Detected. If the information provided matches your Radmind server, you should select Set Default. Then click Continue.
| 14. | If you had any other applications open, you will see a dialog asking if you want to quit those open applications. Select Quit Other. Authenticate if requested to do so.
The Radmind Assistant should report that the negative transcript was successfully uploaded to the server.
|
Checking in the Negative Transcript on the Radmind Server Now that you've uploaded your negative transcript to the server, you need to check it in to approve its use. 1. | If Radmind Server Manager is not currently running on your Radmind Server, open /Applications/Utilities/Radmind Assistant. From the Session menu, choose Open Server Manager.
| 2. | The Radmind Loadsets window displays a dialog after detecting your newly-uploaded negative transcript. If a dialog doesn't appear, click the Refresh button in the toolbar. Click OK and authenticate.
| | | 3. | Another dialog appears asking if you would like to add the negative transcript to your client's command file. Click OK.
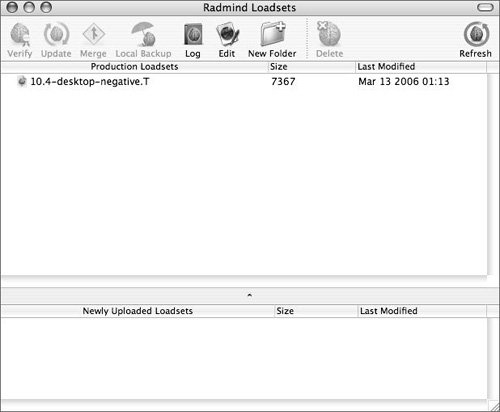
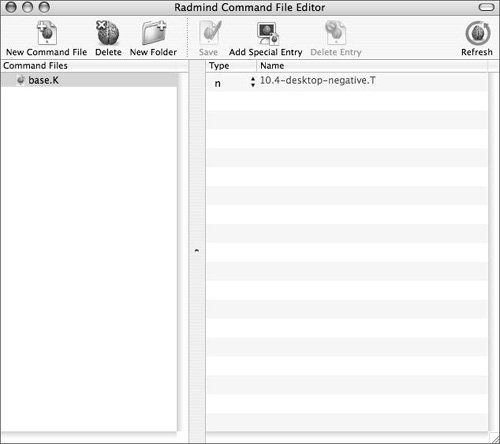
Your Radmind Loadsets window should now show your negative transcript, and your Radmind Command File Editor window should show a base.K Command File with the 10.4-desktop-negative.T transcript file in it.
  |
Creating the Positive Transcript on the Client So far, you've created a negative transcript that lists which files and directories will be ignored. Next, you'll create the positive transcript that lists the files that should be present, along with all of their attributes. 1. | The Radmind Assistant should still be reporting that the negative transcript was successfully uploaded to the server. Click Continue.
| 2. | The Radmind Assistant offers to check the Radmind server for updates. Make sure the Radmind host is either the IP address or the fully qualified domain name of your Radmind server, click Continue and authenticate, if necessary.
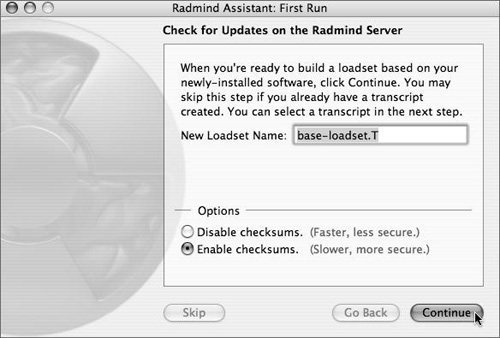
| | | 3. | The Radmind Assistant offers to create a new transcript and loadset. Select "Enable checksums" and click Continue.
 The Radmind Assistant now begins to scan the entire file system and creates a positive transcript of every file system object The Radmind Assistant now begins to scan the entire file system and creates a positive transcript of every file system object
Tip You should use checksums whenever possible to ensure the integrity of your files. This is especially important when building your transcripts and loading the files up to the Radmind server. You may want to run client updates without checksums at times when users are waiting, but during idle times, such as overnight, run a full Radmind update with checksumsthis will ensure the integrity of their files. | 4. | When the Radmind Assistant has finished scanning the file system, click Review Loadset and authenticate. The Transcript Editor opens, allowing you to inspect and, if necessary, edit your transcript before uploading it and its files to the Radmind Server.
| 5. | When you have finished inspecting and editing the transcript, click the Save button in the toolbar, and quit the Transcript editor. In the Radmind Assistant window, make sure Enable checksums is selected and click Continue, Authenticate, if necessary.
The Radmind Assistant begins uploading your positive transcript and all associated files to the Radmind server.
| 6. | When the Radmind Assistant has successfully completed the upload, click Finish.
|
Checking in the Positive Transcript on the Radmind Server After the positive transcript is uploaded to the server, you need to check it in to approve its use. 1. | If Radmind Server Manager is not currently running on your Radmind Server, open /Applications/Utilities/Radmind Assistant. From the Session menu, select Open Server Manager.
| 2. | The Radmind Loadsets window displays a dialog after detecting your newly-uploaded positive transcript. If a dialog doesn't appear, click the Refresh button in the toolbar. Click OK and authenticate.
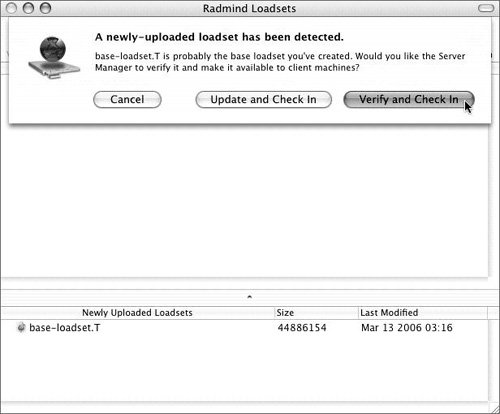
| 3. | A dialog appears noting the newly-uploaded loadset. Click the Verify and Check In button and authenticate.
 | 4. | When the verification process has completed, you asked to authenticate again. You are then asked if you want this loadset added to your client's command file; click OK.
|
Updating the Client Now that you have your negative and positive transcripts on the server, your client needs to use them to verify that nothing has changed since they were created. It does this by updating itself with what's on the server. In theory, there should be nothing to update, but this process must be followed so the client knows that. This process is also necessary if you used multiple machines to create transcripts. The process of updating the client will find any additional transcripts that this machine doesn't already know about. 1. | Open/Applications/Utilities/Radmind Assistant. The Radmind Assistant offers to guide you through the update process. Click Continue and authenticate.
| 2. | In the window that appears, confirm the correct Radmind Host, click Continue and authenticate.
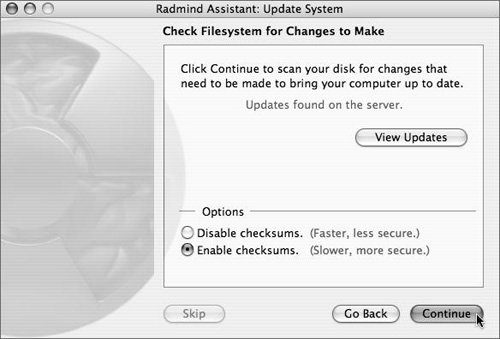
| 3. | The Radmind Assistant checks the Radmind server for any updates in the command or transcript files and download them, if there are any. Select "Enable checksums" and click Continue.
 | 4. | After scanning the filesystem, if any changes need to be made, the Radmind Assistant offers to perform the update. Select "Enable checksums" and click Continue.
| 5. | When the changes have been applied, click Finish, then click Reboot.
|
Creating an Overload With your client's file system perfectly matching the files stored on the server, you are ready to create an overload. Overloads are used to reflect any optional files that may not be present on every computer, such as for applications, or even for updates to the original base load, such as with system software updates. For this exercise, you are going to set up Radmind's automation features, and install iHook, a GUI for running shell scripts. You will then make an overload of these changes. 1. | Open /Applications/Utilities/Radmind Assistant. From the Radmind Assistant menu, choose Preferences, and in the toolbar click the Automation button.
| 2. | Select all of the checkboxes in the Automation Preferences window. Then click the Download iHook button.
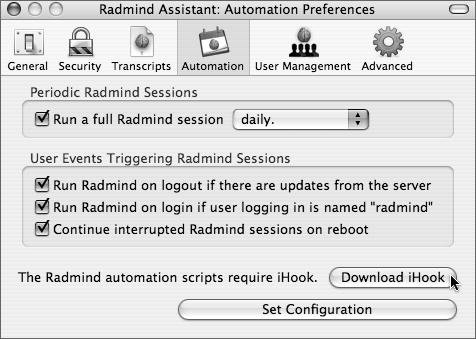 | 3. | A browser opens. Download iHook and install it by dragging it to the /Applications/Utilities folder.
| 4. | Return to the Radmind Assistant: Automation Preferences window. Click Set Configuration and authenticate.
| 5. | Click the Advanced button in the toolbar. Then click "Make Preferences Global."
| 6. | Close the Radmind Assistant preferences, and return to the Radmind Assistant. From the Session menu, select Create New Radmind Loadset, then click Continue.
| | | 7. | Because you just updated the client, you don't need to do so now. In fact, doing so would erase the changes you've just made. Click Continue.
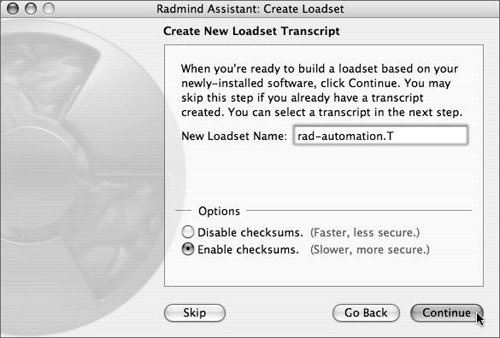
| 8. | Name the new transcript rad-automation.T, and select "Enable checksums". Click Continue and authenticate as needed.
 | 9. | When the Radmind Assistant has finished scanning the file system, click Review Loadset and authenticate. This opens the Transcript Editor, allowing you to inspect and, if necessary, edit your transcript before uploading it and its associated files to the Radmind server.
| 10. | When you have finished inspecting and editing your transcript, click the Save button in the toolbar, and quit the Transcript Editor. In the Radmind Assistant window, make sure "Enable checksums" is selected. Click Continue and authenticate if necessary. If a dialog appears suggesting that you quit other open applications, click Quit Other.
The Radmind Assistant uploads your positive transcript and all associated files to the Radmind server.
| 11. | When the Radmind Assistant has successfully completed the upload, click Finish.
|
Checking in the Positive Transcript on the Radmind Server Your overload transcript is another positive transcript that must be checked in on the server to approve its use, just like the original positive transcript used as your base load. 1. | If Radmind Server Manager is not running on your Radmind Server, open /Applications/Utilities/Radmind Assistant. From the Session menu, choose Open Server Manager.
| 2. | The Radmind Loadsets window displays a dialog after detecting your newly-uploaded positive transcript. If a dialog doesn't appear, click the Refresh button in the toolbar. Click OK and authenticate.
| 3. | A dialog appears noting the newly-uploaded loadset. Click the Verify and Check-in button. Authenticate, if necessary.
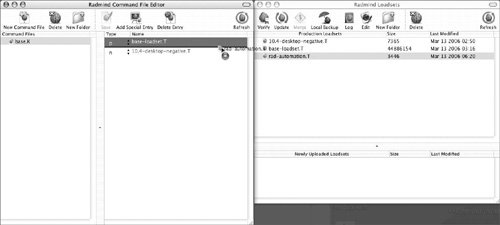
| 4. | With both the Radmind Loadsets window and the Radmind Command File Editor open, drag the new loadset from the Radmind Loadsets window to the Radmind Command File Editor window. Drop the file between the base-loadset.T and the 10.4-desktop-negative.T transcripts. In the toolbar, click the Save button and authenticate.
 |
Loading Additional Clients Loading any number of additional clients is now a simple task. 1. | On each additional client you want to manage, open a web browser and go to http://radmind.org. Find and download the latest version of Radmind Assistant.
| 2. | Drag the Radmind Assistant application to /Applications/Utilities, and double-click it to start the Radmind Assistant.
| 3. | A dialog notifies you that you must install the Radmind Tools. Click OK and install the Radmind Tools.
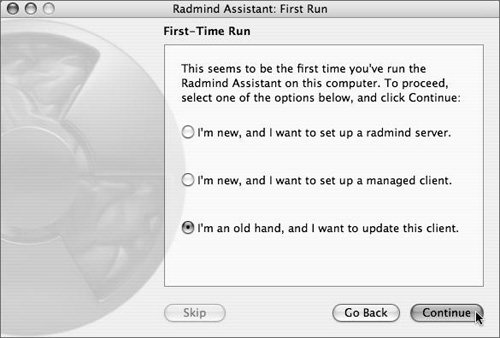
| 4. | The Radmind Assistant: First-Time Run window is displayed. Select the "I'm an old hand, and I want to update this client" button and click Continue.
 | 5. | Click Continue to dismiss the welcome window.
| 6. | Enter the fully qualified domain name or IP address of your Radmind server, and click Continue. Authenticate, if necessary.
| | | 7. | In the Check Filesystem for Changes to Make window, select Enable checksums, and click Continue.
| 8. | In the Apply Necessary Changes to This Machine window, select "Enable checksums", and click Continue to apply the changes.
| 9. | When your client has been successfully updated, click Finish and then reboot.
The steps you've performed in this appendix serve to outline some of the key features of Radmind. As you become a seasoned Radmind administrator, you'll learn that there's much more that can be done with Radmind. When you perform these steps in the GUI, you should also open the drawer that shows the associated UNIX commands for each action. Becoming familiar with these UNIX commands will allow you to perform these actions remotely using SSH or ARD.
|
|