| Now that you have a fully functional email service, you'll no doubt want to make some refinements to its configuration. Mac OS X Server offers numerous mail server enhancements through the Server Admin tool, as well as many that can be configured from the command line via the Terminal application. Setting mail quotas You generally don't want your users to be able to accept emails of an unlimited size or to accumulate an excess amount of email in their inbox. Doing so would put a strain both on your server's bandwidth and on the disk space consumed by your mail service. You can control this through the use of quotas. Mac OS X Server offers two sets of quotas that you can define for your mail service: per-message size limits that control the maximum size of an individual message as it's received by your server, and per-mailbox size limits, which control the total size of any one user's mailbox. To limit mail size 1. | From the Computers & Services column, select Mail.
| 2. | Select the Settings tab at the bottom of the screen and then select the Quotas tab.
| 3. | Select the "Refuse incoming messages larger than X megabytes" check box and change the value to 5 (Figure 8.19).
Figure 8.19. Configure quotas to refuse messages larger than 5 MB. 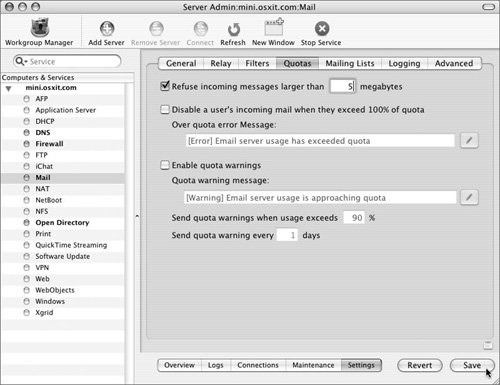
This will limit the size of any single incoming message to 5 MB or less.
| 4. | Click Save.
|
You also want to limit the maximum size of any user's mailbox. There are two types of quotas to be applied here. The first is known as a soft quota, which is merely a quota warning a user that he or she is approaching (or even exceeding) their quota, but no mail is ever blocked for the user. The other type of quota is a hard quota. With hard quotas enabled, once the user reaches their maximum mailbox size, any future emails addressed to that user will be returned to the sender and will be undelivered. Generally soft quotas are preferred since it won't result in email being denied for a user, but if you're tight on disk space or have users who ignore the warnings, you'll want to use the hard quotas. To enable soft quotas 1. | Click the Quotas tab and select the "Enable quota warnings" check box (Figure 8.20).
Figure 8.20. Enable soft quota warnings so users get a warning email at 95 percent of their quota. 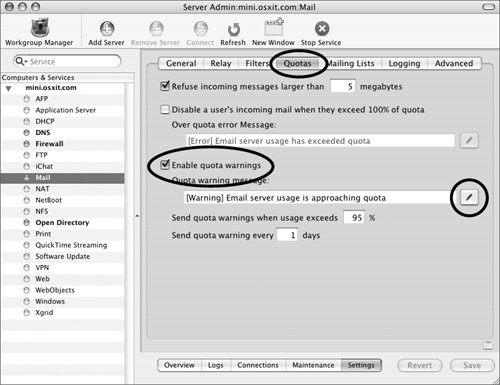
| 2. | In the settings below, change the values to send quota warnings when usage exceeds 95% and send a quota warning every day.
| 3. | To change the messages sent to users warning them of their approaching quota limits, click the pencil icon next to the "Email server usage is approaching quota" text box.
| 4. | In the window that appears, change the address in the From field (Figure 8.21).
Figure 8.21. Customize the quota email with your administrator's email address. 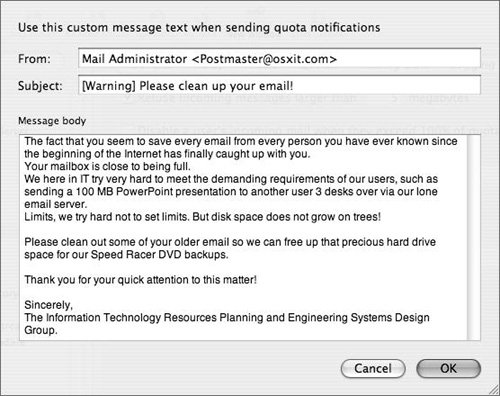
You can also change the text of the message sent to the offending users.
| 5. | Click Save.
|
Setting mailbox quotas The settings you just enabled apply to all users, but by default, users don't actually have a mailbox quota set. To set the quota for each account 1. | Launch Workgroup Manager, and in the lefthand column, select the user(s) for whom you want to enable mail.
| 2. | Select the Mail tab and change the Mail Quota value to 500 MB (Figure 8.22).
Figure 8.22. Select the user you wish to modify in Workgroup Manager and change this user's mail quota to 500 MB. 
You may wish to adjust this value, depending on the number of users and the amount of available disk space on your mail server. A quota of 0 signifies that the user has no quota (unlimited storage).
| 3. | Click Save.
| 4. | Repeat these steps for any other users that should have quotas applied to the size of their entire mailbox.
|
Users Postal Over Mail Quotas? Users generally despise having mail quotas, especially low ones, or ones that result in mail loss. Depending on the types of users you have on your server, simple user education might be sufficient. It's also important to remember that free email providers such as Gmail and Yahoo offer mailboxes with multi-gigabyte quotas. If you need to restrict your mailboxes to smaller sizes than what is offered by the free email providers on the Internet, be prepared to explain both why you did and why users should continue using your servicecompany security policies, faster connections, and better servicerather than a public Internet service. |
Handling junk mail and viruses One thing you'll want to do for your users is scan their email for spam or other unsolicited junk mail. Mac OS X Server includes SpamAssassin, an open source solution for doing just that. Although SpamAssassin provides a mechanism to scan messages by itself, Apple has chosen to scan mail using another open source solution: AMaViS (A Mail Virus Scanner) calls the SpamAssassin modules internally, simultaneously passing each message through ClamAV, an open source antivirus scanner, while scanning it for spam contentand it all happens automatically as soon as the server receives each message. To configure your mail server for spam and virus scanning 1. | Launch Server Admin and select Mail from the Computers & Services column.
| 2. | Select the Settings tab at the bottom of the screen and then select the Filters tab.
| 3. | Select the check boxes to scan email for junk mail and viruses (Figure 8.23).
Figure 8.23. Configure junk mail and virus scanning in the Server Admin tool. 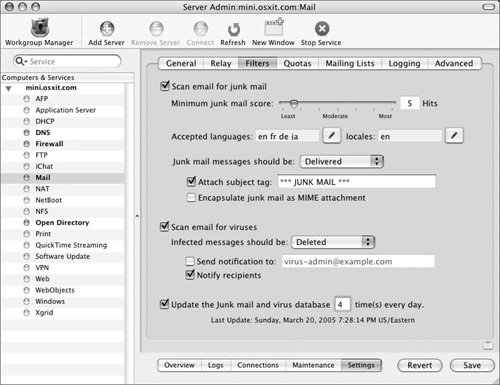
| 4. | Select the "Update the junk mail and virus database" check box, change the value to 4 times per day, and click Save.
|
Scoring junk mail There are a number of other customizations you can make on the last screen in the previous exercise. The most visible one is the Minimum junk mail score, which defaults to 5 hits. Every time a message is received by your server, it is assigned a score, based on how many spam tests were matched and the probability of each test indicating that the message is spam. If the score it receives is lower than 5, it's considered not spam (sometimes called ham). If the score is 5 or above, the message is tagged as spam. When this happens, the subject line has *** JUNK MAIL *** prepended to it, and some extra headers are added indicating the actual score and the tests that matched. You can, of course, change these options, but the defaults are good ones to stick with until you are more familiar with the operation of the junk mail scanner. Checking email for spam is a tricky problem. On one hand, nobody likes to receive spam. An even worse problem, however, is when a legitimate message is tagged as spam. This is known as a false positive, and can occur when you have your minimum junk mail score set too low. The default of 5 is a good starting point, but if you discover too many false positives, you may want to adjust this number to be higher. Junk mail training One of the best ways to check for spam is using a technology called Bayesian Filters. These filters examine the contents of the message for certain patterns common to spam messages. This filtering process is included as part of SpamAssassin, but first must be trained. If you already have some folders of mail that contain example messages of both spam and non-spam, save them out to two directories, one containing only spam messages, the other containing only non-spam messages. You can perform your initial spam training using these commands in Mac OS X 10.4.010.4.3 from the Terminal on your server or a remote ssh connection: sudo /bin/rm -rf /private/var/amavis/  .spamassassin sudo ln -s /private/var/clamav/ .spamassassin /private/var/amavis/ .spamassassin sudo -s su - clamav -c "sa-learn --spam .spamassassin sudo ln -s /private/var/clamav/ .spamassassin /private/var/amavis/ .spamassassin sudo -s su - clamav -c "sa-learn --spam  --showdots /Path/To/JunkMail/Folder su - clamav -c "sa-learn --ham --showdots /Path/To/NonJunkMail/Folder --showdots /Path/To/JunkMail/Folder su - clamav -c "sa-learn --ham --showdots /Path/To/NonJunkMail/Folder
You'll also want to continually update the spam training. As messages arrive, the Bayesian database is continually updated. Occasionally, you will receive a message that was mis-tagged as spam or not-spam. When this happens, you'll want to provide a place for users to submit their own samples of messages that are spam or are not spam. For this, create two accounts with special names: junkmail and notjunkmail. The mailboxes of these accounts are in place for users to bounce or redirect appropriate messages to, and are scanned once a night for inclusion in the Bayesian database. To create spam accounts 1. | Launch Workgroup Manager and click the New User icon.
| 2. | In the Name field, enter JunkMail, and in the Short Names field, enter junkmail (Figure 8.24).
Figure 8.24. Set up the junk mail user in Workgroup Manager. 
Leave the User ID at its default (1079).
| 3. | In the Password field, enter a password and reenter it in the Verify field.
| 4. | Deselect the access account check box.
| 5. | Click the Advanced tab at the top of the screen.
| 6. | Deselect the "Allow simultaneous login on managed computers" check box.
| 7. | Set the Login Shell to None (Figure 8.25).
Figure 8.25. Disable the shell for the junk mail user. This will help to secure this account from misuse. 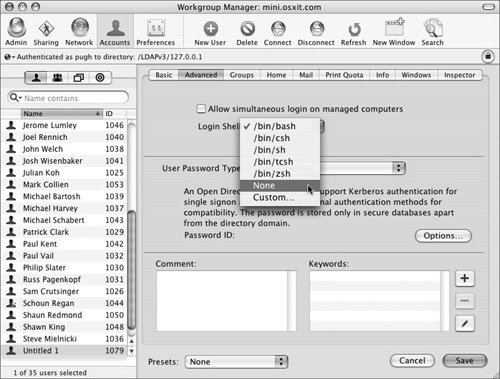
| 8. | Click the Mail tab at the top of the screen.
| 9. | Click the Enabled radio button and click Save (Figure 8.26).
Figure 8.26. Enable mail service for the junk mail user. 
| 10. | Repeat steps 29 but use NotJunkMail for the long name and notjunkmail for the short name.
|
 Tip Tip
Offering mailing lists Mailing lists, which are sometimes called listservs, offer a convenient way for people inside or outside of your organization to form a group identified by one email address. Mac OS X Server provides an open source solution called Mailman, with features such as message archiving, private lists, moderated lists, commands sent through email, and much more. You can manage mailing lists through the Server Admin tool, or users can manage their own lists with a convenient Web interface. To enable mailing lists 1. | Launch Server Admin and select Mail from the Computers & Services column.
| 2. | Select the Settings tab at the bottom of the screen and then select the Mailing Lists tab.
| 3. | Select the "Enable mailing lists" option (Figure 8.27).
Figure 8.27. Enable mailing lists in the Server Admin tool. 
| 4. | In the window that appears asking you to create the master password for all lists, type in a password that is not used anywhere else on the system and provide one or more email addresses for the top level mailing list administrators (Figure 8.28).
Figure 8.28. Set the mailing list service master password and top-level administrators. 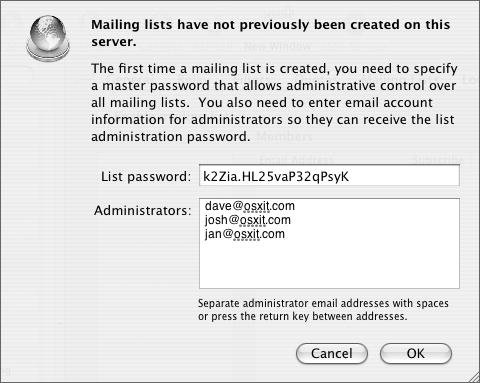
| 5. | Click OK and then Save.
You'll notice that a default mailing list called "Mailman" was just created. This is also referred to as the master mailing list, and should not be renamed or deleted.
|
To create mailing lists 1. | Click the Mailing Lists tab and then click the plus button under the Lists column.
A new window appears asking you to enter the details of the new list you're creating (Figure 8.29).
Figure 8.29. Create a new mailing list and select its default options in the Server Admin tool. 
| 2. | Name your list following normal email address conventions.
For simplicity, it's often best to restrict it to letters, numbers, or hyphens.
| 3. | Type the username (local to this server) or email address (of anyone) that will be administering this list.
| 4. | If you want to allow people to subscribe themselves to this list, check the "Users may self-subscribe" box.
Otherwise, the mailing list administrator will have to add everyone to the list.
| 5. | Select the default language and supported languages for the list.
| 6. | Leave the Maximum length of a message body at its default of 40 KB.
Since messages to mailing lists are sent to many people, it's generally good to limit the size of each message. This avoids the problem of someone inadvertently sending a 100 MB attachment to hundreds of people.
| 7. | Click OK.
Your new mailing list is now created, but currently has no members except the administrator. You probably want to add a few people that you know will be on the list, or perhaps other administrators.
| 8. | In the Lists column, select the name of your new list and then click the plus button (Figure 8.30).
Figure 8.30. You can use the Server Admin tool to add users to a mailing list. 
| | | 9. | In the window that appears, type one or more local usernames and/or remote email addresses (Figure 8.31).
Figure 8.31. List the local usernames or remote email addresses of the users you wish to add to the mailing list. 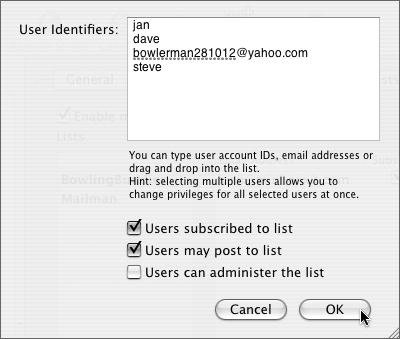
| 10. | Select the options that should apply to all of those users and click OK.
If you want different options for different users, repeat steps 910 for each type of person, or alternatively, add all the users here, then use the main Server Admin window to select or deselect the check boxes for each user.
| 11. | In the main Server Admin window, click Save.
Your mailing list is now ready to use. Assuming you're a member of the list (since nonmembers can't post to it by default), you can send mail to it right away. Nonmembers will have their messages held for approval by the moderator.
|
To set options for your list through the Web interface | | 1. | In your Web browser, go to http://yourserver.xyz/mailman/admin (Figure 8.32).
Figure 8.32. Use your web browser to select the mailing list you wish to administer. 
| 2. | Select the name of the list you want to edit.
| 3. | Type a list administrator's password.
Note that this is not any user's password, but rather the password you typed when you first enabled mailing lists for your server.
A page is now displayed with many different options you can customize for this list (Figure 8.33).
Figure 8.33. Many administration options are available through the Web that are not available in the Server Admin tool. 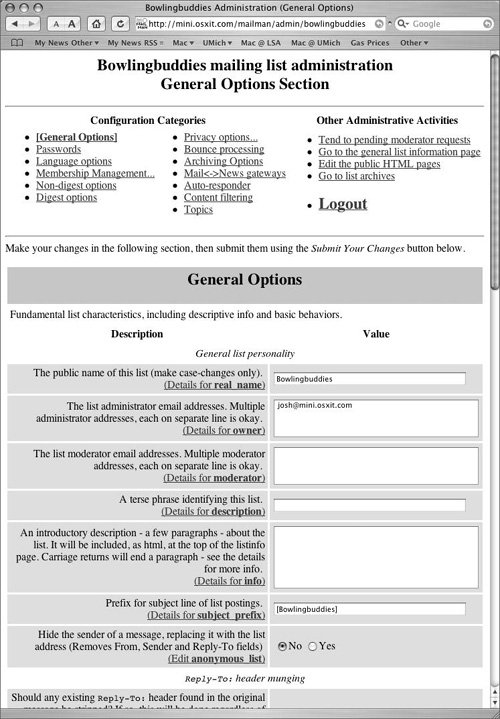
|
Tips You can view information about lists at the following URL: http://yourserver.xyz/mailman/listinfo After selecting the list, the archives and subscription information are displayed (Figure 8.34). Figure 8.34. Users can use a Web browser to modify their subscription or view the mailing list archives.  Many options are available to configure and use Mailman to your liking. Please consult www.list.org or the Mac OS X Mail Service Administration manual for more information.
Storing mail In the days of older mail systems, mail was simply stored in one file per user. Although this was much simpler to deal with, it was also much slower, particularly for large mailboxes. To alleviate this problem, Cyrus, the mail storage mechanism used by Mac OS X Server, splits the mail up into a large number of files, with an associated database for each user, allowing for faster searching and quicker retrieval of any given message. To locate the Cyrus mail store 1. | Launch Server Admin and select Mail from the Computers & Services column.
| 2. | Select the Maintenance tab at the bottom of the screen.
| 3. | Click the Database tab at the top of the screen.
|
Backing up mail Figure 8.35 shows a typical mail server, where the database of mailboxes is stored in /var/imap, and each mailbox is located in /var/spool/imap. If you have many users, you may also be storing mail in other locations, which will be shown in the window at the bottom. Figure 8.35. Server Admin shows where your mail databases are stored. This screen also has a repair button to fix your mail databases. 
Numerous configuration and database files are stored in the following locations: /var/imap /var/spool/imap /etc/mail /etc/postfix /etc/cyrus.conf /var/amavis /var/clamav /var/mailman /etc/spam
As with any important data, your mail server should be backed up. Unfortunately, since mail relies so heavily on databases, the mail service should be shut down while the backup is taking place. This avoids problems that might arise from a mailbox being modified after the database for that mailbox has been saved but before the actual mail data has been backed up. The downside to shutting down your mail server when you make backups is that users with IMAP connections will get disconnected. This inconvenience will have to be weighed against the need for accurate regular backups, and, depending on the types of users you support, could dictate the frequency of your mail server backups. Mac OS X Server has no built-in GUI for performing mail server backups. You'll want to create a series of shell scripts that can be automatically run by cron to automate the task of doing mail server backups. To prepare your system for mail backups, you must first create some directories that will store the backups. Execute the following commands: mkdir -p /var/backupmail/tmp chown root:wheel /var/backupmail/tmp chmod 700 /var/backupmail
Next, you need to actually save your mail server data in a backup. These commands should be placed in a script, which could be put in /private/etc/periodic/daily so that it's run automatically every day: /usr/sbin/serveradmin stop mail rsync -exclude=socket -delete -a /var/imap/ /var/backupmail/ tmp/varimap rsync -delete -a /var/spool/imap/ var/backupmail/tmp/varspoolimap rsync -delete -a /etc/postfix/ /var/backupmail/tmp/etcpostfix rsync -delete -a /etc/mail/ /var/ backupmail/tmp/etc/postfix rsync -delete -a /var/amavis/ /var/backupmail/tmp/varamavis rsync -delete -a /var/clamav/ /var/backupmail/tmp/varclamav /usr/sbin/serveradmin start mail tar -C /var/backupmail -zcpf /var/ backupmail/`date +%a`.tar.gz tmp
By using rsync, you're only updating copies of files that have changed, thus minimizing the downtime of your mail service. The tar command at the end will compress that day's backup into a file named Mon.tar.gz, Tue.tar.gz, and so on for each day of the week. Consult the date man page for other options you could use. If you need to restore files from a particular backup, execute these commands: mkdir /var/backupmail/restore cd /var/backupmail/restore sudo tar -zxpf /var/backupmail/ DAY.tar.gz
Once the archive is expanded, you can copy any missing or corrupted files to their appropriate location. Using the Command Line As with many tasks in Mac OS X Server, you can reconstruct a user's mailbox from the command line through a remote ssh connection by typing: sudo -u cyrusimap /usr/bin/cyrus/bin/ reconstruct -r user/Substitute the appropriate short name for username. |
Fixing mailbox corruption Should you run into problems with your mail server, one of the most likely culprits is mail database corruption. Before you restore a corrupted database from your backups, you should first try repairing the existing database. To fix common database corruption problems 1. | From the Computers & Services column, select Mail.
| 2. | Select the Maintenance tab at the bottom of the screen.
If everyone is having problems with their mail, or if particular users are having problems receiving mail, it's likely that the problem lies with the database of mailboxes.
| 3. | Click the Database tab at the top of the following screen and click Repair (see Figure 8.35).
If only certain people are having problems with their mail, particularly if they are reporting that messages are disappearing or becoming corrupted, or that previously read messages are reappearing as new messages, the problem is likely with an individual user's mailbox database.
| 4. | Click the Accounts tab.
| 5. | Select the account you're having trouble with and click Reconstruct (Figure 8.36).
Figure 8.36. Server Admin allows you to reconstruct an individual user's mail database with the click of a button. 
|
|