| On Mac OS X, when you add a printer to the printer list, you create a local print queue for the computer. Whenever you print from an application, the print job is temporarily stored in the queue until the job is sent to the printer. So in essence, you're a self-contained print server and client. The same is true for Mac OS X Server, only on a larger scale. When you create a print queue on a server, you can then share those queues, allowing other computers to use them. In other words, every printer that is created can be shared and have a queue attached to it. The default method for setting up printer queues on Mac OS X Server is to use the Server Admin application. Server Admin lets you add printers to the server's printer list and then enable sharing for each printer queue. It is much easier to use the Printer Setup Utility, located in /Applications/Utilities, to configure printers for the print server the same way you would on Mac OS X. (See the section "Configuring Printers on Mac OS X," later in this chapter, for more information about using the Printer Setup Utility.) However, this utility doesn't let you enable the shared queue settings for the server, nor does it easily allow for remote administration of those shared queues. So while you can add printers with either the Printer Setup Utility or Server Admin, in order to share the printer, you must use Server Admin. One advantage to using the Printer Setup Utility is that you have more options for connecting your server to the printer than you get from Server Admin. Think of the Printer Setup Utility as totally focused on getting the computer to talk to the printer(s), and Server Admin as focused on not only talking to the printer(s), but also talking to other computers. Also, using the Printer Setup Utility to first create the printers allows the drivers to be chosen automatically under most circumstances, reducing the risk of manually choosing the incorrect driver by mistake. Before you create any printers, you must understand the different ways a printer can be connected via Server Admin. (Here we're only talking about Server Admin because the Printer Setup Utility is the same whether you run it on Mac OS X or Mac OS X Server): AppleTalk creates a print server queue for an AppleTalk printer (Figure 7.1). If your network has AppleTalk zones, select the appropriate zone from the pop-up menu. In either case, AppleTalk printers automatically populate in the list. Select the printer from the list and click OK. AppleTalk printing's great advantage is that it is an "intelligent" protocol, able to relay information not just from the server to the printer, but from the printer to the server too. This allows you to learn more about what's going on with the printer when there's a problem, and allows for automatic configuration of the printer settings. Figure 7.1. In Server Admin, you can add an AppleTalk printer... 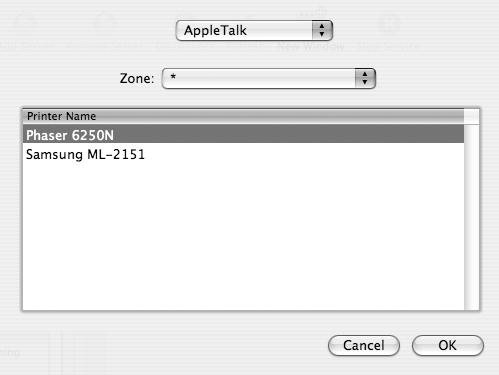 LPR creates a print server queue for an LPR/IP printer (Figure 7.2). Enter the IP address or DNS name of the printer. For most printers, you'll leave the "Use default queue on server" check box enabled. However, if the destination printer has multiple queues, deselect the check box and enter the queue name in the appropriate field. When you're done, click OK. The great advantage of LPR is that it's supported by any device that can print on a network. Figure 7.2. ...or an LPR (IP) printer... 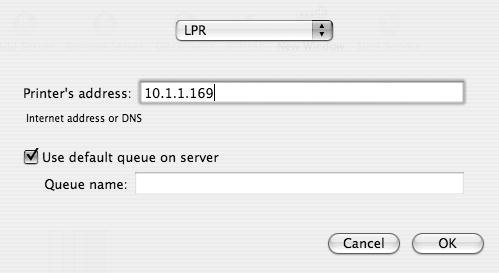 Open Directory creates a print server queue for a printer listed in a directory system (Figure 7.3). While you can put printers in your local NetInfo database, doing so will not automatically share the printer queue to other systems. To share the queue, your server must be either an Open Directory master (or replica) or configured to connect to another Open Directory server. (See Chapter 3, "Open Directory," for more information.) Select the printer from the list and click OK. Open Directory, in this usage, is not a printing protocol per se, but a printer directory. You don't actually use an "Open Directory" print protocol, but you use Open Directory to manage printers that you've already created queues for on an Open Directory master. If you aren't using Open Directory, then you don't need to worry about this. Figure 7.3. ...or an Open Directory printer. 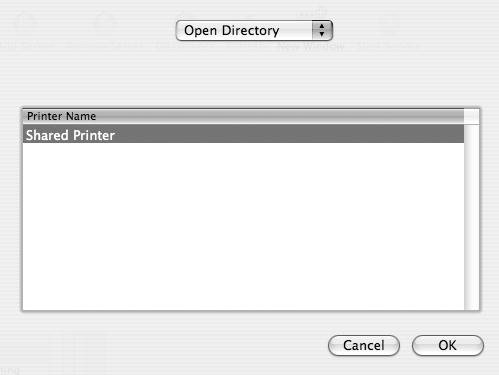
Common Unix Printing System (CUPS) Mac OS X uses an open source technology known as the Common Unix Printing System (CUPS) to handle printing. CUPS is a standards-based printing system that was written to allow printing to work the same on many different operating systems. Apple first started using CUPS in Mac OS X 10.2. CUPS has many advantages: Web-based administration via http://_127.0.0.1:631/ (you can also use the hostname of the server in the URL) (Figure 7.4) Figure 7.4. You can manage printers using the CUPS Web interface.  Command-line administration via the lpadmin and other utilities. A plethora of technical documentation and support, available at www.cups.org. The full CUPS documentation is available from the CUPS URL on every Mac OS X system, both Mac OS X and Mac OS X Server. A legion of Unix geeks who create hundreds of third-party printer drivers, which are available at http://gimp-print.sourceforge.net
Mac OS X Server in 10.3 and earlier didn't use CUPS to manage the print queues. This changed with Mac OS X Server 10.4, and now the Print service uses CUPS for sharing as well. This allows you to have more options for sharing your printers. Thus, if you prefer, you can use the CUPS command-line or Web-based administration tools to create and edit your server's print queues. You use Server Admin to configure sharing for each print queue. |
Printer-Sharing Protocols There are various protocols to share your print queues with others. You can see the options by double-clicking any printer in the print queues window under the Settings tab of the Print Service dialog: IPP shares a queue via the Internet Printing Protocol (IPP). This is the main protocol used by CUPS for printer sharing, and is a new feature for Mac OS X Server 10.4's Print Server. A printer shared via IPP show up as a "Shared Printer" in the Printer Setup Utility, or in the Shared Printers list for printer selection in the print dialogs on any clients (Figure 7.5). Figure 7.5. Viewing shared printers from the Print menu of an application. 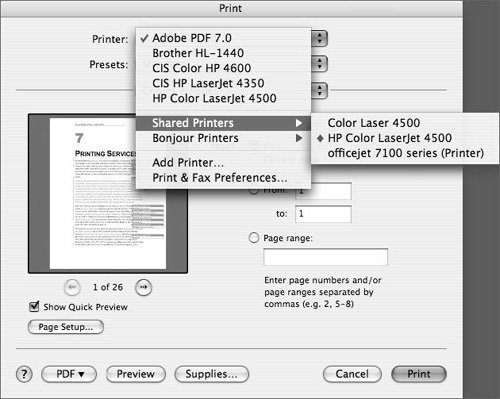 AppleTalk shares this queue via AppleTalk's Printer Access Protocol (PAP). Make sure AppleTalk is enabled in the Network Preference pane on your server (Figure 7.6). Figure 7.6. Ensure that the AppleTalk protocol is selected on Mac OS X Server if AppleTalk is to be used for printing. 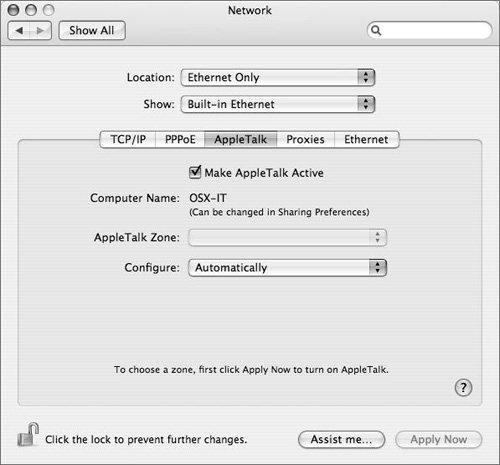 LPR shares this queue via the LPR protocol. If LPR is selected, you can then click the "Show name in Bonjour" check box and subsequently browse for this shared queue on Mac OS X 10.2 or newer computers via any Print window (Figure 7.7). Figure 7.7. Sharing a printer over LPR and as an option, Bonjour. 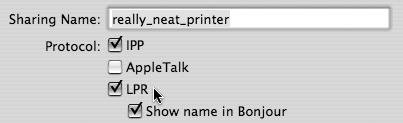 SMB shares this queue via the SMB (Windows printing) protocol. Make sure the Windows service is also enabled on your server (Figure 7.8). (See the section "Configuring the Windows File Sharing Service" in Chapter 5 for more information.) Figure 7.8. Sharing a printer over SMB. 
|
To create a printer queue in Server Admin 1. | Launch Server Admin located in /Applications/Server, and authenticate as the administrator for the server you're going to use as a print server.
| 2. | Select the Print service for your server in the Computers & Services list (Figure 7.9).
Figure 7.9. Selecting the Print service in Server Admin by using the search bar. 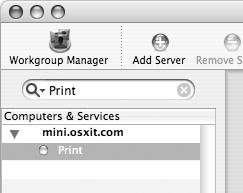
| 3. | Click Settings at the bottom of the window and then click the Queues tab at the top of the Settings pane.
For most servers, the print queues list is empty (Figure 7.10). On the other hand, any printer connected to your server via USB automatically appears in this list, as do any printers you have already set up using the Printer Setup Utility (Figure 7.11).
Figure 7.10. The Print queue list is normally empty, unless a printer has been configured using the Printer Setup Utility. 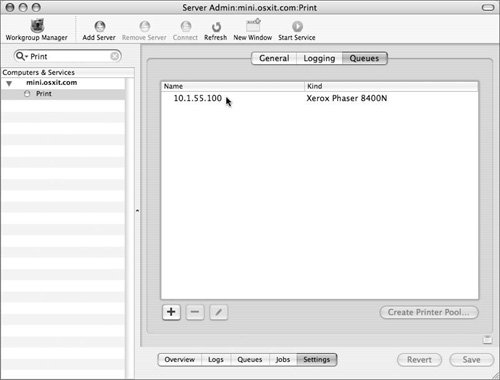
Figure 7.11. Viewing Printer Setup Utility to ensure local printers have been created. 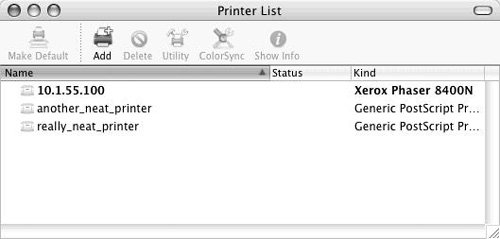
| 4. | Click the plus button at the bottom of the window.
The Create Print Queue dialog appears.
| | | 5. | Click the Print Protocol pop-up menu, and select one of the following options (Figure 7.12):
AppleTalk LPR Open Directory
Figure 7.12. Adding print queues via a variety of methods. 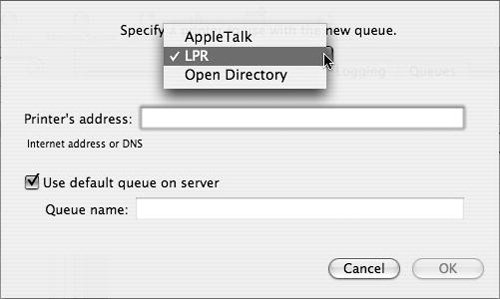
Once you've added the printer queue, the queue Editing window opens (Figure 7.13). Again, remember that your goal is to get the printer to talk to the server, and if you prefer, you can use the Printer Setup Utility for this function as well. The major difference is that you don't have Open Directory as an explicit option with the Printer Setup Utility. While it's possible to set up a printer in this manner, setting up a printer with the Printer Setup Utility is the preferred method (as they will show up here to be managed). Please refer to "Configuring Printers on Mac OS X" later in this chapter.
Figure 7.13. Options for editing the queue such as the protocols used to connect to the queue. 
| 6. | In the Editing window, you can change the sharing name of the print queue.
Note that in the figure, the printer's original name is different from the shared queue's name. Some operating systems or protocols don't allow for spaces or "odd" characters like ampersands in the name of the queue.
| 7. | To enable the shared queue, select one or more of the following protocol check boxes:
| | | 8. | To enable quotas for this queue, select the "Enforce quotas for this queue" check box.
To configure user quota settings, you must use the Workgroup Manager application. Refer to "Enabling Printer Quotas" in Chapter 4.
| 9. | To print a standard cover sheet that identifies the classification status of every document printed via this queue, select the correct option in the Cover Sheet list (Figure 7.14).
Figure 7.14. Various cover sheets can be applied to each job printed on the print queue. 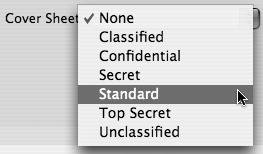
If you aren't sure whether you need this, you probably don't, and should just leave it set at the default.
| 10. | Click Save and then Back  to return to the print queues list view in Server Admin. to return to the print queues list view in Server Admin.
|
Setting default print queues Once a print queue is created, it is advantageous to have a certain queue be listed as the default queue. In this manner the default queue acts as a catchall for users who are not paying attention if (and when) they print via LPR. To set a default print queue and start the queue 1. | In Server Admin with the Print service selected, click the General tab.
| 2. | From the Default Queue for LPR pop-up menu, select a queue to act as a catchall for any print job not destined for a specific queue on your server (Figure 7.15).
Figure 7.15. Choosing a print queue as the default queue in the General tab of Server Admin. 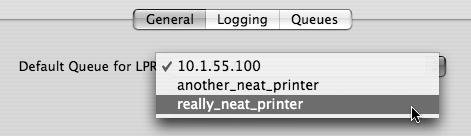
| | | 3. | Click the Overview tab and if the Print service isn't running, click Start Service on the Server Admin Toolbar (Figure 7.16).
Figure 7.16. The Print service Overview tab of Server Admin shows number of queues and spooled jobs. 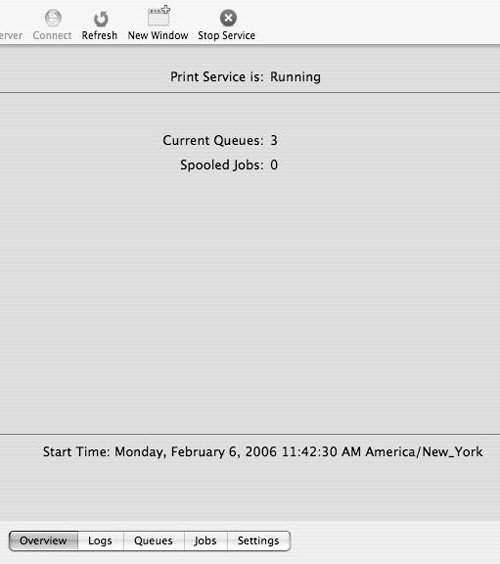
|
 Tips Tips
Printer Sharing, available in the Sharing and the Printers and Fax preference panes on Mac OS X, is disabled on Mac OS X Server in favor of the Print service. If you create a print queue for a network printer, Mac OS X Server can't prevent your users from bypassing this print queue and printing directly to a networked printer, although certain printers allow you to do this via masking on the printer directly. One way to control printing to a given set of printers is to attach them to a separate switch and connect that to the second Ethernet interface on your server, thus turning your server into a pass-through for the hosted printers. Doing so may not permit Bonjour to advertise the printers, based on the networking information supplied to both Ethernet interfaces. This is because Bonjour advertises via multicast, and most organization's routers are configured to deny multicast packets to pass through their routers.
|